- Get Started
- User Management
- Token Management
- Profile Management
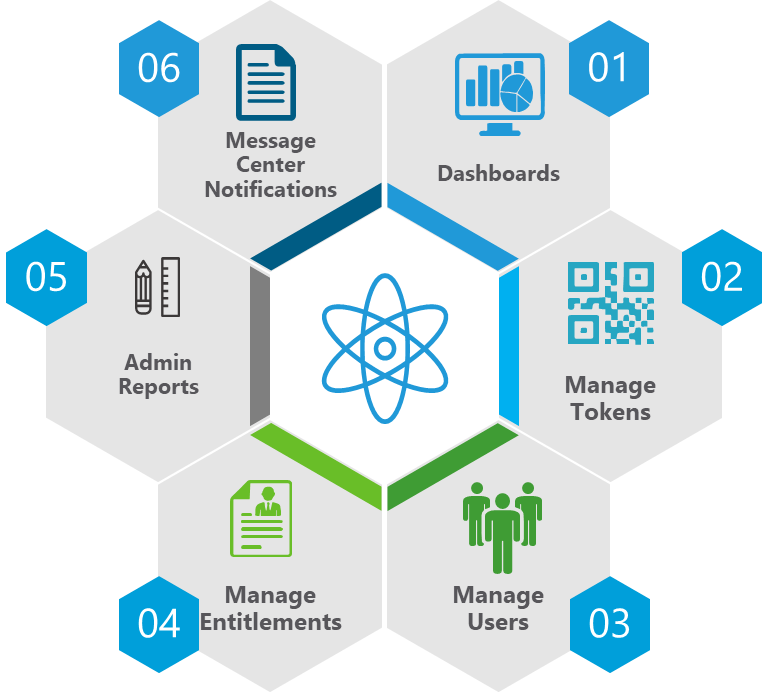
Overview of Client Self Administration
Straight2Bank provides the nominated administrators the tool to effectively create, extend and modify permission access and security tokens to your intended users online.
This effectively streamlines Straight2Bank onboarding process as this effectively gives administrator acces to perform relevant tasks online with little dependency from the bank.
The process outlined in this section highlights Straight2Bank features and categorized into the following points:
- User Management: Creation, modification and cancellation of user and corresponding service entitlement
- Token Management: Security Device nomination (soft/physical), Modification and cancellation
- Profile Management: Creation, modification and approval
Accompanying Dashboard information relating to activities on Client Self Administration will also be provided to entitled users for convenience.
Create User
How to create a new user?
The following steps list the process on how a user can be created in Straight2Bank
Type of Users that can be created through Straight2Bank NextGen's Client Self Administration
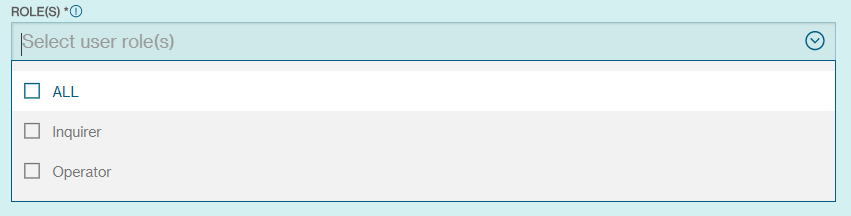
- Operator - ability for users to create transactions
- Inquirer - ability for users to view and access reports
Step 1: New User Journey.
There are multiple ways to go to the specific 'user creation' journey.
1st Option: Dashboard via the Quick Navigation card

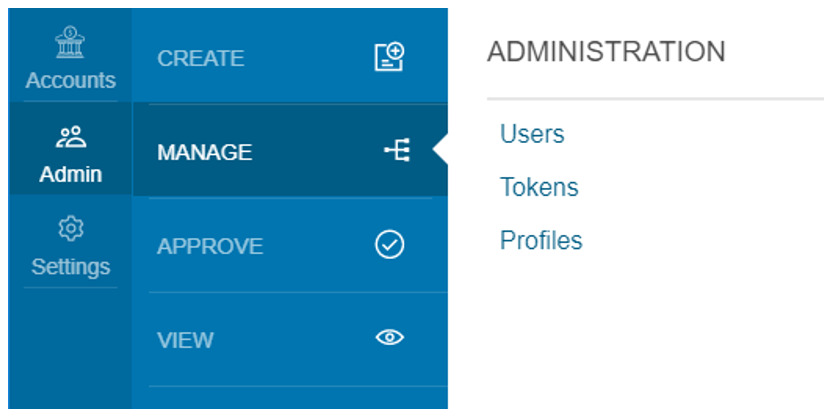
2nd option: via menu
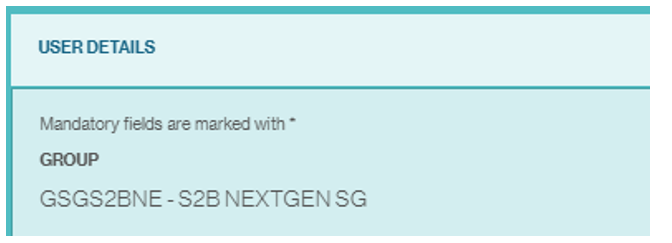
Step 2: The system will reveal the GROUPID the user is entitled with. The user is not permitted to amend any details at this stage
Step 3: Input all user details in the first page
Note: Please be advised that fields listed on the left panel are mandatory, while fields available on the right panel are optional. the user will be advised accordingly.
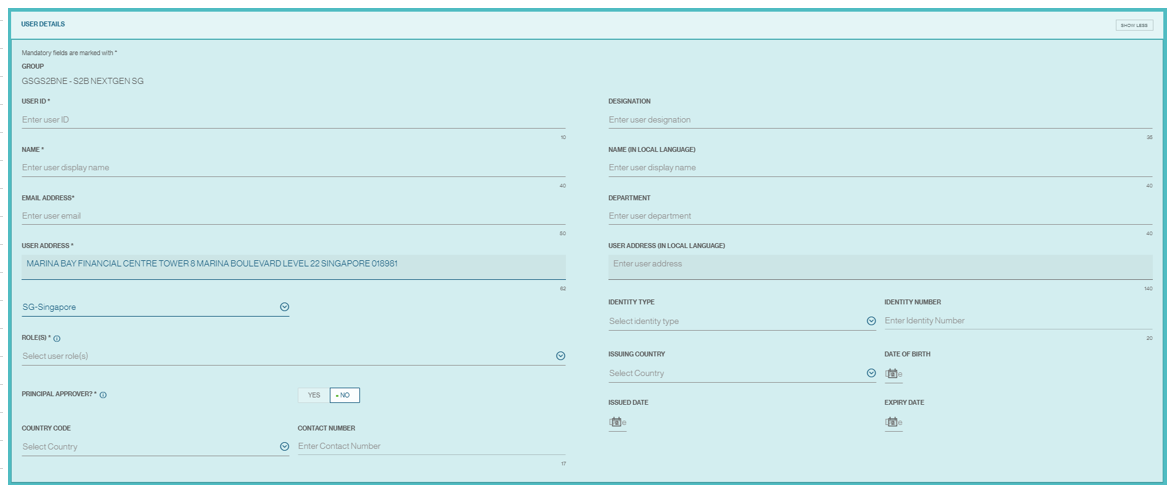
Step 4: Few fields will be defaulted based on the customer group for users' convenience such as
- User Address will be defaulted to Customer Group's Address
- User Country will be defaulted to Customer Group's Country

Step 5: Select the applicable role(s) you wish to assign to the user. Multiple roles can be selected.
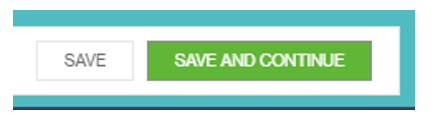
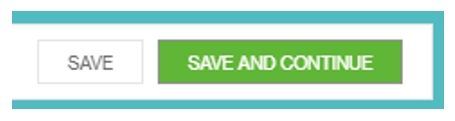
Step 6: Once the required data have been provided, the user has the option of saving the details by selecting SAVE.
Otherwise, the user should select SAVE AND CONTINUE to proceed to the subsequent pages.
Sept 7: The system will prompt the user if it wishes to apply the bank standard default profiles.

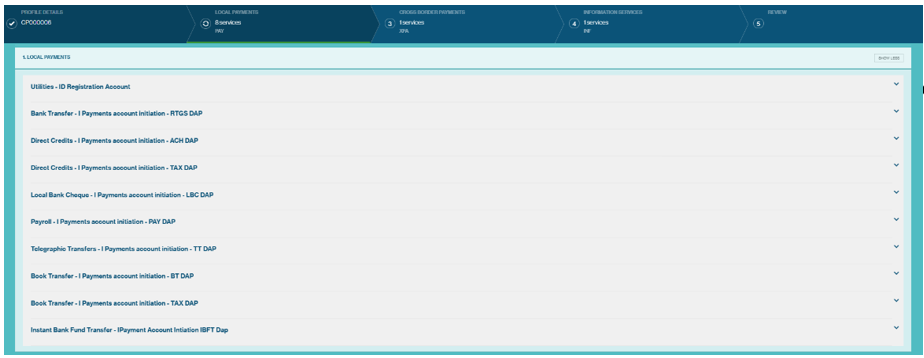
Step 8: The applicable profiles available to the user will be presented and the administrator is responsible in selecting the appropriate entitlements. if the user opted to use only bank standard permissions then standard profiles will only be shown.
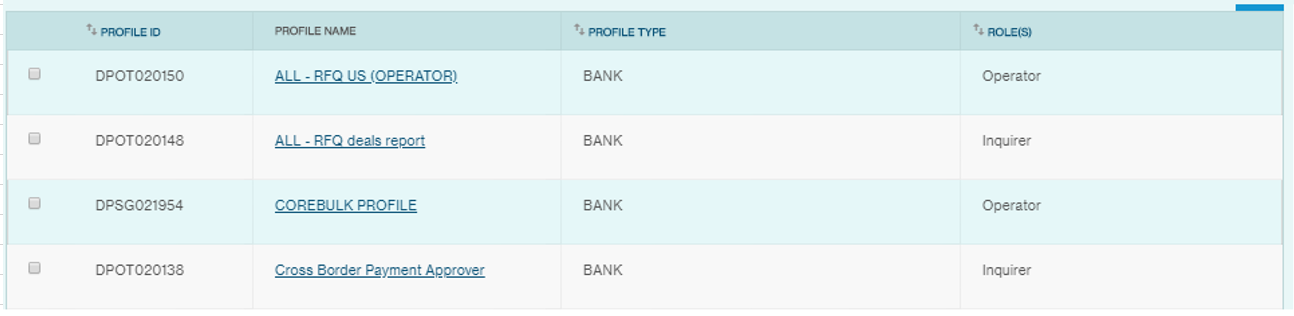
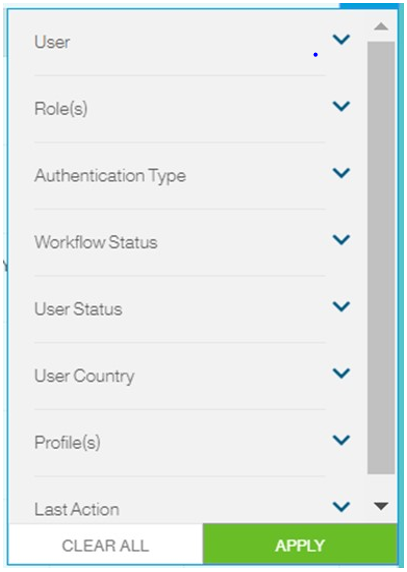
The user can use the  filter function for its convenience
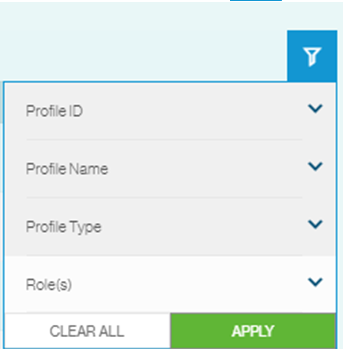
Step 9 : Complete the selection of the require profile(s) you wish to extend to the applicable user(s).
Once the profile assignment is completed, Click on SAVE AND CONTINUE to navigate to the subsequent page.
or select SAVE should the user want to keep the option of keeping the item in DRAFT
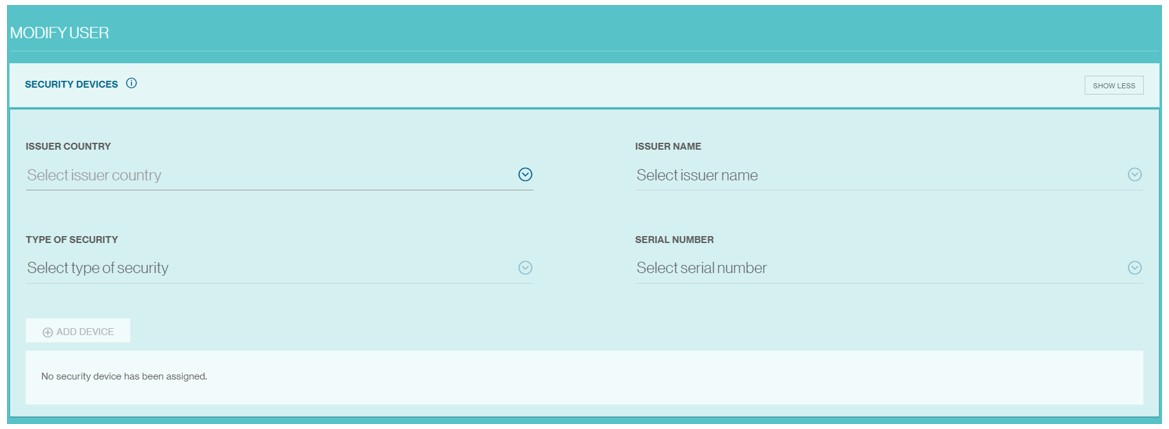
Step 10: The next task is assignment of the applicable security device
Physical VASCO Token
Mobile VASCO Token
Others Digital Certificate (India)
The system will reveal the applicable and eligible security devices once the selection of the 'issuer country' is provided.
Step 11 : After asssignment of the security device to the intended user, Click SUBMIT for approval submission. otherwise, save as draft by selecting SAVE.
How to modify an existing user
Step 1: Modifying the access rights of an existing user
There are multiple ways to go to the specific 'user creation' journey.
1st option: Dashboard via the Quick Navigation card
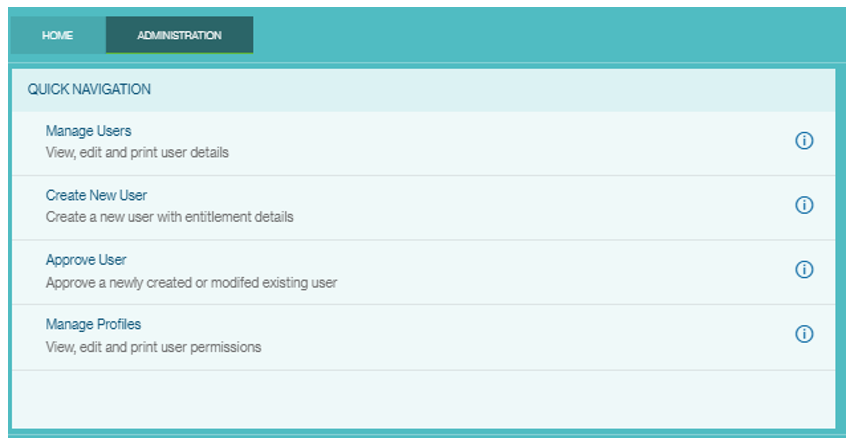
2nd option: via menu
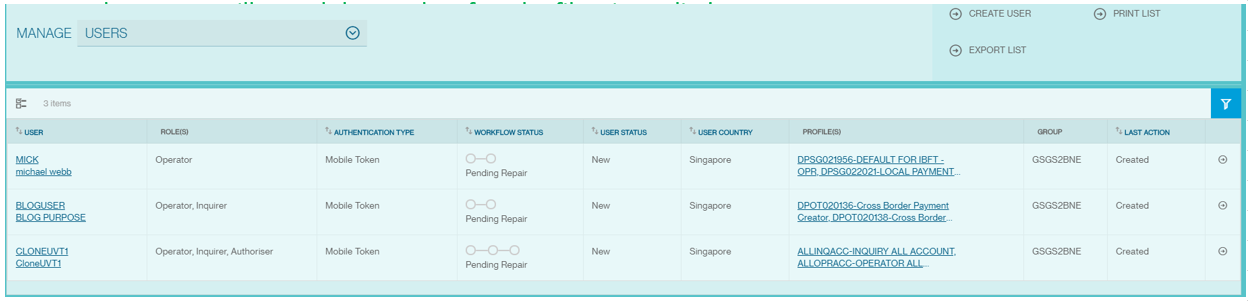
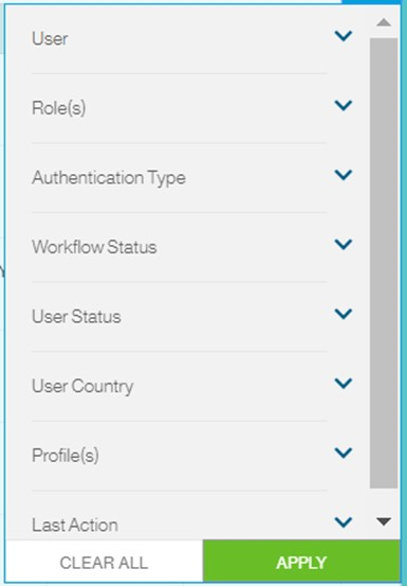
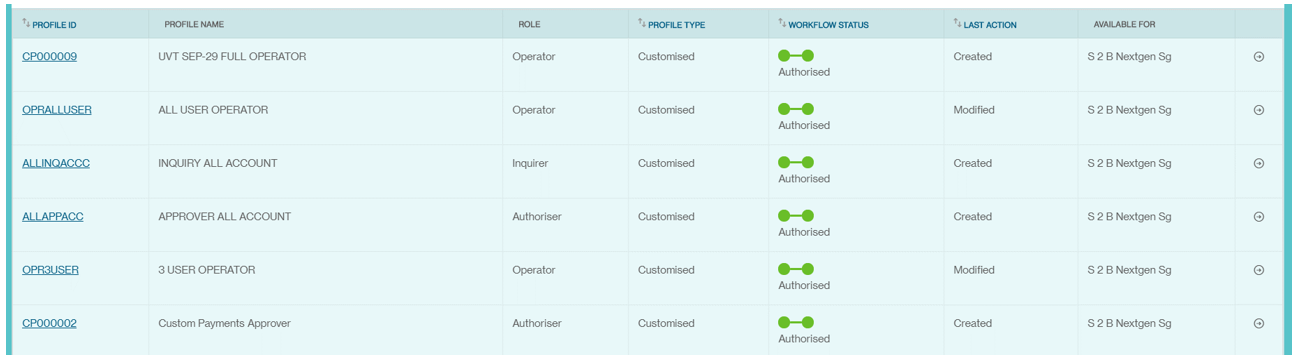
Step 2: the users will be presented with the full list of users. Description and information are also provided in the table to easy navigation:
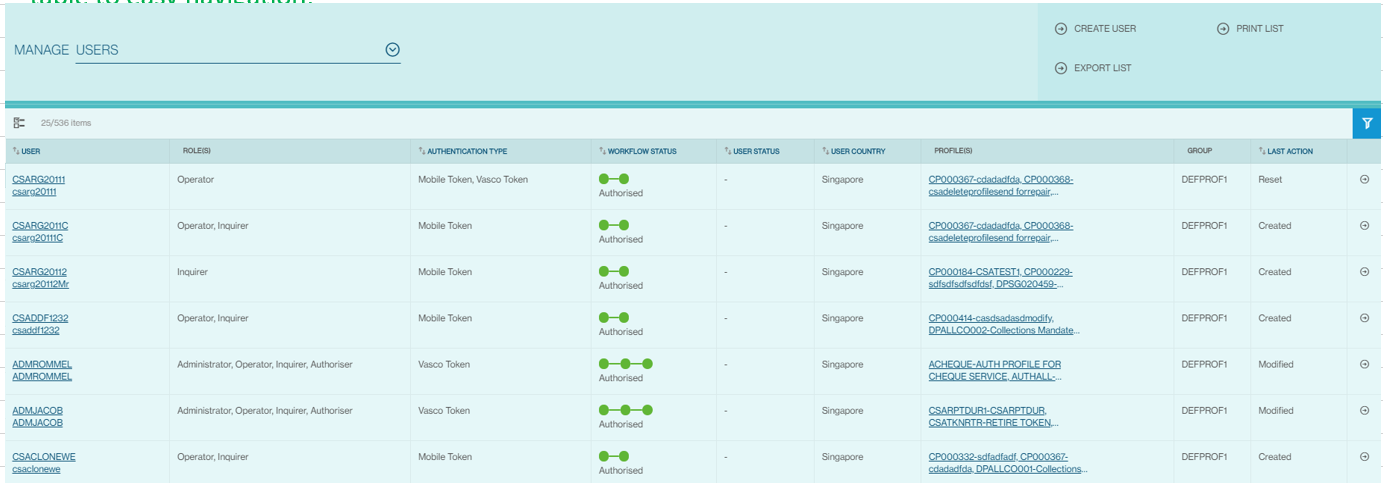
The user can use the filter function for its convenience
Step 3: Modify the user directly in the screen by selecting ![]() function
function
Step 4: Alternately, the user can locate more details about the user by selecting the hyperlink
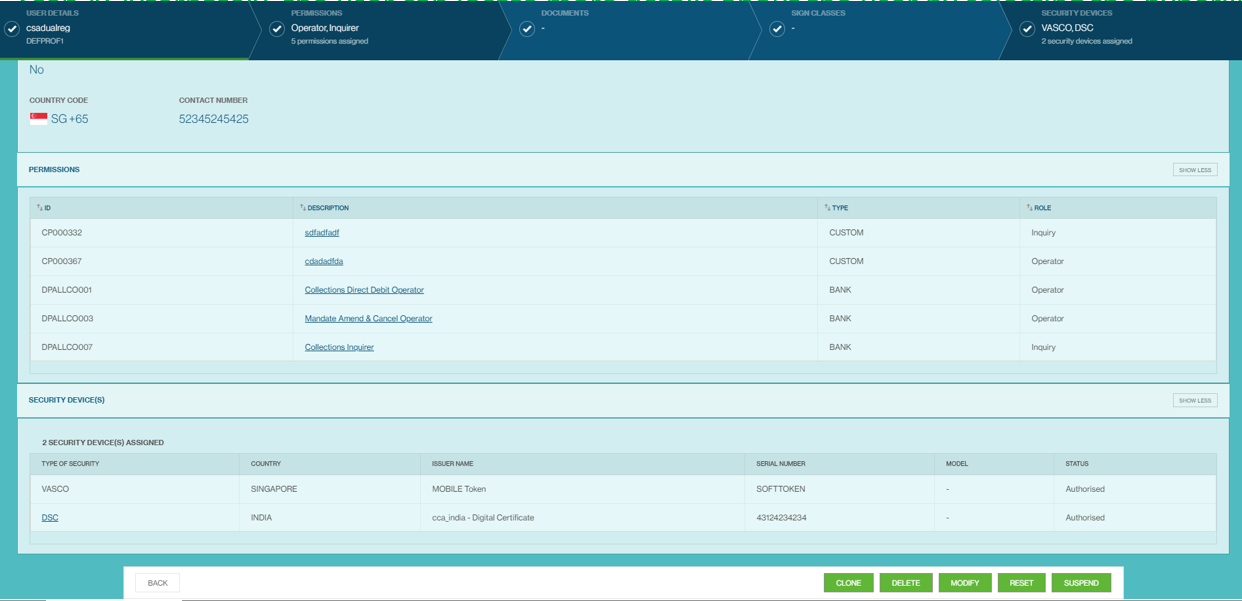
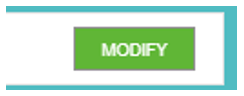
select MODIFY to complete modification.

At this point, the user can directly to the particular area of service (Permissions, Documents, Sign Classes and Secuirty Devices) it wishes to modify.
The process in effecting changes will be similar to journeys listed in user creation.
How to repair an existing user
For instances, where the approver requires the administrator to repair the set-up of an intended user.
Listed below are the steps on how to perform these actions
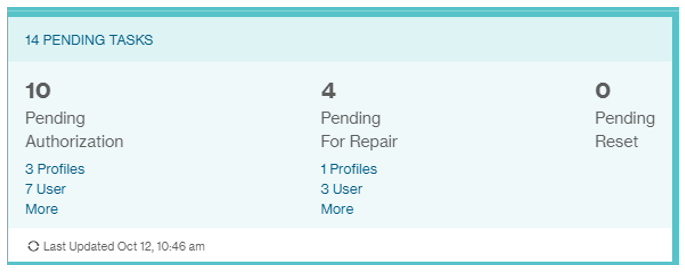
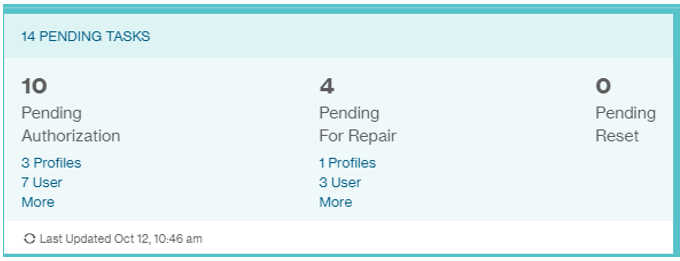
Step 1: Identify the applicable user it intends to send for repair. The applicable set of users are identified and represented through its workflow status "Pending Approval" 
Users under this category are easily identifiable through the following:
- Filter through workflow status by selection of 'Pending Repair'

- Through Client Self Administration's Pending Task card itemized as 'Pending for Repair'
Step 2: The system will reveal the result.
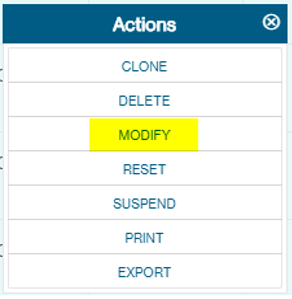
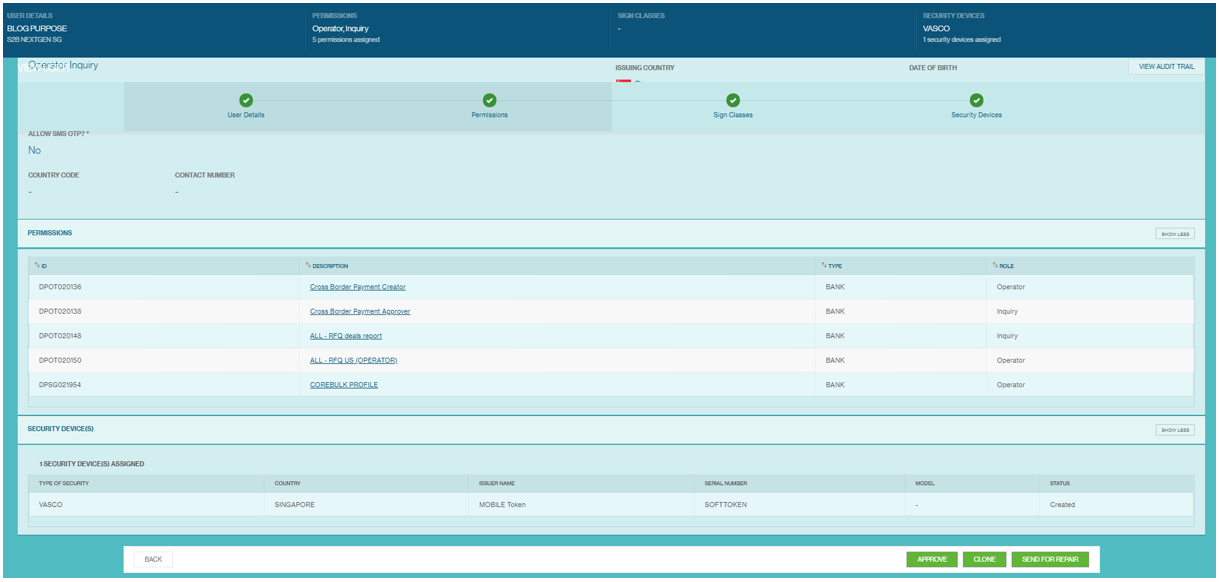
At this stage, The user can directly indicate its intended action in the summary page by selecting the action icon![]() which will reveal the following screen:
which will reveal the following screen:
Alternatively, the user can directly select the applicable user. The screen will indicate the reason(s) for the repair request and the user can perform edit by selecting the appropriate action
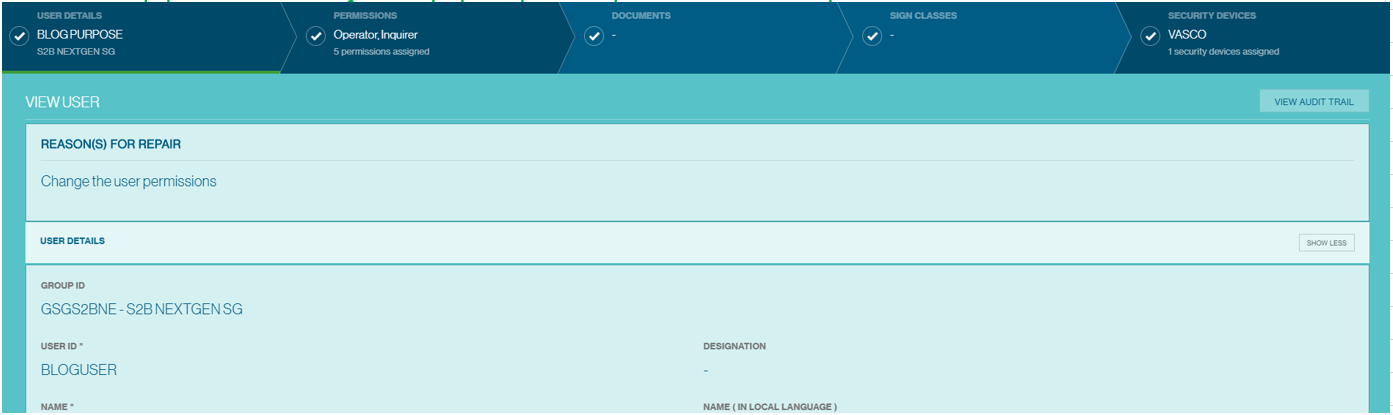
Step 3: At this stage, the user can select the particular section (Permissions, Documents, Sign Classes and Secuirty Devices) it wishes to modify.

Step 4: After selection of the applicable service section, the user implement the appropriate action(s). The journeys will be similar to user creation
How to approve a new user is created through Client Self Administration
The page outlines the process on how a new user can be authorized for usage
Step 1: Identifying which users are intended for approval
The applicable list of users intended for repair are identified through workflow status
Users under this category are easily identifiable through the following:
- Filter through workflow status by selection of 'Pending Approval'
- Though Client Self Administration's Pending Task card itemized as 'Pending Authorization'
Step 2: The system will reveal the result . after the filter is applied

The user can directly indicate its intended action in the summary page by selecting the action icon ![]() which will reveal the following screen:
which will reveal the following screen:
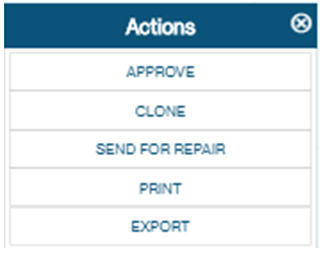
Alternatively, the user can directly click the applicable user. The screen will reveal the user details.

User to select the applicable field

Please be advised the approval flow that your company had requested will be taken into consideration-
- If your group is "Single Controlled" i.e. same administrator can perform both maker & checker actions
- If your group is "Dual Controlled" i.e. maker & checker actions should be performed by two different adminstrators
How to suspend an active user
The page outlines the process on how the administrator can suspend an active user.
Step 1: Identify the applicable active user

Step 2. After the applicable active user has been selected, the administrator should select the ![]() icon to initiate action.
icon to initiate action.
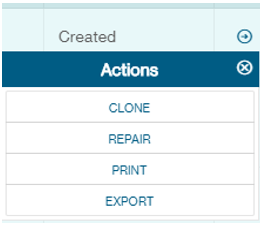
The user will be presented with list of actions and is required to select SUSPEND to complete task
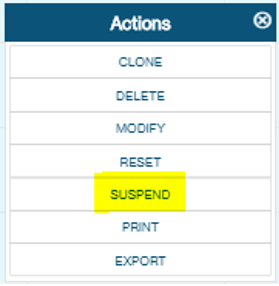
A confirmation message will appear to confirm the intended activity. The user is required to select SUSPEND to conitinue

Please be advised the approval flow that your company had requested will be taken into consideration-
- If your group is "Single Controlled" i.e. same administrator can perform both maker & checker actions
- If your group is "Dual Controlled" i.e. maker & checker actions should be performed by two different adminstrators
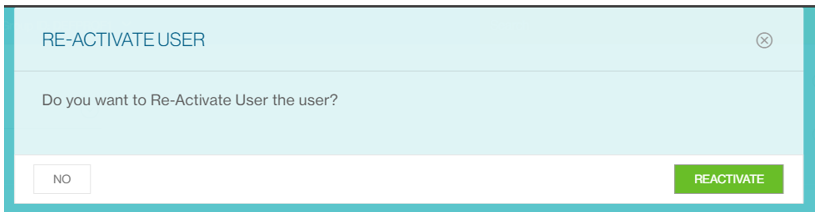
How to re-activate a suspended user
The page outlines the process on how the assigned administrator is to reactivate a suspended user.
Step 1: Identify the applicable active user

Step 2: After the applicable user has been selected, the administrator should select the ![]() icon to initiate action.
icon to initiate action.
The user will be presented with list of actions and is required to select REACTIVATE to complete task
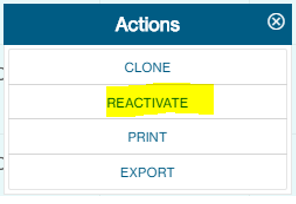
A confirmation message will appear to confirm the intended activity. The user is required to select REACTIVATE to conitinue
Please be advised the approval flow that your company had requested will be taken into consideration-
- If your group is "Single Controlled" i.e. same administrator can perform both maker & checker actions
- If your group is "Dual Controlled" i.e. maker & checker actions should be performed by two different adminstrators
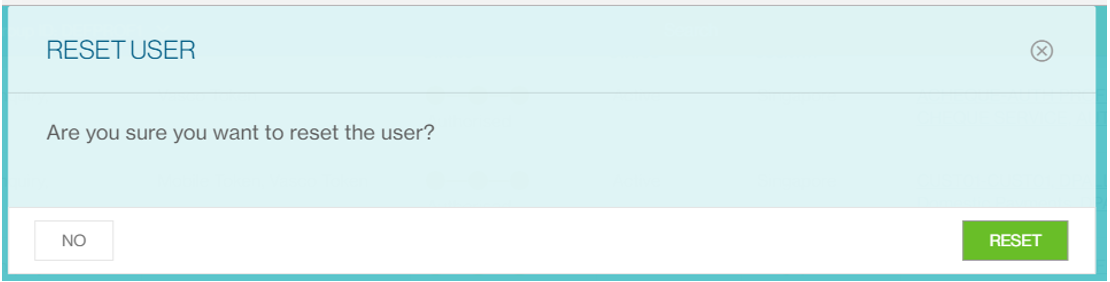
How to unlock a user ?
The page outlines the process on how a user can have its access unlocked.
Step 1: Identify the applicable active user. Users where its accesses have been locked are identified through user status

Step 2: After the applicable active user has been selected, the administrator should select the ![]() icon to initiate action.
icon to initiate action.
The user will be presented with list of actions and is required to select RESET to complete task
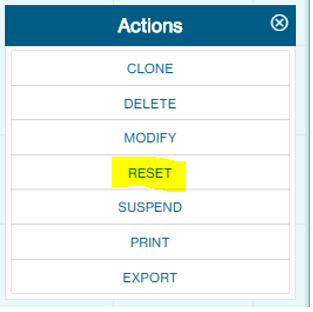
A confirmation message will appear to confirm the intended activity. The user is required to select RESET to conitinue
Please be advised the approval flow that your company had requested will be taken into consideration-
- If your group is "Single Controlled" i.e. same administrator can perform both maker & checker actions
- If your group is "Dual Controlled" i.e. maker & checker actions should be performed by two different adminstrators
How to assign a secuirty token to a user?
The page outlines the process on how a user is assigned with a secuirty device/token. The requisite is that users need to be created prior to token assignment.
Step 1: Identify the applicable active user. Tokens that have not been assigned are listed as INITIALSED under token status

Step 2: After the applicable active user has been selected, the administrator should select the ![]() icon to initiate action.
icon to initiate action.
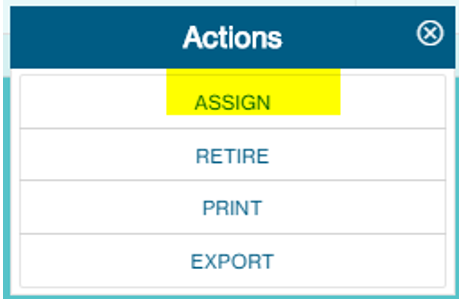
The user will be presented with list of actions and is required to select ASSIGN to complete task

The user will need to assign the applicable user they intend to assign the token to
How to unassign and/or retire secuirty tokens?
The page outlines the process on how a user is assigned with a secuirty device/token. The requisite is that users need to be created prior to token assignment.
Unassigning a token affiliated to a user
Step 1: Identify the applicable user you wish to unassign the security token-

Step 2: After the applicable user has been selected, the administrator should select the ![]() icon to initiate action.
icon to initiate action.
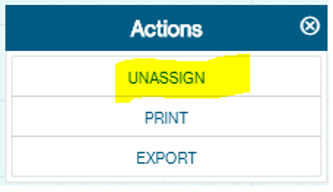
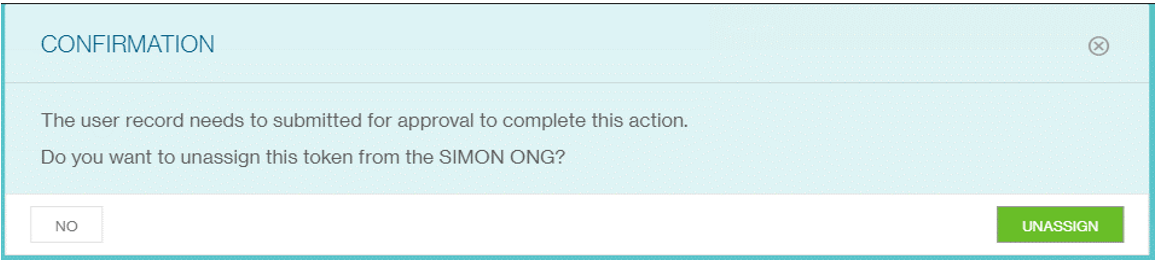
The user will be presented with list of actions and is required to select UNASSIGN to complete task and user will be prompted for confirmation.
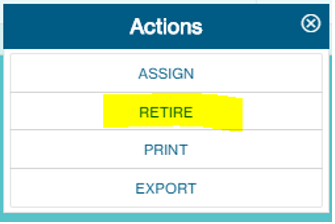
Retiring a token (available to physical issued token(s))
Step 1: Select the applicable token you intend to retire

Step 2: After the applicable token has been selected, the administrator should select the ![]() icon to initiate action.
icon to initiate action.
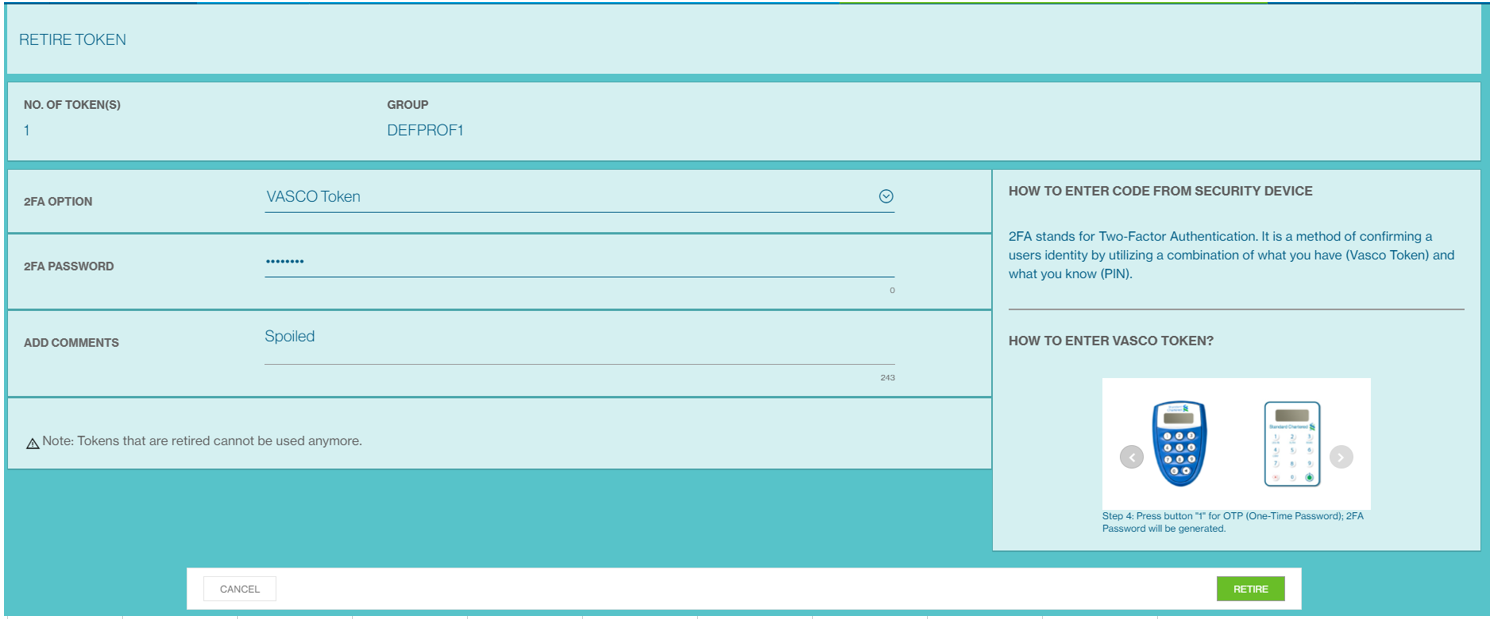
Step 3: To complete the request, the user needs to provide the applicable challenge code provided by its assigned security device. The user will be required to indicate the reason under the 'comments' section.
How to create a custom profile
The page outlines the process on how a custom profile can be created through the Client Administration module
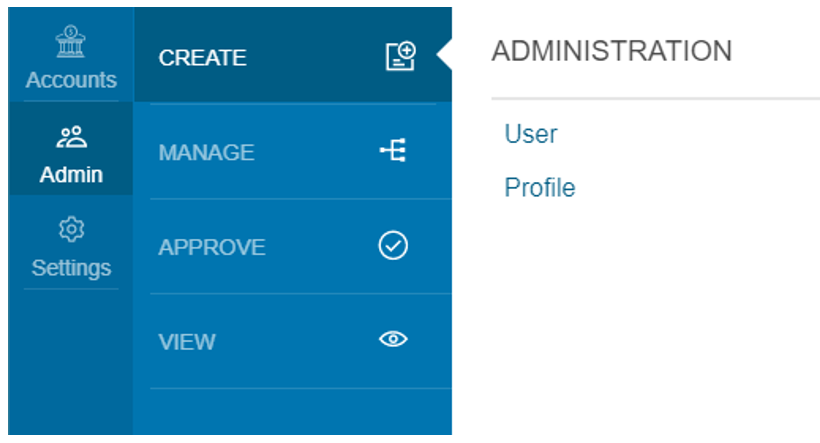
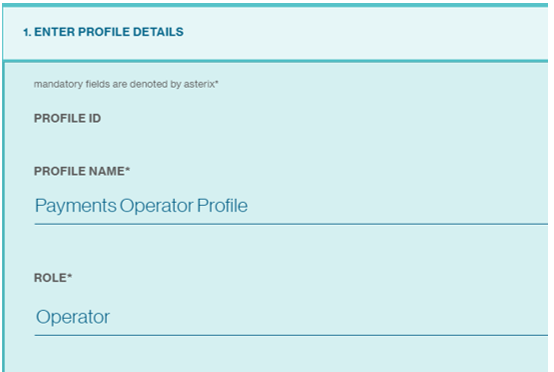
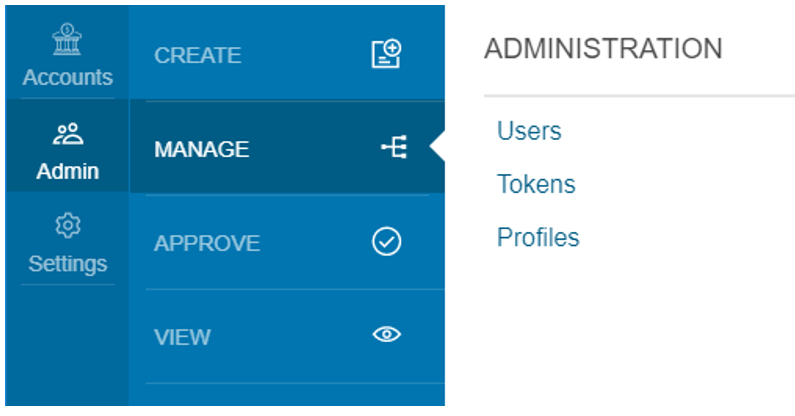
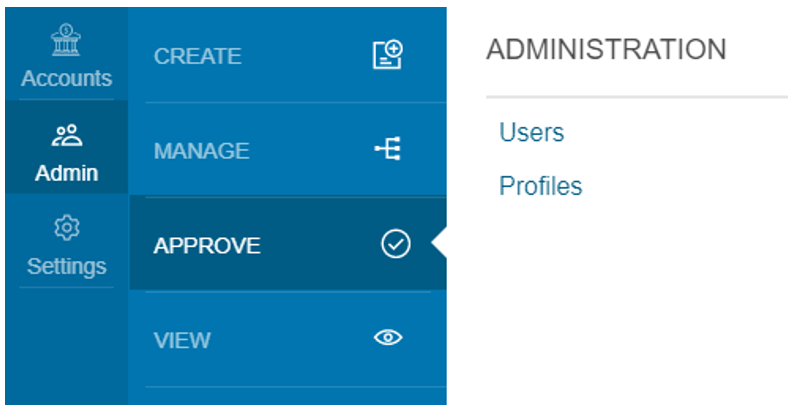
Step 1: Visit menu and navigate to Admin > Create > Profile

Step 2: The applicable user is required to provide a custom name & select the intended role role for which you want to customize the profile.
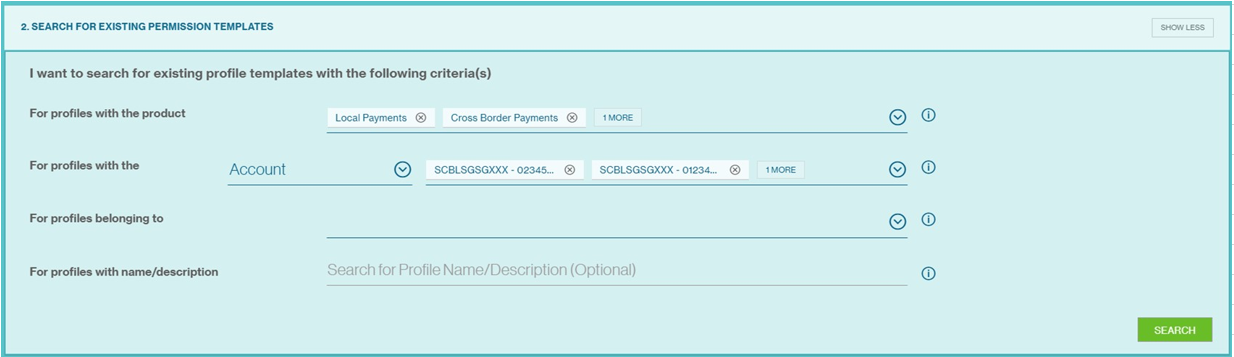
Step 3: The customize profile needs an existing profile to be refered to, hence, the user is required to locate the closest profile the user wants to reference with. The user can perform this task by using the 'search' function and below are the available criterias:
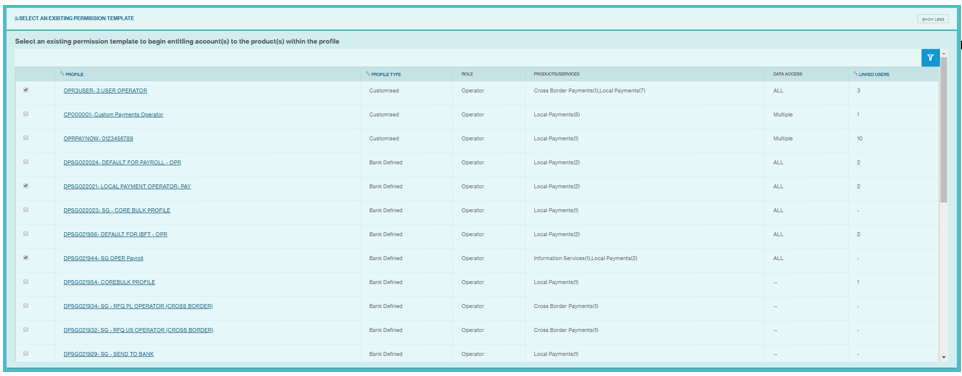
Step 4: User will be presented with the search result(s) revealing the list of existing profiles matching with the provided search criteria.
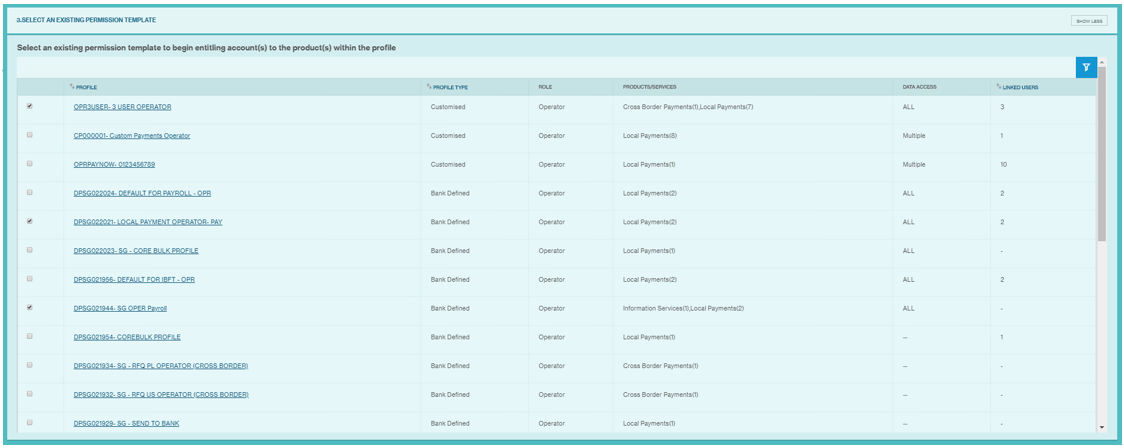
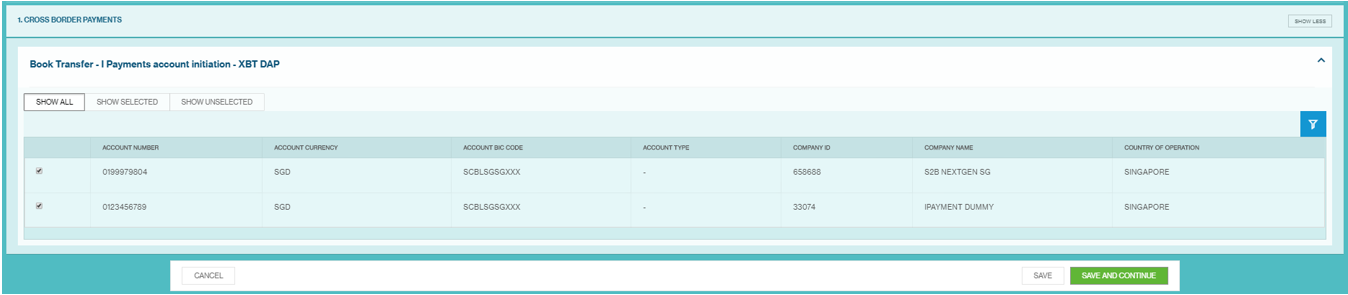
The list can be narrowed down by selecting the filer function. The user can click on the profile to extract more details which includes products, services, sub-services, functions & data access associated with that profile
Step 5: The user can choose one or more(max 5) profiles that you want to take as a reference for the intended custom profile.
The products, services, sub-services, and data access are cloned from the selected profiles and will be shown to the user for further refinement and amendment.
Each product is diplayed and can be expanded to reveal more information.
Accounts and companies linked to the specific service are also listed. At this stage, the user can amend further (ie de-link certain accounts or company) as per intended requirement of the profile.
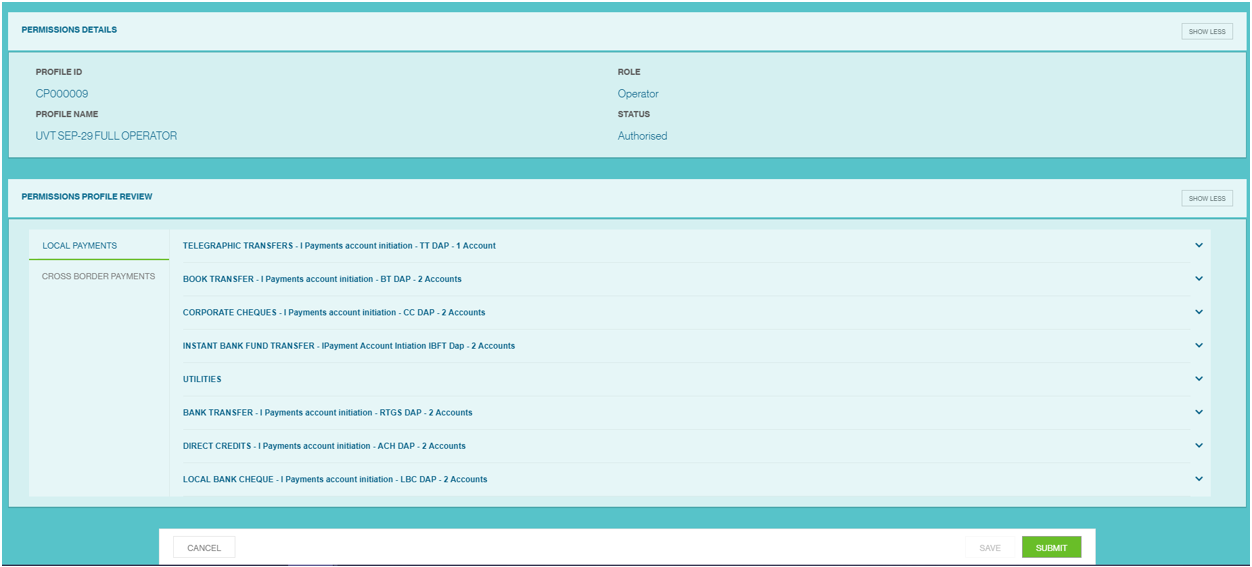
Step 6: Upon selection, the user will be asked to review the draft for final review
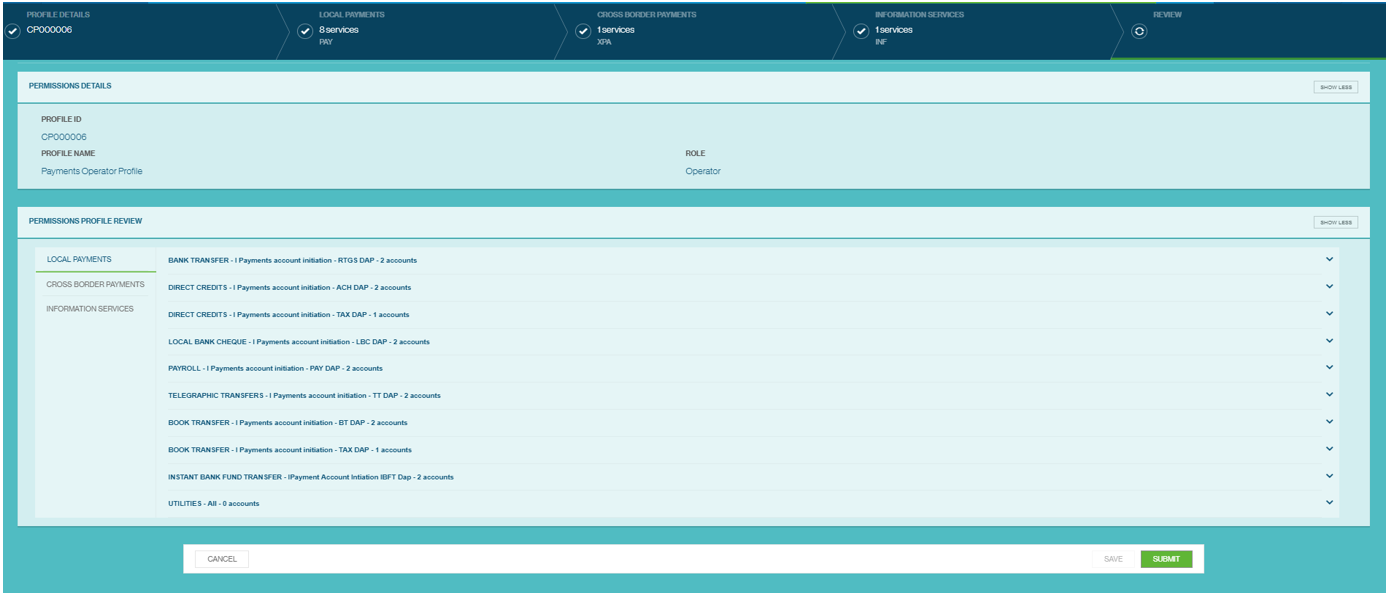

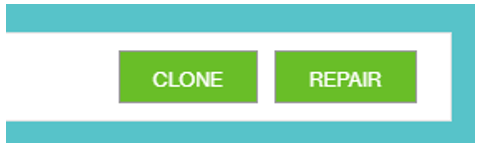
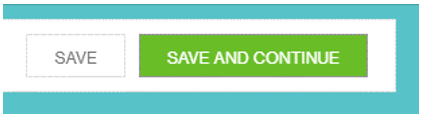
Step 7: After reviewing the profile, Click on SUBMIT button for submitting the profile for approval. Click on SAVE for saving the profile in draft mode.
How to amend an existing custom profile
Step 1: Visit menu and navigate to Admin > Manage > Profile
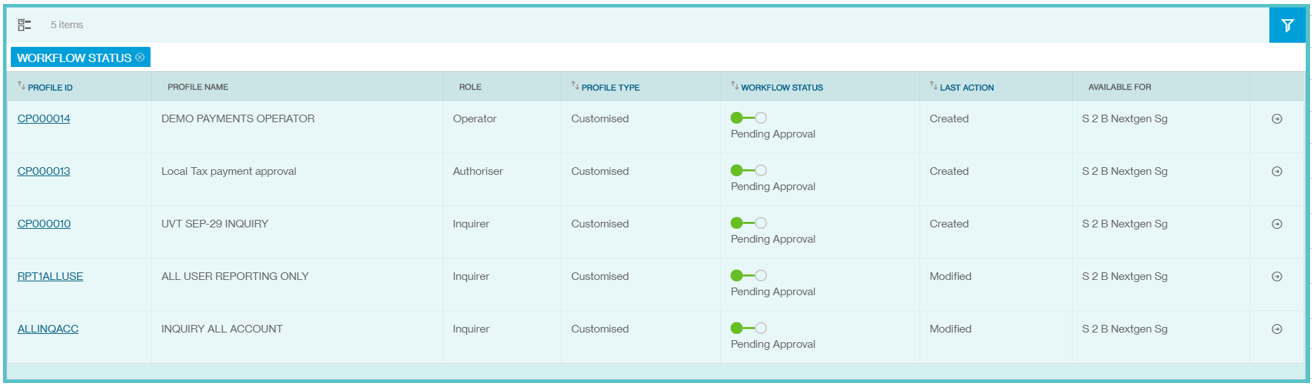
Step 2: The user will be presented with its full list of custom profiles. The user needs to select the applicable profile it intends to perform the action
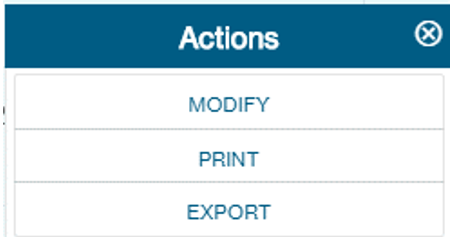
Step 3: After the applicable active profile has been selected, the administrator should select the ![]() icon to initiate action.
icon to initiate action.
Alternatively, you can click on Profile Id hyperlink so that entire profile will be displayed in View mode and the available actions are indicated at the bottom of the page.
Step 4: Once selected, the user can proceed to amend the profile.
Listed are the list of items that can be amended -
- Profile Name
- Services and Sub-Services
- Data Entitlements of Accounts
The user needs to select "save & continue" or "save" to ensure that the intended amendments have been affected.
Step 5: Upon selection, the user will be asked to review the draft for final review. After verification, the user needs to select "submit" action in order for the request to proceed to the approval queue of the designated user.
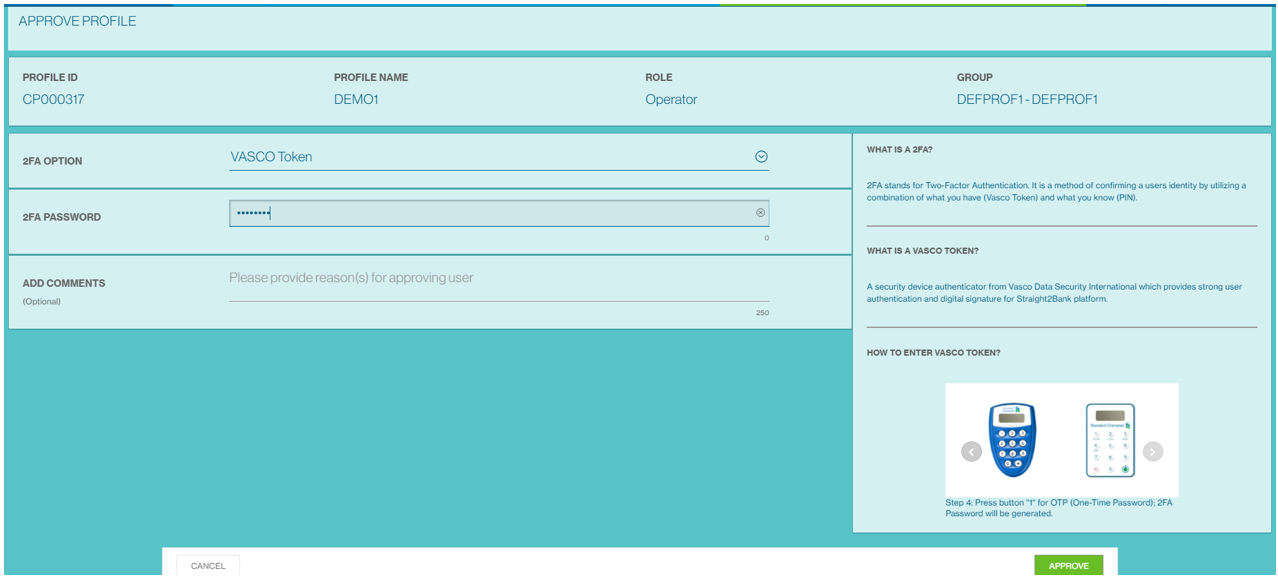
How to approve an existing custom profile?
Step 1: Visit menu and navigate to Admin > Approve > Profile
Step 2: The user will be presented with its full list of custom profiles requiring approval. The user needs to select the applicable profile it intends to perform the action
Step 3: After the applicable active profile has been selected, the administrator should select the ![]() icon to initiate action.
icon to initiate action.
Alternatively, you can click on Profile Id hyperlink so that entire profile will be displayed in View mode and the available actions are indicated at the bottom of the page.
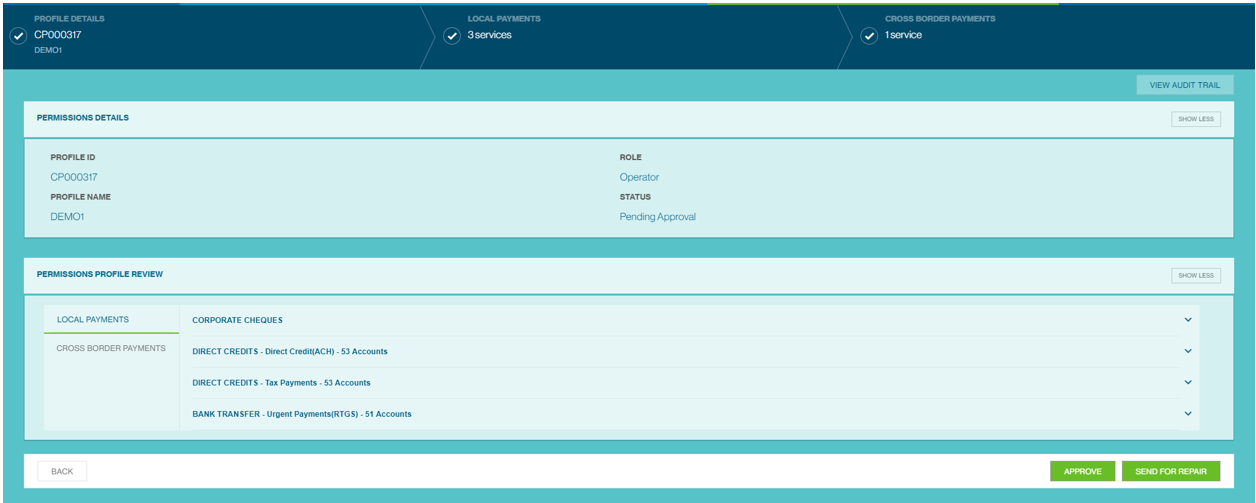
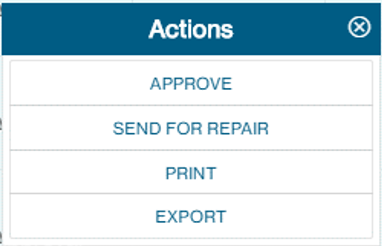
Click APPROVE to proceed

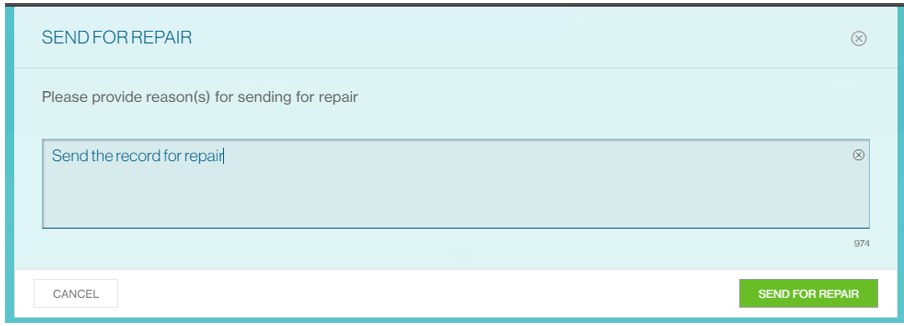
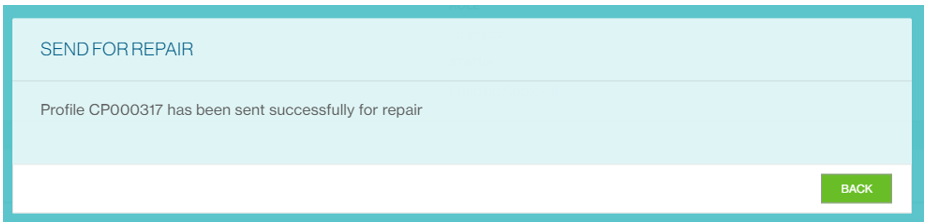
Option for Repair: Should the user requie the customer profile to be amended, it can select 'send for repair' in the action options. The user needs to provide reason at the comments section in order to proceed
Step 4: To complete the request, the user needs to provide the applicable challenge code provided by its assigned security device