- Get Started
- Create Payments
- Manage Payments
- Payee Maintenance
- Approve Payments
- Batching of Payment Instructions
- Bulk Import Payments
- Bulk Import Payees
- Universal Data Adapter
- FX Service - Standalone
- FX Service - Payments
- iHost-to-Host
Overview of Payment
Straight2Bank builds efficiency into every step of the payment process through features such as:
- Extensive file upload and download capabilities Customisable templates for transaction initiation and reporting
- Customisable templates for transaction initiation and reporting
- Built-in validations (for regulatory requirements, mandatory fields)
- Field auto population, eliminating the need to re-key information
- Customisable multi-level authorisation matrices
- Look-up reference tables (bank codes, FX rates)
- Work flow alerts to maximise efficiency
Doing payments on Straight2Bank is a simple 3 step process. Payments will have to be created, authorised and subsequently submitted to the Bank for processing.
The below provides an overview of the workflow:
Initiation
- Create in ‘Bulk’ or ‘Manual’ options
- Payment transactions (for both domestic and cross-border payments) can be created in a variety of ways
- Subsequently payment may be available for authorisation
Authorisation
- Instant email notifications to approvers on approval request
- Complete oversight on transaction details for each batch authorisation request before approval
- Multi-level authorisation matrix available
- Through Web or Mobile
Submission
- Status of all online transaction is updated on a real-time basis
- Released for processing upon successful authorisation
- Processing based on payment type, currencies, etc
- Sent to Bank
Payment Types on Straight2Bank
Straight2Bank provides various payment services such as domestic payments, cross border payments, tax/statutory payments, electronic cheques and financial institutions (FI) payments.
The below list provides an overview of the various payment types offered on Straight2Bank and the usage / purpose of them:
Direct Credit
This payment type must be used for low value and large volume domestic payments, usually within the country. The payments are processed in batches and hence during pre-defined cut-off times during the day. These payments are processed in 2-3 days based on the clearing capabilities, in-country.
Local Bank Transfer
This is a real-time settlement (also referred to as RTGS), domestic transfer payment capability and normally used for urgent and high value transactions. The settlement is usually in local currency and priced higher than direct credit (ACH) payments. Supports FX payments depending on the country where the debit account is held.
Instant Bank Fund Transfer
Applicable to several markets. This payment service allows you to send local payments to beneficiaries with accounts in other banks, instantly. These payments would typically be low value payments and processed in real-time. ( e.g. “FAST” for Singapore )
Book Transfer
This payment option must be used to transfer funds to another account within Standard Chartered Bank. The beneficiary account may also be an account belonging to the client themselves. Normally only transfers in domicile account are supported, however, cross currency transfers involving FX are supported in some markets. Round the Clock Book Transfer is available in several markets.
Payroll
This payment type must be used for salary payments. A single debit and multiple credits can be made using this payment option, thereby ensuring integrity of the individual disbursements on the account statement. Underlying payment will be direct credit (ACH) or book transfer (BT) based on the beneficiary’s bank account.
Tax/Statutory Payments
Primarily available across African markets and India. Tax/Statutory payments capability on Straight2Bank allows clients to make corporate tax payments, customs payments, and various other tax payments online, at own convenience.
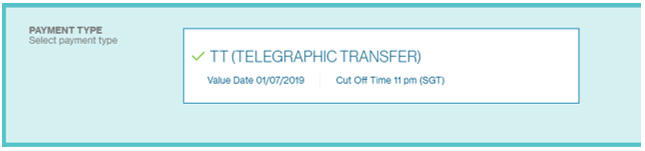
Telegraphic Transfer
Cross border, international payment service available for remittances in more than 100 currencies in several markets. These payments are processed real-time and settled within 1-2 days, depending on the currencies and involve transaction processing fees depending on the beneficiary bank. Various FX options such as online FX quote, system rate and contract rates are available to process cross currency payments.
Request for Transfer
Request for Transfer (SWIFT MT101), also referred as RFT allows clients to make payments out of accounts held in another bank using Straight2Bank. This feature allows clients to centralise management of their accounts held with any bank through Straight2Bank.
Bank to Bank Transfer
This is normally used by Banks / Financial Institutions (FI) to transfer and settle funds. The message is normally sent as a SWIFT MT202 message and used in US and UK.
Corporate Cheque
Corporate Cheque on Straight2Bank allows clients to send physical cheque instrument to the beneficiary printed by the Bank, or optionally by the client themselves. The client account is debited when the instrument is presented for clearing and not at issuance.
Local Bank Cheque
A physical cheque is printed by the Bank and available to the client for pickup or delivered to the beneficiary on behalf of the client. The client’s account is debited when the instrument is printed. Also referred to as cashier’s order.
International Bank Cheque
A paper based instrument is printed and sent to the beneficiary by the Bank on behalf of the client. The payment may be in domestic or foreign currency and sent to clients overseas or within the same country.
Cross Border Cheque
A value added payment capability, cross border cheque allows our clients to make cross border cheque payments to a beneficiary in another Standard Chartered presence country, thereby reducing transaction costs and ensuring certainty of payment.
Cross Border Book Transfer
A value added payment capability, Cross Border Book Transfer allows our clients to make cross border book transfers to a beneficiary in another Standard Chartered presence country. This reduces transaction costs in making cross border payments.
Cross Border Direct Credit
A value added payment capability, Cross Border Direct Credit allows clients in making low value, non-urgent payments to beneficiaries in another Standard Chartered presence country and significantly reduces transaction costs and eliminates need to maintain local accounts for frequent remittances.
Cross Border Payroll
A value added payment capability, Cross Border Payroll allows clients to make salary payments to beneficiaries in another Standard Chartered presence country, thereby reducing transaction costs and ensuring certainty of remittances.
Cross Border Real Time Settlement
A value added payment capability, Cross Border Real Time Settlement allows clients in making high value, urgent payments to beneficiaries in another Standard Chartered presence country and significantly reduces transaction costs and eliminates need to maintain local accounts for frequent remittances.
Availability & Control
There are individual screens for each payment type on Straight2Bank. Each of the payment types are controlled at a company profile level and user level. The control at a user level is at two levels
Function level
Data level
The “Function” level control is to enable one or more users with the access to the menu option for each of the payment type such as “Telegraphic Transfer”, “Local Bank Transfer”, etc while the “Data” level control is to restrict / allow a user to access one or more accounts. It will be possible to configure a user, “User A” with access to “Telegraphic Transfer” only and “Account 1” while another user, “User B” may have access to “Telegraphic Transfer” and “Local Bank Transfer” for “Account 1” and “Account 2”. These controls may be changed by the “Customer Administrator” or the “Bank Administrator”.
The various payment types offered on Straight2Bank are also dependent on where the debit account is held and hence not all payment types listed in the earlier section will be available across all markets
Create Payments


Manual payment creation is one of the ways in which payments can be created on Straight2Bank.
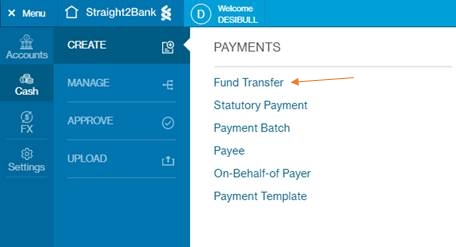
Start from the options on the left. Go to “Create New”, and click 'Payment'.
On this page, all inputs are mandatory unless stated as optional. Fill in the transaction's details including:
Payment Reference
This field is auto-populated. It has to be unique and the field accepts up to 16 characters.

Pay From
Select 'Debit Account', choose from drop down list (Payment Centre is derived based on the payment originating account).

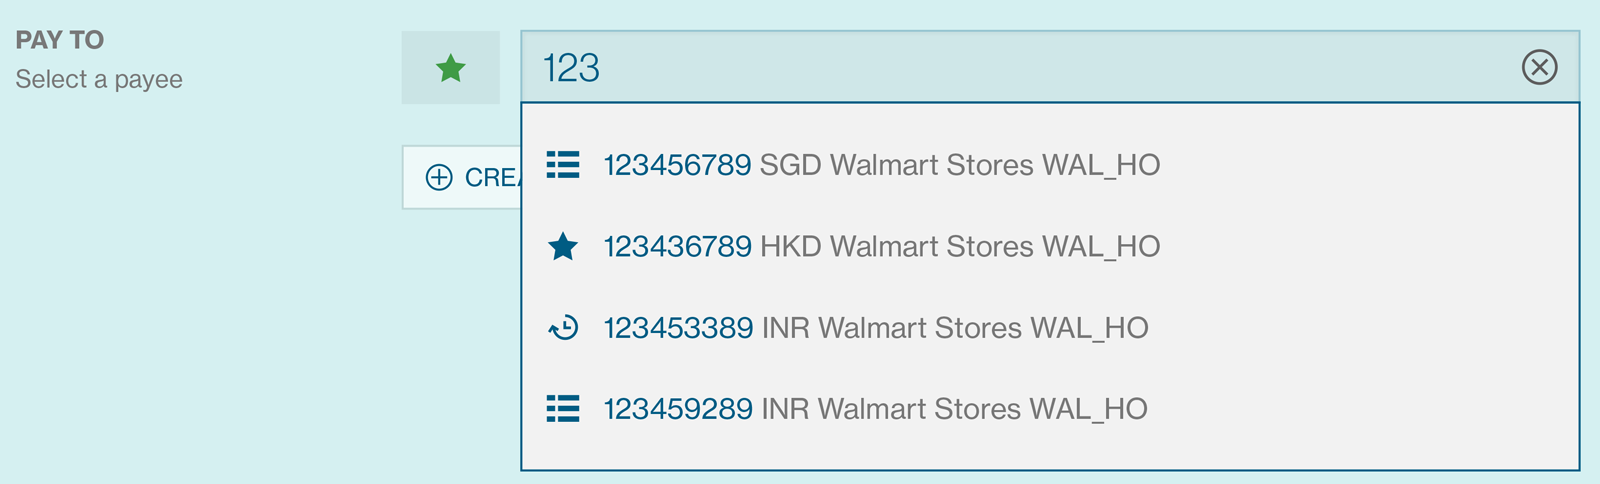
Pay To
Select existing 'Payee / Beneficiary Account', input keyword to search or choose from drop down list. System will capture detailed information about the beneficiary that may be used just for this payment or stored within Straight2Bank for reuse later. Refer to the Payee / Beneficiary Maintenance for details on this.
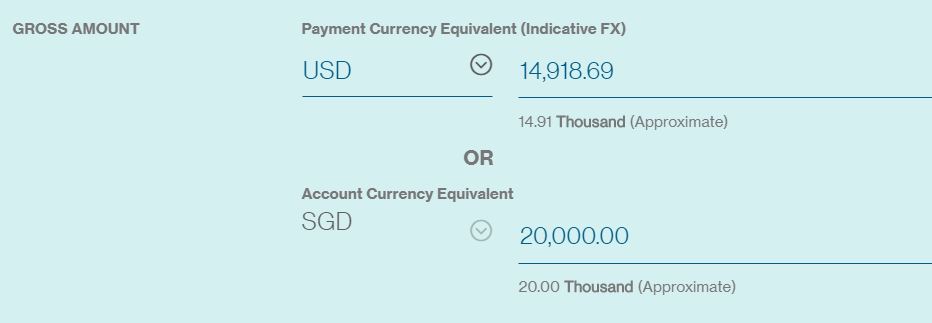
Amount
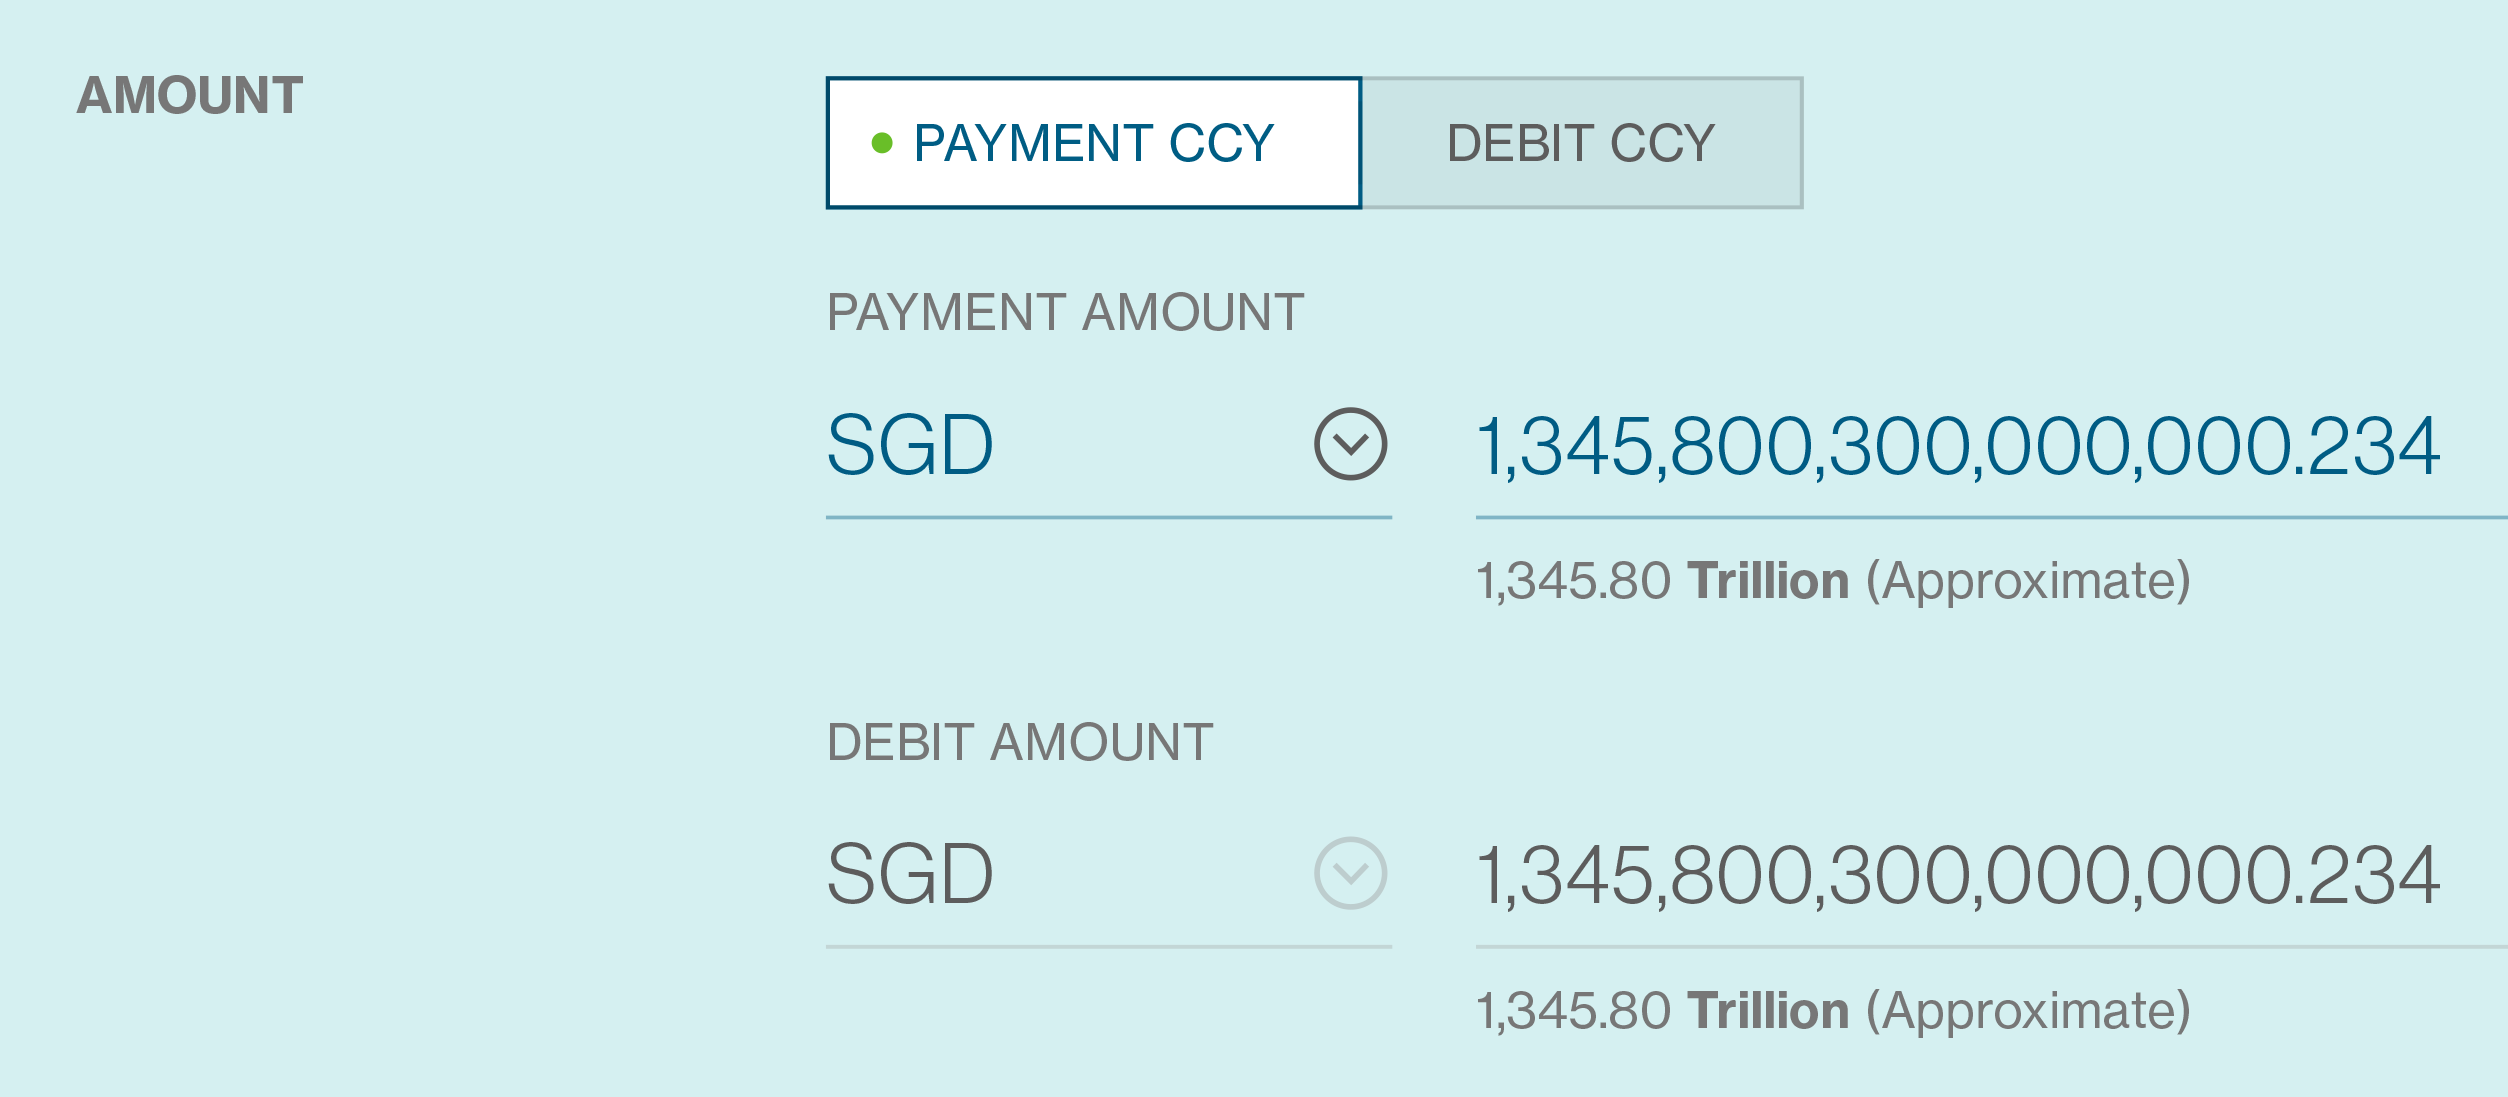
Select 'Payment Currency' / 'Debit Currency', input Transaction Amount ( Amount in words will be available for ease of reference ).
For cross border payments, payment amount is relevant based on the currency pair. Refer to Amount Priority Capability for Cross Border Payments for detials on this.
Payment Schedule
Select Payment 'Debit Date' or 'Value Date' - The date when the payment is required to be processed by the bank. This may however not be the date when the beneficiary receives the funds as the beneficiary receiving the funds depends on payment type, settlement type, public holidays, etc.

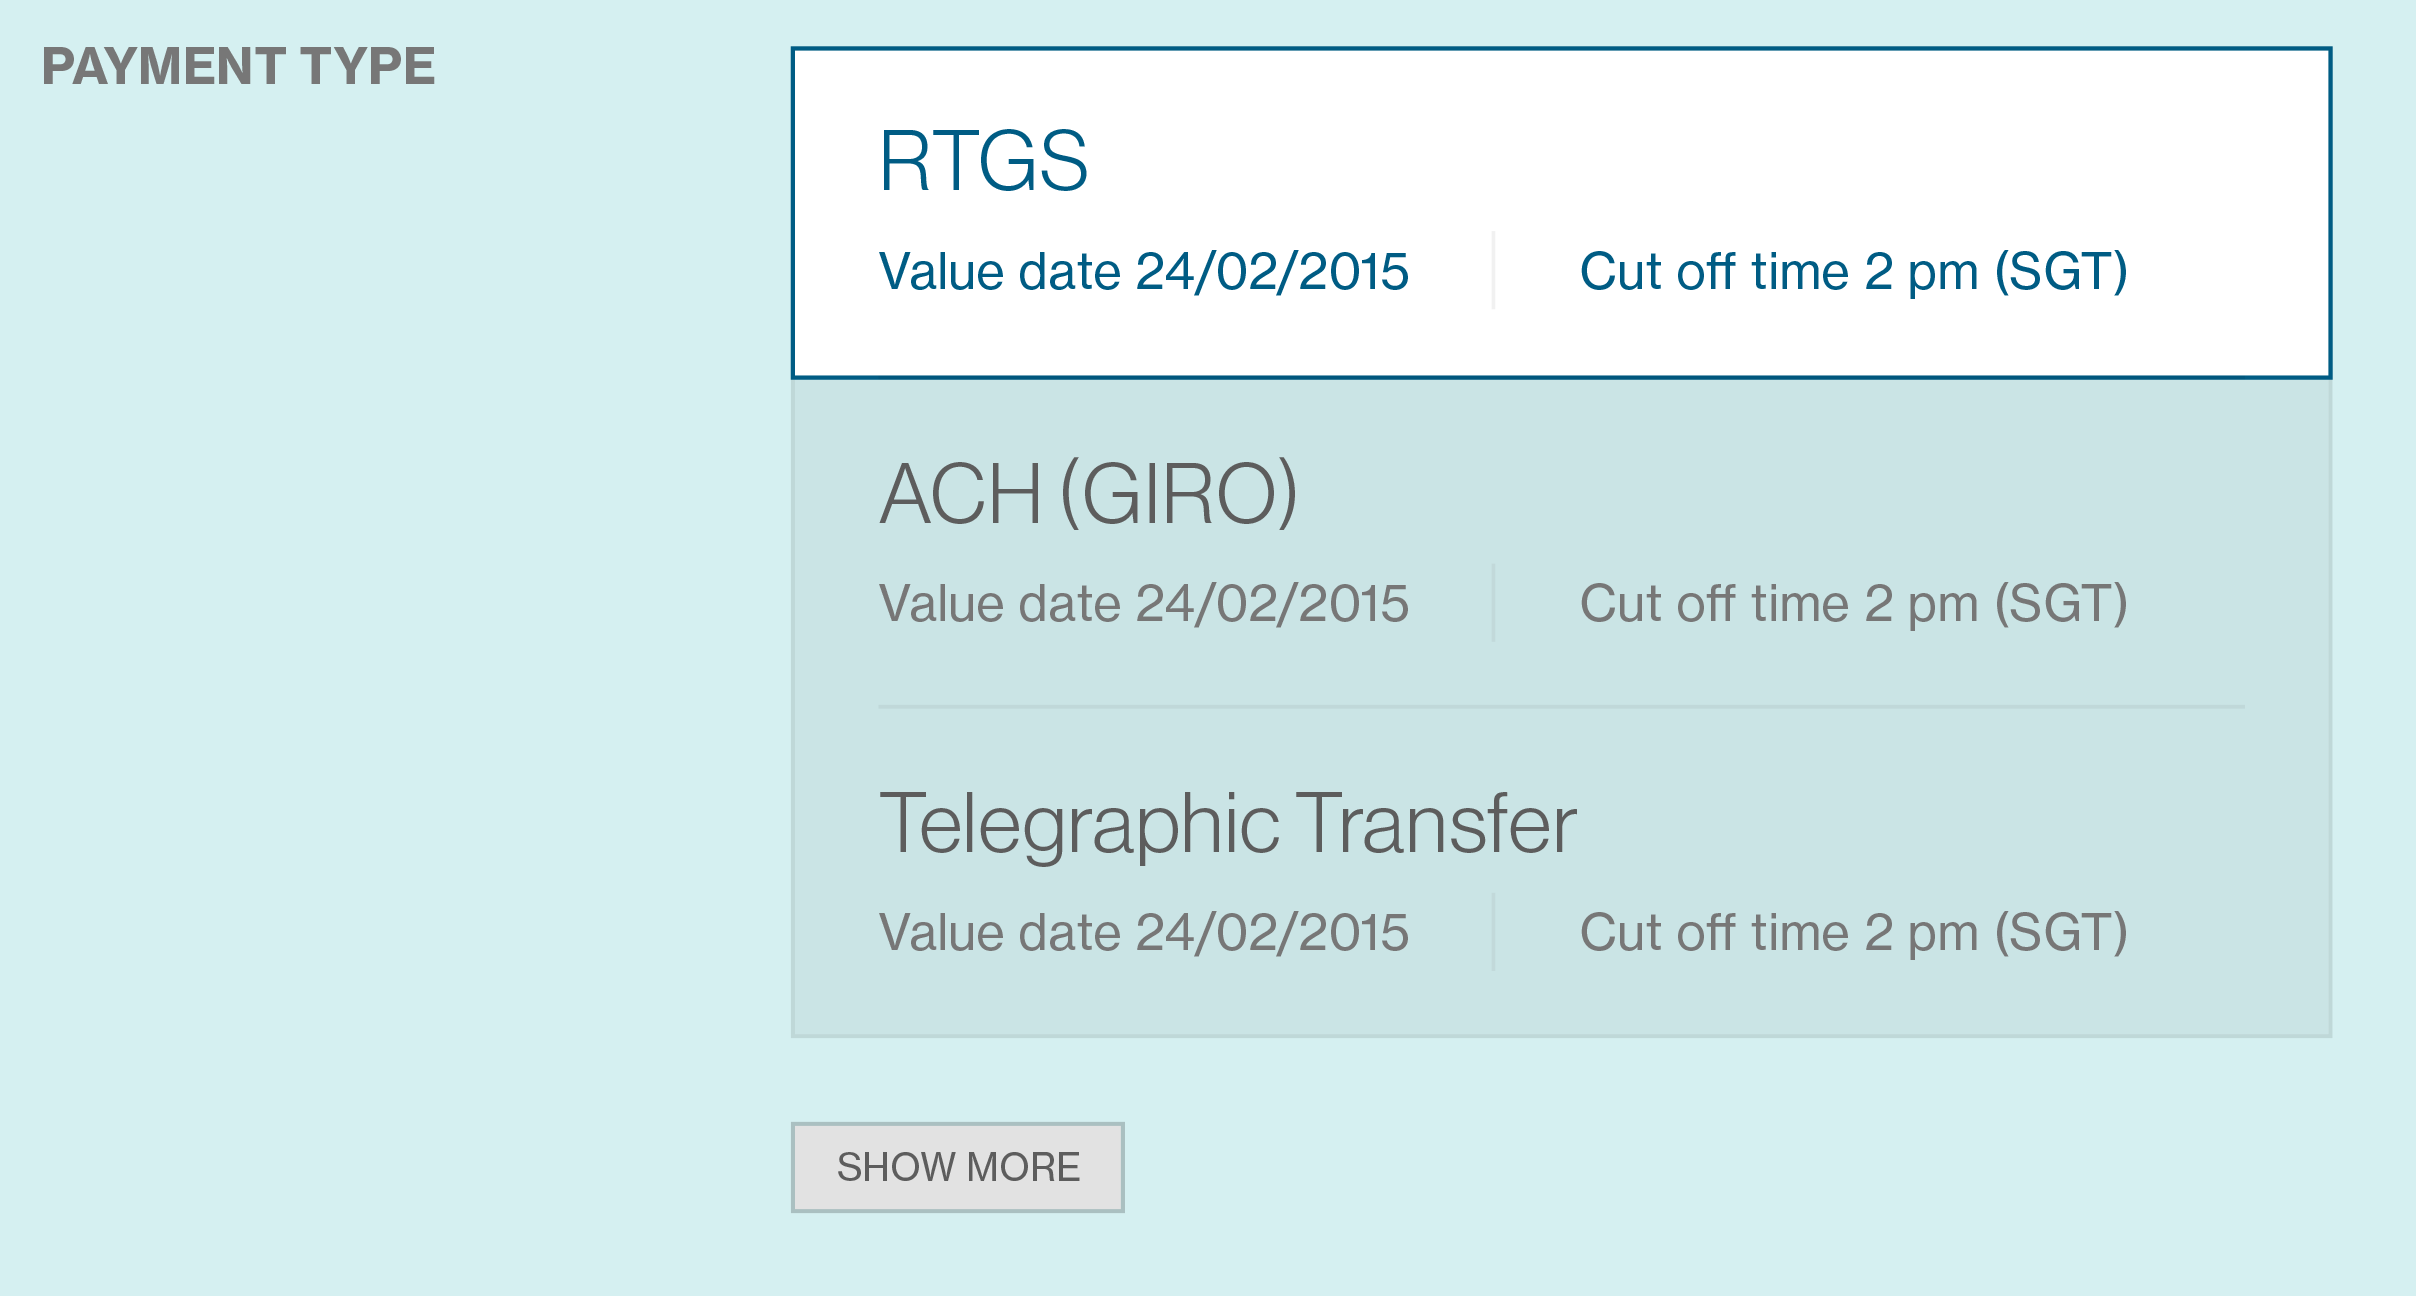
Payment Type
Select 'Payment Type' - Straight2Bank provides various payment services such as domestic payments, cross border payments, tax/statutory payments, electronic cheques and financial institutions (FI) payments.
Refer to Payment Types on Straight2Bank for detials on this.
Upon completing providing the payment information, Charges information and optionally Invoice information and additional information for regulatory reporting can be provided.
At the end of the payment screen, you will have various options pertaining to the payment. The options available are:

Cancel
Allows you to cancel the transaction instruction creation and get back to the previous page.
Save & Close
The payment information input will be saved as draft (“Draft” status) and allows you to complete at a later point.
Continue
This option will let you perform online validation of the payment information input on payment summary page.
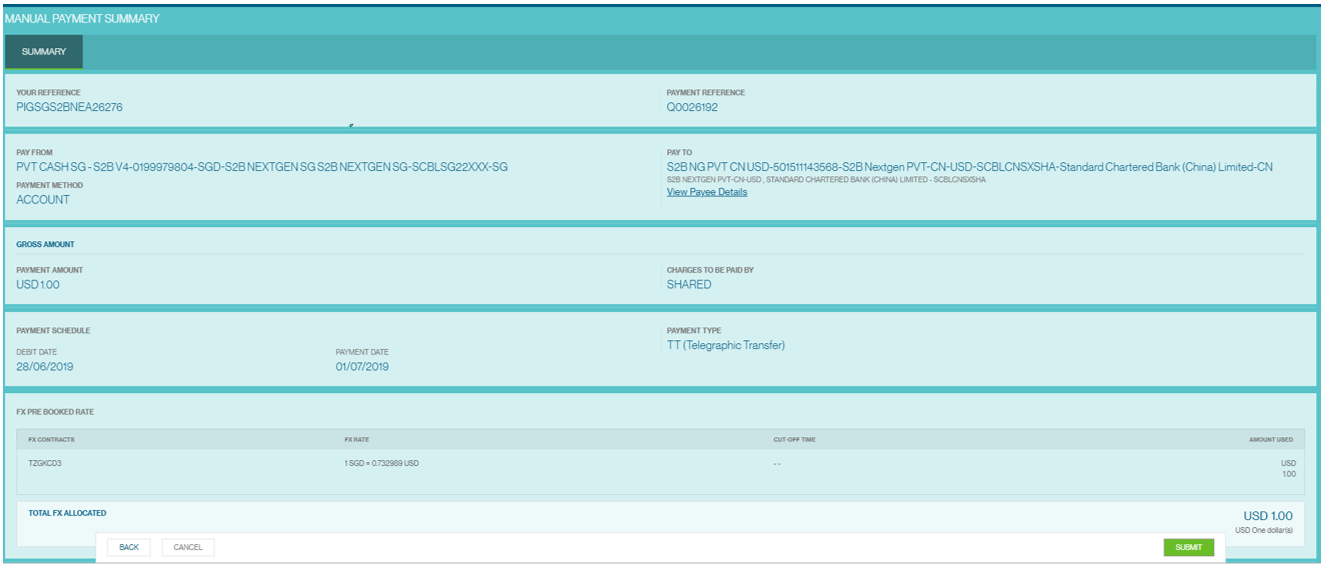
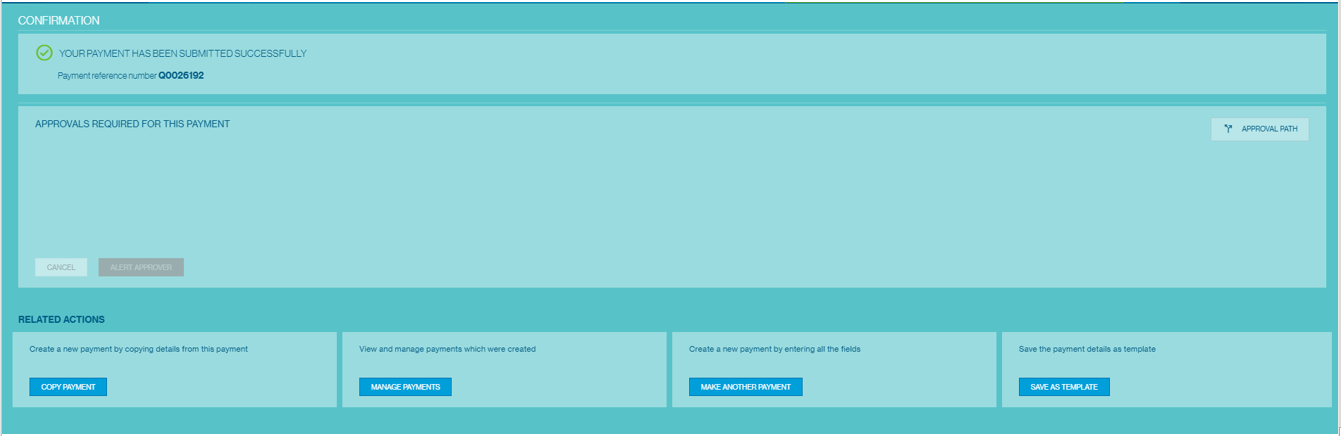
Review all the information on the summary page and click on “Submit” when done.
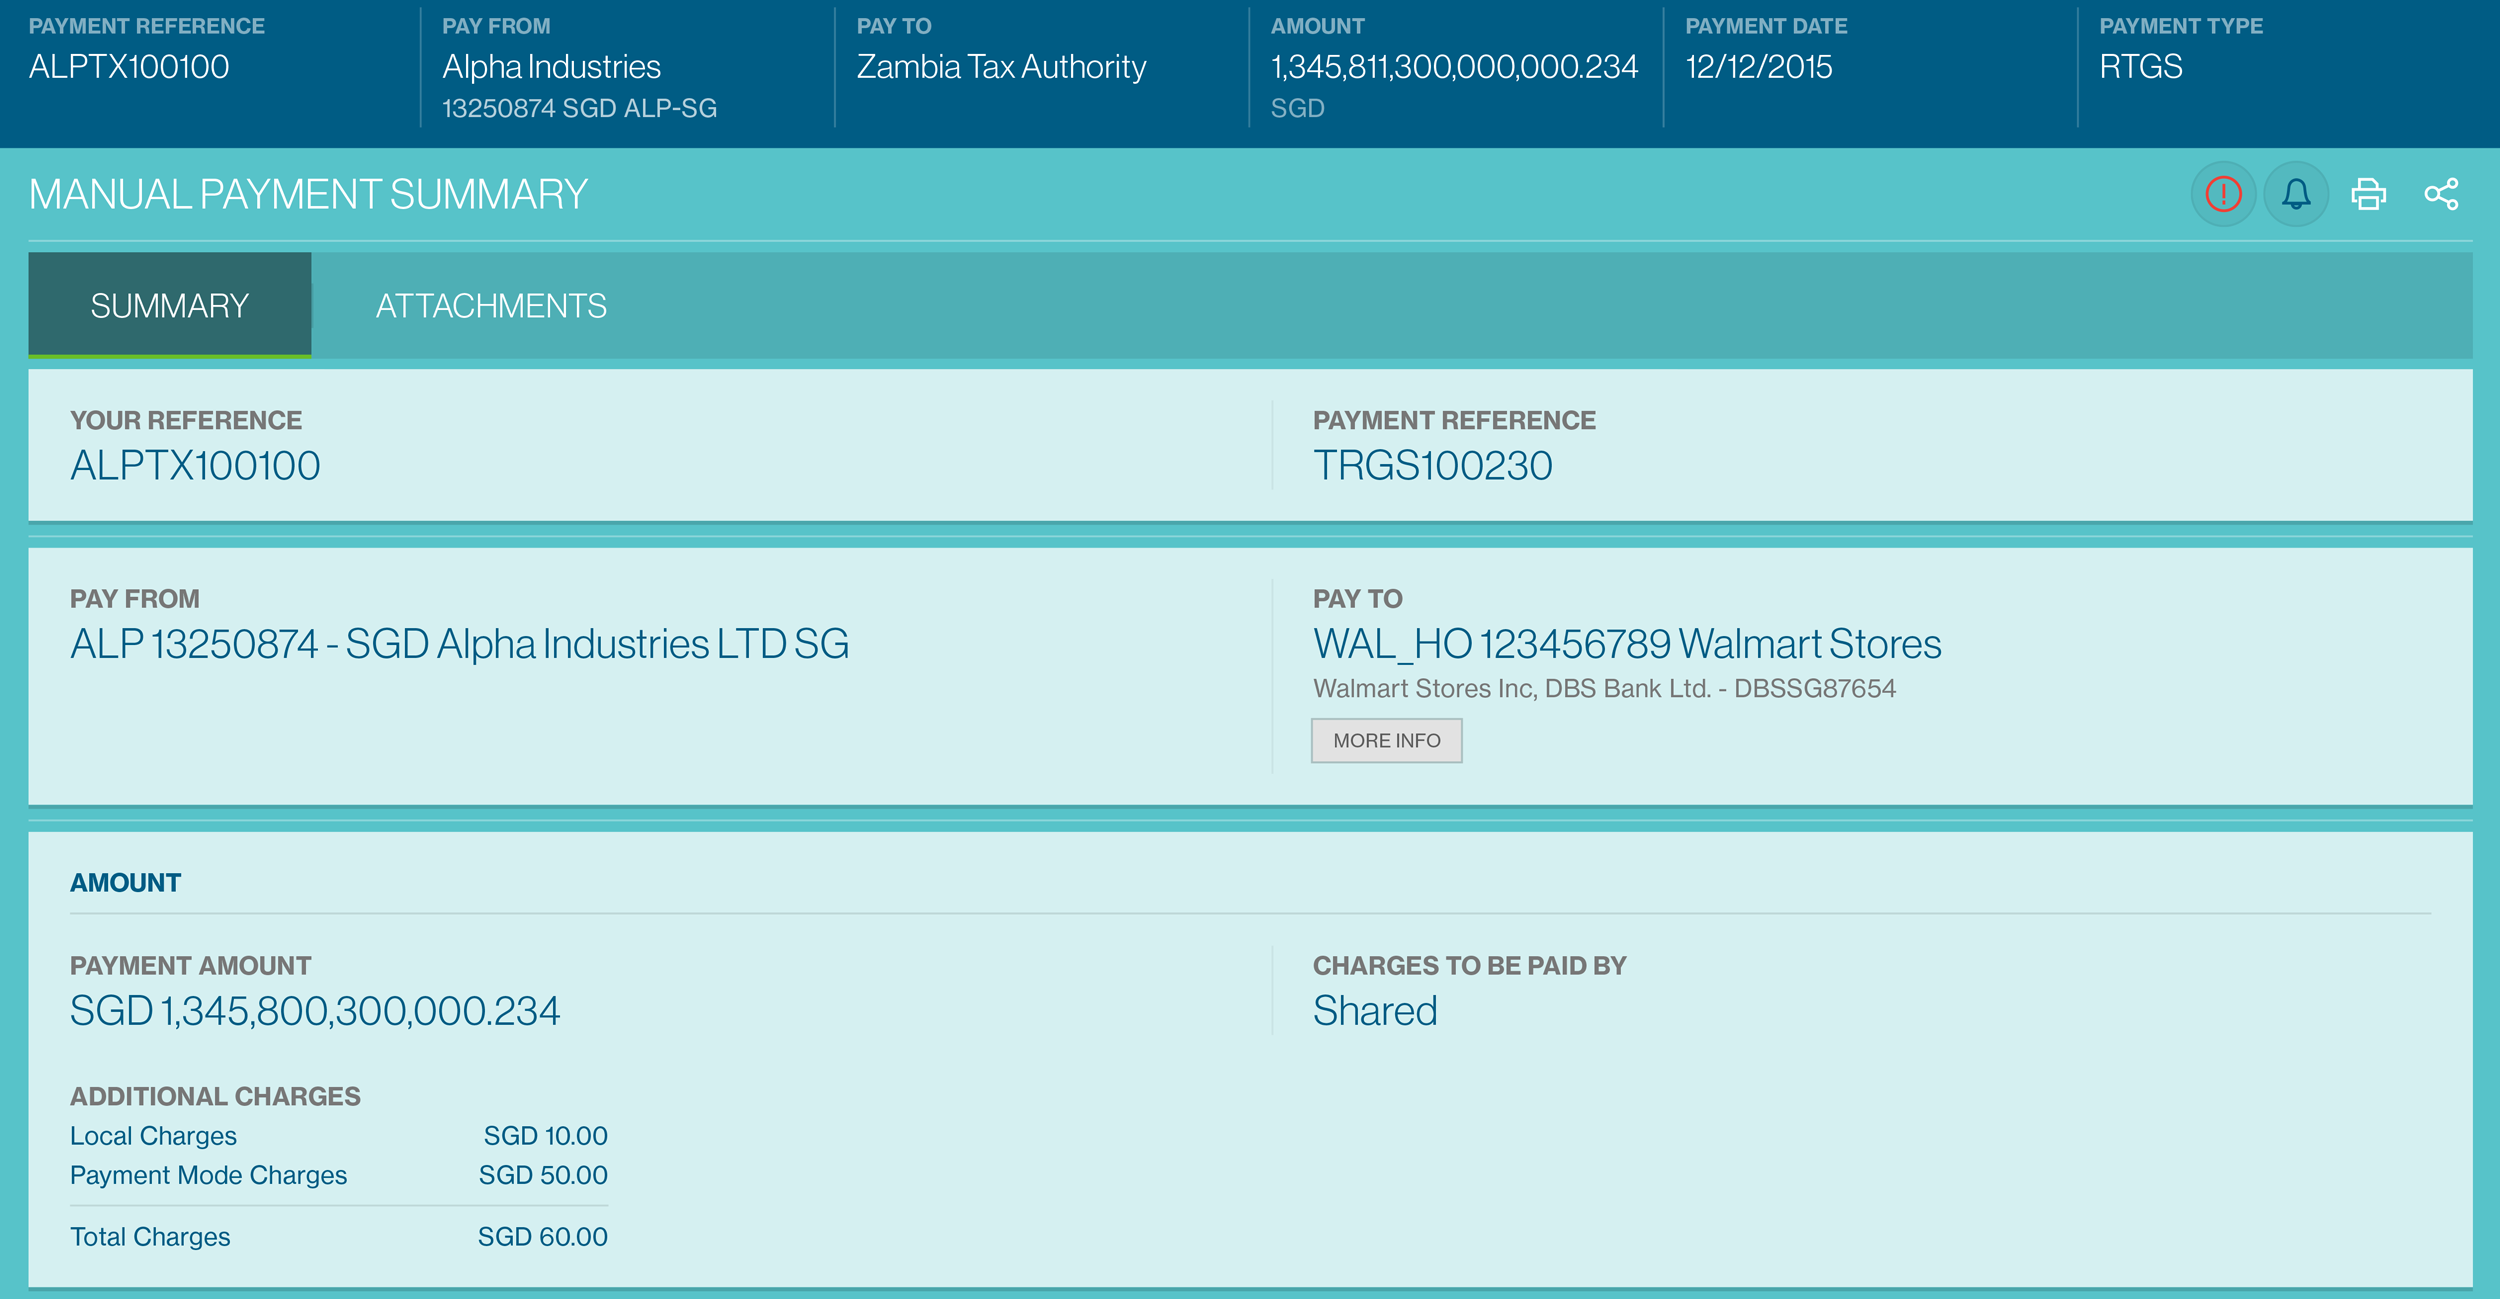
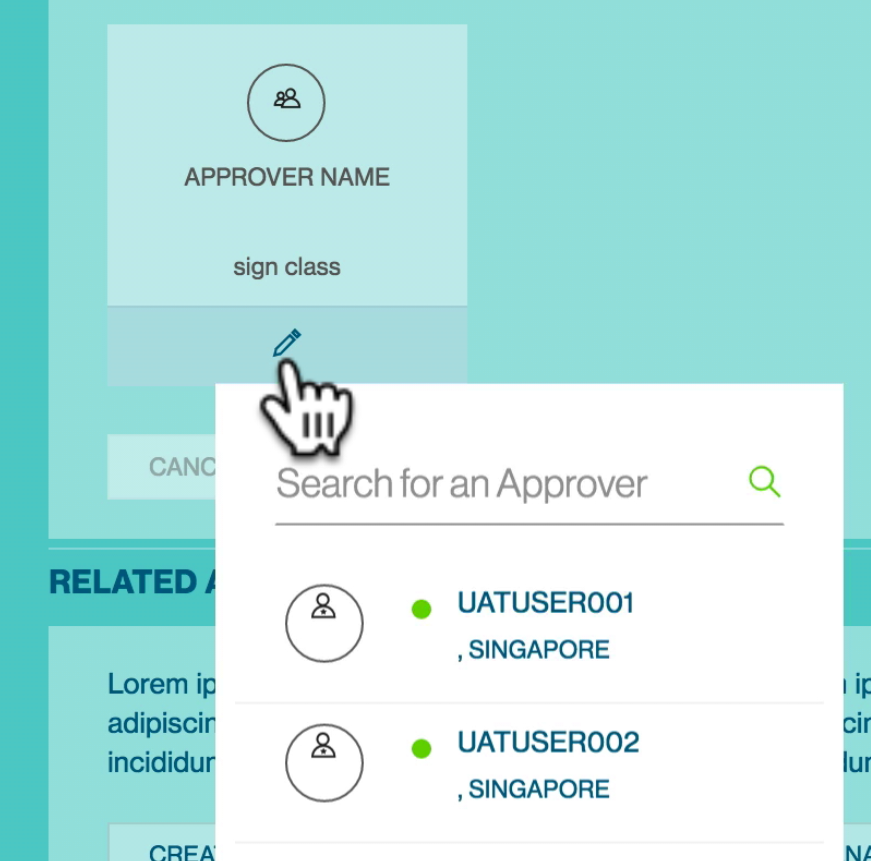
Next page, you can select and send an alert to the appropriate approver . Refer to the Approve Payments for details on this.
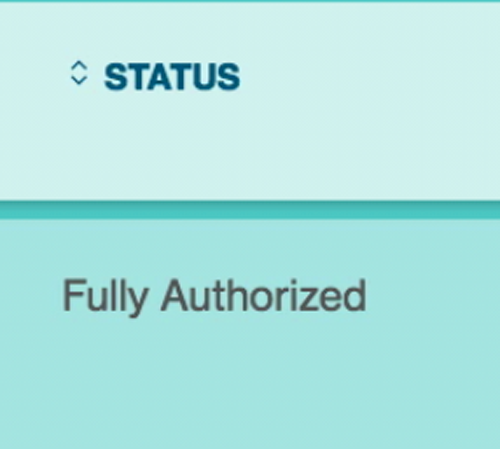
To view the list of payments awaiting authorisation, you can check the Manage Payment list screen . Once approved, the status will change to ‘Fully Authorized’.
Amount Priority Capability for Cross Border Payments
This feature provides you with the option to make cross border payments via Straight2Bank, by indicating the amount either in “Payment Currency” or “Debit Currency”.
The default option is “Payment Currency”. The debit amount is calculated based on the payment amount. If you wish to prioritise based on the payment currency equivalent to be paid, then you will need to click on Debit CCY tab.
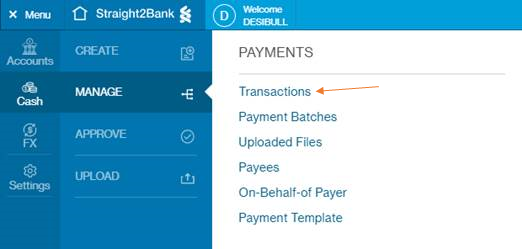
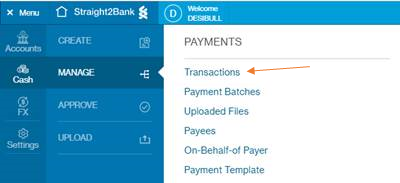
Manage Payments
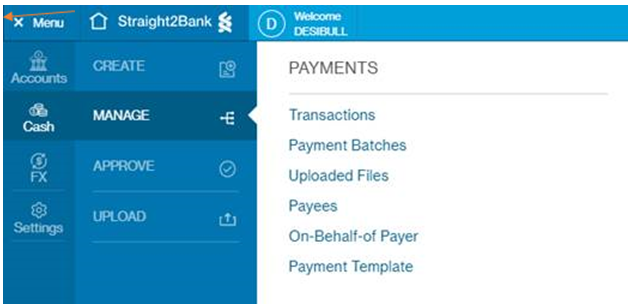
The Manage Payments List Screen will be available from the Menu > Manage > Payment.
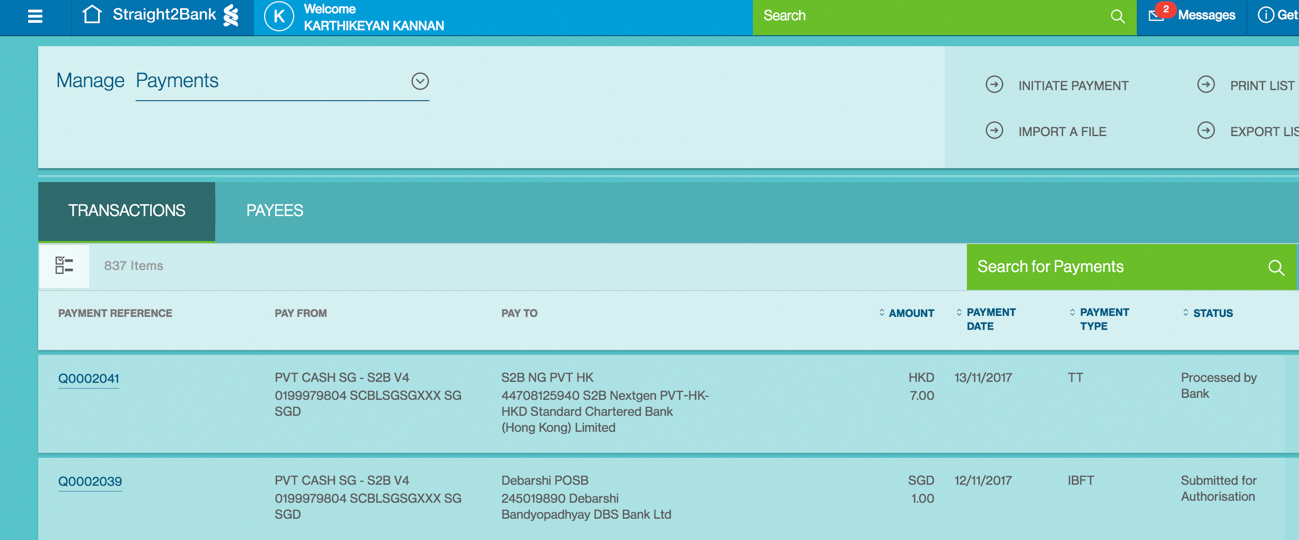
Column Headers
This page displays the payments as a table with the following headers:
- Payment Reference
- Pay From - Debit Account Name or Nick Name if available, Debit Account Number
- Pay to - Payee Name or Payee Nick Name, Payee Account Number, Payee Bank Name
- Amount - Payment Amount in Payment Currency
- Payment Date
- Payment Type
- Status - Refer to Understanding Transaction Statuses for details
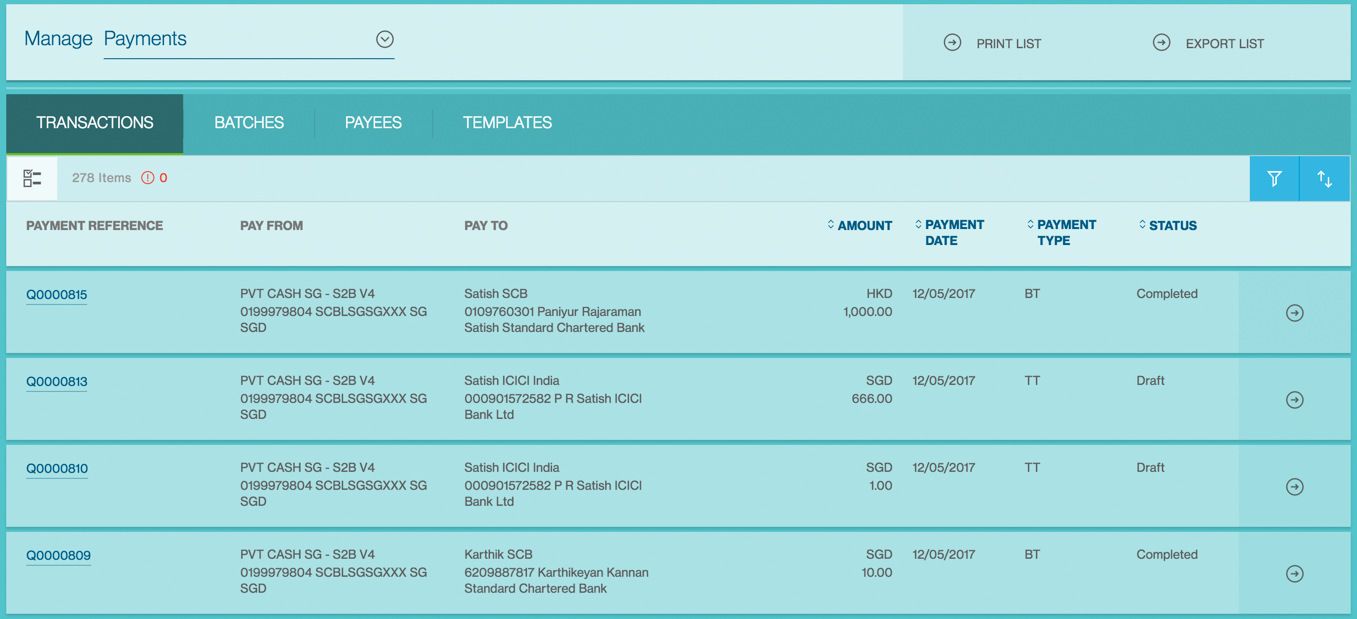
Sort and Filter Function
You can click each of the headers predefined as sortable to sort the table data in ascending order. Clicking one more time on the sortable headers will sort the table values in descending order.
Filter button - When click on this button, the system shows a filter with the filter criteria including Amount, Payment Date, Status, etc. On Check of the checkbox next to any of the values as per below, system updates the Payment List Display to display only results containing the values matching the checked filter.

Priority Sort - On Click, the system expands the sort options which are configurable at system level. Each sort category will have a 2 way switch - Ascending / Descending indicator for you to select. By default the categories will be listed in the order of header display. This settings are not saved and it will revert to the default state if you relaunch the application

Payment Action Menu
Filter button - When click on this button, the system shows a filter with the filter criteria including Amount, Payment Date, Status, etc. On Check of the checkbox next to any of the values as per below, system updates the Payment List Display to display only results containing the values matching the checked filter.

The list of actions shown in the payment action menu depends on the status of the payment and the user entitlements to perform various actions.
The following are some key actions that apply to a payment under Manage Payments:
- Submit - Not applicable for payments that have been sent for repair.
- Edit - Allows you the edit a payment that has not be “Approved”
- Delete
- Copy
- Export
- Repair
- Send to Bank
Print Payments
The “Print Payments” feature available on Straight2Bank helps in printing the payment instructions in list or in details
The option will be available on the Manage Payments List Screen - from the Menu > Manage > Payment
Print List
One or more payment instrucions may be selected to use the “Print List” feature. All the selected payment instructions will be available in the Print View screen to enable printing. The column headers of the “Print List” screen will be as following:
- Payment Reference
- Pay From - Debit Account Name or Nick Name if available, Debit Account Number
- Pay to - Payee Name or Payee Nick Name, Payee Account Number, Payee Bank Name
- Amount - Payment Amount in Payment Currency
- Payment Date
- Payment Type
- Status - Refer to Understanding Transaction Statuses for details

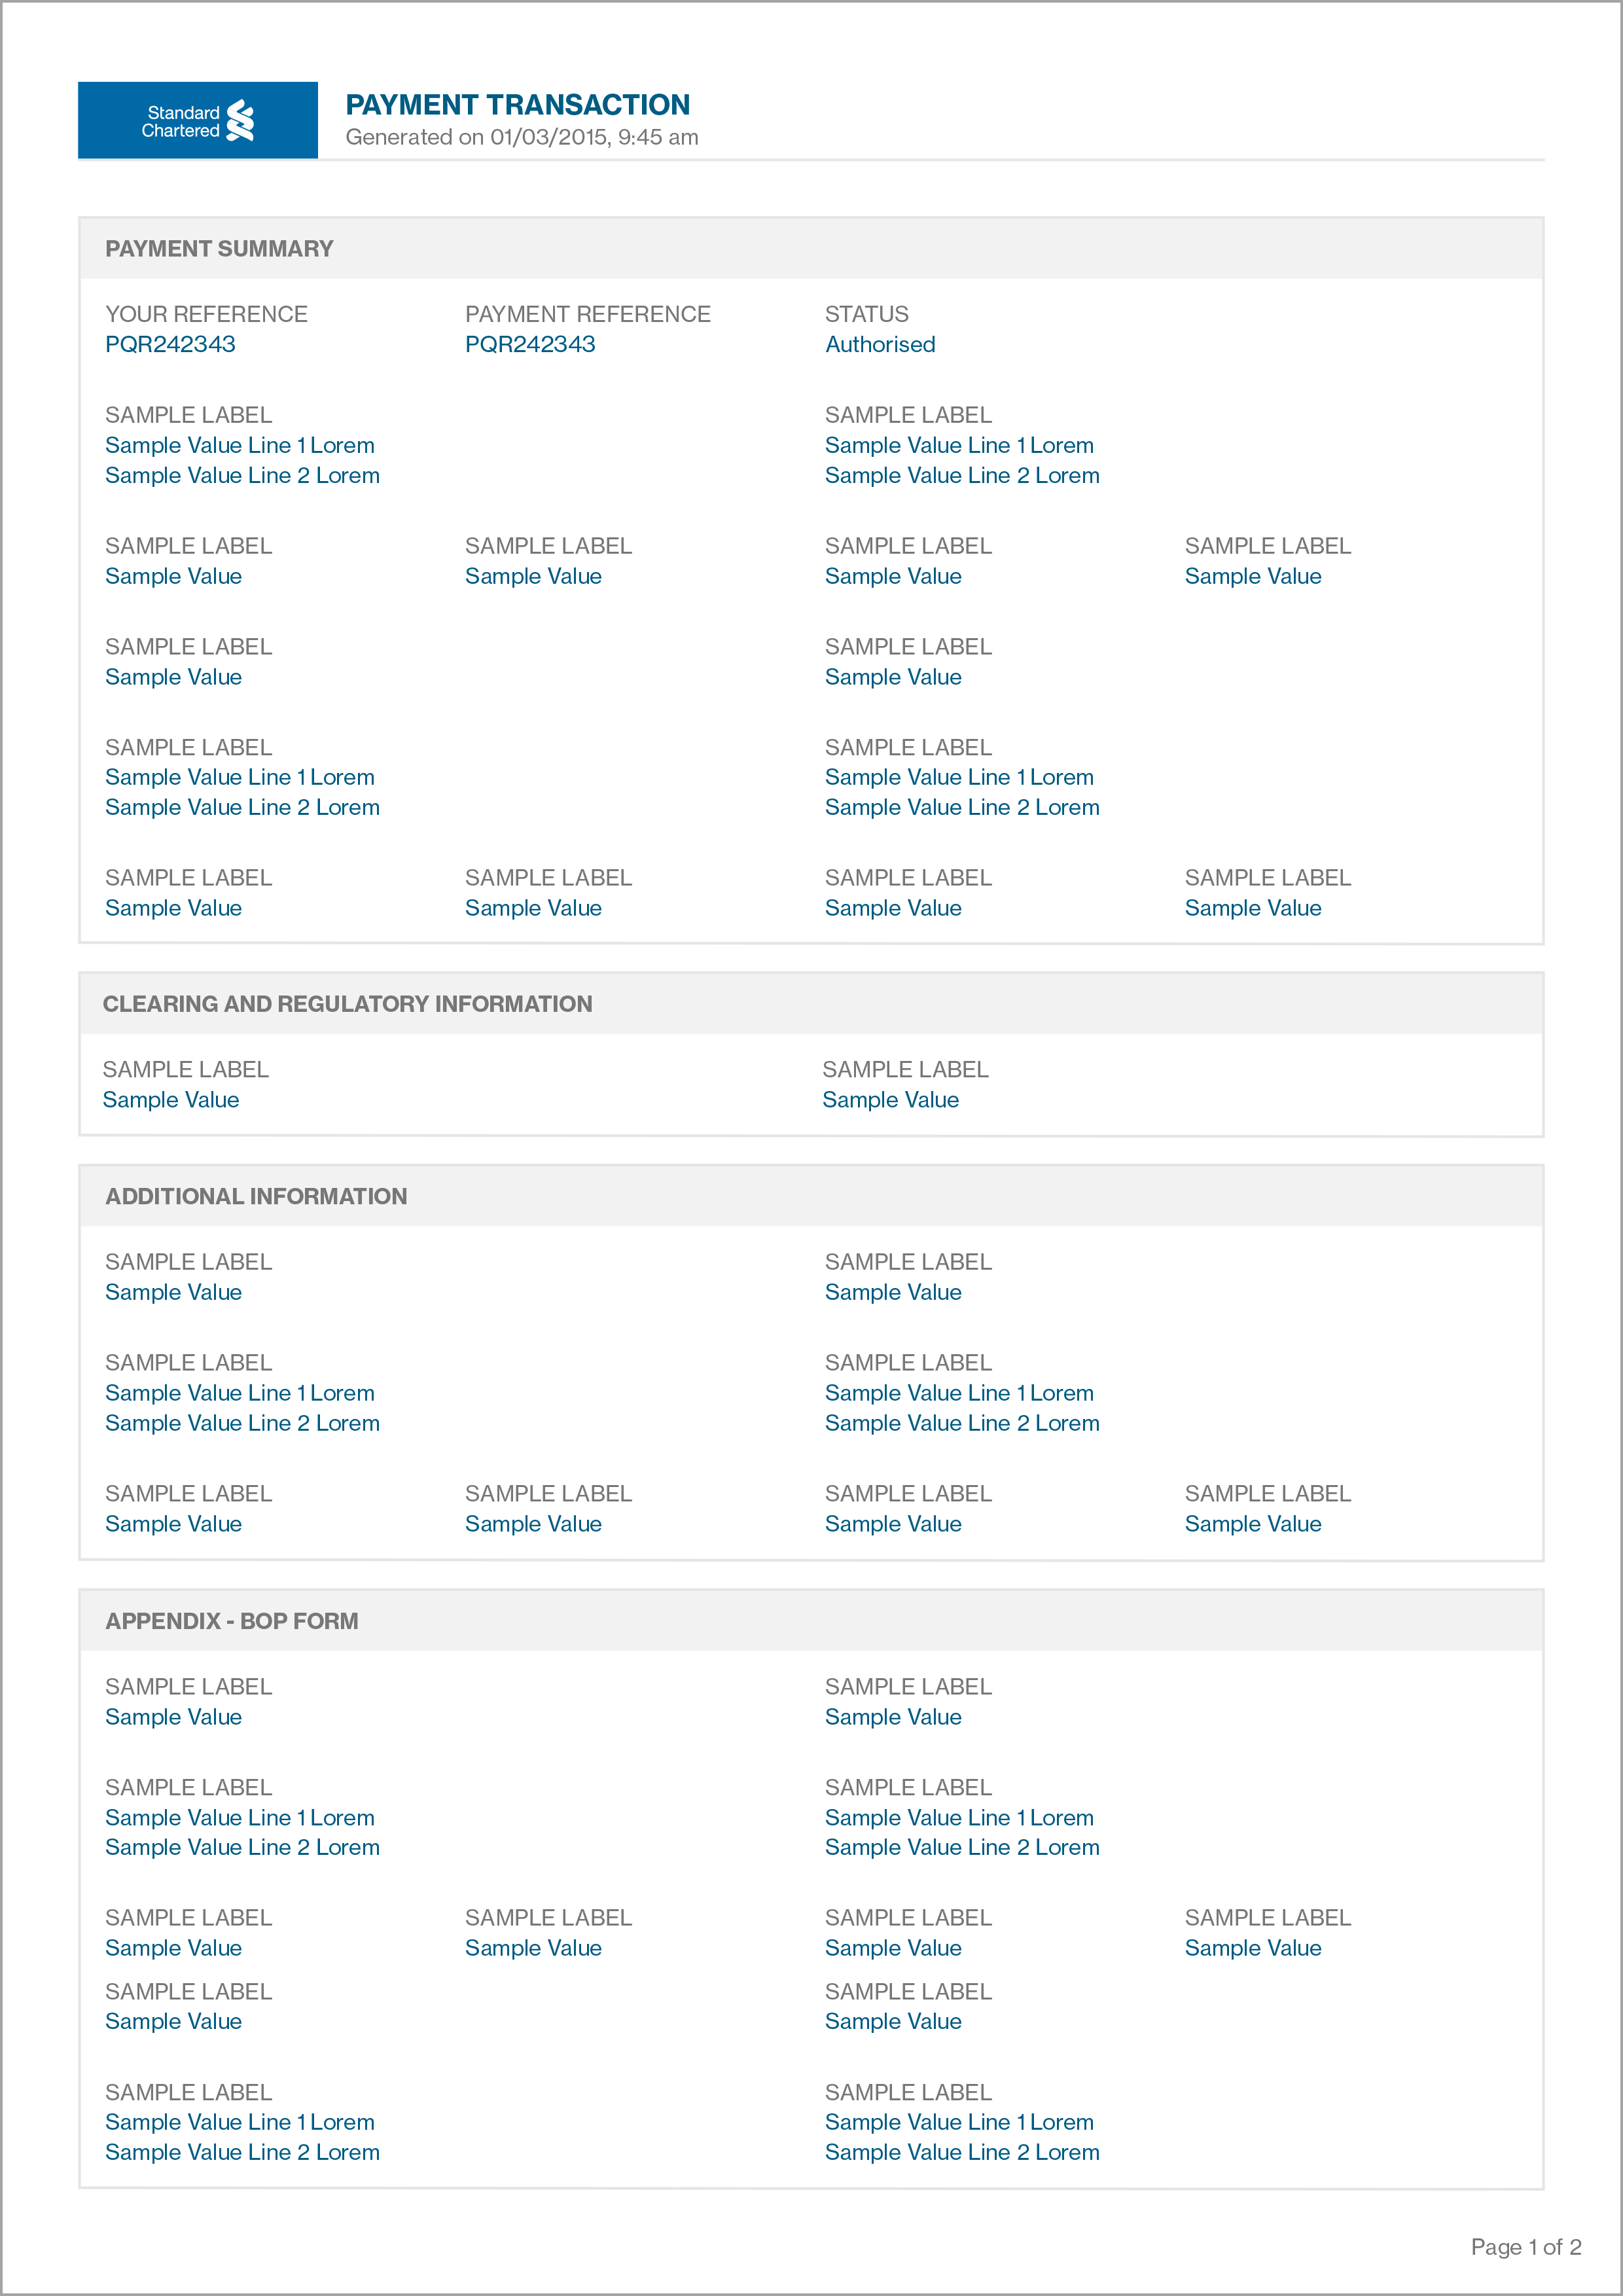
Print Payment Details
Similar to the “Print List” feature, the “Print” feature available on Straight2Bank helps in printing the transaction details of each of the payment instructions by simple click. This feature will be available from action menu of each payment.

The contents of the “Print View” screen will be based on the Data entitlements of the user in listing the transaction details.
Create Payee

The access to creating Payee’s on Straight2Bank is controlled at a user level. Normally all users of Straight2Bank will have access to create Payees unless a specific request has been made to remove this access for a user.
The Payee Creation option is available under Menu > Create New > Payee.

The create New Payee screen will capture information that is both Mandatory and Optional. The key fields as part of Payee creation include:
Payee Nick Name
This has to be unique and the field accepts up to 35 characters. Payee nick name can be used to search for Payee’s during payment workflow or payee maintenance.
Default Payment Type
Default payment type field is an optional field in payee creation journey.

Payee Name
Name of the Payee in English. 35 characters maximum.

Account Number
To capture Payee’s bank account number. There is an optional IBAN Validation option available to validate the structure of the beneficiary account number as per “International Bank Account Number” standards that is followed for payments made to several countries, mostly in the EU.

Bank Information
Payee’s bank information such as Bank Name, Bank Address, Bank Code, Branch Code, etc. Depending upon the Payment type that is used, some of the fields will be mandatory. Choose the country from the drop down list, and use the search tool to identify the bank’s name. Intermediary bank information is also available for cross border telegraphic transfers.
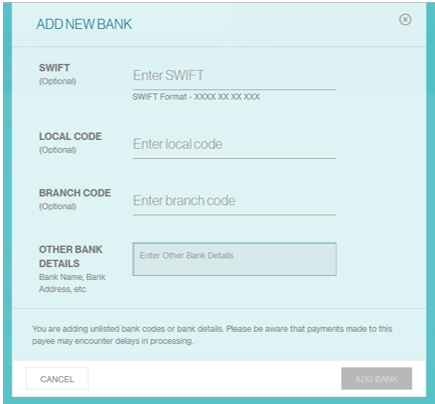
If you are unable to find the Bank Code in the search function or if you are not able to provide a Bank Code, please use the ‘Add Unlisted Bank’.
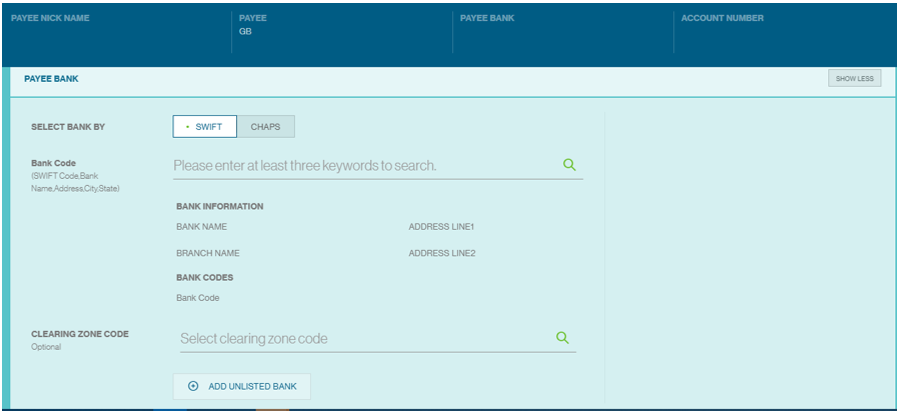
Fill up the bank’s SWIFT Code, Local Code and Branch Code accordingly. In ‘Other Bank Details’, please provide the Bank Name and Bank Address. Select ‘Add Bank’ once you are done.

Finally, proceed by clicking on ‘Continue’. Review all the information on the summary page and click on “Submit” when done.

Next page, you can select and send an alert to the appropriate approver.
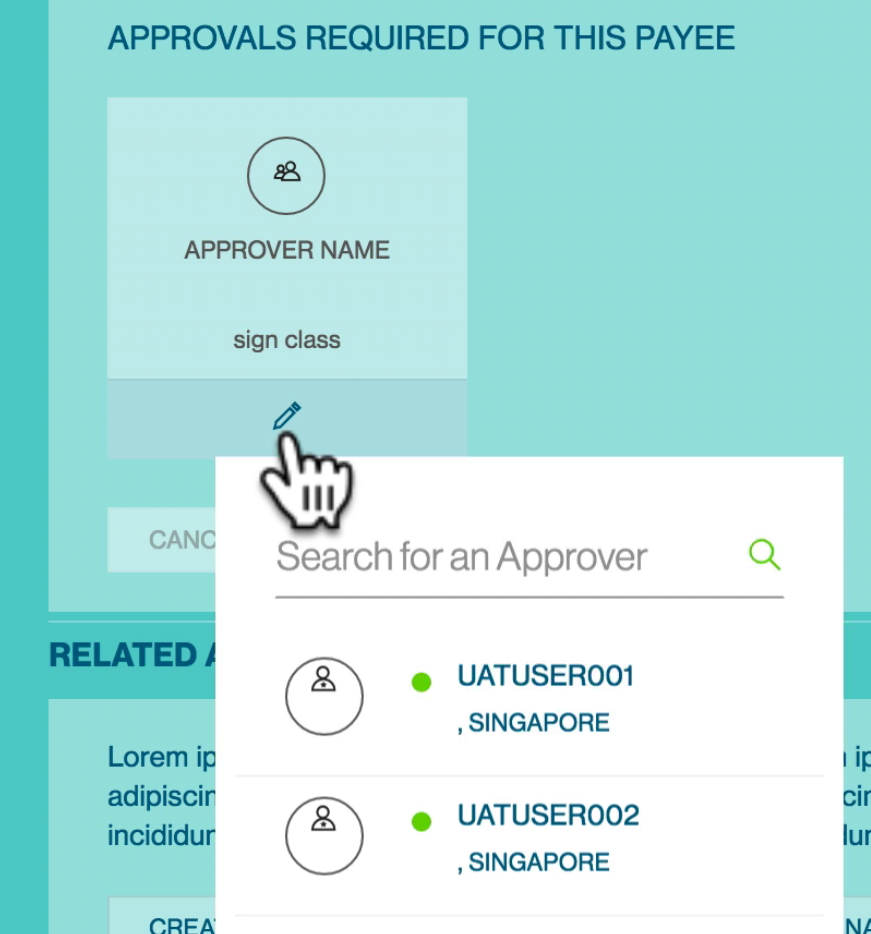
To view the list of payees awaiting authorisation, you can check the Manage Payee list screen . Once approved, the status will change to ‘Fully Authorized’.
Create One-Time Payee
Payee / Beneficiaries are not mandatory to be setup and maintained on Straight2Bank. It is possible for payments and payroll instructions to be made without setting up the payees on Straight2Bank.
The “Create One-Time Payee ” capability during payments initiation journey will provide convenience in setting up Payee one- time and authorising it later.
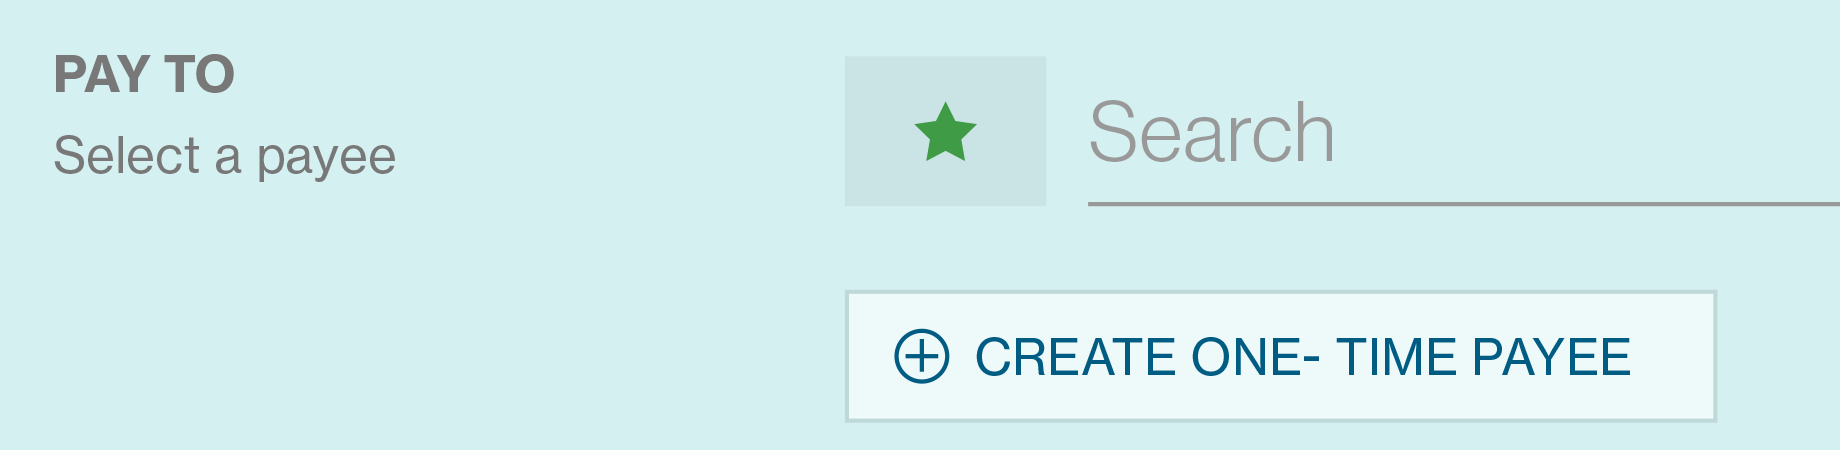
After clicking “Create One-Time Payee ” button, an additional screen “Non-Registered Payee ” will appear - to capture information that is both Mandatory and Optional.
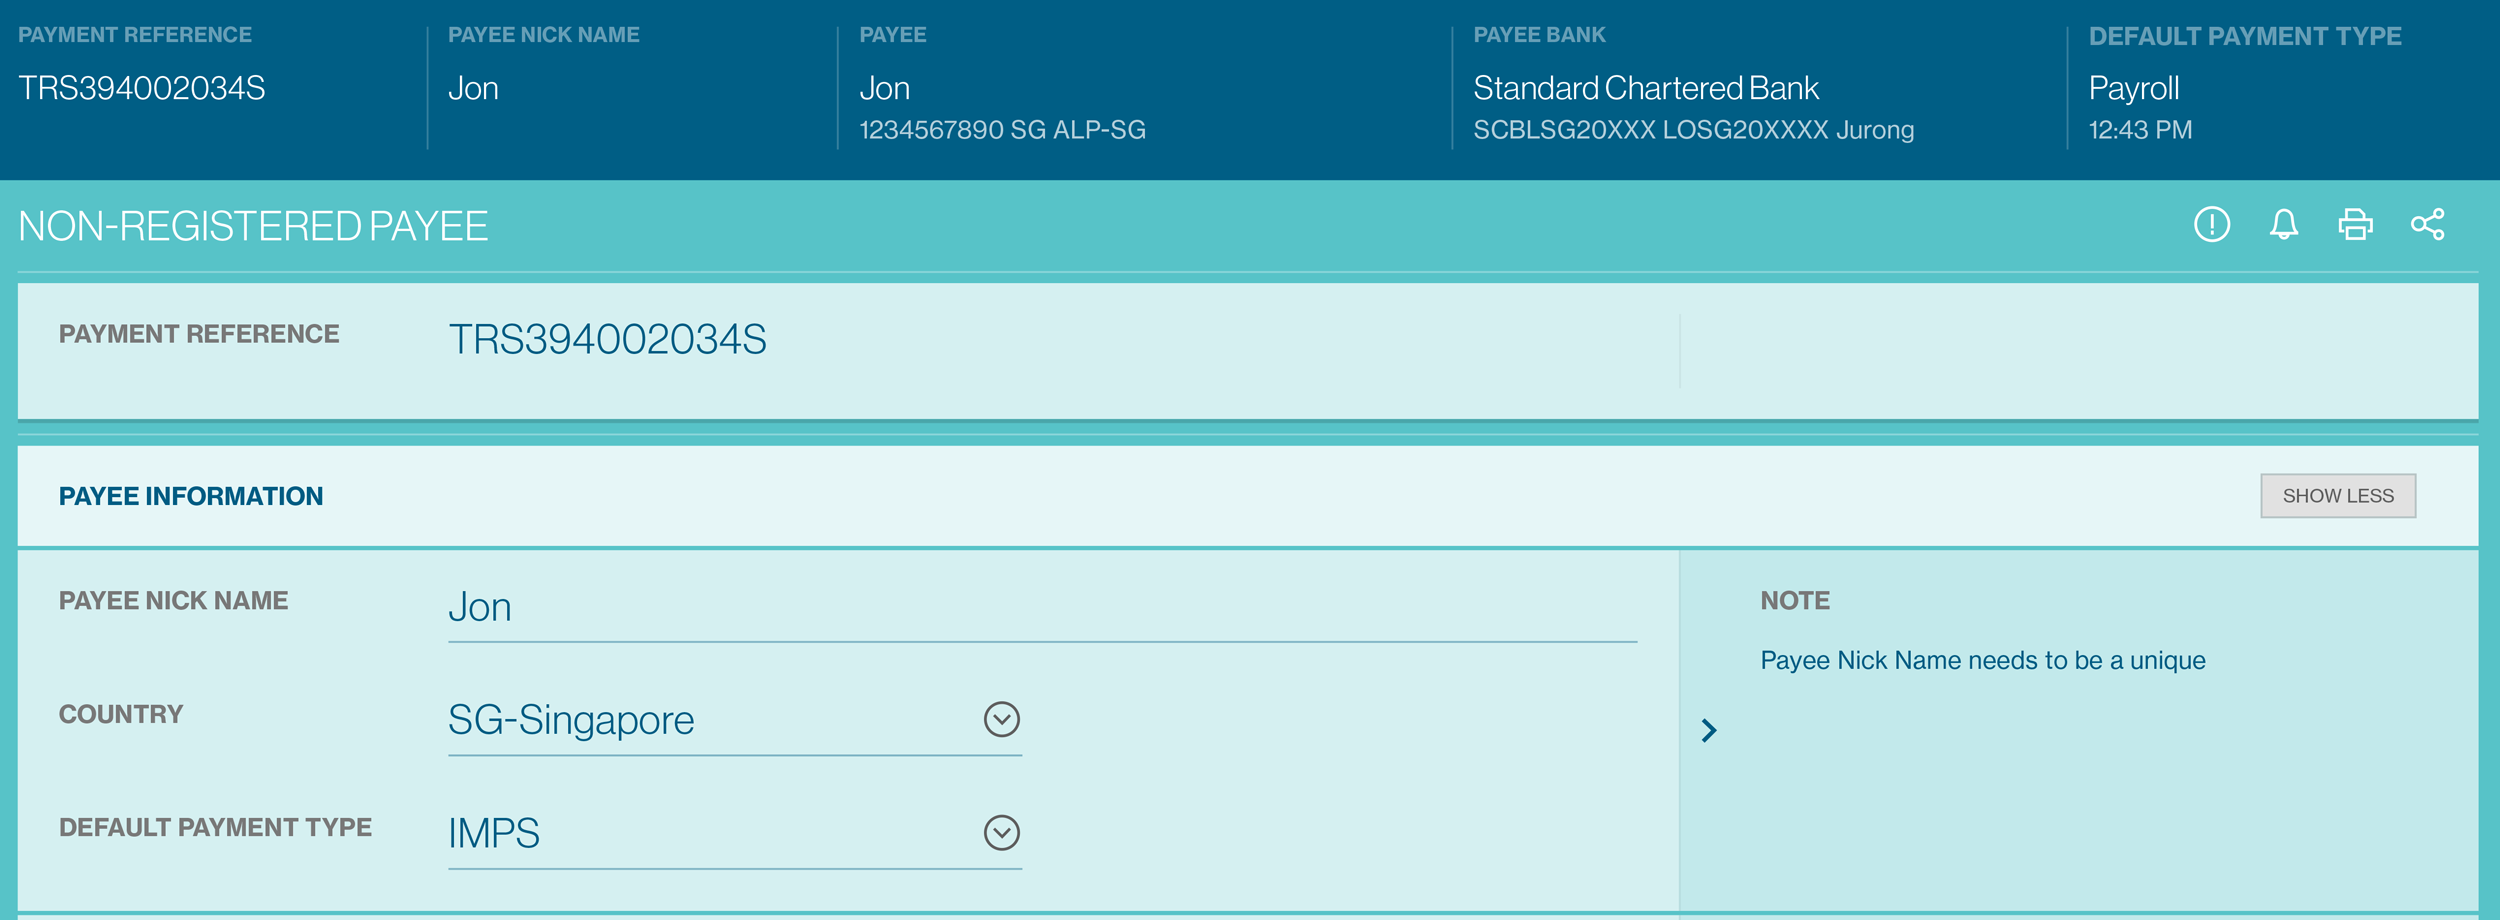
The key fields as part of Non-Registered Payee creation include:
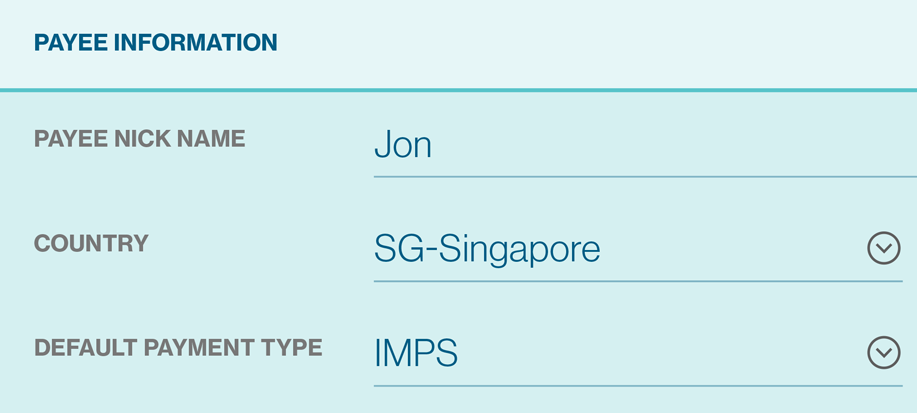
Payee Nick Name
This has to be unique and the field accepts up to 35 characters. Payee nick name can be used to search for Payee’s during payment workflow or payee maintenance.
Default Payment Type
Default payment type field is an optional field in payee creation journey.
Payee Name
Name of the Payee in English. 35 characters maximum.

Account Number
To capture Payee’s bank account number. There is an optional IBAN Validation option available to validate the structure of the beneficiary account number as per “International Bank Account Number” standards that is followed for payments made to several countries, mostly in the EU.

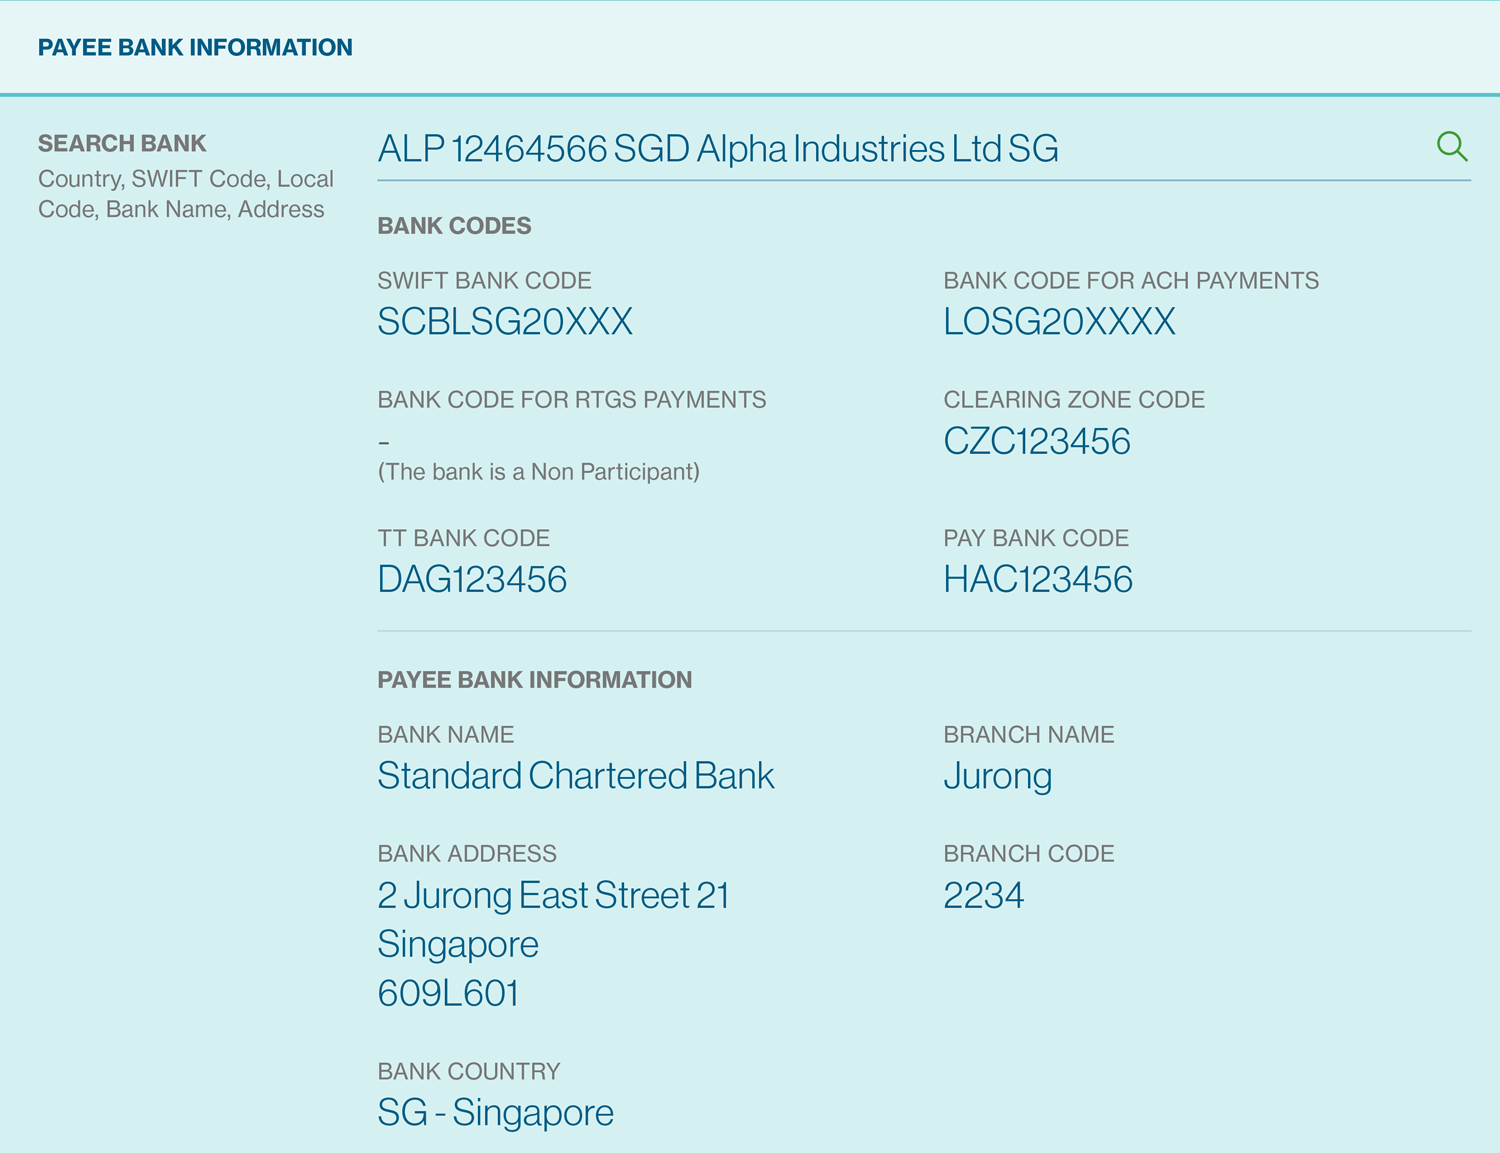
Bank Information
Payee’s bank information such as Bank Name, Bank Address, Bank Code, Branch Code, etc. Depending upon the Payment type that is used, some of the fields will be mandatory. Choose the country from the drop down list, and use the search tool to identify the bank’s name. Intermediary bank information is also available for cross border telegraphic transfers.
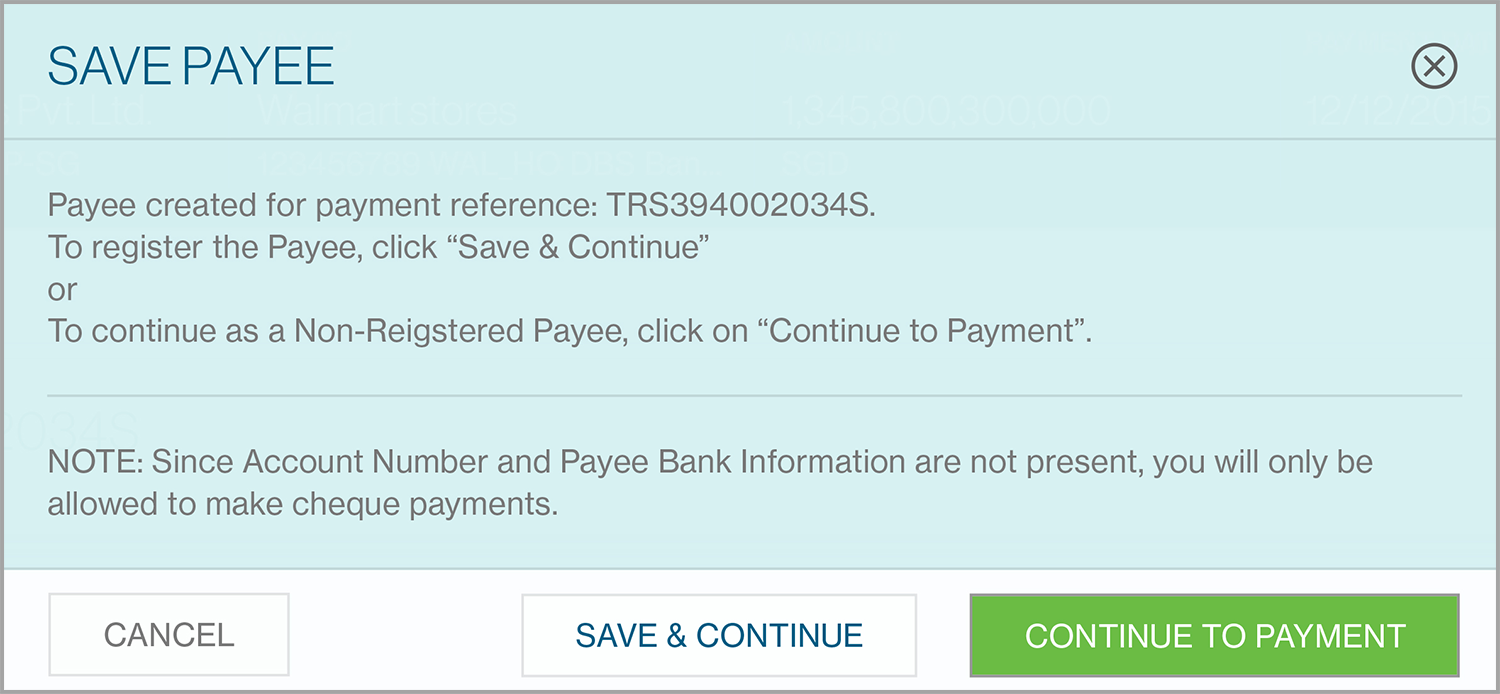
Upon clicking “Continue” button will provide an additional screen that allows you to Register the Payee now or to Continue to Payment with a Non-Registered Payee.
Manage Payee
The Manage Payee Screen will be available from the Menu > Manage > Payee.

Column Headers
This page displays the payments as a table with the following headers:
- Payee Nick Name
- Payee Name
- Account Number
- Payee Country
- Payee Bank Name
- Status

Sort and Filter Function
You can click each of the headers predefined as sortable to sort the table data in ascending order. Clicking one more time on the sortable headers will sort the table values in descending order.
Filter button - When click on this button, the system shows a filter with the filter criteria including Amount, Payment Date, Status, etc. On Check of the checkbox next to any of the values as per below, system updates the Payment List Display to display only results containing the values matching the checked filter.
Priority Sort - On Click, the system expands the sort options which are configurable at system level. Each sort category will have a 2 way switch - Ascending / Descending indicator for you to select. By default the categories will be listed in the order of header display.
This settings are not saved and it will revert to the default state if you relaunch the application
Payee Action Menu
This button provides you various services and functions pertaining to Payee
The list of actions shown in the action menu depends on the status of the payee and the user entitlements to perform various actions.
The following are some key actions that apply to a payment under Manage Payments:
- Mark / Unmark Favourite
- Alert Approver
- Edit
- Delete
- Export
- Repair
- Initiate Payment
Approve Payee
By default, payees / beneficiaries need to be approved before they can be used. This will provide increased control when doing payments on Straight2Bank.
Creation of payees on Straight2Bank is based on your user entitlement. Refer to the “Create Payee” & “ Create One-Time Payee” section for instructions on how to create a payee on Straight2Bank.
Entry Points
In fact, there are several ways that let you approve payees on Straight2Bank:
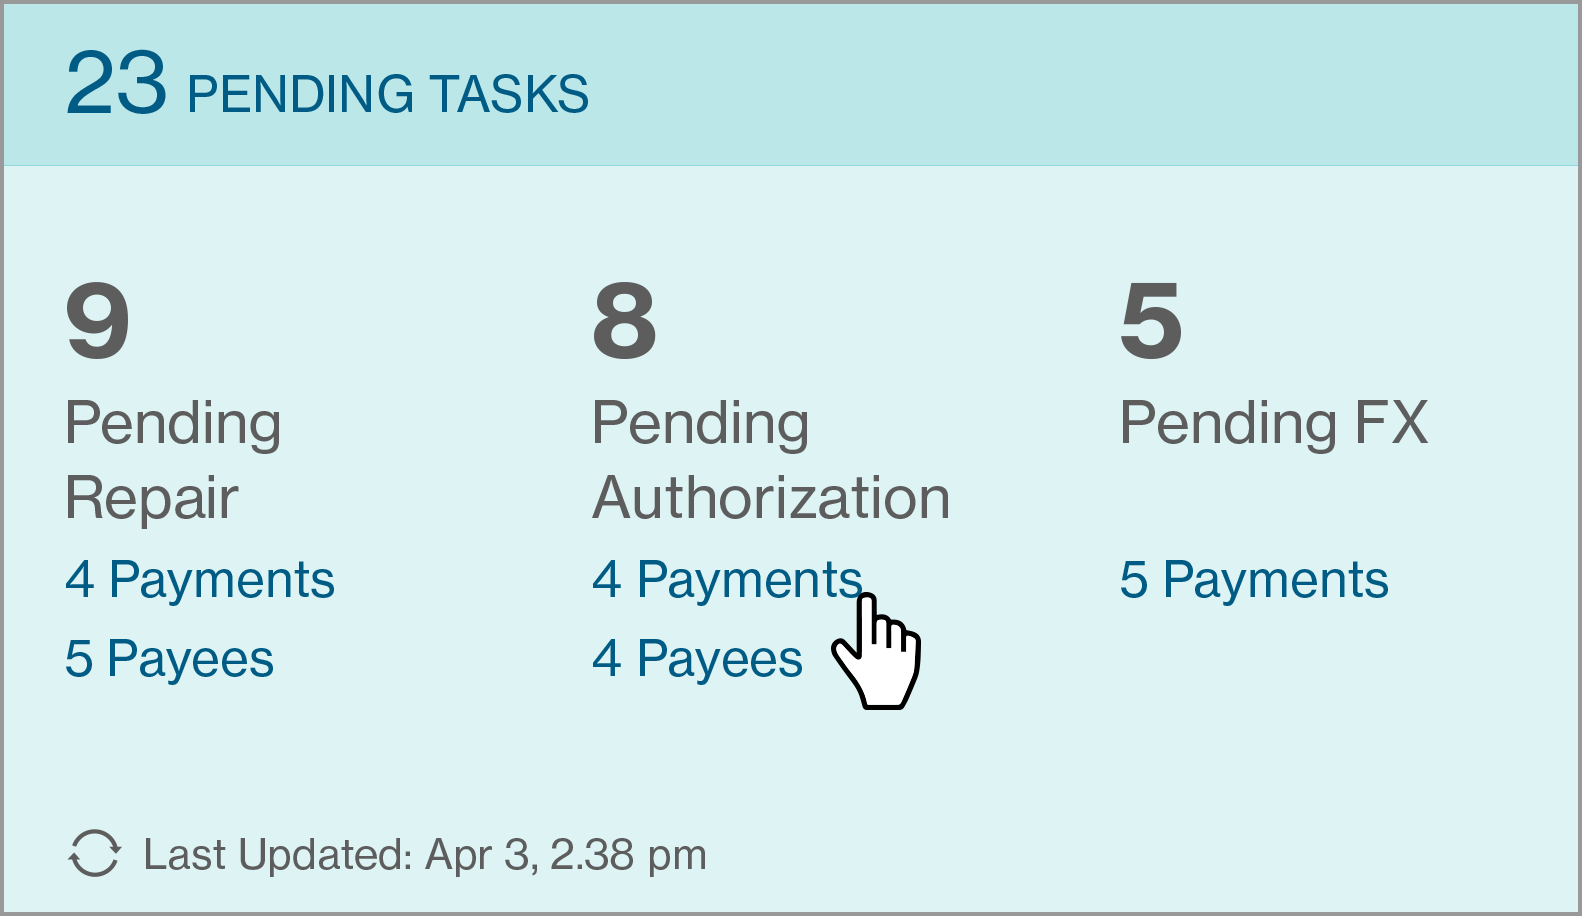
Main page - Dashboard
Payees that are pending approval will be available on Individual Task Card and Pending Task Card on main page.
Approve Payee List Screen - Action Menu
Payees that are pending approval will be available on the Approve Payees List Screen - from the Menu > Approve > Payee. you can approve selected payee by clicking Payee Action Menu.

Payee Detail Display
The Approve Payee List Screen will list all the existing payees available. This screen has various data fields that may be customised optionally by clicking on Filter or Sort button.
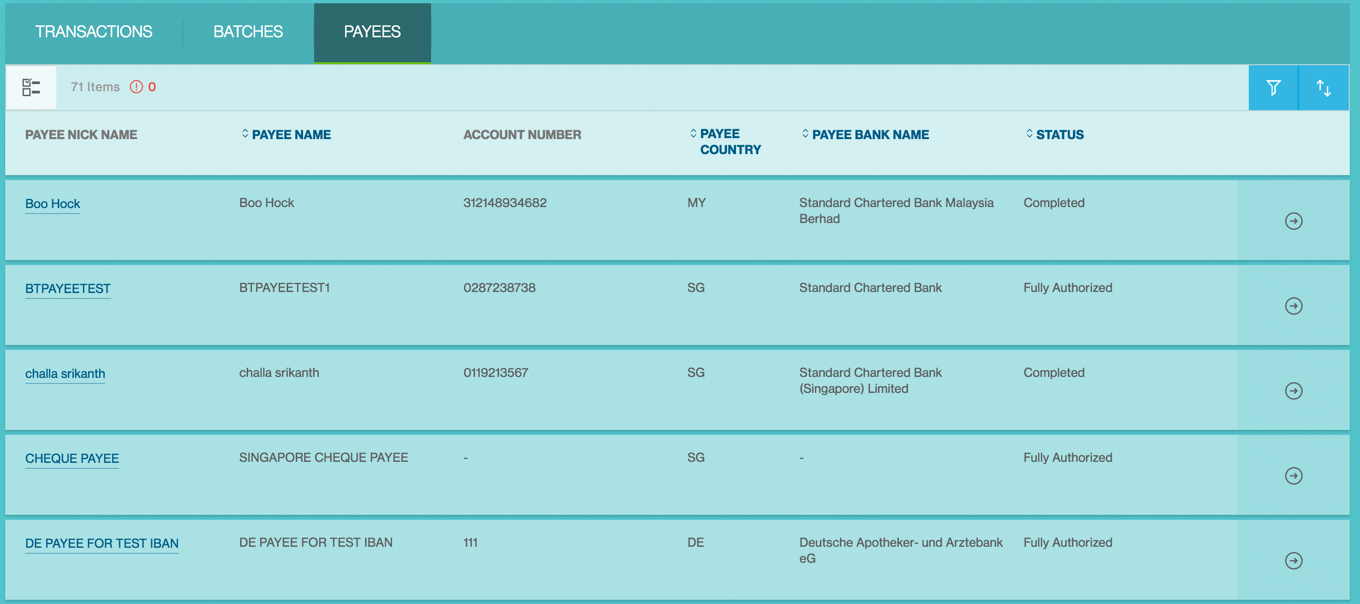
Clicking on Payee Nick Name, new page will provide summary of the payee that have been submitted pending approval.

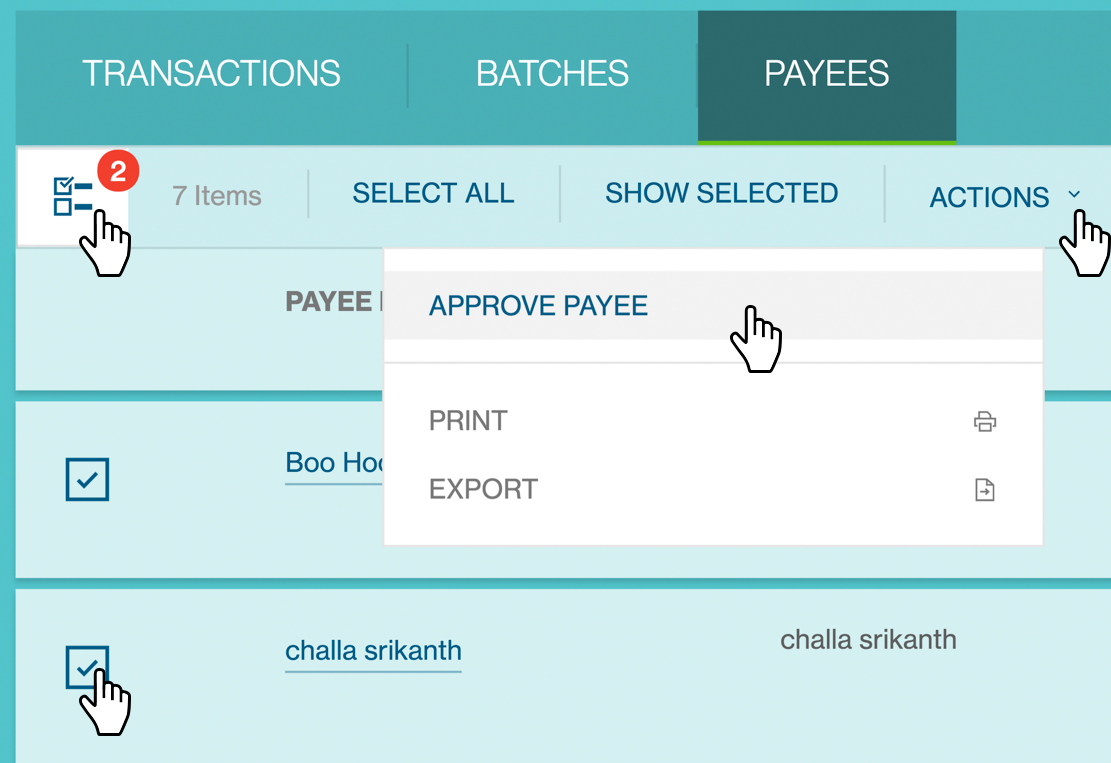
MultiSelect
Click on MultiSelect button and select Payees needs approval (tick check box). Approve Payee option will be available from Action menu.
Use a Vasco Token for Approval
For authorisation, your operator(s) will inform you of the batch number (or payee nick name) that requires authorisation with support documents. Alternatively you will receive an e-mail alert to log into Straight2Bank for authorisation.
Once you have clicked the “Approve Payee” button in Action Menu / Dashboard Task card, the “Submit Approval” screen will be shown:
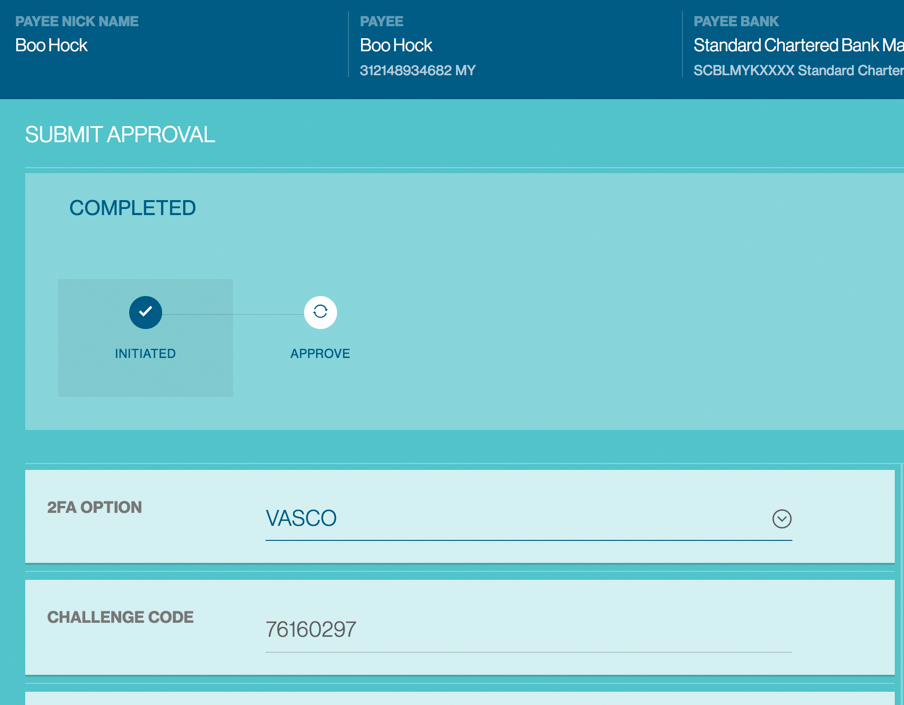
Your Vasco token is required at this point. Approvers are able to approve a payee by performing the steps below:
Turn on the Vasco Token and enter PIN
Turn on the Vasco token by pressing the On button.
Proceed to enter your personalised PIN (setup during Token activation) to activate the Token.

Display “APPLI _”
The screen will display “APPLI _” upon successful login.

Enter the number “2”
Enter the number “2” on the token keypad for Transaction Authorisation - “APPLI 2”.

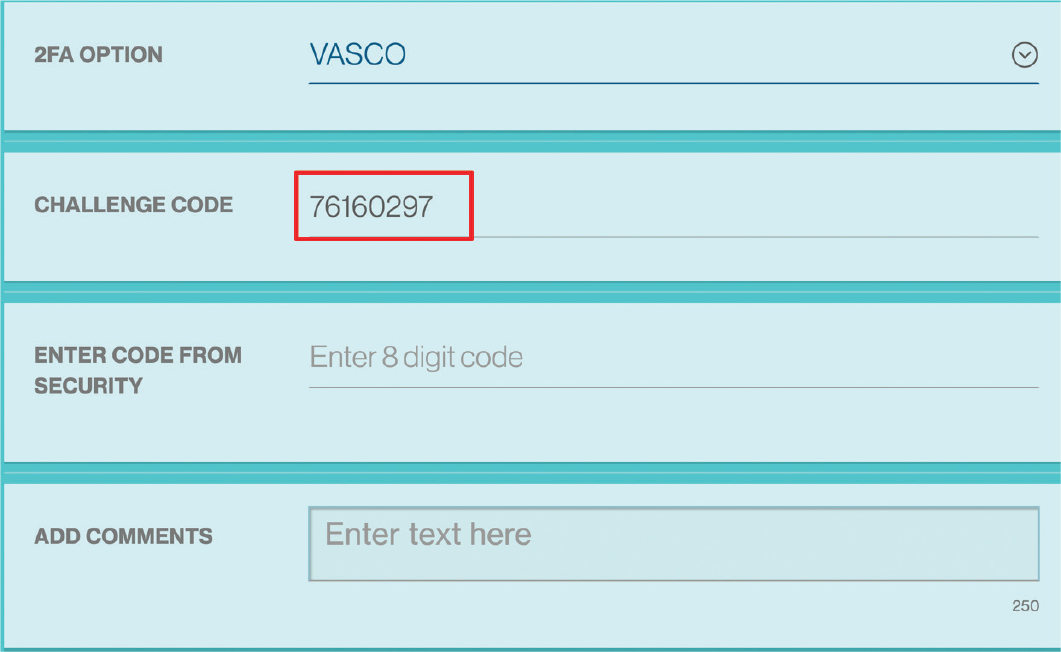
Input the “Challenge Code”
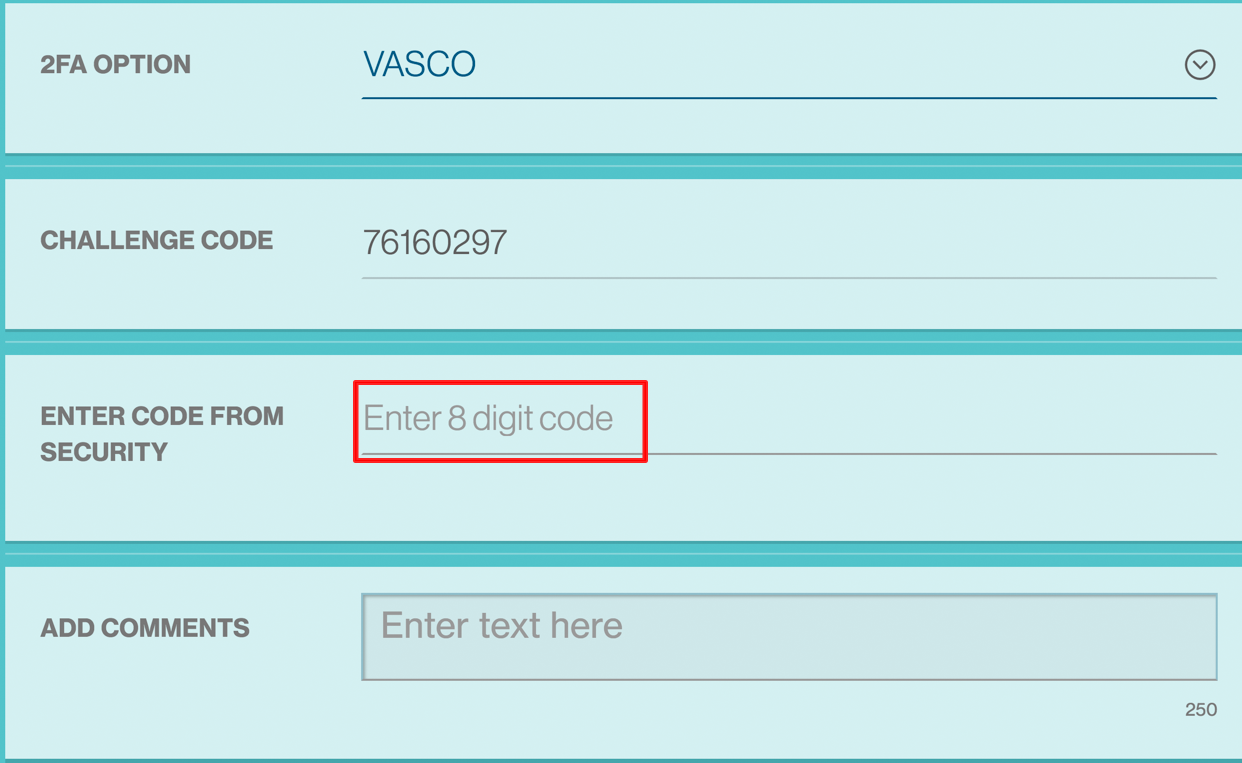
You will be prompted to key in a set of numbers on the Token. Input the “Challenge Code” response from the Straight2Bank into the Token shown as below.
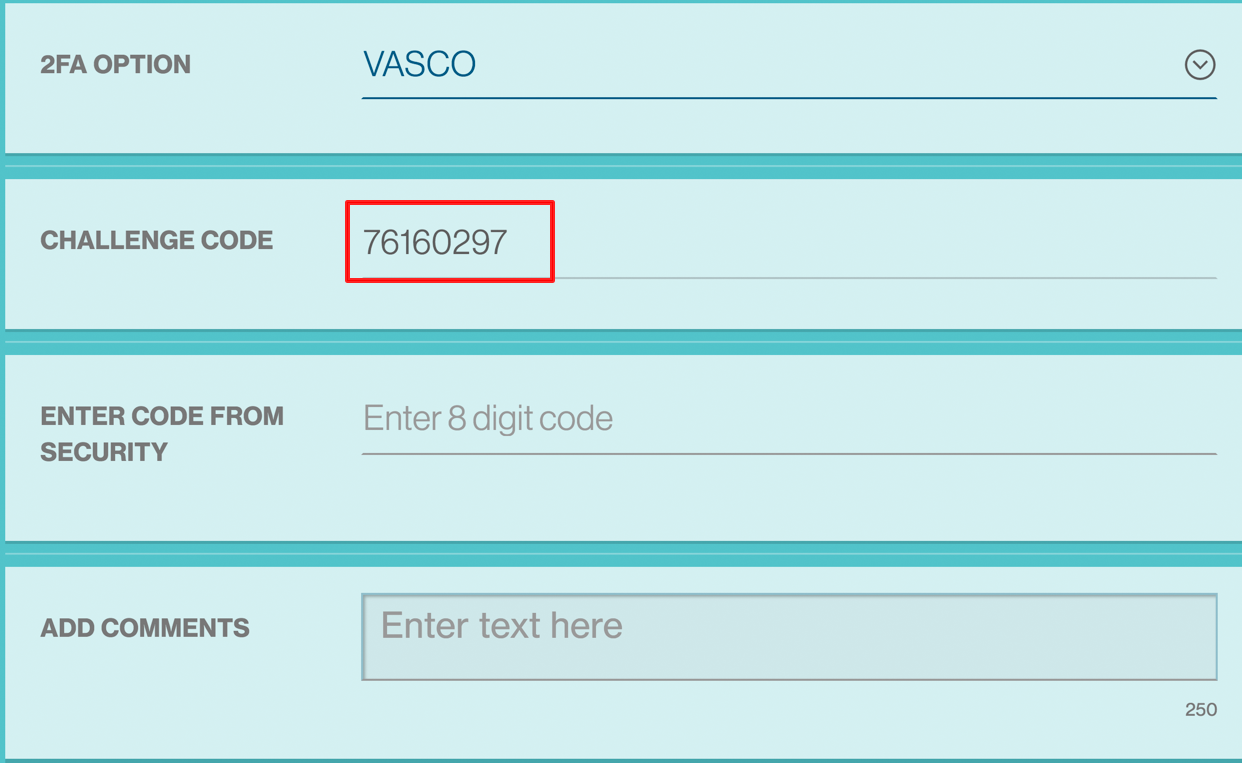

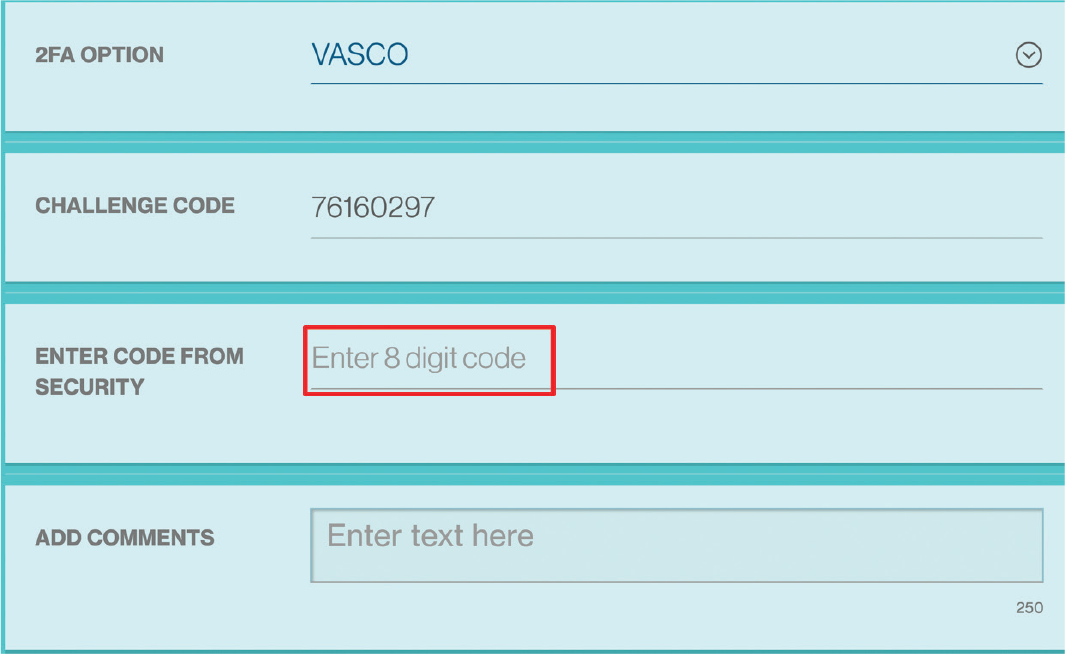
Enter the “Response Code”
The Token will generate and display a new set of numbers as the “Response Code”. Enter this set of numbers in the “Enter Code From Security” field on Straight2Bank screen and click Approve.

You will be prompted with a confirmation notice and see the status updated on the “Manage Payee” list.
You can now utilise the payee account to make payments.
Send for Repair
Instead of rejecting a transction creation instruction, the reviewer / approver will have the option to insert comments against the field that required.
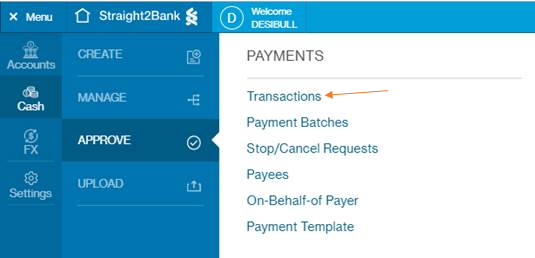
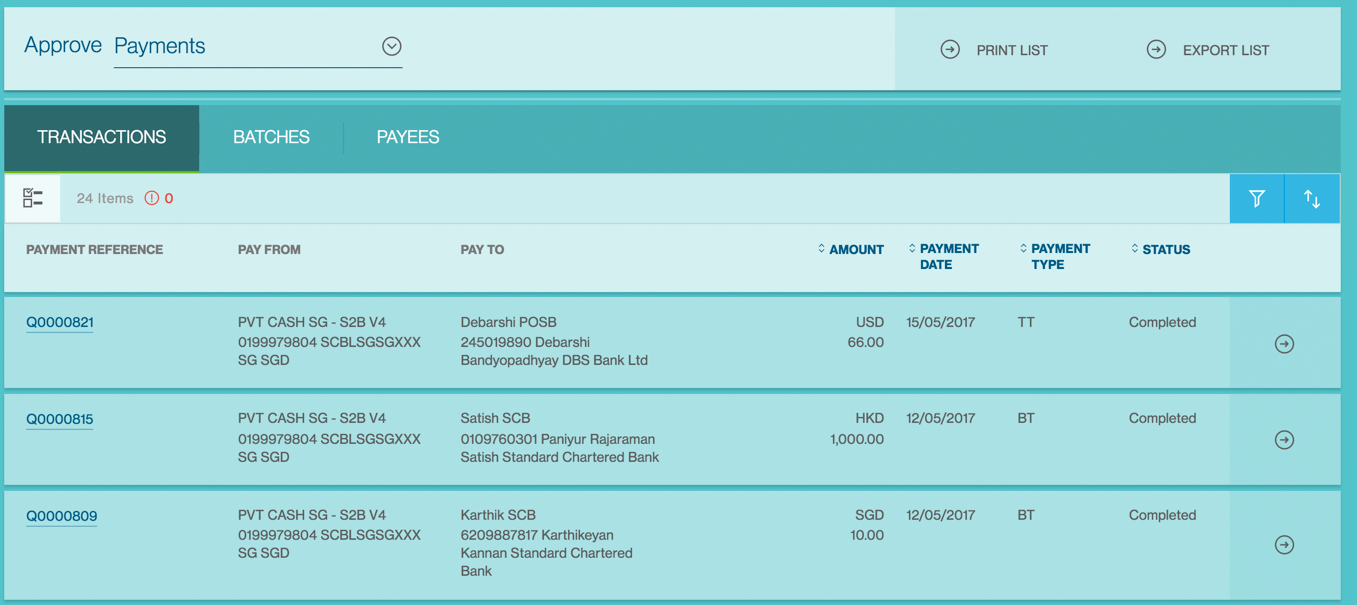
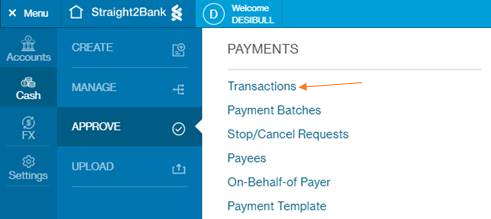
Payments that are pending approval will be available from the Menu > Approve > Payment.
The Approve Payments List Screen will list all the existing transactions that are in “Completed” Status (meaning that payment has been created and submitted for further actions such as Authorisation or Batching). This screen has various data fields that may be customised optionally by clicking on Filter or Sort button.

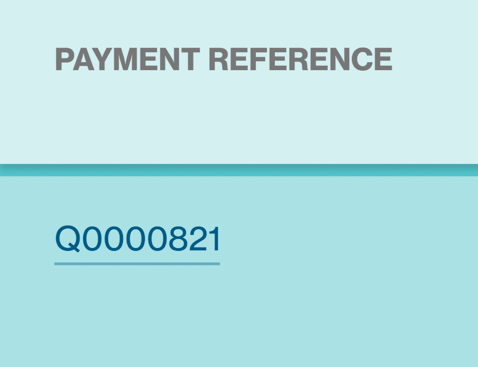
Clicking on Payment Reference Number, new page will provide summary of the payments that have been submitted pending approval.
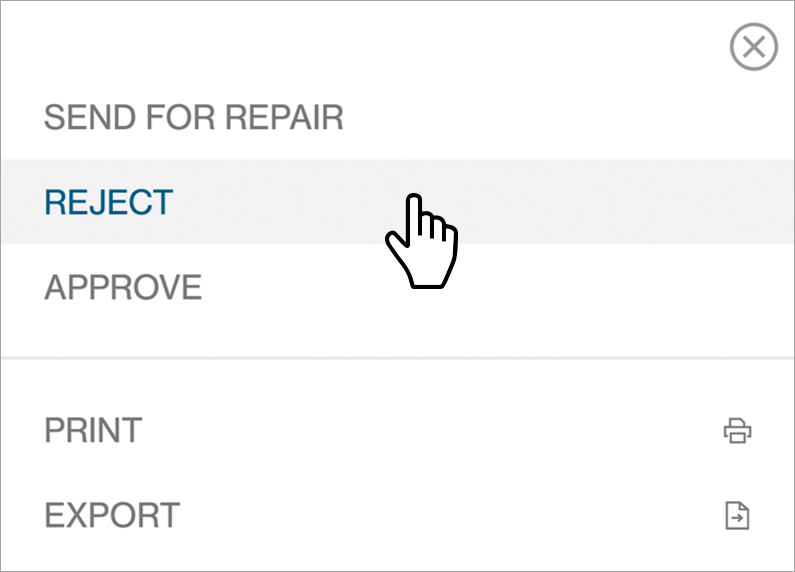
Click on action menu button of selected payments.
Send for Repair option will be available from the menu.
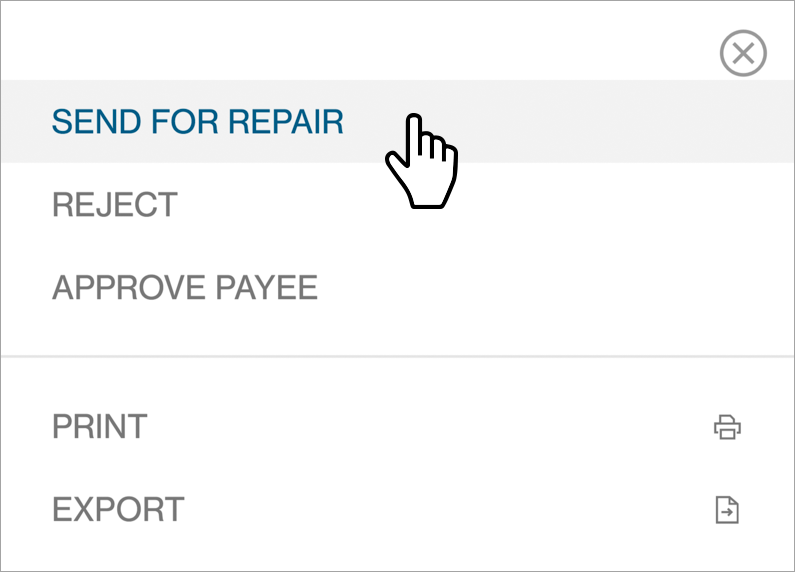
Addtional comments for repair must be provided and this will be available to the Initiator or any other user who has access to view the payment for further action.
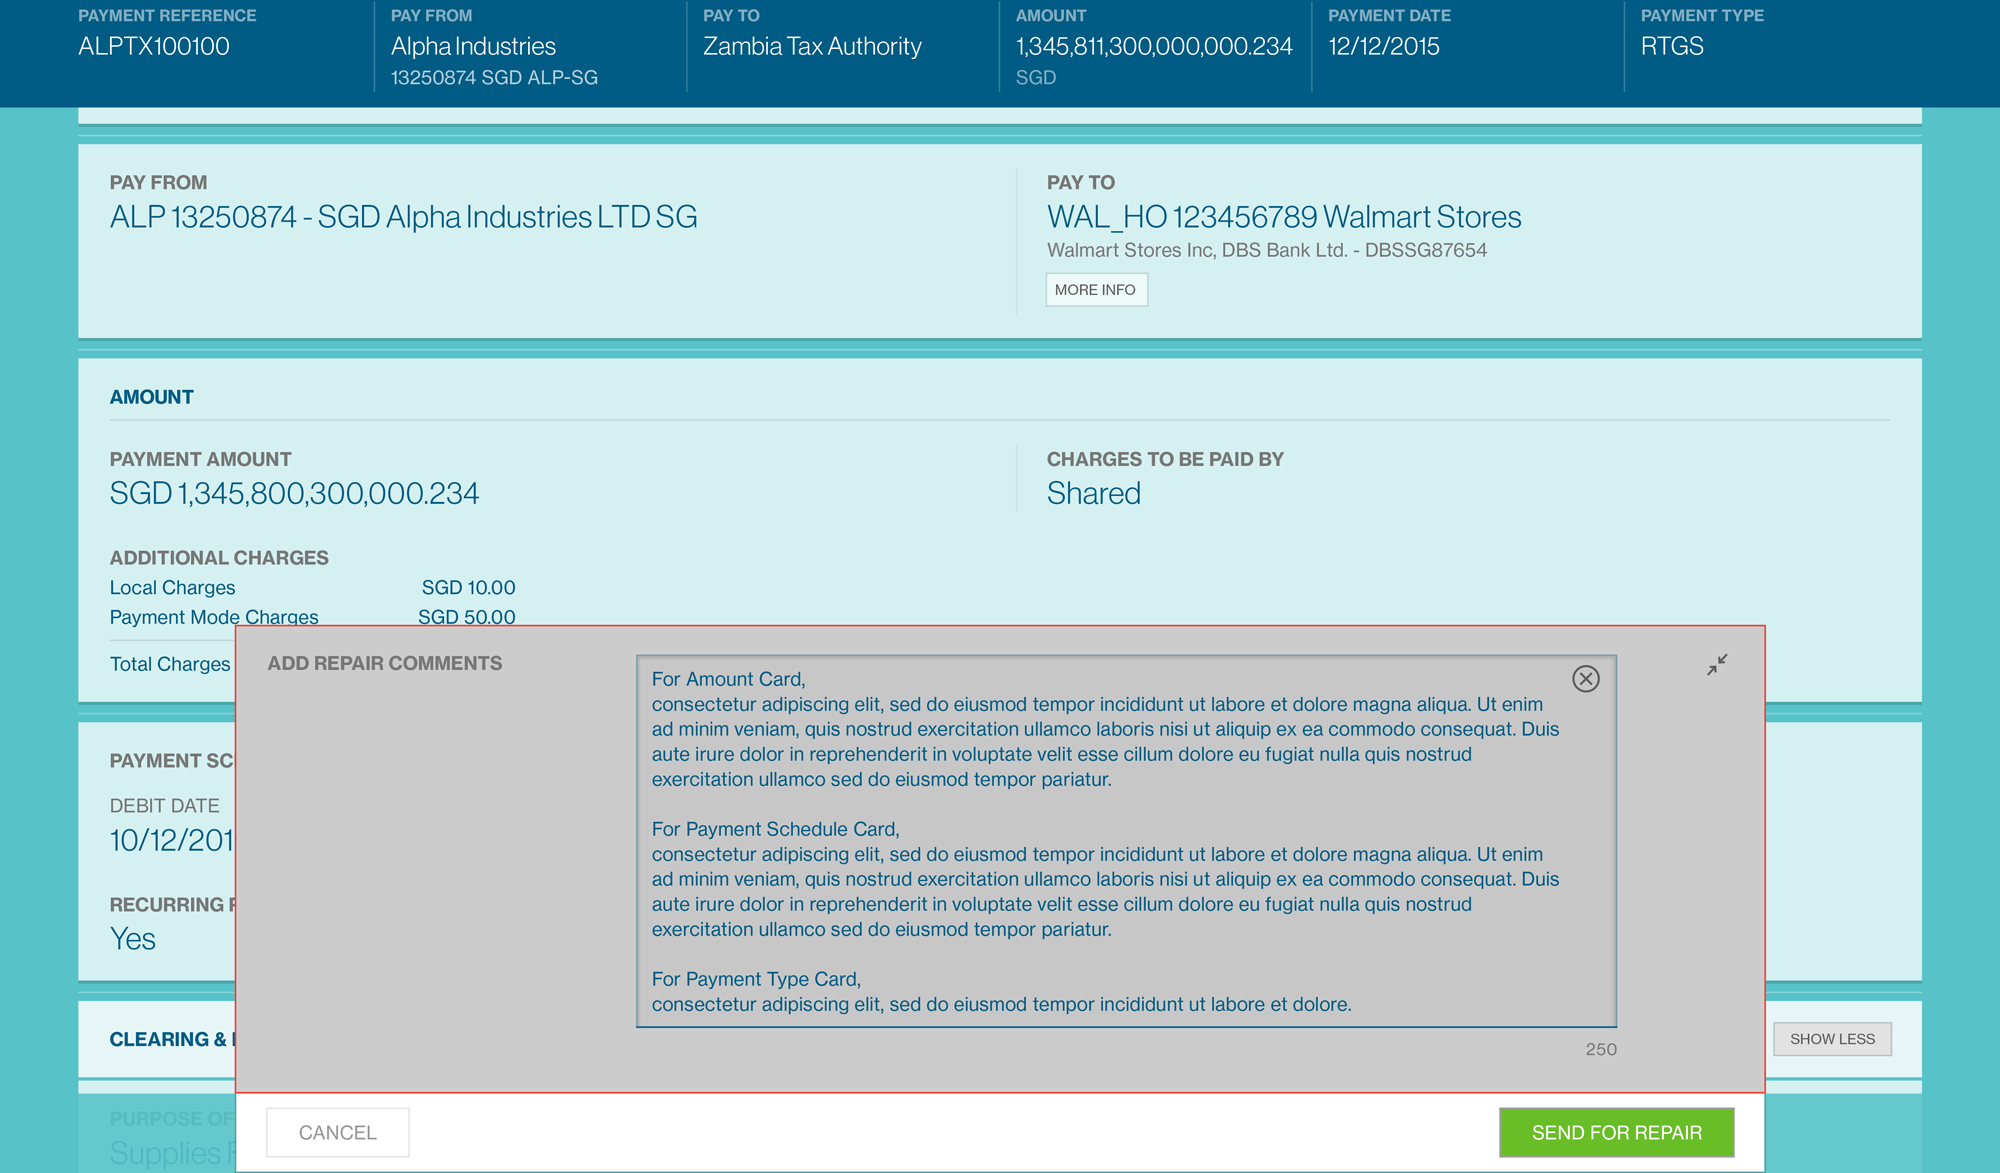
The status of the transaction will change to “Pending Repair” on the Manage Payments List screen.
Reject Payments
With an “Approver” profile, you will also be able to reject payments on Straight2Bank. By doing this, selected payment instruction will be rejected from any further authorisation related function (i.e.) approval or rejection by others, and the status of the payment instruction will appear as “Rejected by Approver”.
Payments that are pending approval will be available from the Menu > Approve > Payment.

The Approve Payments List Screen will list all the existing transactions that are in “Completed” Status (meaning that payment has been created and submitted for further actions such as Authorisation or Batching). This screen has various data fields that may be customised optionally by clicking on Filter or Sort button.

Clicking on Payment Reference Number, new page will provide summary of the payments that have been submitted pending approval.

Click on action menu button of selected payments.
Send for Repair option will be available from the menu.
Addtional Reject Comments must be provided and this will be available to the Initiator or any other user who has access to view the payment for further action such as edit and re-submit or delete the payment.
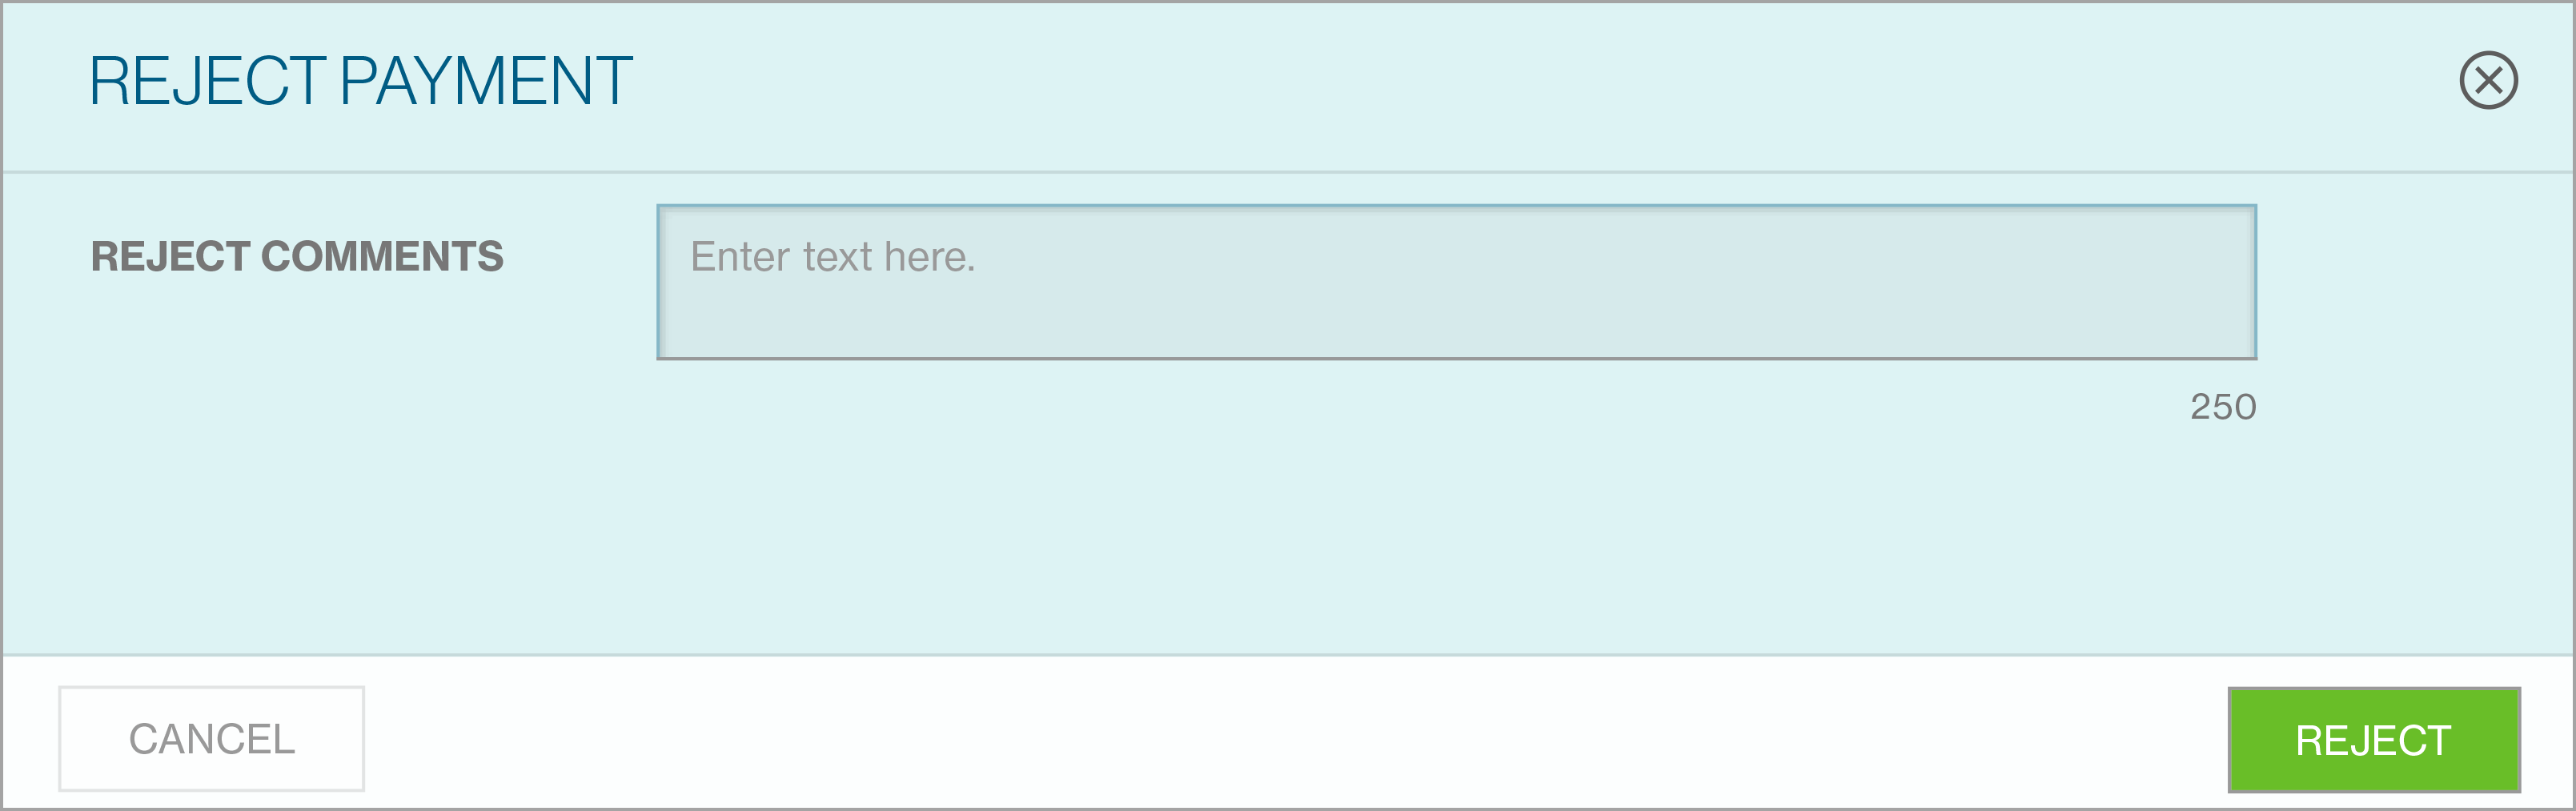
The status of the transaction will change to “Rejected by Approver” on the Manage Payments List screen.
Approve and Release Payments
Up to 8 levels of authorisation can be setup for payments on Straight2Bank (e.g.) A, A+B, A+B+C, etc. Individual payments as well as payment batches are supported for authorisation.
Creation of payments on Straight2Bank is based on your user entitlement. Refer to the “ Create Payments” section for instructions on how to create payments on Straight2Bank
Entry Points
In fact, there are several ways that let you approve payments on Straight2Bank:
Main page - Dashboard
Payments that are pending approval will be available on Individual Task Card and Pending Task Card on main page.

Approve Payment List Screen - Action Menu2
Payments that are pending approval will be available on the Approve Payments List Screen - from the Menu > Approve > Payment.

You can approve selected payment by clicking Action Menu.
Payment Detail Display
The Approve Payments List Screen will list all the existing transactions that are in “Completed” Status (meaning that payment has been created and submitted for further actions such as Authorisation or Batching). This screen has various data fields that may be customised optionally by clicking on Filter or Sort button.
Clicking on Payment Reference Number, new page will provide summary of the payments that have been submitted pending approval.

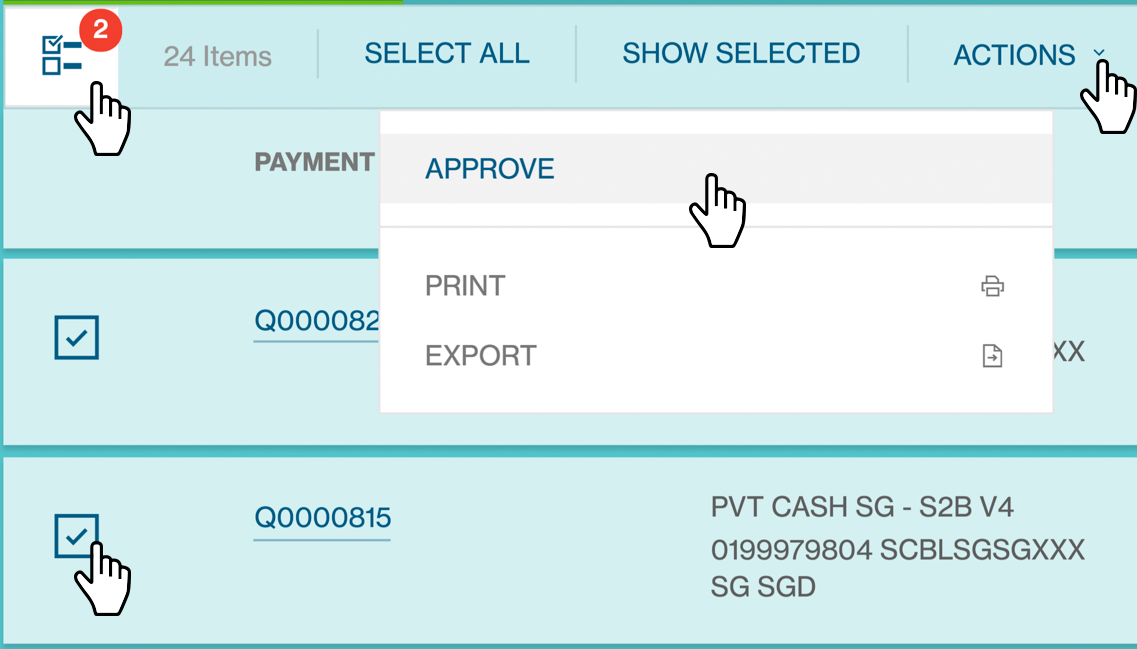
MultiSelect
Click on MultiSelect button and select Payments needs approval (tick check box).
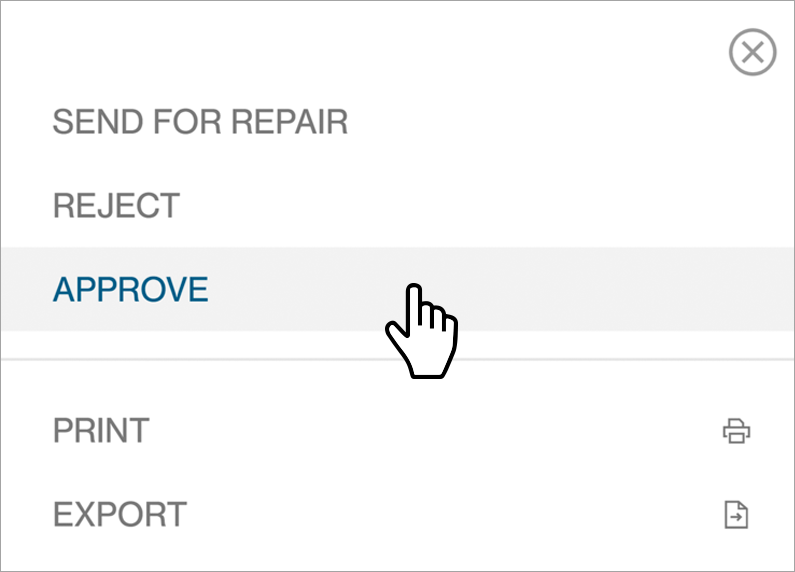
Approve option will be available from Actions menu.
Use a Vasco Token for Approval
For authorisation, your operator(s) will inform you of the payment details or reference number that requires authorisation with support documents. Alternatively you will receive an e-mail alert to log into Straight2Bank for authorisation.
Once you have clicked the “Approve” button in Action Menu / Dashboard Task card, the “Submit Approval” screen will be shown:

Your Vasco token is required at this point. Approvers are able to approve a payee by performing the steps below:
Turn on the Vasco Token and enter PIN
Turn on the Vasco token by pressing the On button.
Proceed to enter your personalised PIN (setup during Token activation) to activate the Token.

Display “APPLI _”
The screen will display “APPLI _” upon successful login.
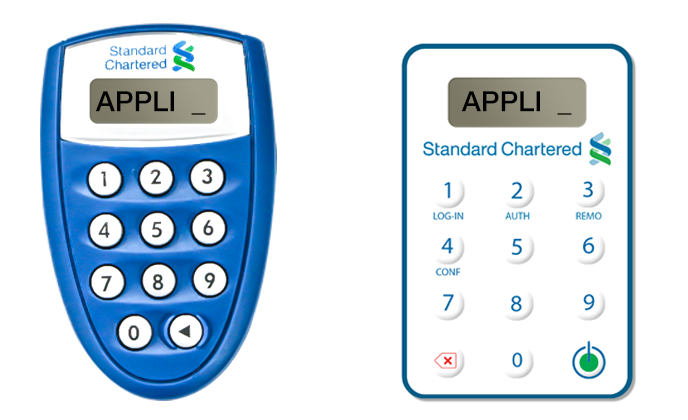
Enter the number “2”
Enter the number “2” on the token keypad for Transaction Authorisation - “APPLI 2”.

Input the “Challenge Code”
You will be prompted to key in a set of numbers on the Token. Input the “Challenge Code” response from the Straight2Bank into the Token shown as below.

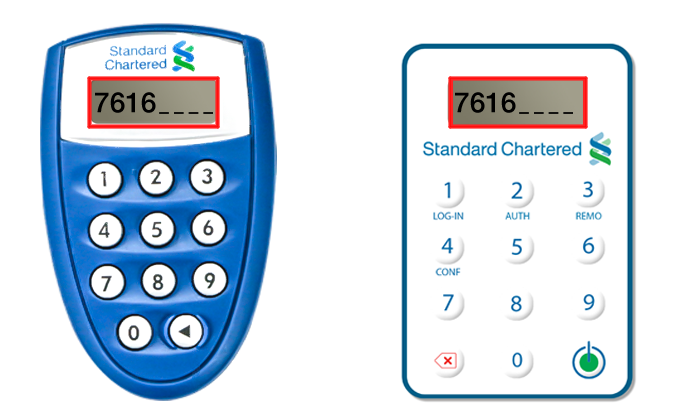
Enter the “Response Code”
The Token will generate and display a new set of numbers as the “Response Code”. Enter this set of numbers in the “Enter Code From Security” field on Straight2Bank screen and click Approve.
Send to Bank
The “Send To Bank” feature on Straight2Bank allows you to select one or more payment instructions to be released to the Bank for further processing.
Payments that are pending Send to Bank will be available on Individual Task Card, Pending Task Card on main page and Manage Payments List Screen.
Navigation
Go to Menu > Cash > Approve > Remote Authorize Transactions or Payment Batches
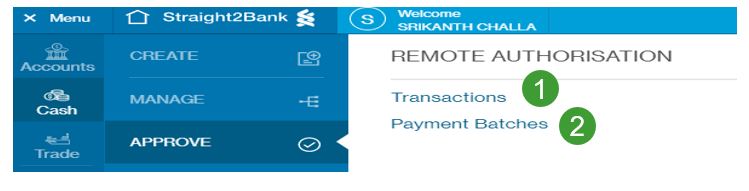
Users with Remote Authorization access can select either single or multiple transactions
Users with Remote Authorization access can select single or multiple payment batches
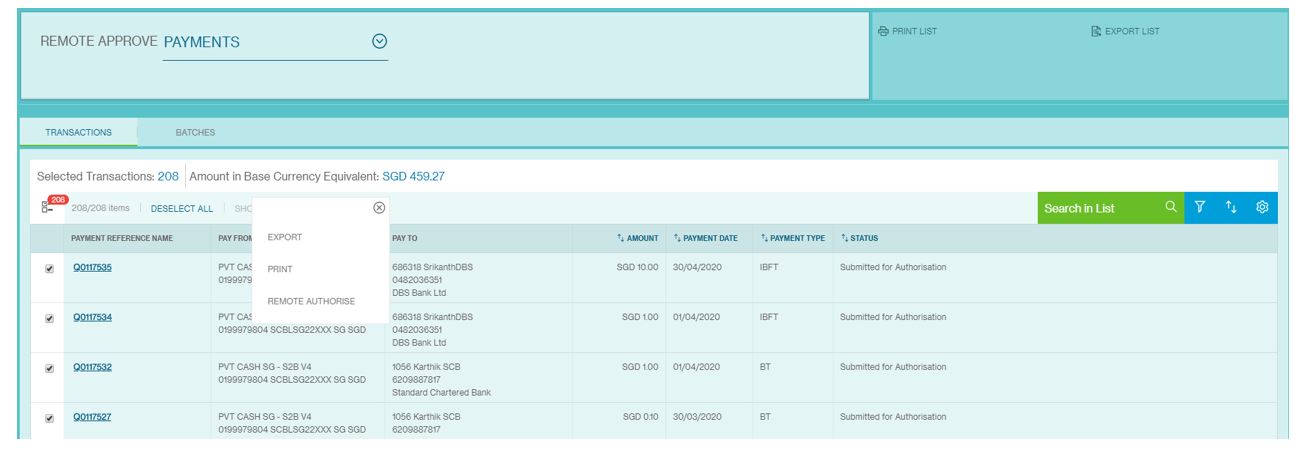
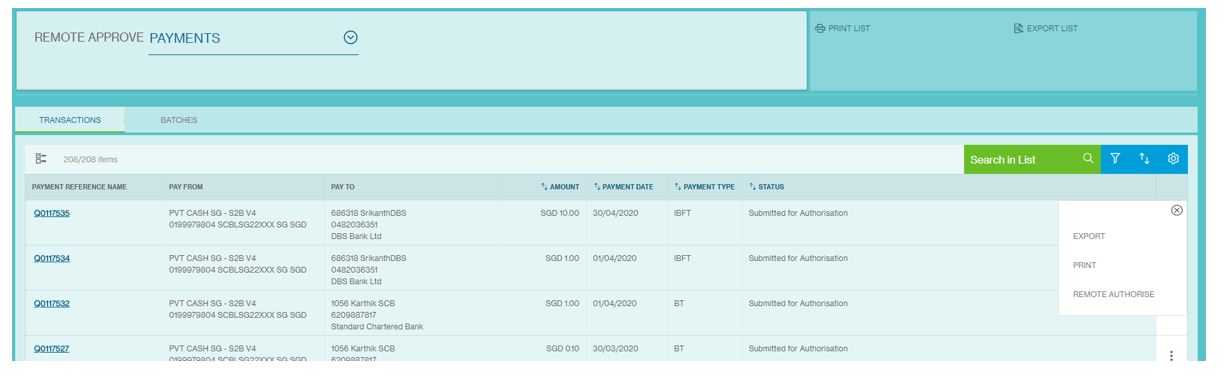
Approval Flow
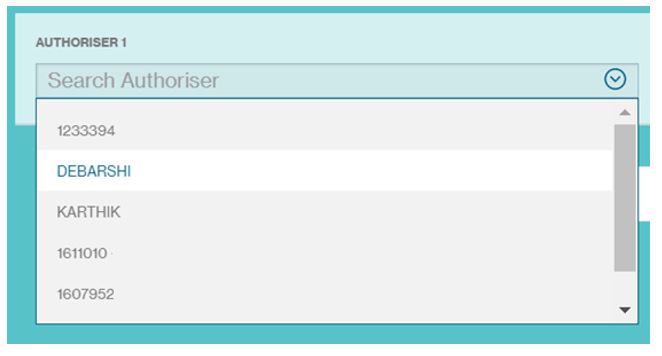
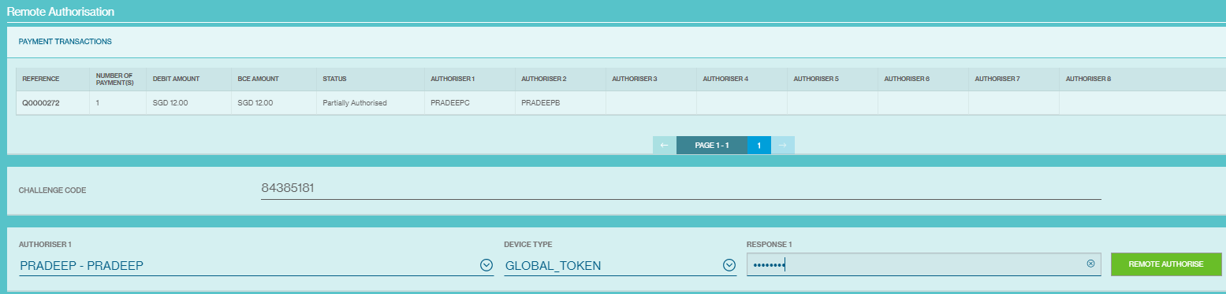
Once Transaction(s) or Payment Batch(s) is selected for authorization, users can select the authorizers based on the authorization matrix
Remote Approval Flow for Transactions
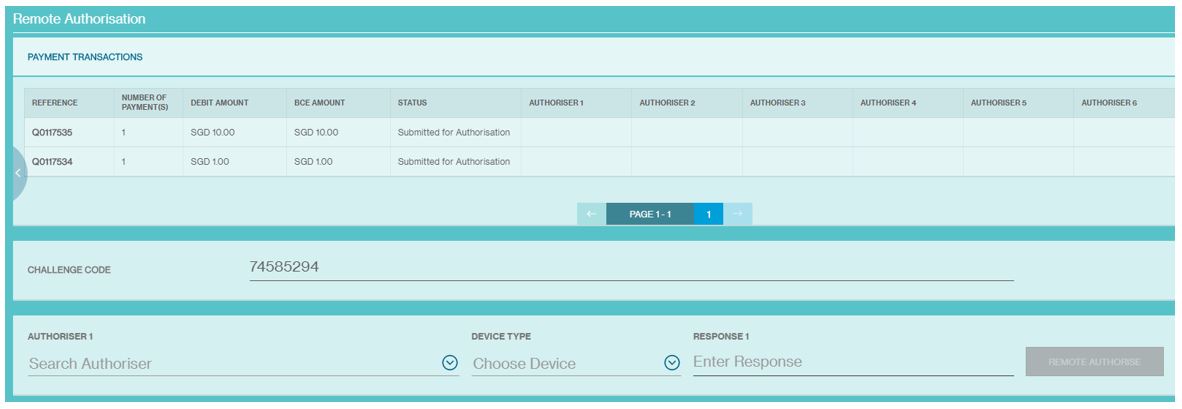
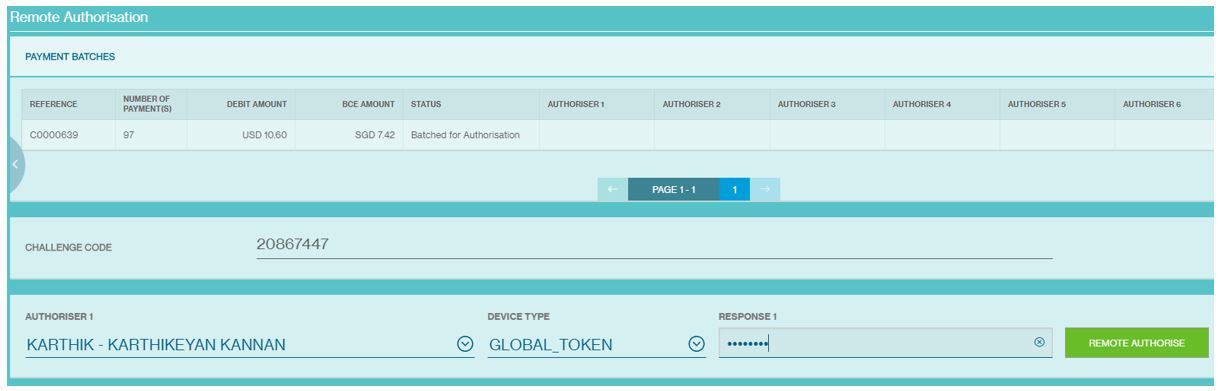
Remote Approval Flow for Batches
All eligible authorizers based on authorization limits will be shown in the dropdown list
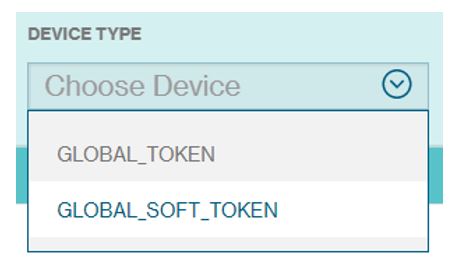
Select the VASCO device to be used for authorization. Global Token refers to the physical token and Global Soft Token refers to Mobile Token.
Once the authorizer details and response are provided, users need to click remote authorize.

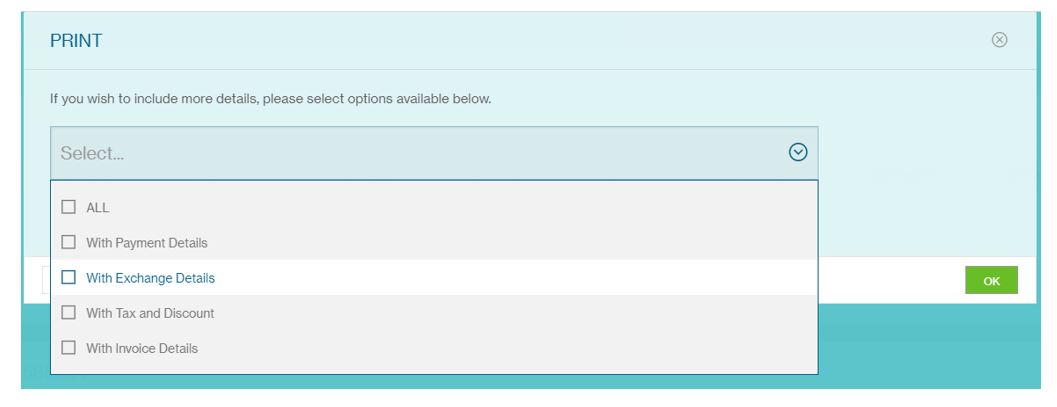
To print the authorization confirmation for audit purposes, click print and select the type of information to be provided with the authorization confirmation.
Example to show how Remote Authorisation works with sign type combination
Scenario: Authorisation Matrix – A+B+C – Unlimited
- Assume the system internally identifies the following sign type combination based on the matrix number and highest Total BCE Amount
- Out of this above three combinations, the system will choose the largest combination ie the “combination five - A+B+C” and display three rows as shown below
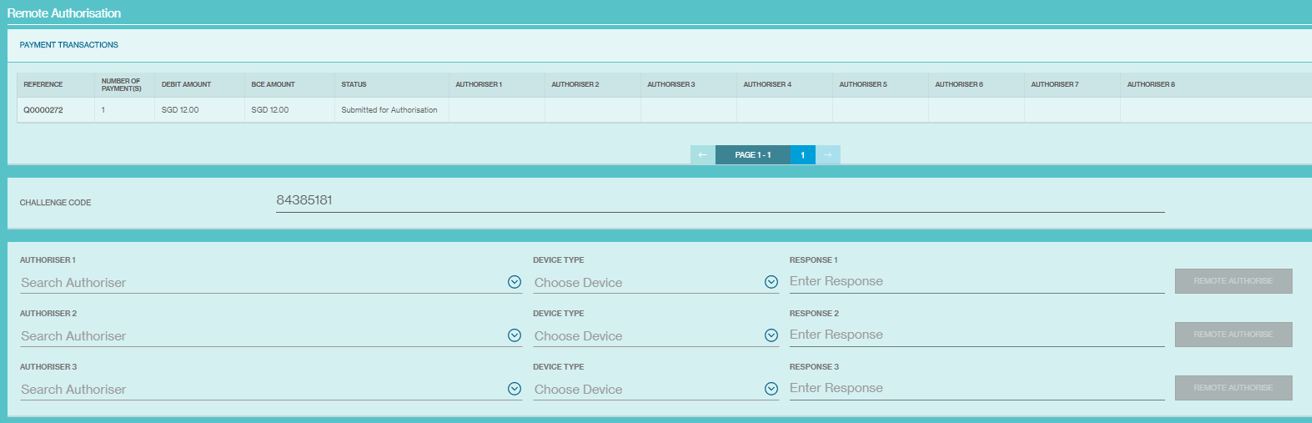
Step 1: Once the transaction/batch is selected for remote authorisation, three rows will be made available to populate the authorizers’ details.
Step 2: Select the Sign Class C – authorizer, provide the all the details (device type & response from the authorizer) and click Remote Authorize
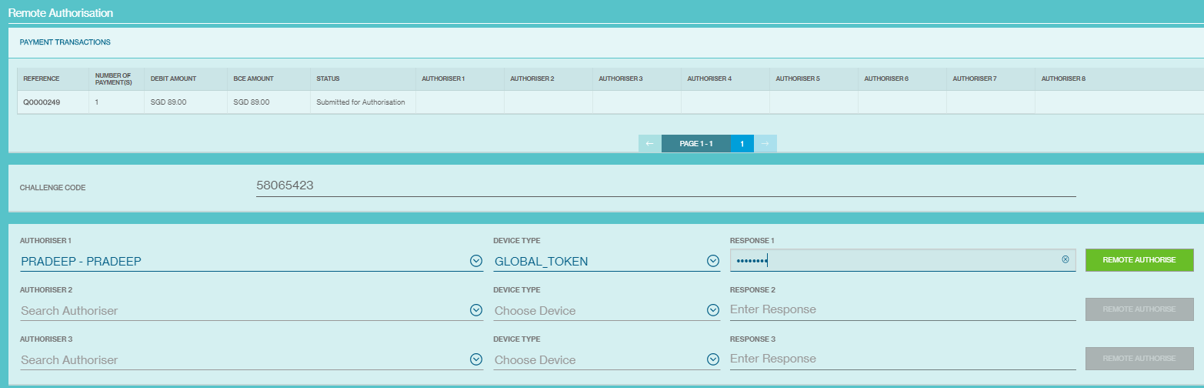
Step 3: Select the Sign Class B – authorizer, provide the all the details (device type & response from the authorizer) and click Remote Authorize
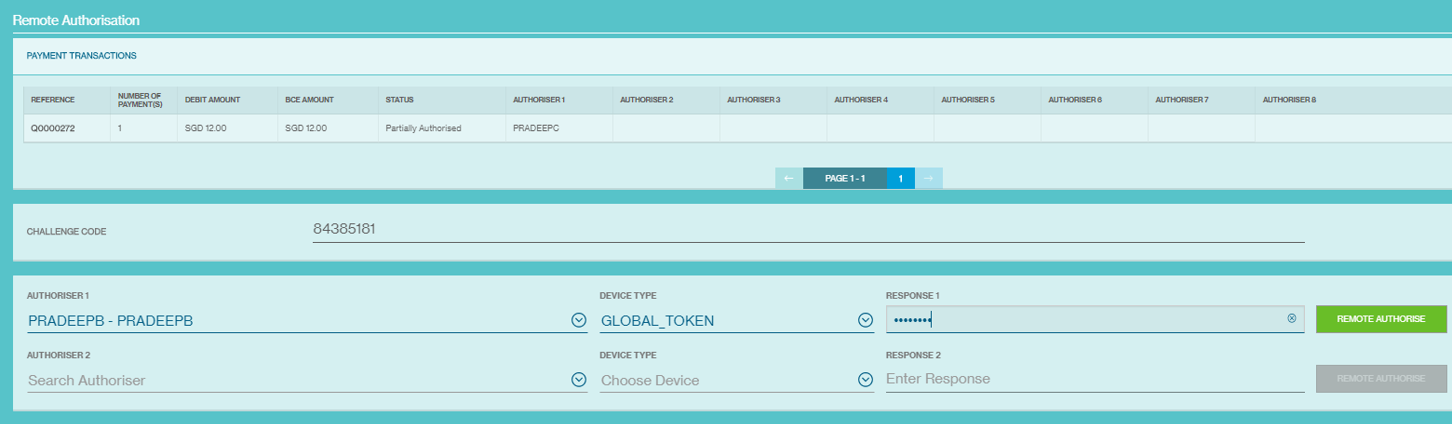
Step 4: Select the Sign Class A – authorizer, provide the all the details (device type & response from the authorizer) and click Remote Authorize
Step 5: All authorizers are selected and remotely approved transaction/batch as shown below. User can click on print to secure for audit purpose.

Overview
Straight2Bank supports cross currency for various payment types such as telegraphic transfer as well as for value added payment services depending on the country of debit and the payment type.

There are different types of FX services offered for making cross currency payments on Straight2Bank.

Request for Quote (RFQ) at Send to Bank
Overview: The feature allows you to book an online FX rate for a single payment instruction or a batch containing multiple payment instructions just before releasing the payments to the Bank for processing. This will allow you to ensure the actual amount of debit or payment even before the payment is processed by the bank.
Availability: This feature is available for payments initiated out of accounts held in Hong Kong, Singapore, India, UAE, Bahrain, Oman, Qatar, Botswana, Kenya, Uganda, Zambia, United Kingdom and United States of America
Control: This feature is available to all clients having accounts in the supported countries. Users with access to do a “Send to Bank” of payments will be able to perform an Online Request for Quote (RFQ) and automatically attach to the payment instructions(s).
Tenor: Only payments of value date Cash (T+0), TOM (T+1) and SPOT (T+2) are supported for this FX Service . Most of the currencies support all 3 tenors, but not all.
Currencies: More than 100+ ( up to 132 in few markets) payment currencies support this service.
Book FX Now - Payment Linked Request for Quote (PLRFQ)
Overview: The feature allows you to book an online FX rate during transaction initiation. This will allow you to ensure the actual amount of debit or payment even before the payment is submitted for authorization.
Availability: This feature is available for payments initiated out of accounts held in Hong Kong, Singapore, India, UAE, Bahrain, Oman, Qatar, Botswana, Kenya, Uganda, Zambia, United Kingdom and United States of America
Control: This feature is available to all clients having accounts in the supported countries. Users with access to do a “Payment Linked RFQ” of payments will be able to perform an Online Request for Quote (RFQ) and automatically attach to the payment instructions(s).
Tenor: Only payments of value date Cash (T+0), TOM (T+1) and SPOT (T+2) are supported for this FX Service . Most of the currencies support all 3 tenors, but not all.
Currencies: More than 100+ ( up to 132 in few markets) payment currencies support this service.
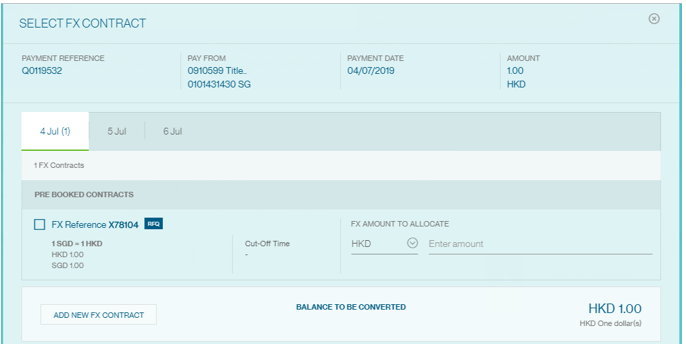
Pre-Booked Rate
Overview: The feature allows you to use a “Pre-booked online FX Rate” or your “Contract Rate” for a single payment instruction during the payment creation workflow itself. This allows you to lock an FX rate even before completing the payment instruction and sending it to the Bank for processing. Multiple payments may be booked against a single FX contract or multiple FX contracts may be used for a single payment. There are reports available on Straight2Bank to provide information on utilisation and other details.
Control: Not available to all clients by default. The feature requires setup at a client level and a user level.
Tenor: Pre Spot (Cash, TOM & SPOT) and Forwards are allowed.
Currencies: Only the locally traded currencies, depending on the location of the Debit account (around 20+) are supported for this FX service.
Assign Later
The status of the transaction will change to “Pending FX” in Manage Payment List.
Request for Quote (RFQ) at Send to Bank
RFQ is an online “Request for Quote” capability that allows you to book an online , real-time FX rate for an individual payment or a batch of payments. This feature will be available to users who have the “Send to Bank” capability and supported is 13 markets globally and may be optionally turned off at user level.
All existing payment types except the below support this feature;
- Corporate Cheque
- Instant Bank Fund Transfer
- Bank to Bank Transfer
- Request for Transfer, and
- Tax Payments
While nearly 130+ currencies are supported by the RFQ capability, restricted currencies such as MYR and CNY (to name a few) are not available for RFQ during Send to Bank.
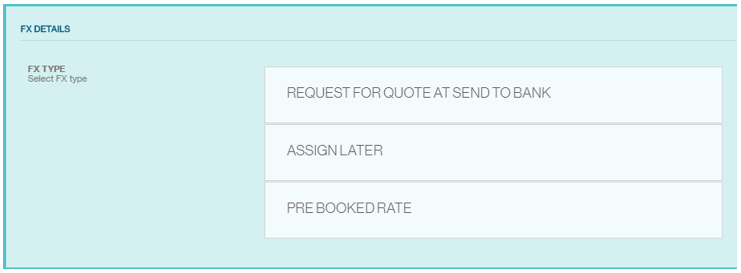
During the payment initiation journey, after entering the fields in the Pay from / Pay to information and Amount / Currency, then proceed to click on “Telegraphic Transfer”. You will see the “FX Details” section and an option to Select FX type.
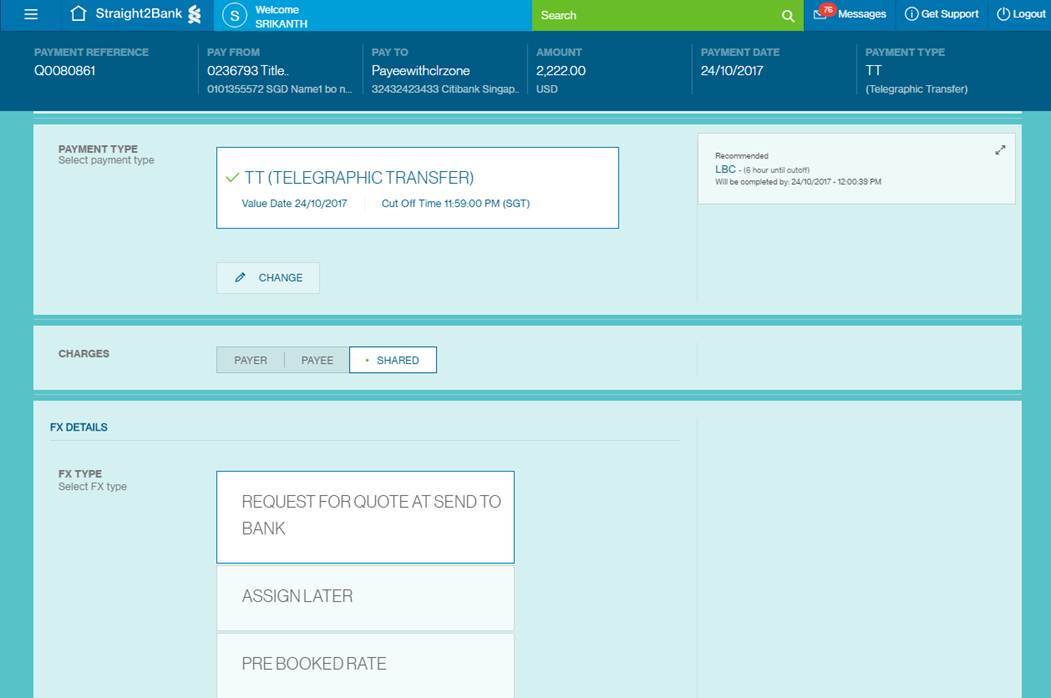
Click on “Request for Quote at Send to Bank”.
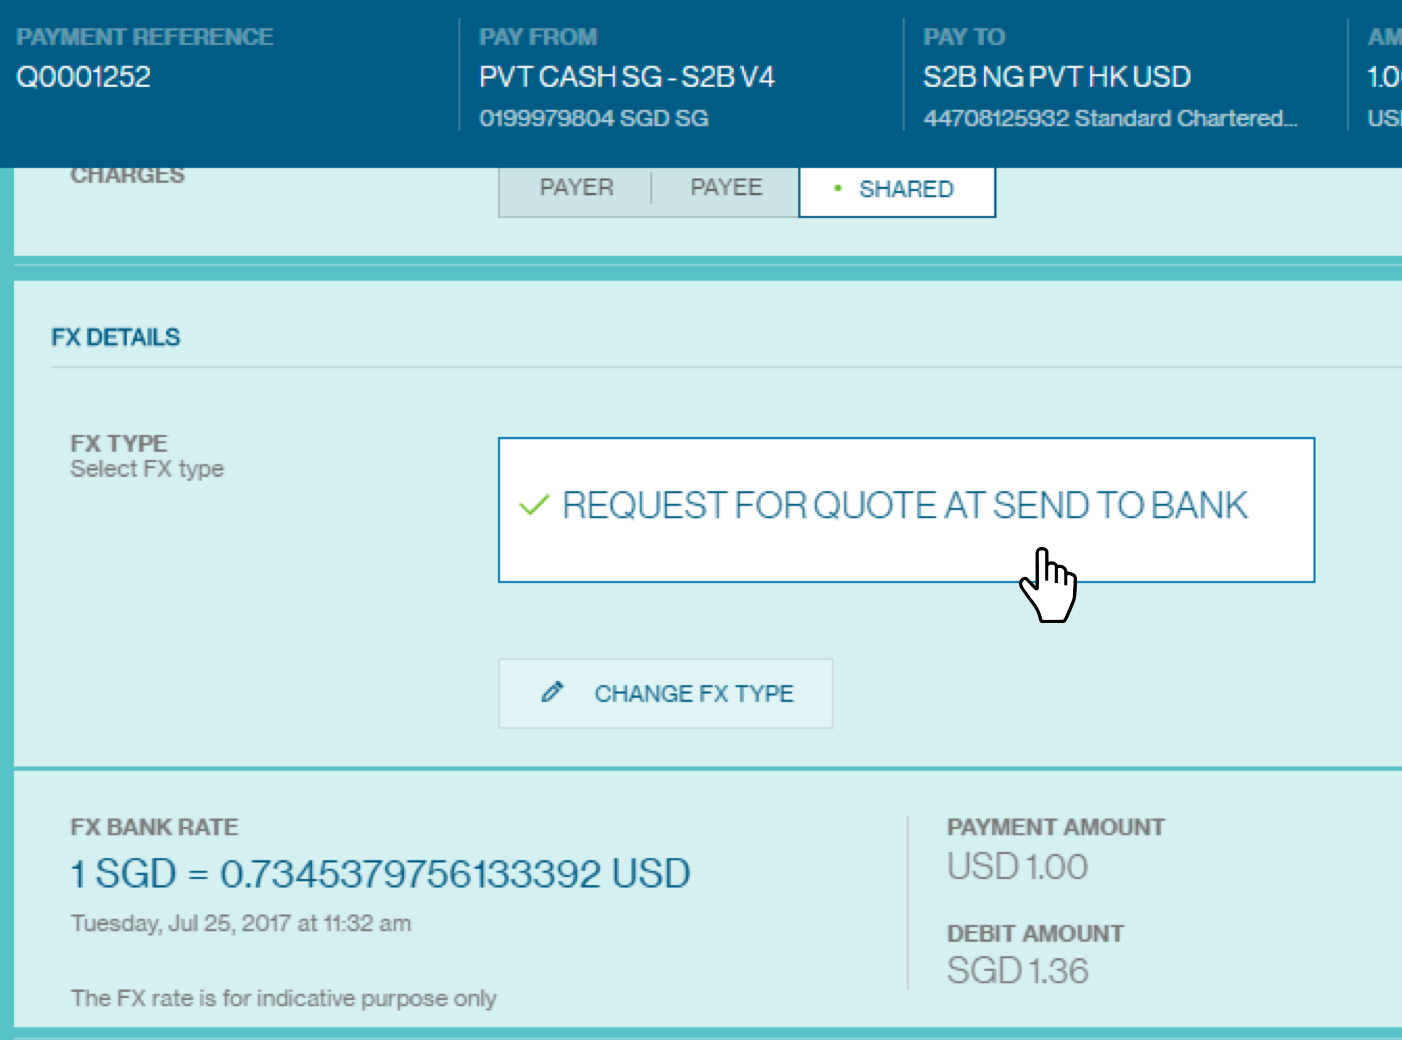
Upon completing providing the payment information, Click On “Submit”.
For authorisation, your will need to inform authoriser of the batch reference number that requires authorisation with Send to Bank RFQ.
Under the Approve menu, choose the "Payment".
The list of all payments that are in “Submitted for Authorisation” status and based on the logged in user’s data entitlements will be lis ted. Approver will be able t o find the transaction for Send to Bank RFQ via the “RFQ” icon found beneath payment reference.
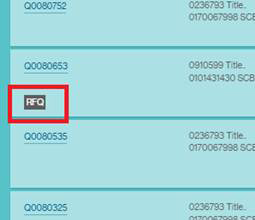
Clicking on Payment Reference, new page will provide summary of the payments that have been submitted pending Send to Bank RFQ / authorisation.
Click on the action menu, choose “Approve and Send to Bank with RFQ”.
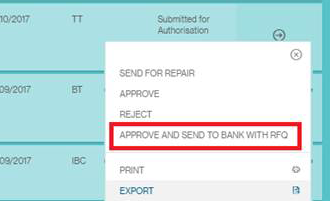
Clicking on the option you will then book a real-time FX when performing “Approve” and “Send to Bank”.
The FX quote will be valid for 20 seconds by when you may accept or reject the rate.
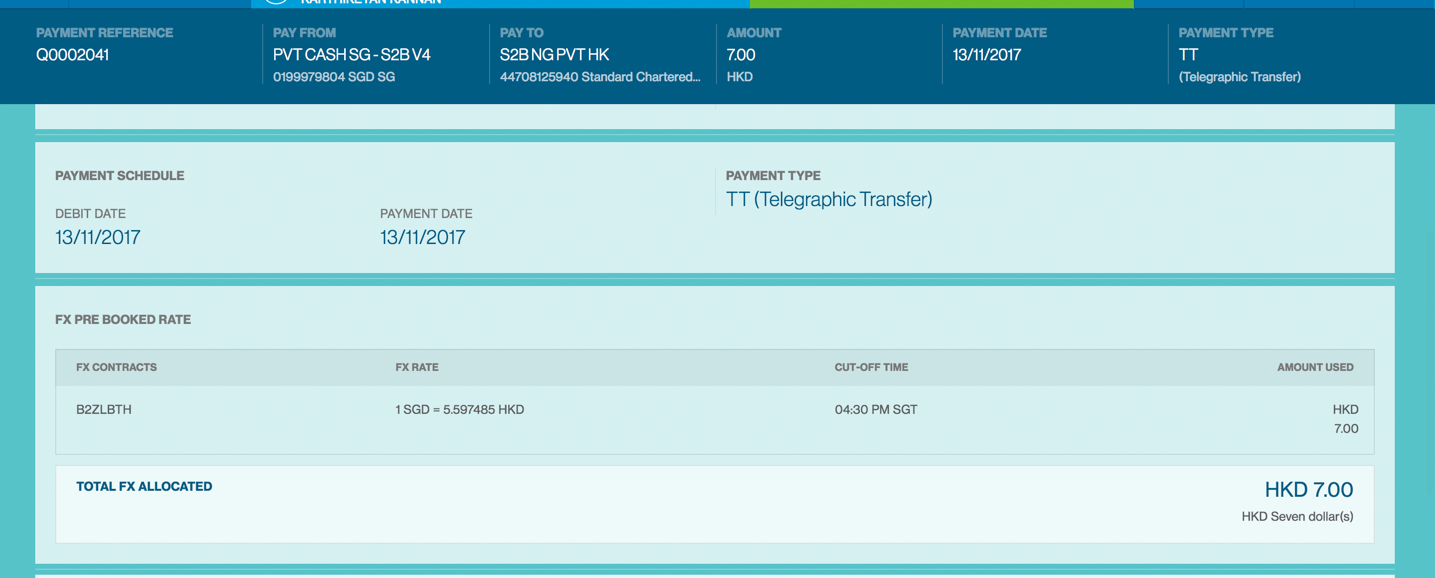
After the user performed “Approve and Send to Bank with RFQ” and if user want to check the FX rate of the deal, user can click on “Menu > Manage > Payments”.
Clicking on Payment Reference Number, new page will provide summary of the payments that have been processed by bank.
The FX rate will appear same to the FX rate of RFQ process during Send to Bank.
Book FX Rate
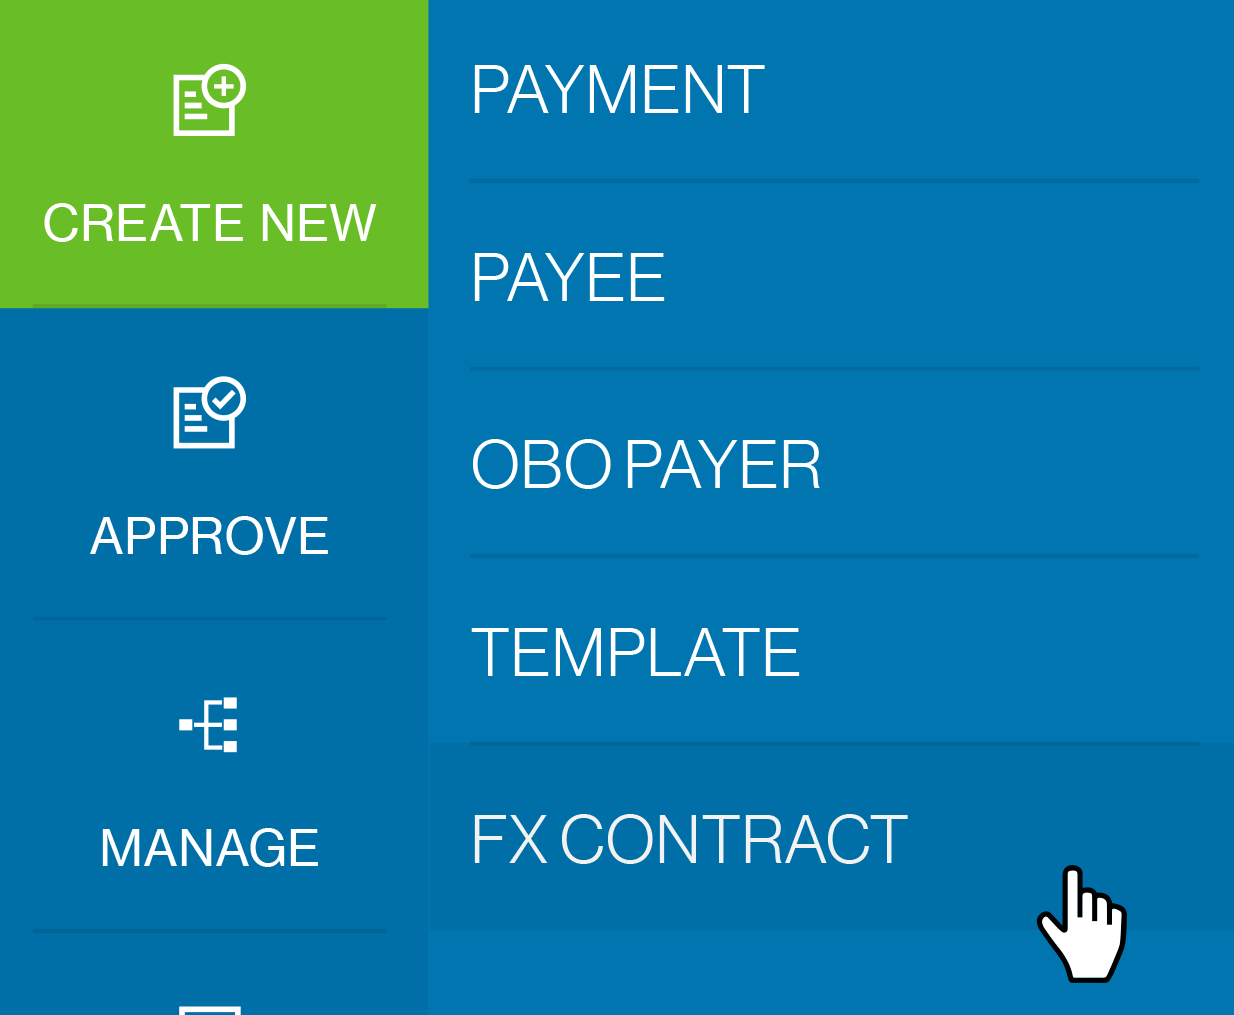
This feature allows you to book an online FX rate for an individual payment or a batch of payments.
This feature will be available from Menu > Create > FX Contract
Enter the fields in the Debit information, Currency, FX Amount and Value Date.
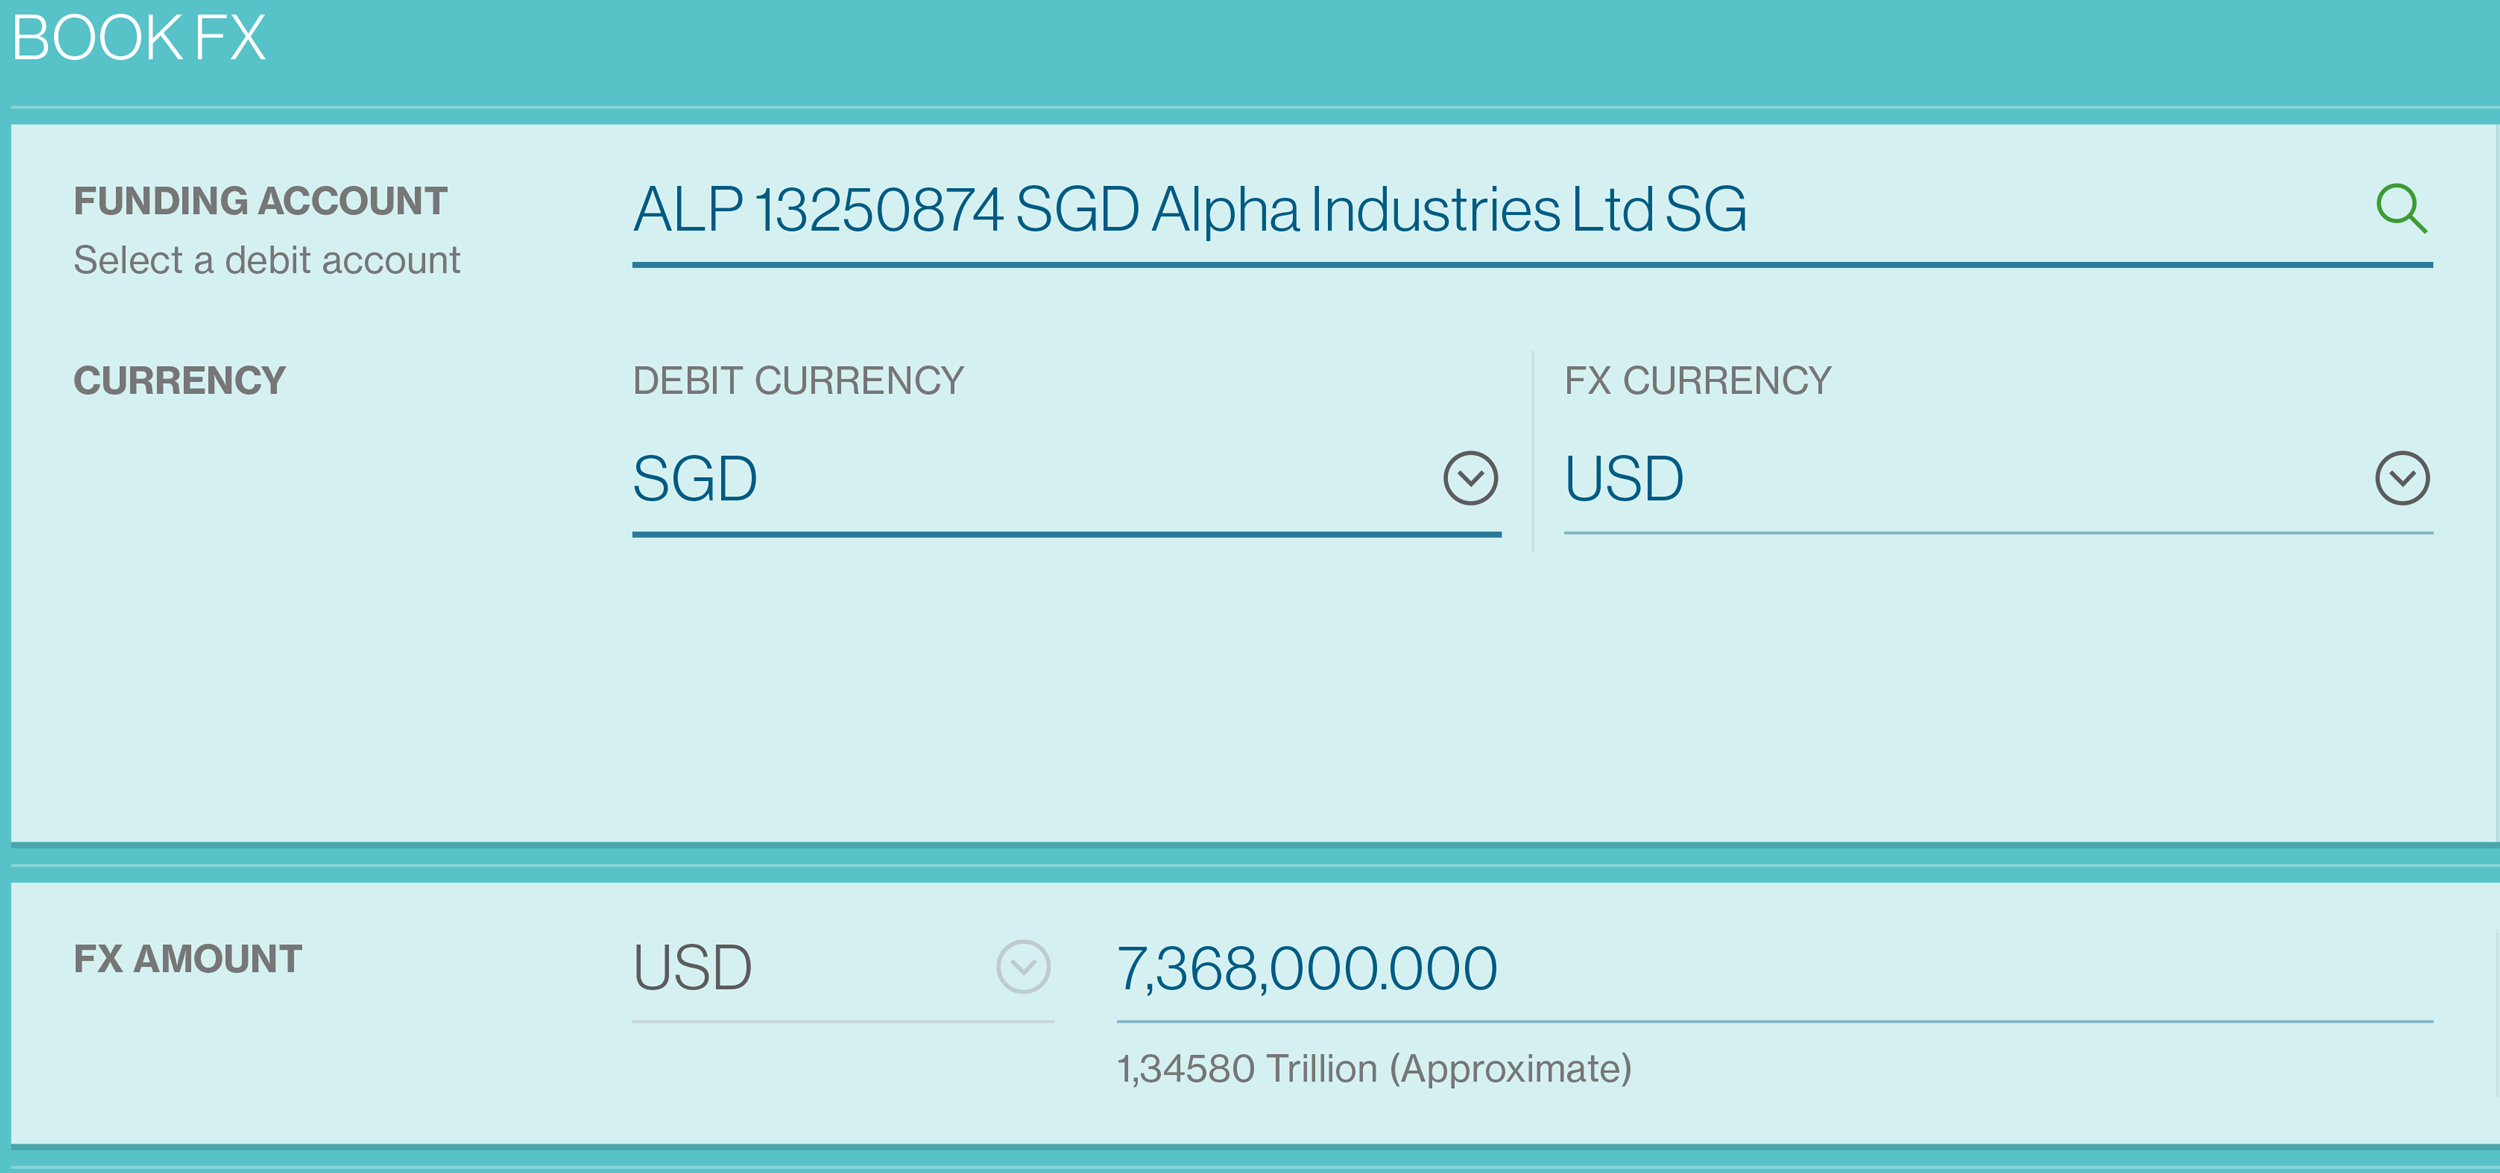
If you select “Get Quote”, you will be brought to a “FX Quote” screen to accept to book the FX.

Booking a FX
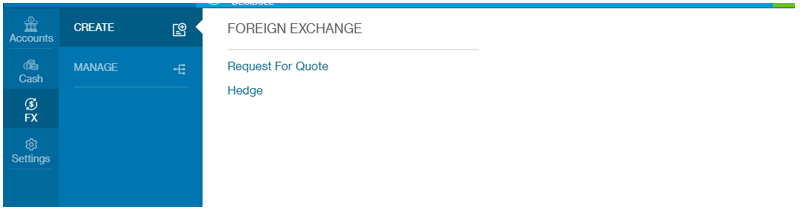
Select FX > Create > Request for Quote
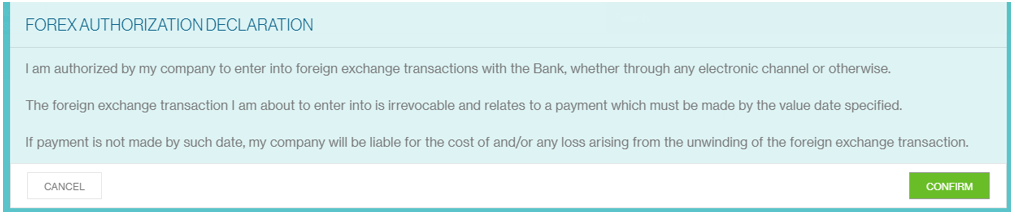
Select Confirm to proceed to the FX booking page. Please read the declaration before selecting ‘Confirm’ to proceed to the FX booking page.
Request for Quote
Select the funding account to be used for this FX booking. In the event of an unutilized FX booking, any FX losses incurred by the Bank will debited to this account.

Enter the amount of FX currency you wish to book.

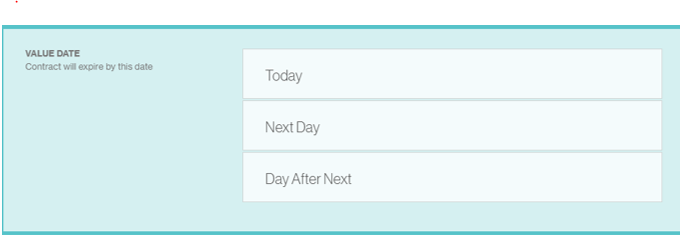
Select the value date for this FX booking. Once the FX booking is past its value date, it will expire and you will not be able to utilize this FX rate.
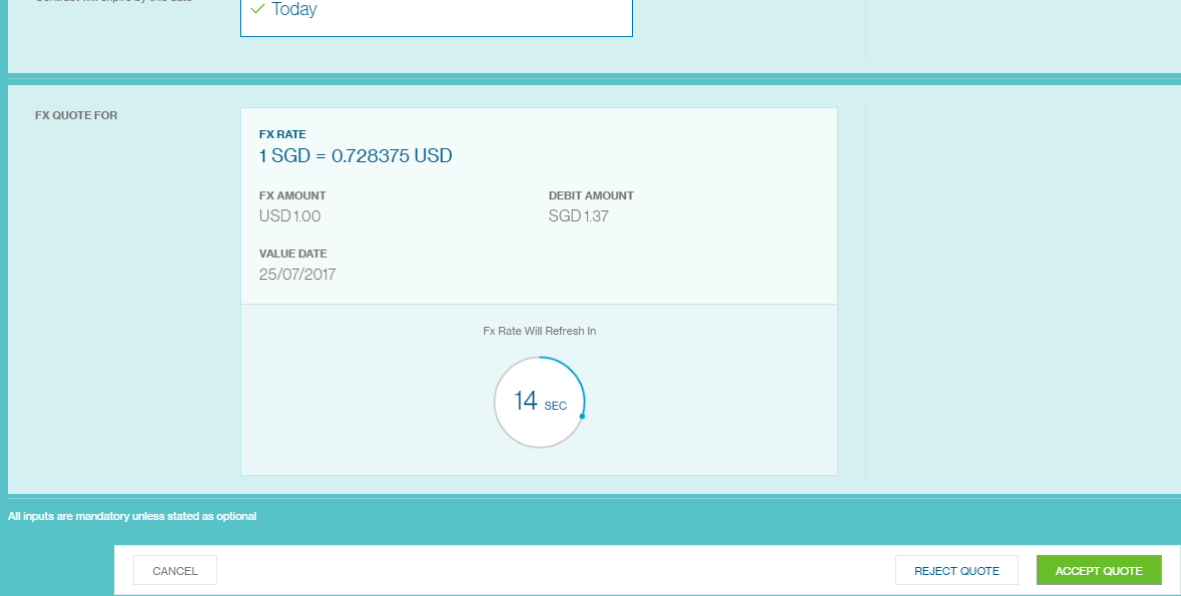
Select ‘Get Quote’ to generate the FX quote.

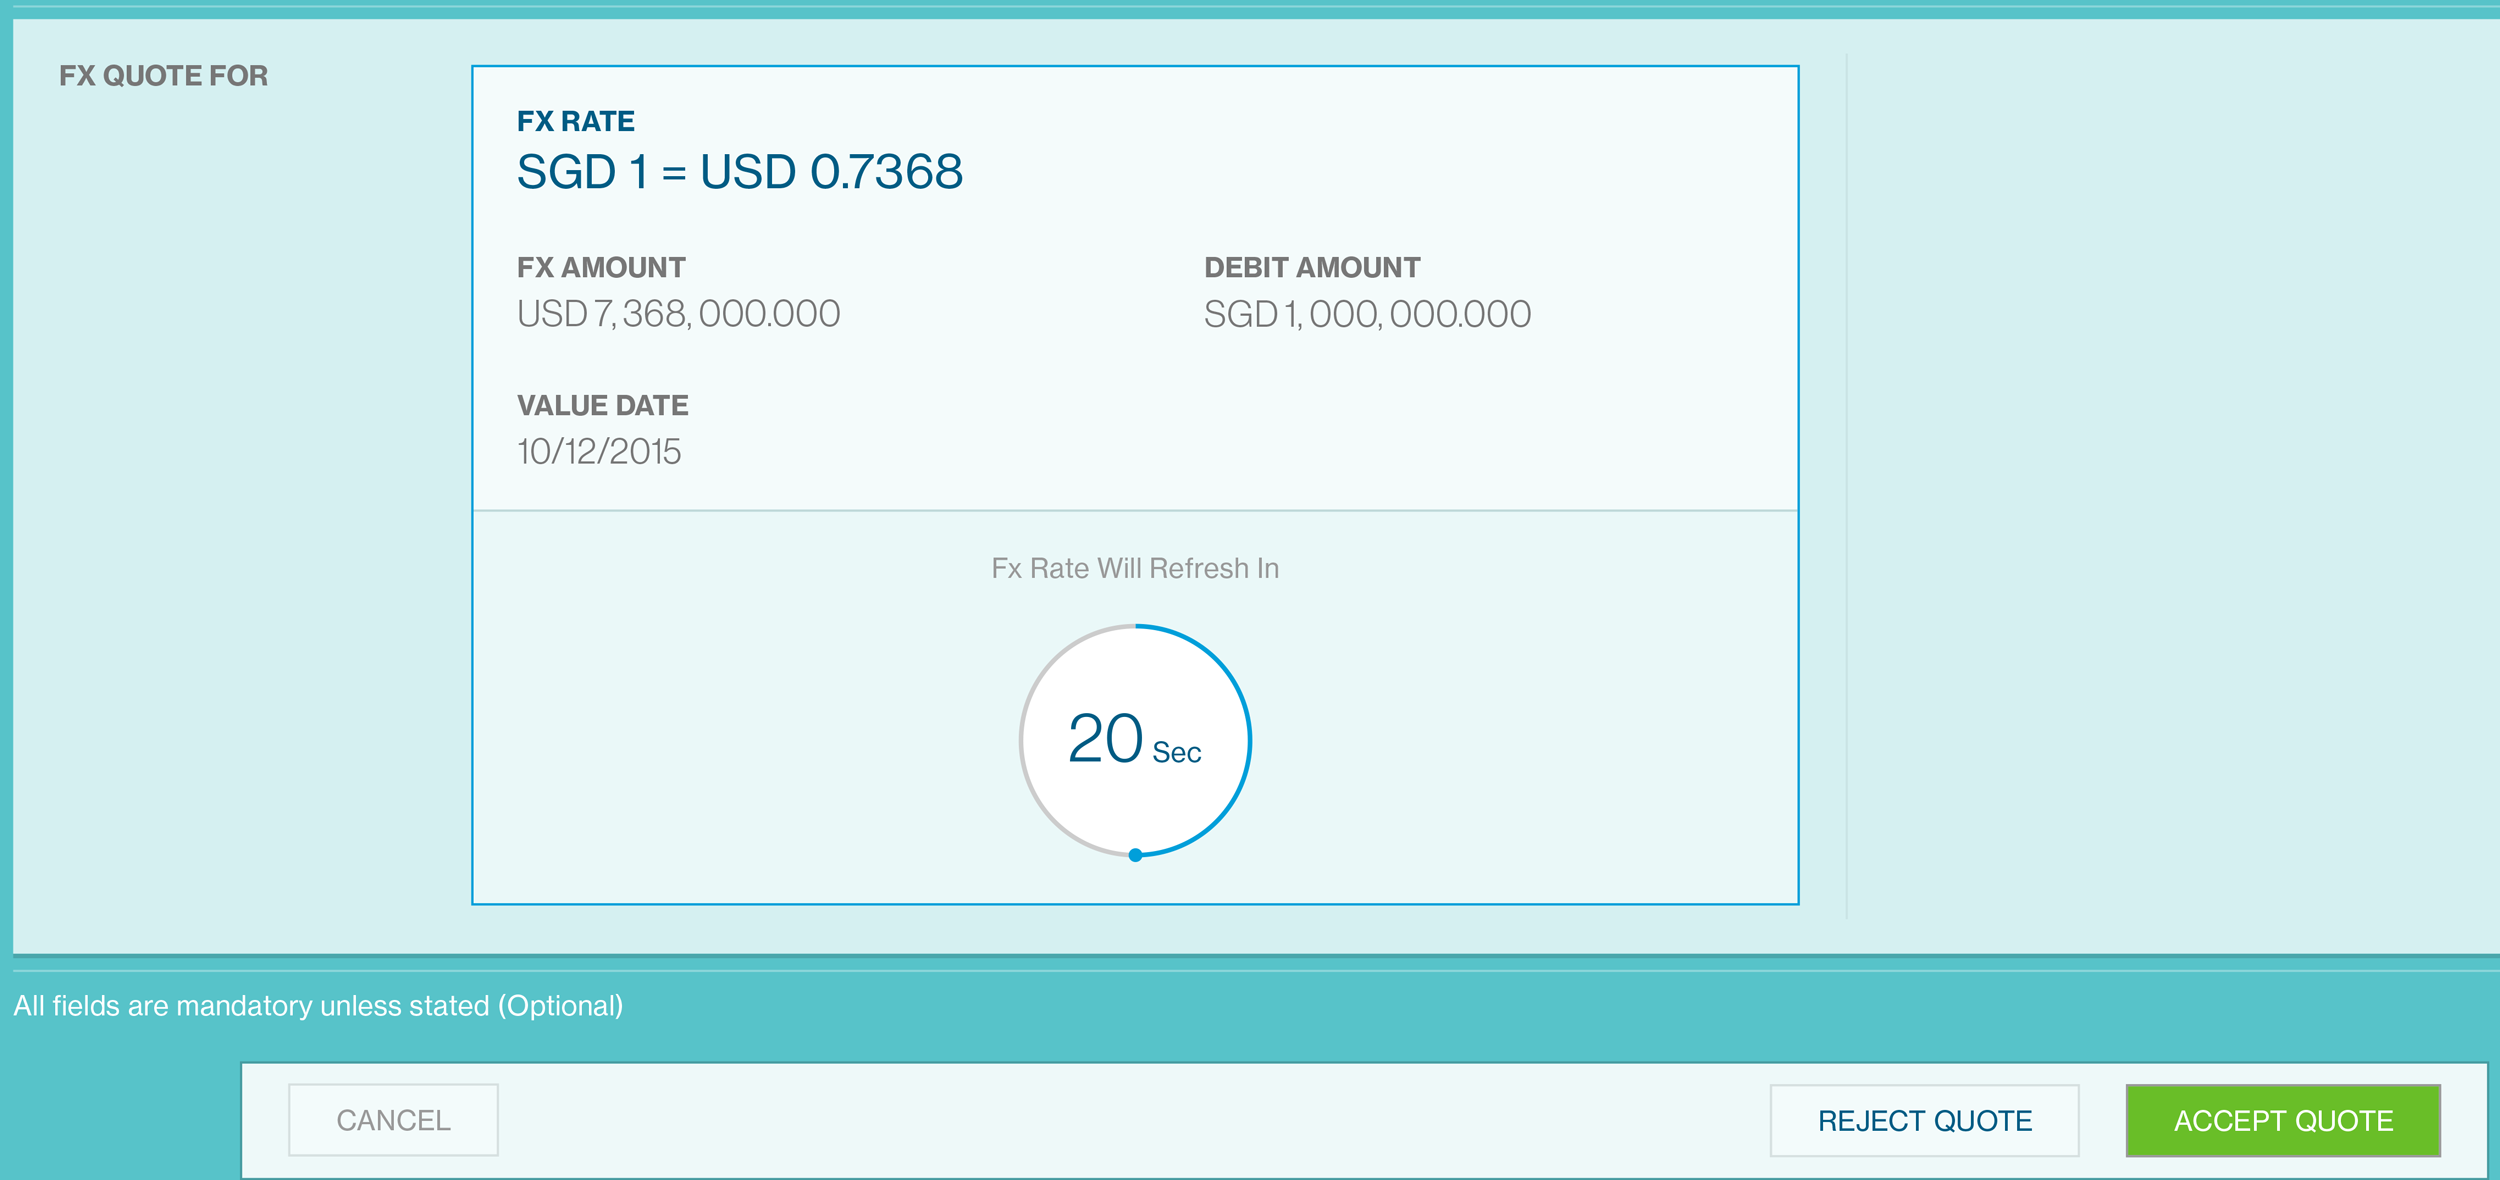
Accept Quote
The FX quote is only valid for 20 seconds and will be refreshed automatically.
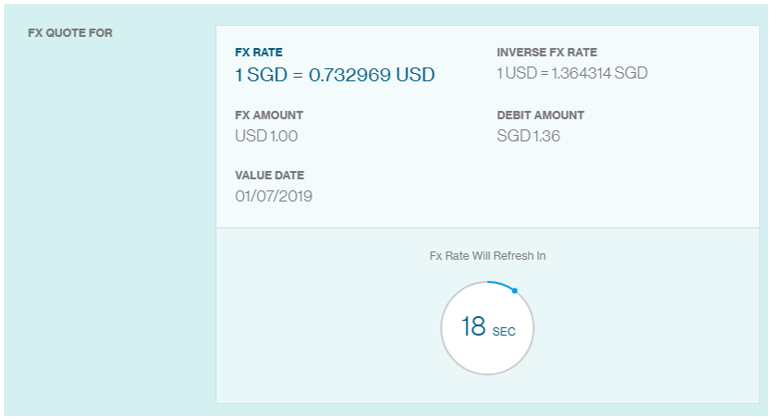
Click ‘Accept Quote’ if you are agreeable to the FX rate.

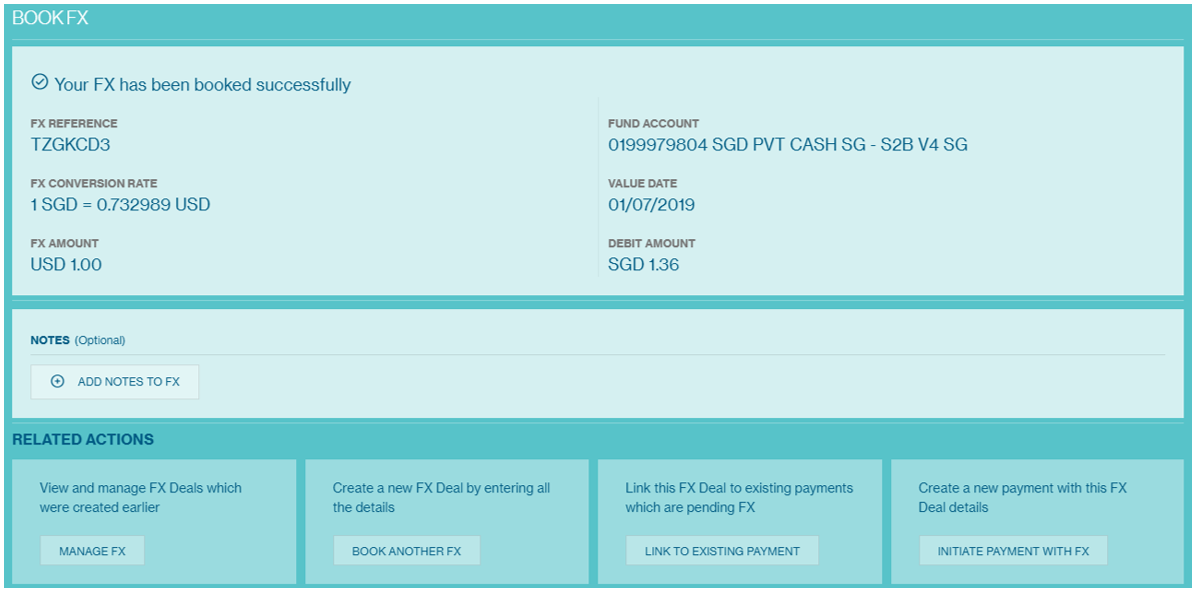
FX Booking Confirmation
Your FX booking confirmation will show the following details and you can immediately utilize this FX by selecting ‘Initiate payment with FX’.
Utilitizing Pre Booked FX
Cash > Create > Fund Transfer
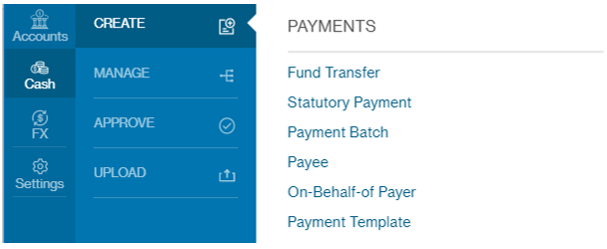
Fill up the necessary details accordingly. Once you have selected the payment type, you will see the following options below. If you wish to utilize an existing FX booking, select ‘Pre booked Rate’.
You will see the available FX bookings that you can utilize for your payment.
After selecting the FX booking, you will see the debit amount and the net payment amount in your selected FX currency.
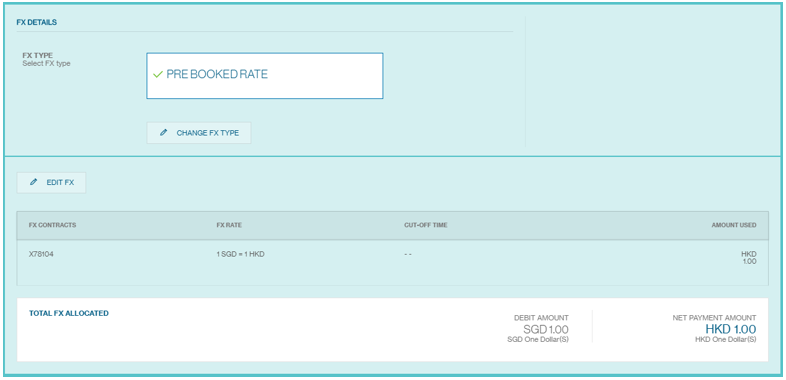
Review your payment details before you submit the payment instruction.
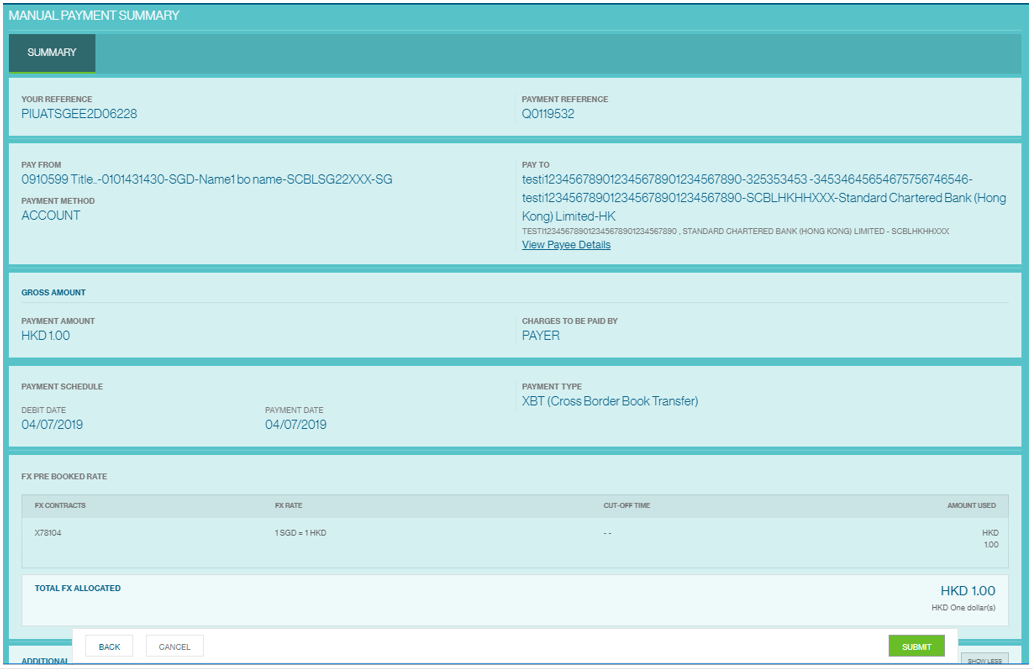
A confirmation will be provided once it has been submitted successfully and you will be able to see the approvals required before your payment will be processed by the Bank.

FX workflow
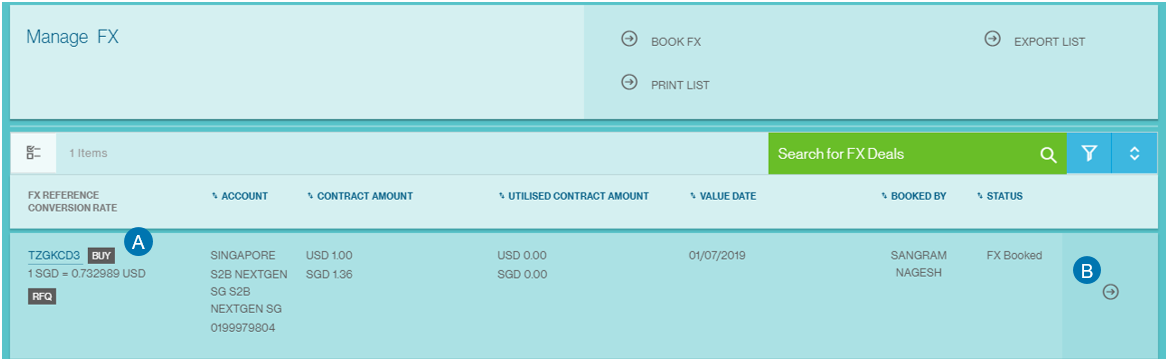
You can also utilize your FX booking by going to Menu > FX > Manage FX and select the FX booking that you wish to utilize.
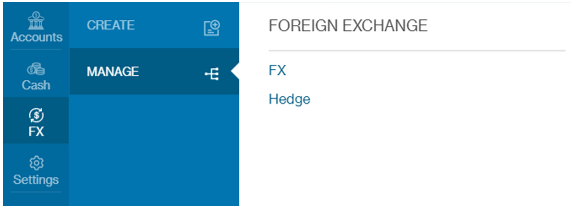
You can either click on the FX booking reference number of the arrow found at the right side of the page.
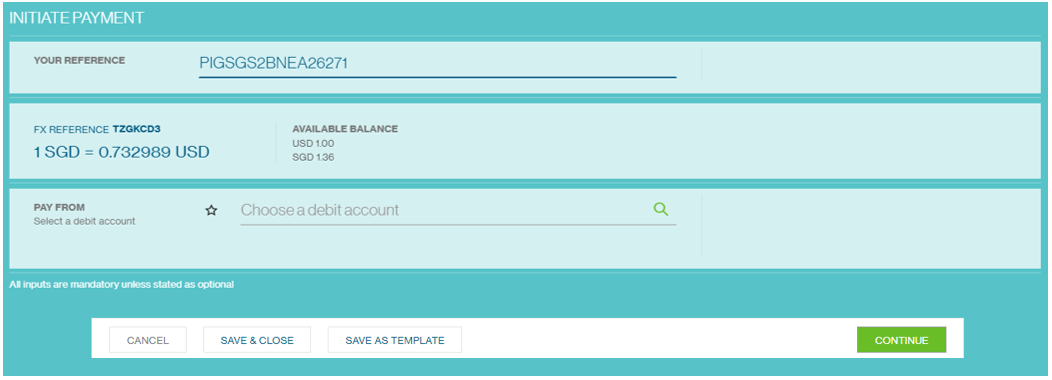
Select the account from which you wish to pay from. The reference number will be populated.
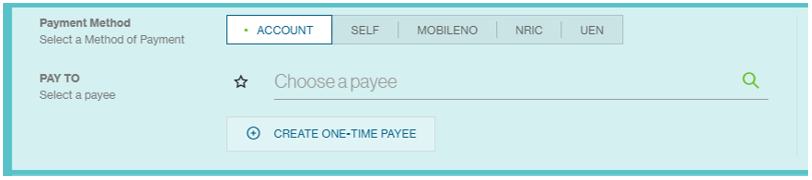
Select the payee
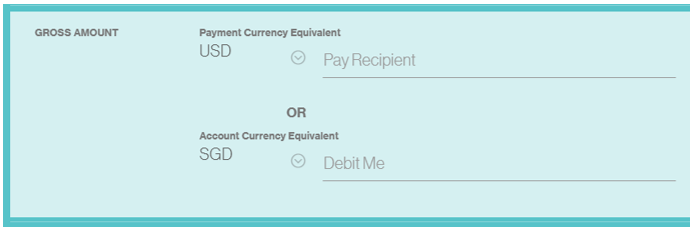
Input the currency amount that you wish to utilize from this particular FX booking.
Select either the debit date or value date. Debit date is the date you wish to make the payment on. Value date refers to the date the payment will be processed with the beneficiary bank.

Select the payment type, the cut off time indicate the latest time you can make this payment for it to be processed on that particular day.
Review the details in the summary page before submitting this payment instruction.
A confirmation will be provided once it has been submitted successfully and you will be able to see the approvals required before your payment will be processed by the Bank.
Overview of Batching
The “Batching” feature on Straight2Bank provides convenience to clients during the payments authorisation workflow. Several payments can be selected to create one or few batches and enable easy authorisation of payment instructions before being submitted to the bank for further processing.
Batching is however an optional step in the transaction initiation workflow and payments can be authorised and submitted as individual transactions to the Bank for processing. This feature is available to Straight2Bank users with appropriate Functional and Data Entitlements. Only those payment instructions that are in “Complete” status will be eligible for batching as online validation of payments will have to be done in order to submit them to the Bank for further processing.
Broadly, there are 3 methods in which payment instructions on Straight2Bank can be batched:
Manual Batching
Select one or more payments and batch them together to create batches based on pre-defined batching rules for approval.
Auto Batching
System compiles payments that are eligible for batching to apply pre-defined batching rules and create multiple batches based on batching rules for approval.
Add to an Existing Batch
Select payments to add to an already existing batch which is created based on pre-defined batching rules for approval.
Parameterised Batching
An optional feature available for clients who may want to define up to 3 parameters to be used for batching of payment instructions.
| Branch Code | Debit A/C Country Code | Payee Address 1 in BO | Payee / Beneficiary Name in BO | Payment / Value Date |
| Clearing Zone Code for Cheques | Debit A/C No | Payee bank local clearing code | Payment Currency | Pick Up Location |
| Customer Memo | Debit Bank ID | Payee ID | Payment Details 1 in BO | Processing Mode |
| Customer Reference | Drawee bank code for IBC | Payee / Beneficiary A/C No | Payment Details 2 in BO | Service Type |
| Debit A/C City Code | On Behalf Of (OBO) Info | Payee / Beneficiary Bank Code | Payment Type | Transaction ID |
Manual Batching
Manual Batching will allow the user to manually select payment instructions and create a payment batch. The following steps should be followed to create a payment batch manually.
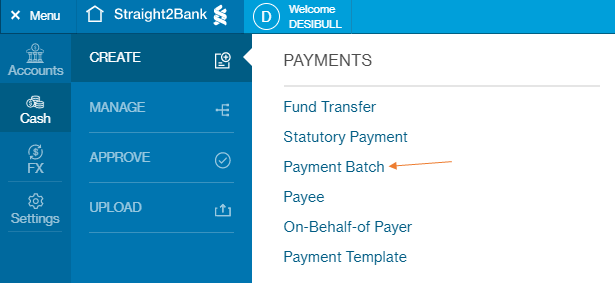
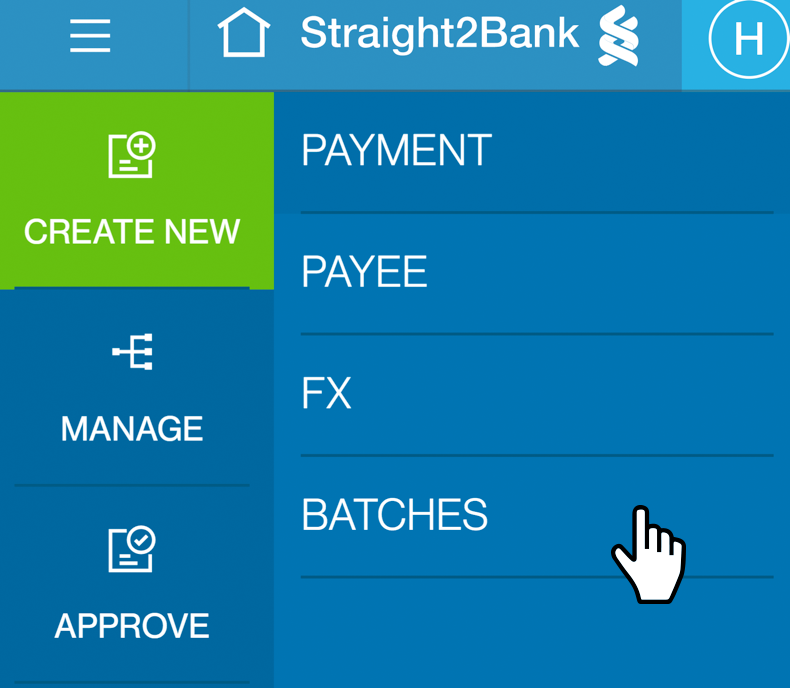
Click on “Batches” option available under “Create New”.
The list of all payments that are in “Submitted for Authorisation” status and based on the logged in user’s data entitlements will be listed.
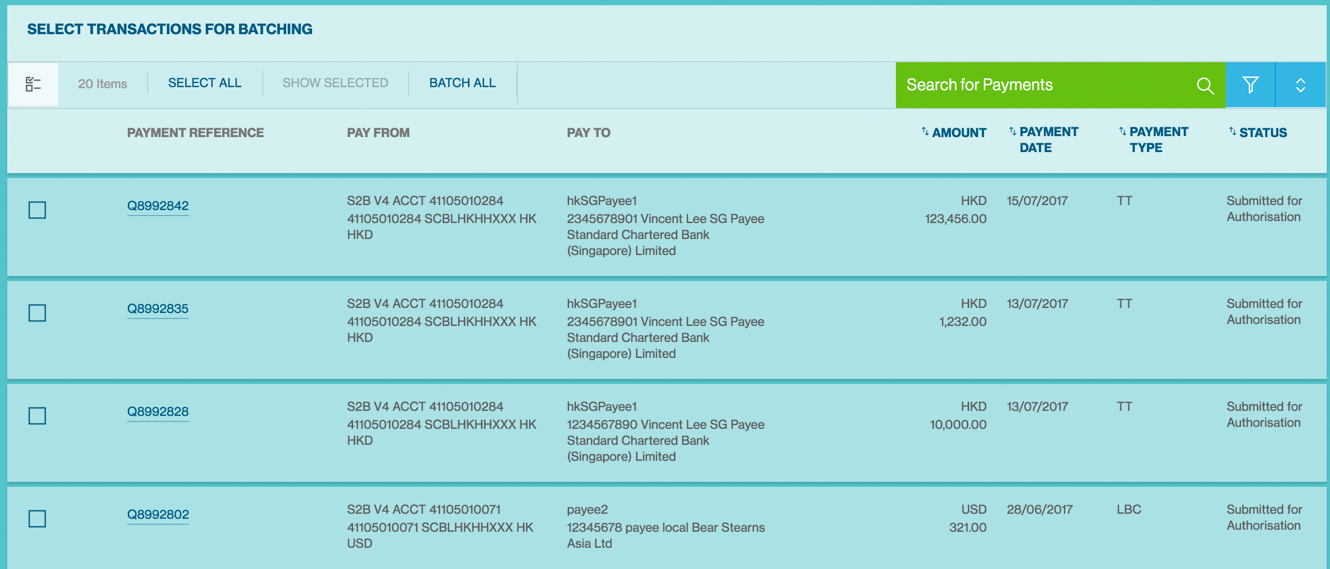

All the payments on the page that are required to go together in a batch can be individually selected or you can simply select all by clicking the “Select All” button.
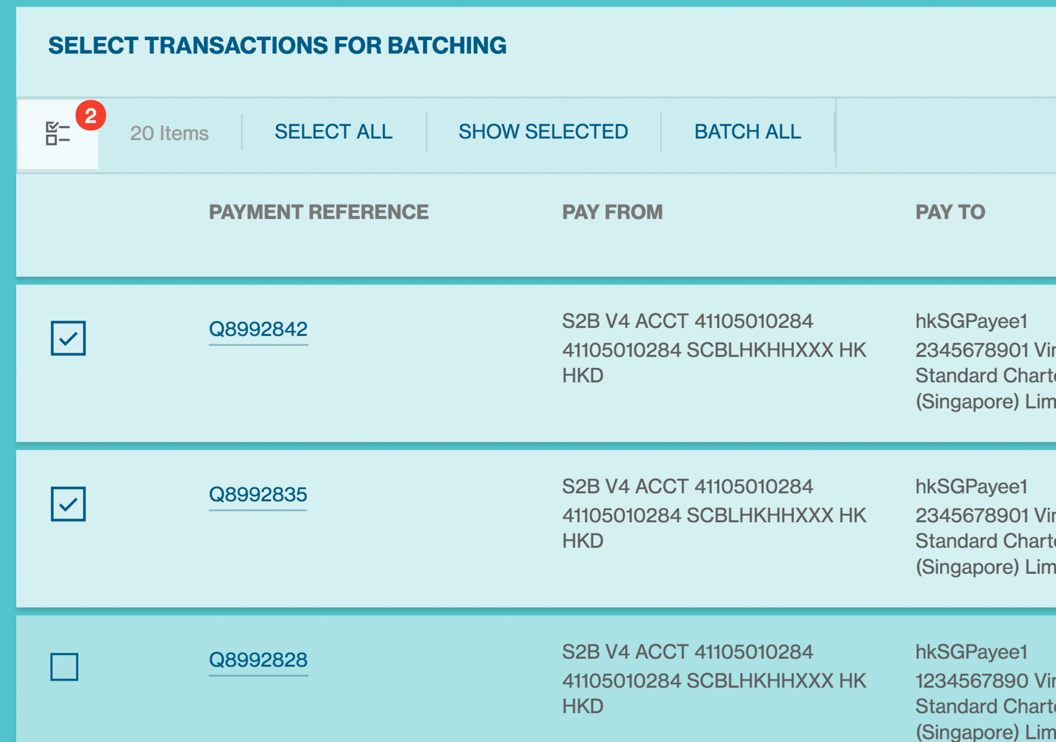
Upon selecting multiple instructions, click on “Create Batch” at the right bottom.

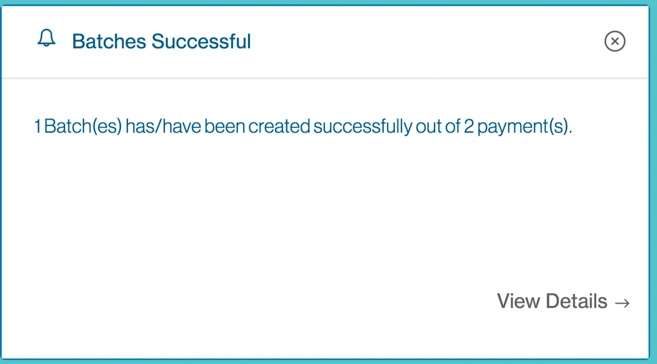
System will provide an acknowledgment indicating that “Batch Creation in Progress”.

Once successful, you can check the Manage Batch list screen to view the list of batches awaiting authorisation. Once approved, the status will change to “Fully Authorized”.
System Rules for Batching Payments
The below rules will be applied when a batch is manually created:
Authorisation Matrix
All the selected payment instructions should be of the same matrix number. If all the selected payments do not have the same matrix number, then the system will throw a validation to select payments that belong to the same matrix number. The matrix number for every submitted payment will depend on “Debit Account Number” or “Payment Type” or “Payee / Beneficiary”. This is by default based on the “Debit Account Number” setup.
FX Criteria
Whether the payments involve foreign exchange (FX) or not. If there is a mix of FX and Non-FX payments, separate payment batches will be created based an additional set of rules that will include (this behaviour does not apply for all markets, but selected markets);
- FX Type (i.e.) System Rate / Contract Rate
- Country (i.e.) the location where the Debit Account is held
- Currency Pair (i.e.) currency pairs will be grouped
- Amount Priority (i.e.) whether it is based on Payment Amount or Debit Amount priority
- Payment Debit Date,
- Payment Value Date, and
- Parameters defined by the Client during On-boarding (e.g.) Payment Type, Beneficiary and
others (refer to subsequent section for more details on this)
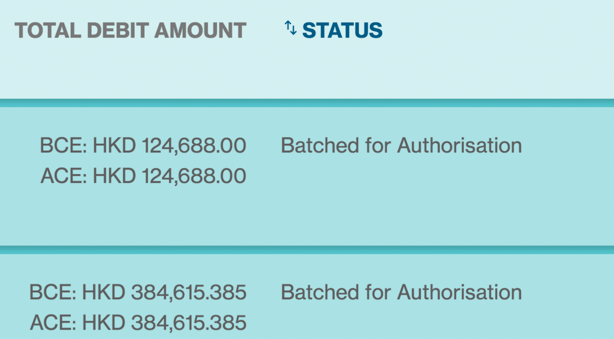
Based upon the above parameters, one or more batches will be created. Each of the batches will be assigned with a system generated batch reference.
The newly created batches will be of the status “Batched for Authorisation” and further options available, based on the user’s functional entitlements will be displayed beneath the batch.
Auto Batching
The “Auto Batch” feature on Straight2Bank is an alternative to the “Manual Batch” feature. This feature will automatically create payment batches based on the preset batching rules within Straight2Bank without requiring the user to manually create batches. The following steps should be followed to automatically create payment batches.
Click on “Batches” option available under “Create New”.

The list of all payments that are in “Submitted for Authorisation” status and based on the logged in user’s data entitlements will be listed.

All the payments on the page that are required to go together in a batch can be automatically batched by clicking the “Batch All” button.
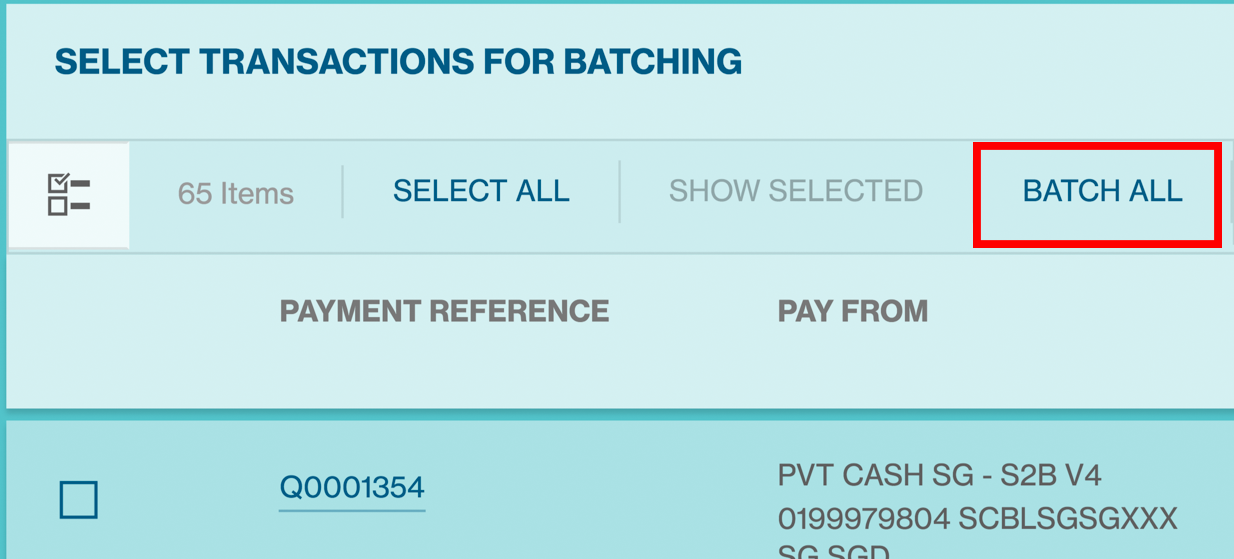
Upon clicking batch all button will provide an acknowledgment of the request together with number of payment instructions. Click “Yes” to continue.

System will indicate that “Batch Creation in Progress”.

Once successful, you can check the Manage Batch list screen to view the list of batches awaiting authorisation. Once approved, the status will change to “Fully Authorized”.
System Rules for Batching Payments
The below rules will be applied when a batch is manually created:
Authorisation Matrix
All the selected payment instructions should be of the same matrix number. If all the selected payments do not have the same matrix number, then the system will throw a validation to select payments that belong to the same matrix number. The matrix number for every submitted payment will depend on “Debit Account Number” or “Payment Type” or “Payee / Beneficiary”. This is by default based on the “Debit Account Number” setup.
FX Criteria
Whether the payments involve foreign exchange (FX) or not. If there is a mix of FX and Non-FX payments, separate payment batches will be created based an additional set of rules that will include (this behaviour does not apply for all markets, but selected markets);
- FX Type (i.e.) System Rate / Contract Rate
- Country (i.e.) the location where the Debit Account is held
- Currency Pair (i.e.) currency pairs will be grouped
- Amount Priority (i.e.) whether it is based on Payment Amount or Debit Amount priority
- Payment Debit Date,
- Payment Value Date, and
- Parameters defined by the Client during On-boarding (e.g.) Payment Type, Beneficiary and
others (refer to subsequent section for more details on this)
Based upon the above parameters, one or more batches will be created. Each of the batches will be assigned with a system generated batch reference.
The newly created batches will be of the status “Batched for Authorisation” and further options available, based on the user’s functional entitlements will be displayed beneath the batch.

Add to Existing Batch
The “Add to Existing Batch” feature on Straight2Bank allows is an alternative to the “Manual Batch” feature. This feature will automatically create payment batches based on the preset batching rules within Straight2Bank without requiring the user to manually create batches.
Click on “Batches” option available under “Create New”.
The list of all payments that are in “Submitted for Authorisation” status and based on the logged in user’s data entitlements will be listed.
All the payments on the page that are required to go together in a batch can be individually selected or you can simply select all by clicking the “Select All” button.
Upon selecting one or more payment instructions, click on “Add to Existing Batch” at the bottom.

A prompt screen with existing payment batches that are in “Batched for Authorization” status will be available. This list will have only those batches that match the batching rules (Authorisation Matrix, Foreign Exchange rules and Optional parameters setup for batching) of the selected payment and hence, it could be possible that despite multiple batches available in “Batched for Authorization” status, not all of them are listed here.
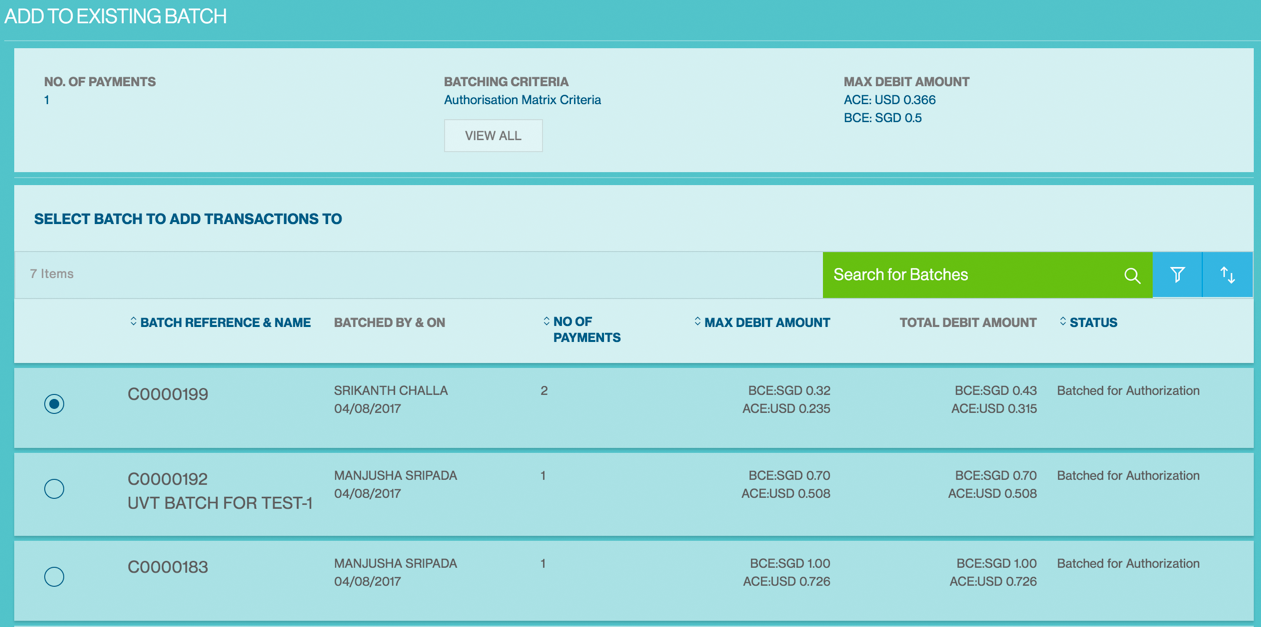
The selected batch will then be updated to include the chosen payment instructions for further action.

Manage Batch
Payment batches that are in “Batched for Authorization” status (i.e.) before being authorised will be available for editing, printing or un-doing by the same user who had created the batch or any other users belonging to the Group.
This section provides information on editing / printing a payment batch and remove one or more instructions or to undo an existing batch for various reasons. This option is dependent on the user’s ‘Functional’ and ‘Data’ entitlements.
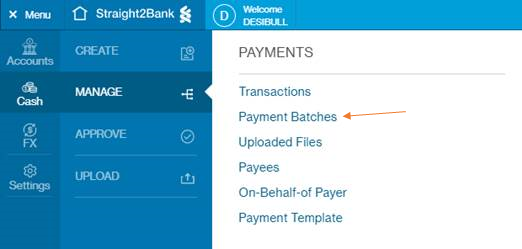
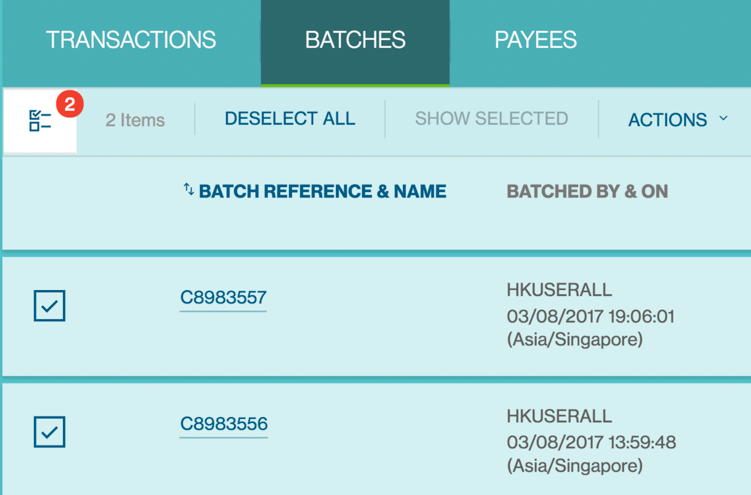
The Manage Batches Screen will be available from the Menu> Manage> Batches.
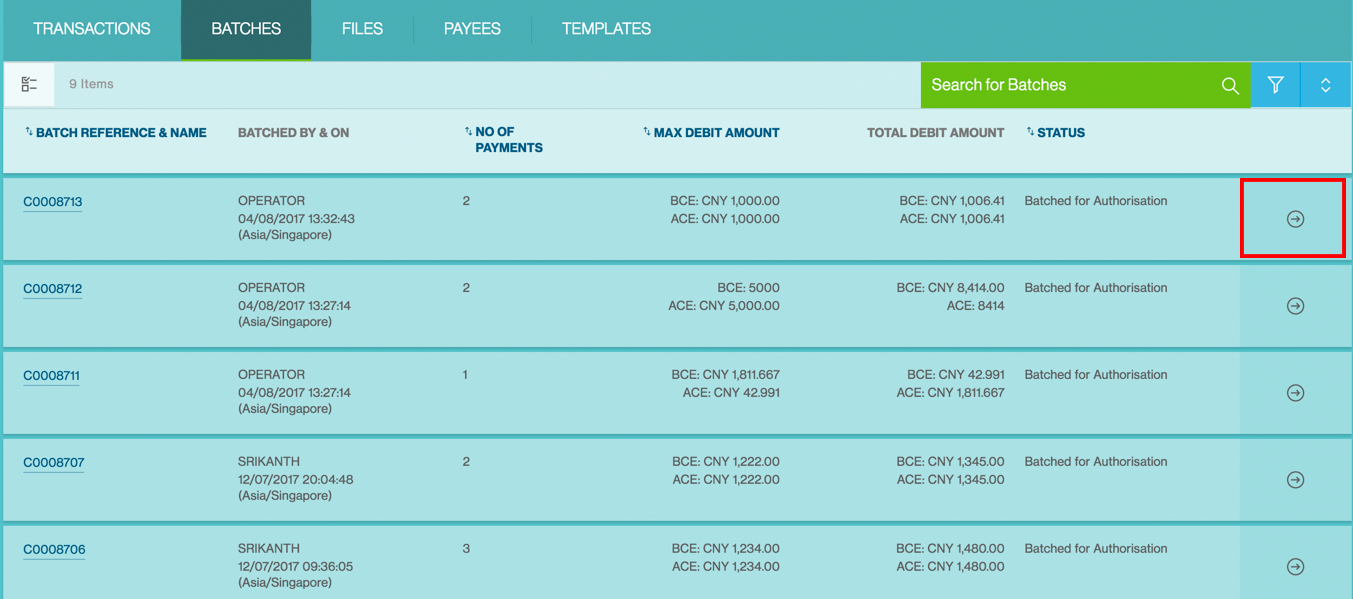
Column Headers
This page displays the payments as a table with the following headers:
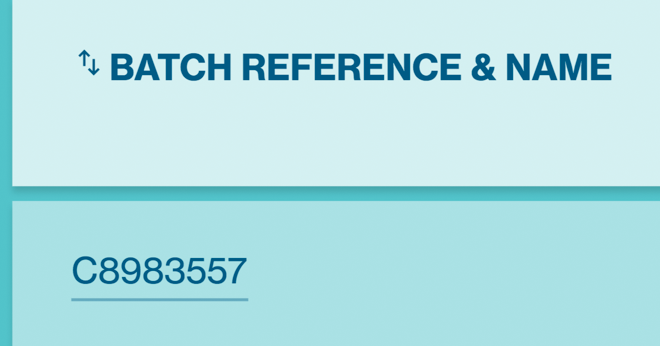
- Batch Reference & Name
- Batched By & On
- No. of Payments
- Max Debit Amount
- Total Debit Amount
- Status
Sort and Filter Function
You can click each of the headers predefined as sortable to sort the table data in ascending order. Clicking one more time on the sortable headers will sort the table values in descending order.
Filter button - When click on this button, the system shows a filter with the filter criteria including Amount, Payment Date, Status, etc. On Check of the checkbox next to any of the values as per below, system updates the Payment List Display to display only results containing the values matching the checked filter.

Priority Sort - On Click, the system expands the sort options which are configurable at system level. Each sort category will have a 2 way switch - Ascending / Descending indicator for you to select. By default the categories will be listed in the order of header display. This settings are not saved and it will revert to the default state if you relaunch the application

Batches Action Menu
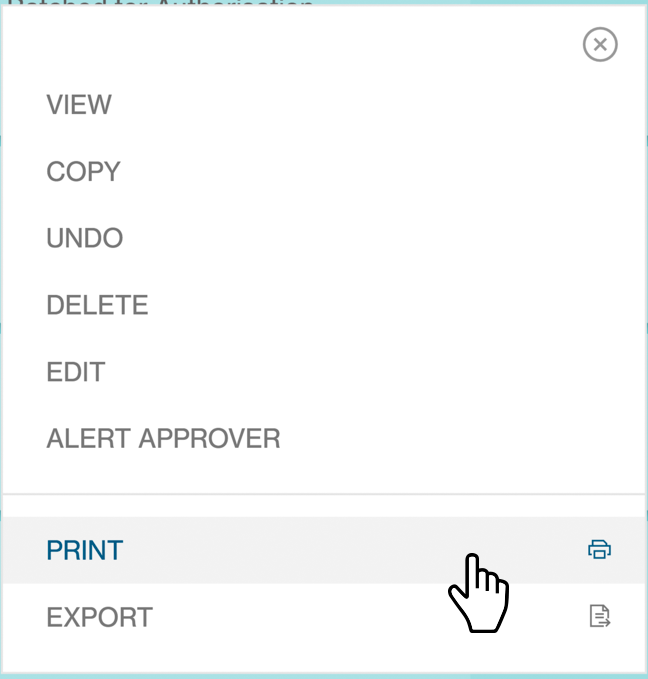
Upon choosing one of the listed batches and clicking on “Action” button, you will be presented with the batches action menu.

The list of actions shown in the action menu depends on the status of the batches and the user entitlements to perform various actions.
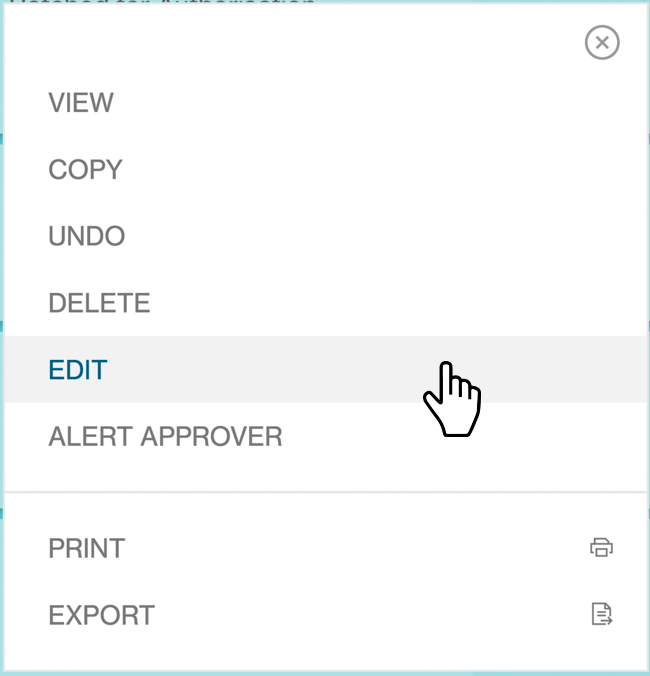
The following are some key actions that apply to a batch under Manage batches:
- View
- Copy
- Undo
- Delete
- Edit
- Alert Approver
- Export
Remove One or More Payment Instructions
Upon choosing one of the listed batches and clicking on the “Edit” option available under action menu.
You will be presented with the “Edit Batch” screen allowing one or more payment instructions to be removed from the batch.
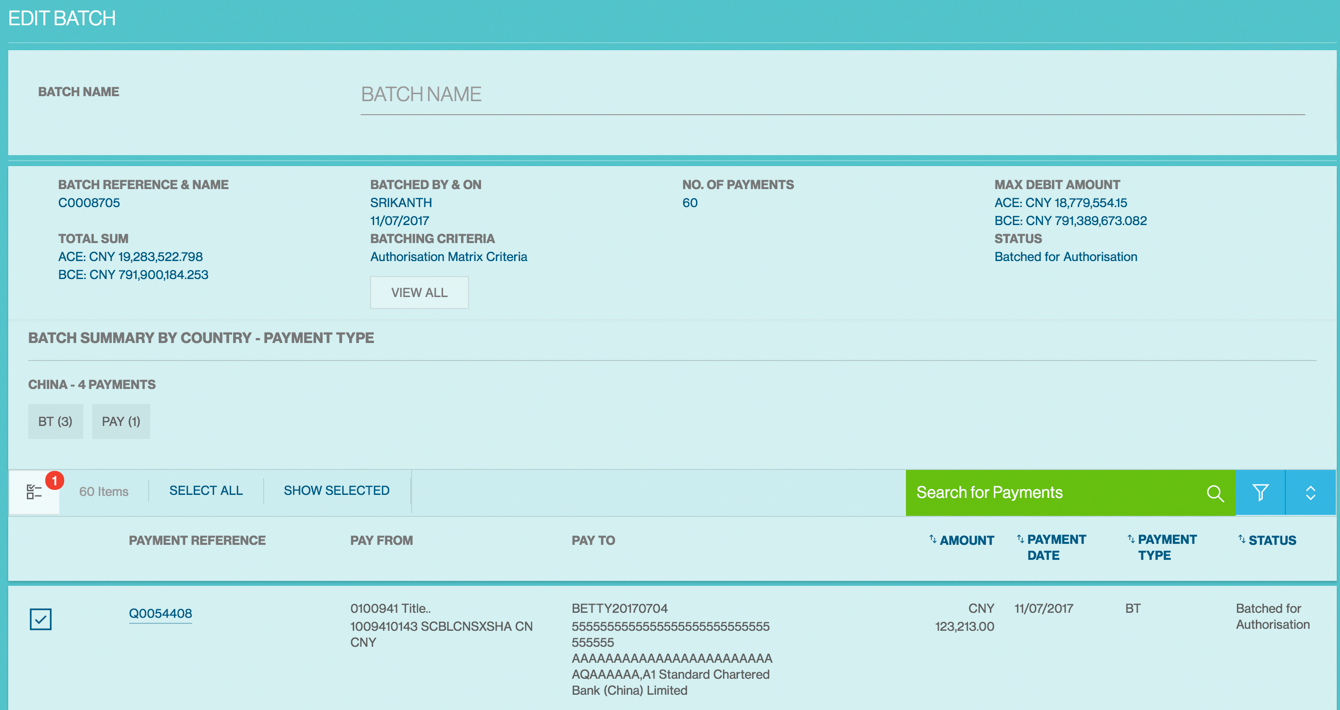
One or more instructions may be selected and click on “Remove from Batch” button at the bottom to update the batch accordingly.

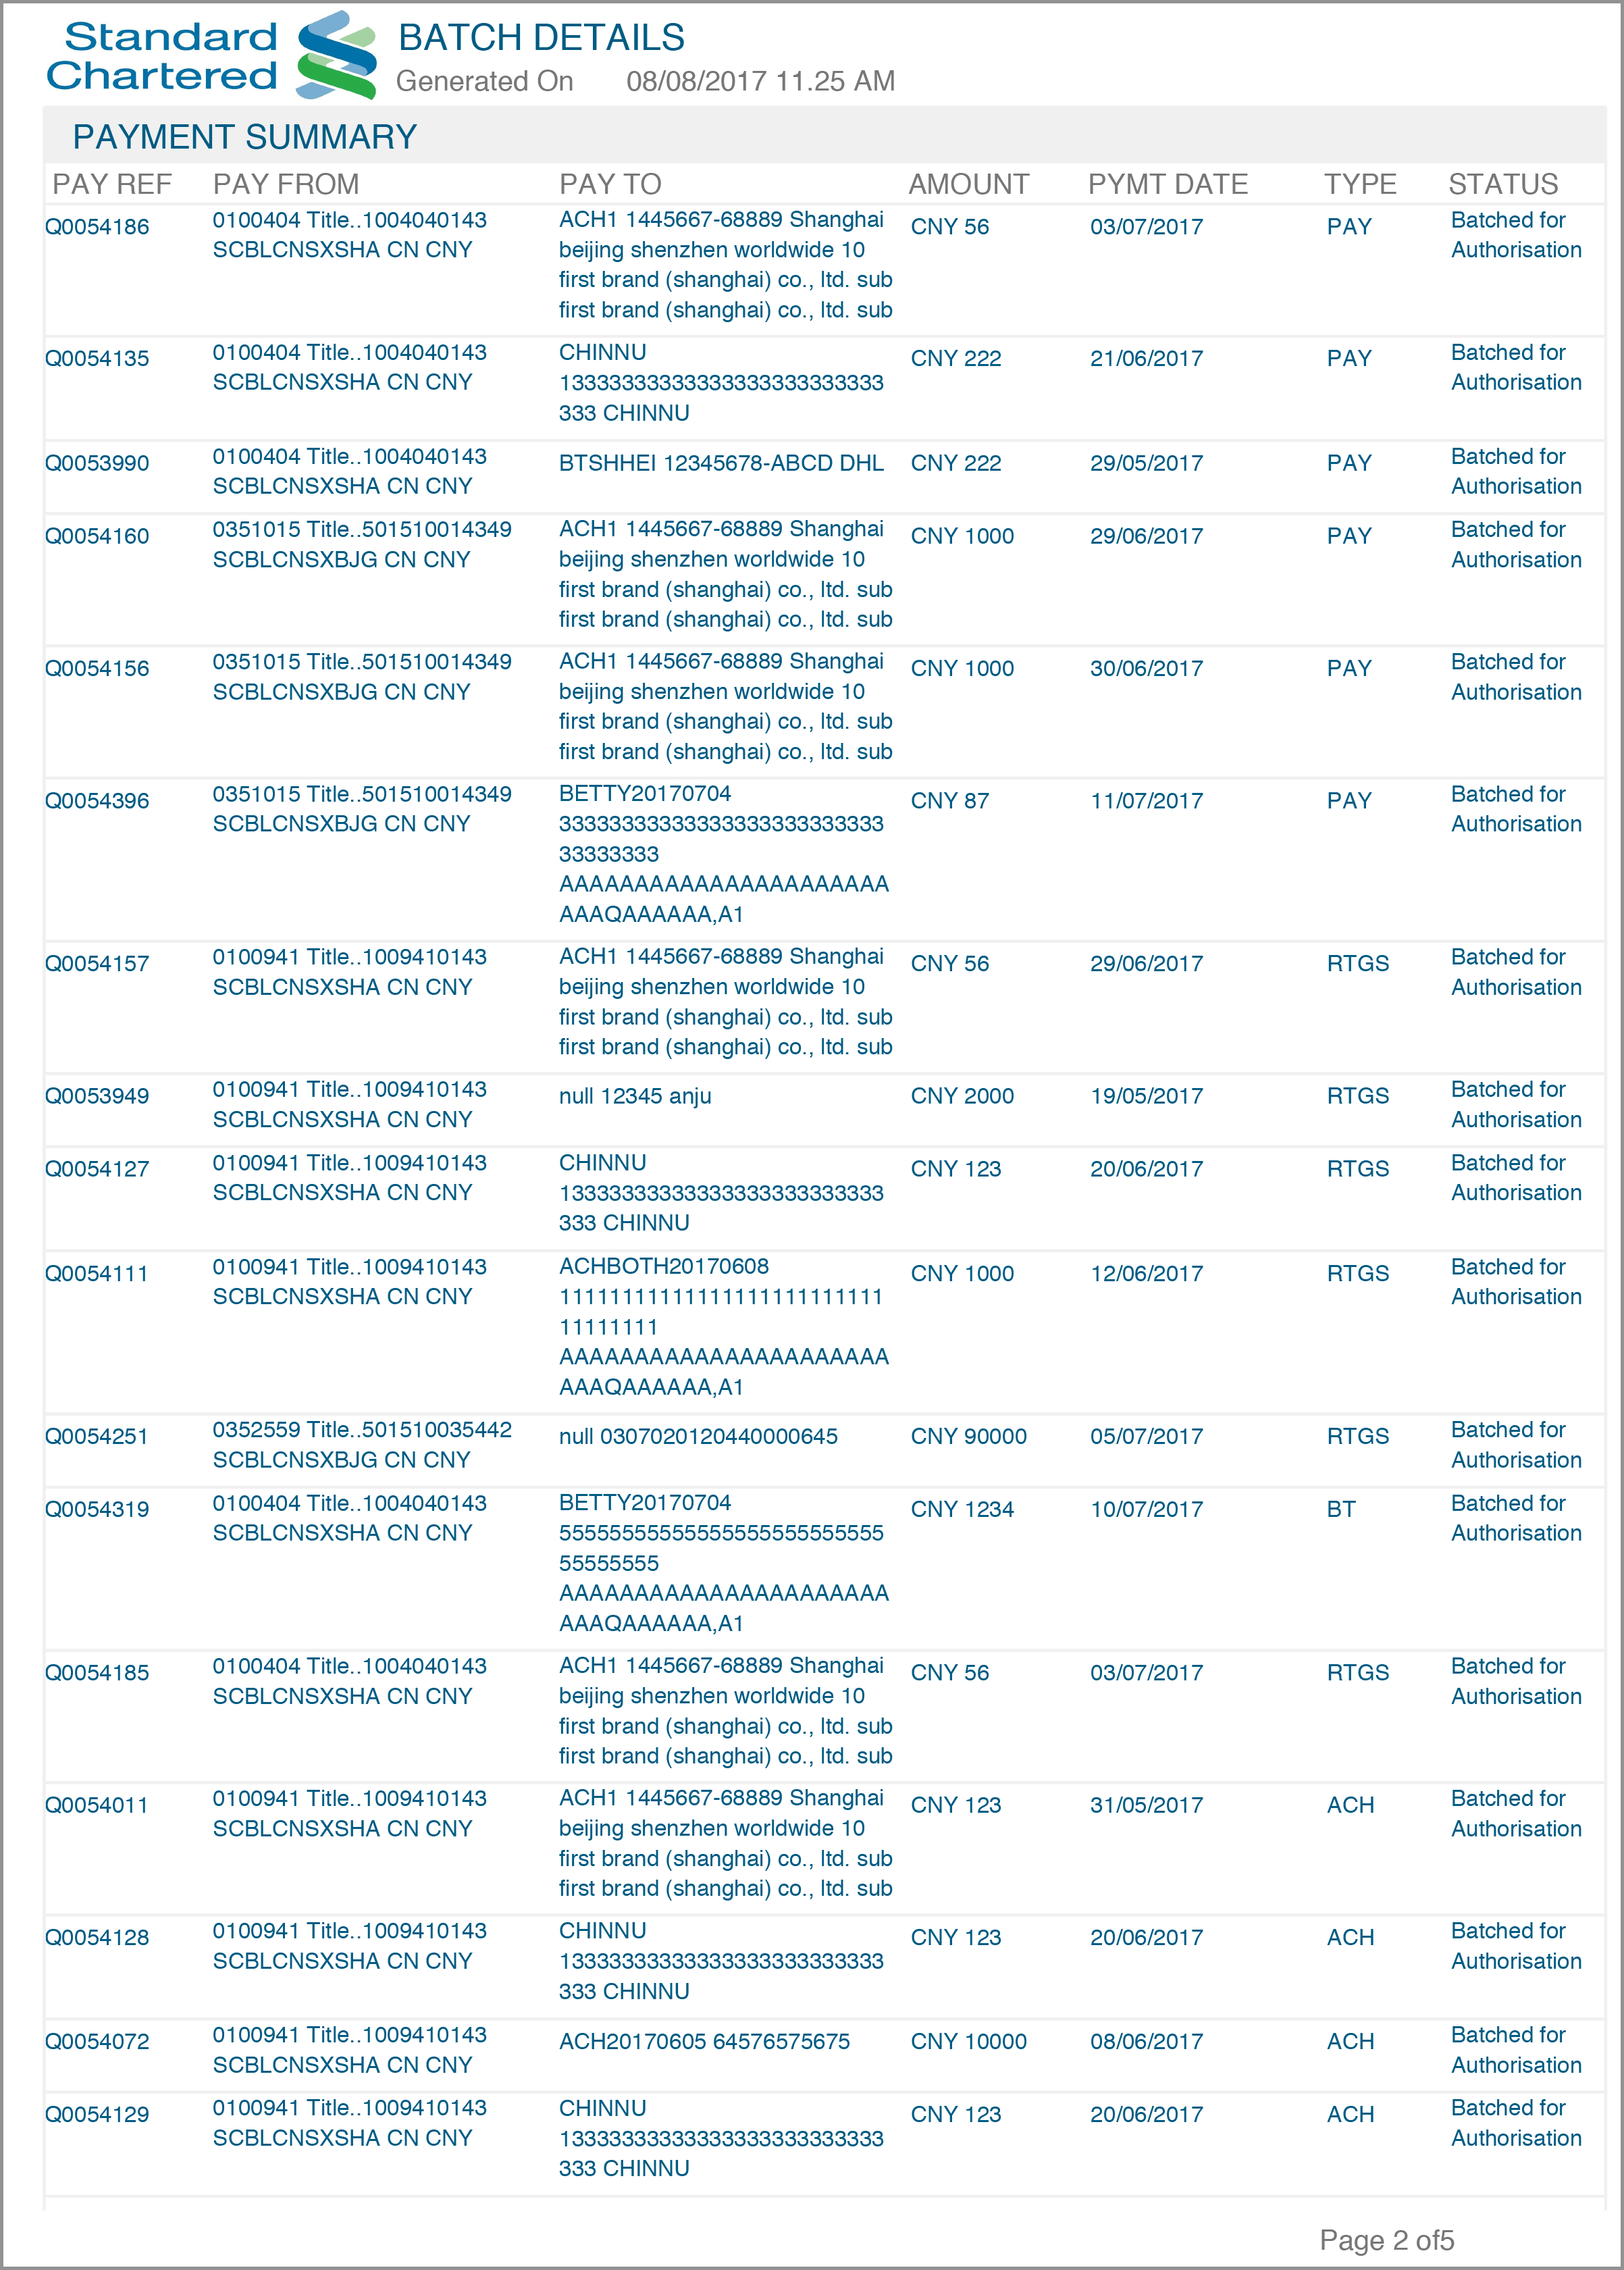
Print Batch
The “Print Batch” feature available on Straight2Bank helps in printing the details of the batch as seen on-screen. This feature will be available from any Manage batch view / listing screen for batches that are in various statuses (e.g.) “Batched for Authorization”, “Partially Signed”, “Released to Bank”, etc.
Upon choosing one of the listed batches and clicking on the “Print” option available under action menu.
One or more batches may be selected to use the “Print Batch Instructions” feature. Payments within all the selected batches will be available in the print view screen to enable printing.
Approve Batch
Up to 8 levels of authorisation can be setup for batches on Straight2Bank (e.g.) A, A+B, A+B+C, etc.
Creation of batches on Straight2Bank is based on your user entitlement. Refer to the "Manual Batching" section for instructions on how to create batches on Straight2Bank.
Entry Points
In fact, there are several ways that let you approve batches on Straight2Bank:
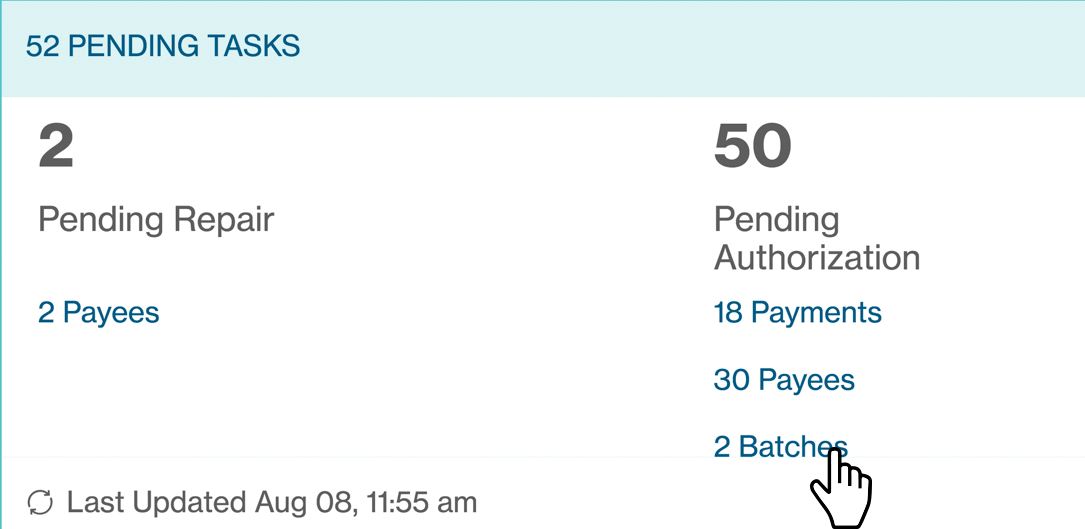
Main page - Dashboard
Batches that are pending approval will be available on Individual Task Card and Pending Task Card on main page.
Approve Payment List Screen - Action Menu
Batches that are pending approval will be available on the Approve Batches List Screen- from the Menu> Approve> Batches.

You can approve selected batch by clicking Action Menu.

Batch Detail Display
The Approve Batches List Screen will list all the existing batches that are in “Batched for Authorisation” Status. This screen has various data fields that may be customised optionally by clicking on Filter or Sort button.
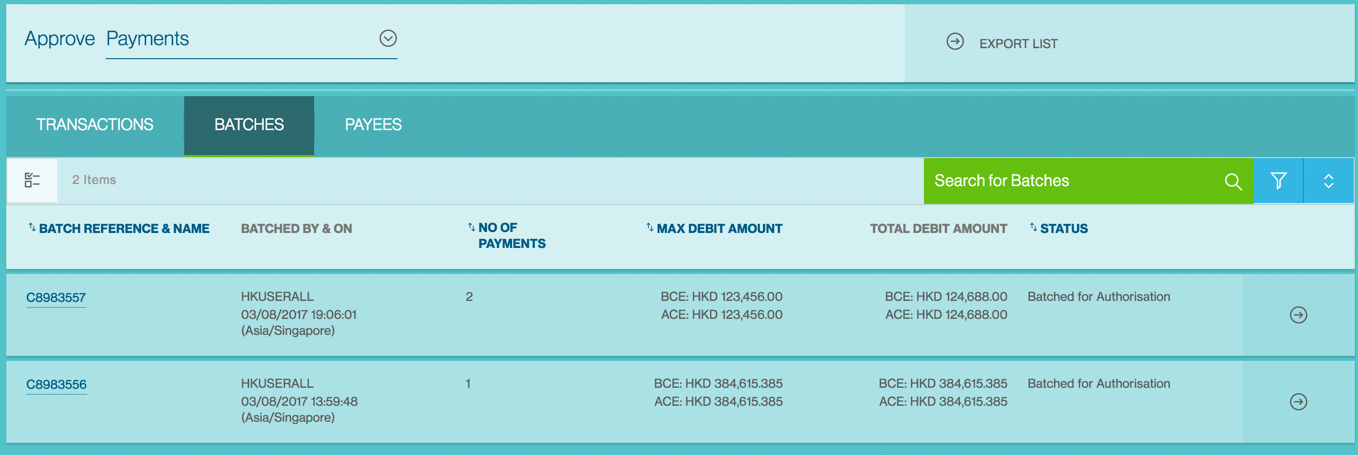
Clicking on Batch Reference & Name, new page will provide summary of the payments in the batch that have been submitted pending approval. You can choose to “Approve”, “Send for Repair” or “Reject” the batch.
MultiSelect
Click on MultiSelect button and select Payments needs approval (tick check box). Approve option will be available from Actions menu.
Use a Vasco Token for Approval
For authorisation, your operator(s) will inform you of the payment details or batch reference that requires authorisation with support documents. Alternatively you will receive an e-mail alert to log into Straight2Bank for authorisation.
Once you have clicked the “Approve” button in Action Menu / Dashboard Task card, the “Submit Approval” screen will be shown:
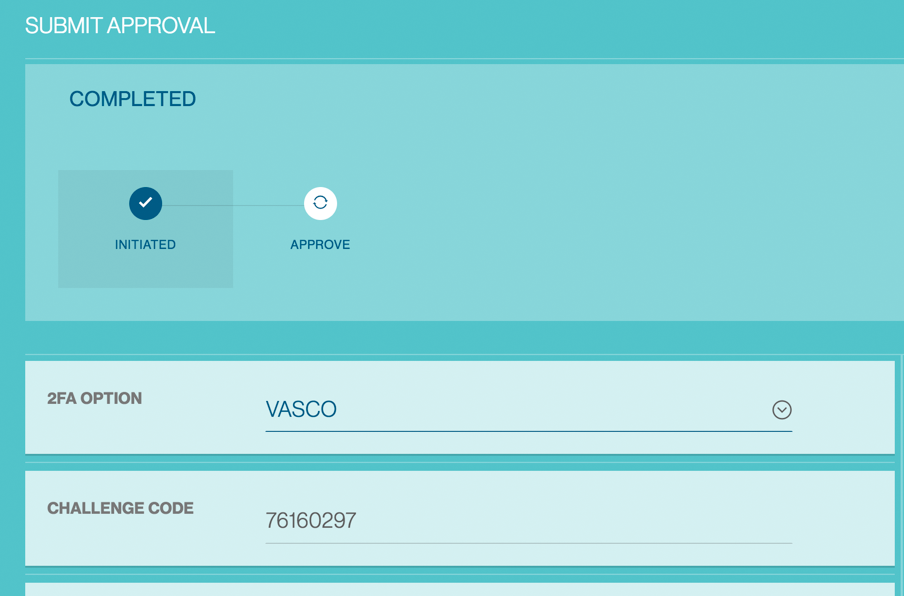
Your Vasco token is required at this point. Approvers are able to approve a payee by performing the steps below:
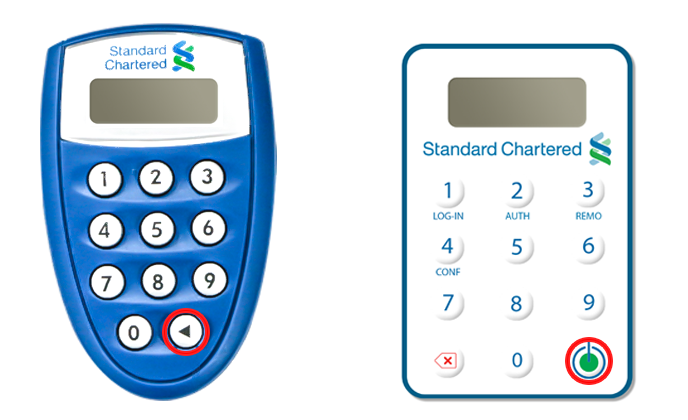
Turn on the Vasco Token and enter PIN
Turn on the Vasco token by pressing the On button.
Proceed to enter your personalised PIN (setup during Token activation) to activate the Token.
Display “APPLI _”
The screen will display “APPLI _” upon successful login.

Enter the number “2”
Enter the number “2” on the token keypad for Transaction Authorisation - “APPLI 2”.

Input the “Challenge Code”
You will be prompted to key in a set of numbers on the Token. Input the “Challenge Code” response from the Straight2Bank into the Token shown as below.

Enter the “Response Code”
The Token will generate and display a new set of numbers as the “Response Code”. Enter this set of numbers in the “Enter Code From Security” field on Straight2Bank screen and click Approve.
Send to Bank
The “Send To Bank” feature on Straight2Bank allows you to select one or more payment instructions to be released to the Bank for further processing.
Payments that are pending Send to Bank will be available on Individual Task Card, Pending Task Card on main page and Manage Payments List Screen
Universal Data Adapter
Not all ERP or Accounting Software generate an industry standard output file that can be uploaded into Straight2Bank without making any changes. The Universal Data Adaptor capability overcomes this challenge by allowing you to define a onetime mapping through a simple graphical user interface and use the template for subsequent uploads without making any changes to ERP / Accounting Software or even the spreadsheets that you may use.
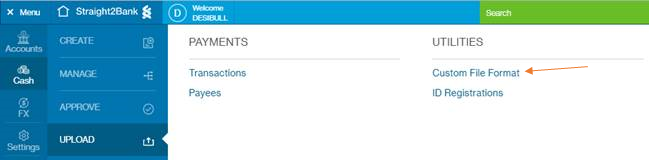
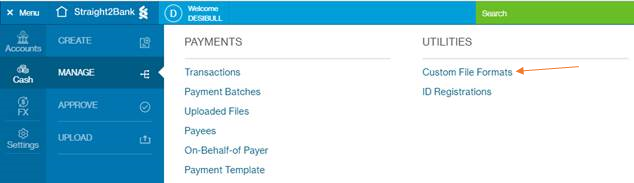
The Universal Data Adaptor capability is profile based feature available under “Menu > Import > Data Templates”. You will need to contact your Relationship Manager or the Bank to subscribe to this service if you do not have access.
You will see a screen similar to the below to capture information on the upload file.
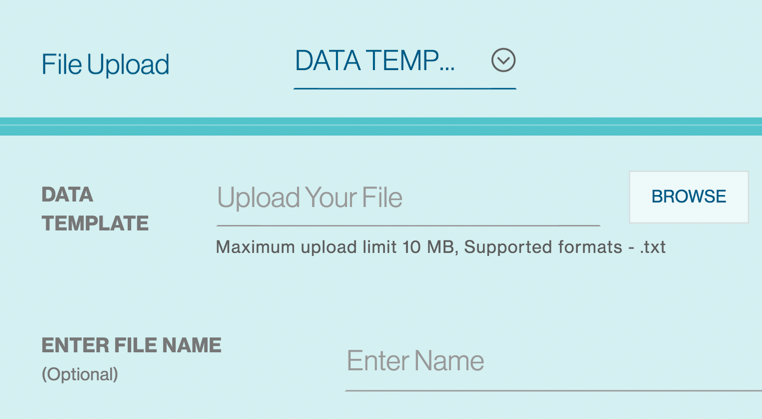
By Default, “Data Templates” will be displayed in “File Upload”
Choose a data template file and Import ( Maximum upload limit: 10 MB. Supported formats: *.txt ).
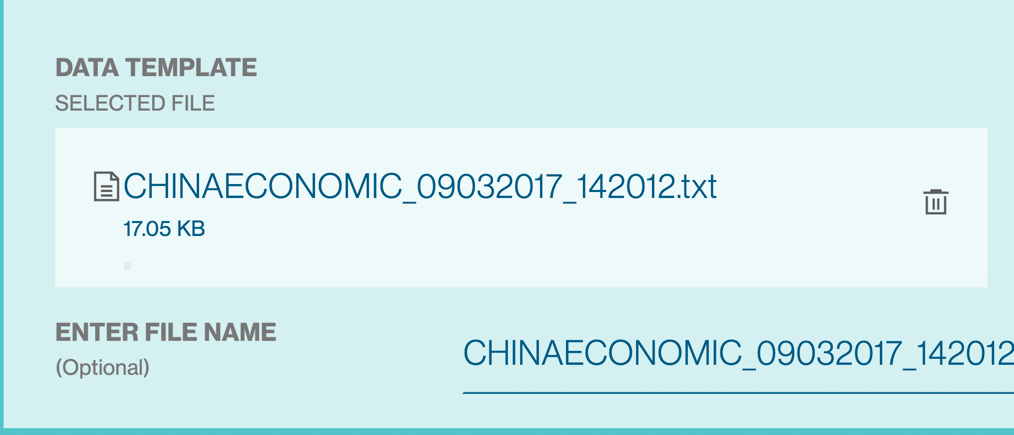
Click “Import” button to process the file.
You will get the confirmation message once the file imported successfully.

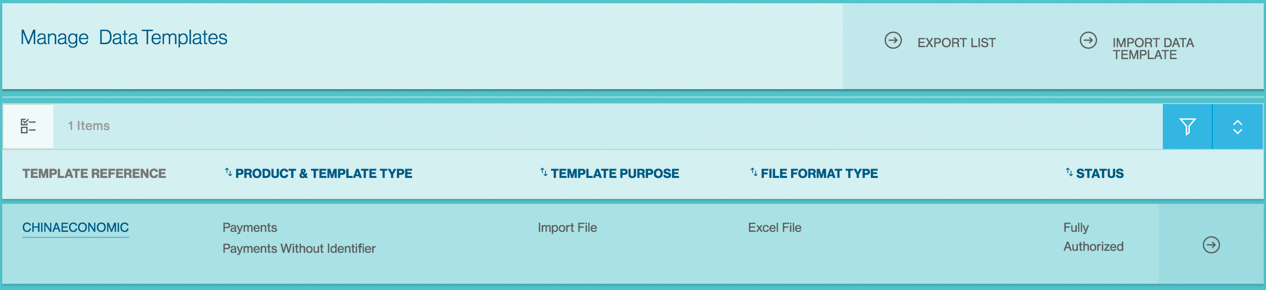
To check whether there are errors or duplicates to your uploaded file, go to “Menu > Manage > Data Templates”. Search for the file by entering the template reference or File name.
This page displays the data templates as a table with the following headers:
Template Reference:
Template Name will be displayed.
Product & Template Type:
For Product as ‘Payments’, Template Type will be ‘Payees’, ‘Payments’, ‘Payments without Identifier’, ‘Payments with Invoices’. For Product as ‘Reporting’, Template Type will be ‘Operating Account Statement’.
Template Purpose
Options will be Import File/Export File.
File Format Type
Options will be Delimited / Fixed Format / Excel
Status
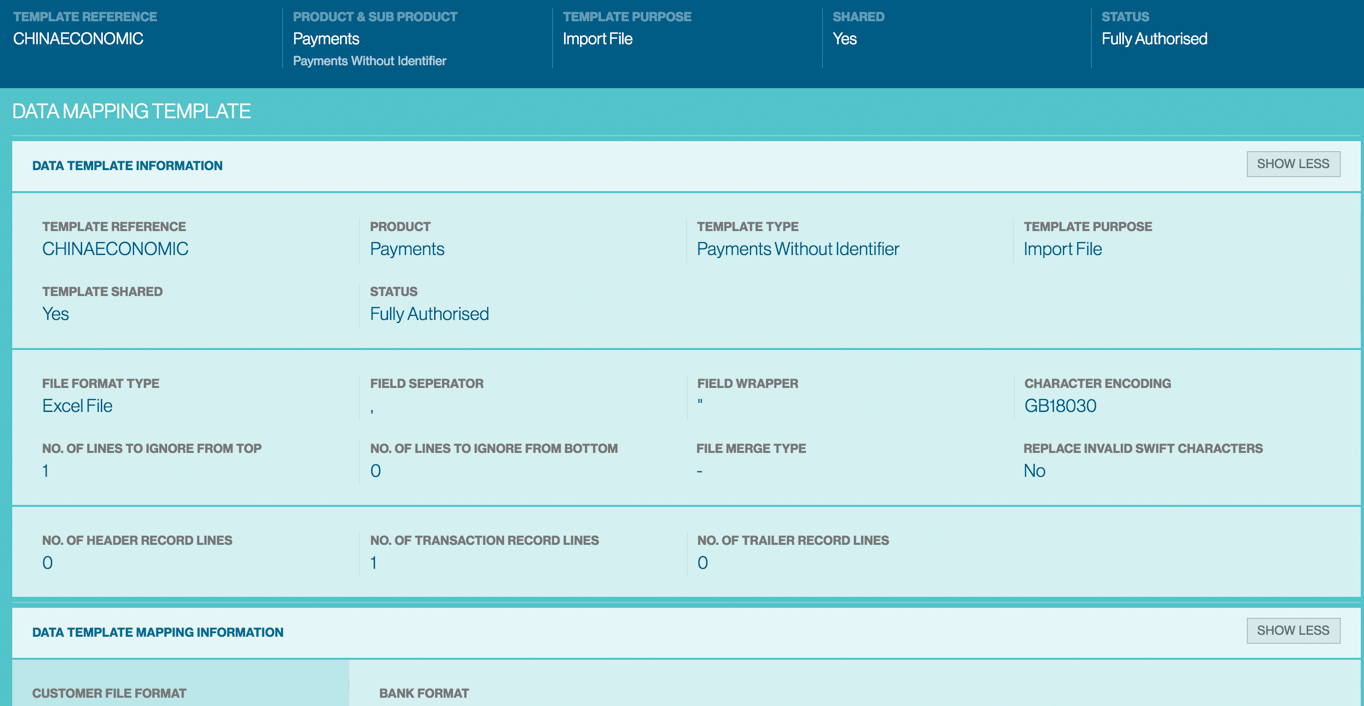
Once the file is successfully uploaded, it would be decrypted and stored as a data template in the list. The Status of data template should be “Fully Authorized”.
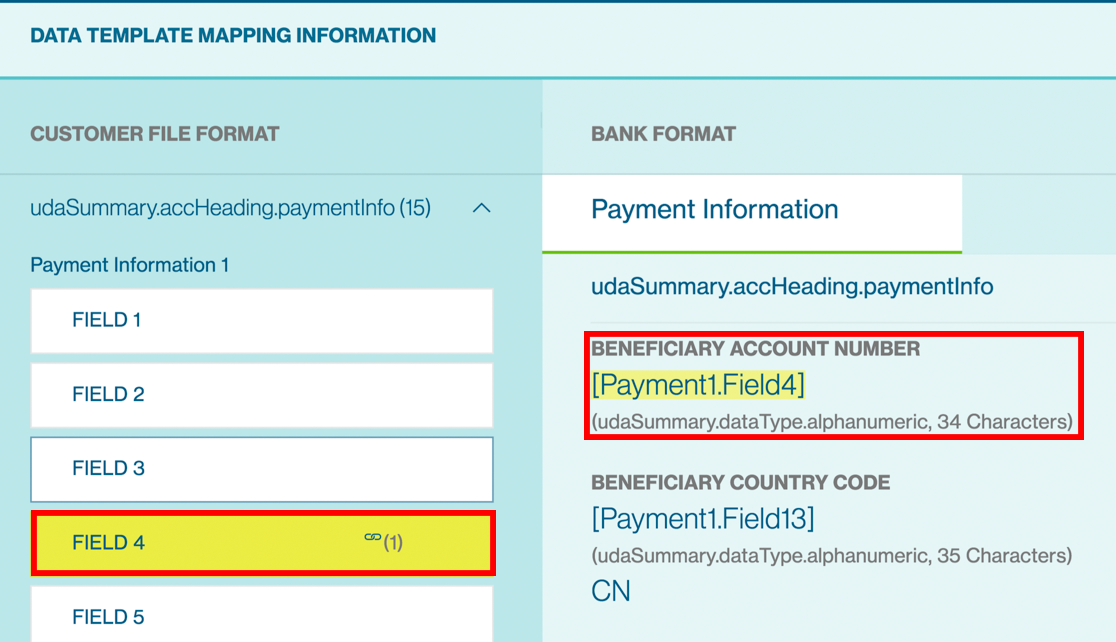
Upon clicking on the template reference, the characteristics of the file format and how the data is organised within the file will be displayed.
| Field Name | Description |
|---|---|
| Template Reference | An unique, user-friendly identifier of the template to easily retrieve during upload or maintenance. |
| Template Type |
Further categorisation of the transaction type. For Payments products, the value available are: - Payee: To create mapping template for payee / beneficiary records. - Payments: To create mapping template for payments containing payment and invoice records in the same file. - Payments with Multiple Files: To create template where payment and invoice records are in different files. - Payments without Identifier: To create template where the file contains only payment records and no identifier. Every line in the file will be treated as one payment item. |
| Template Purpose | Options will be Import File/Export File. |
| Template Shared | If value is “Yes”, the template created would be available to all the Users belonging to the Group. |
| File Format Type | Describe how fields coexist within the file. Options available are “Delimited”, “Fixed Length”, and “Excel File (.xls / .xlsx)”. |
| Field Separator | Applicable to “Delimited” file format type only. It’s the character that separates each field in the file. It can be comma, tab, space, etc. |
| Field Wrapper | Mandatory for “Delimited” file format type only. It’s the character that, when doubled, enfolds each field in the file. It can be double quotes, single quotes, etc. Defaulted to double quotes. |
| Character Encoding | This input allows defining how the characters are encoded within the file format to be mapped. The default selection is ASCII and should be kept if the file does not contain any local language characters. Other options are Chinese Traditional (BIG5), Chinese Simplified (GBK), Thai, Japanese (Shift JIS). |
| No. of Lines to Ignore from Top / Bottom |
Indicates the number of lines to skip from the top and from the bottom of the input file during data conversion. |
| File Merge Type | Applicable for “Payments with Multiple Files” template type only. It determines how the records on the invoice file are merged into the corresponding payment record on the payment file. Options are ‘Sequence’ or ‘Indexed’. |
| Replace invalid SWIFT Characters |
When value is “Yes”, the following invalid SWIFT characters in the input file will be replaced with a space: * ~ \ | ` ! @ # $ % _ { } [ ] ; " < > &. By default, the option is “No”. |
The Payment details will automatically highlight and show validation description to the source value upon clicking on the “Field No.” button on left sidebar.
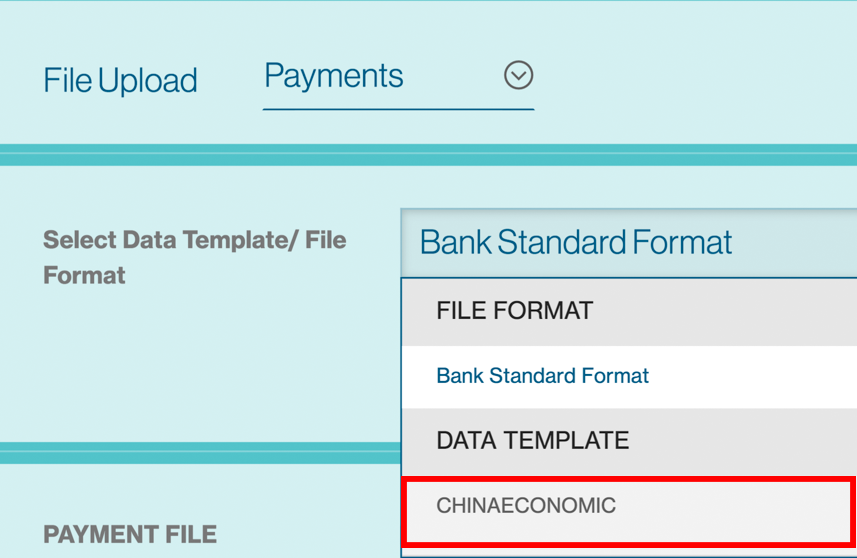
Choosing Payments as the Import type, the list of templates that you may have setup via UDA, or setup by the Bank will be available for selection and file upload.
Bulk Import Payees
The “Bulk Import” feature allows you to upload several payees details onto Straight2Bank in bulk. It saves time in creating these payees on Straight2Bank and improves efficiency.
The upload file may be in a standard, bank defined format or a template created using Universal Adaptor to convert from any format to the bank format and process the instructions within it.
Choose from “Menu > Import > Payees”

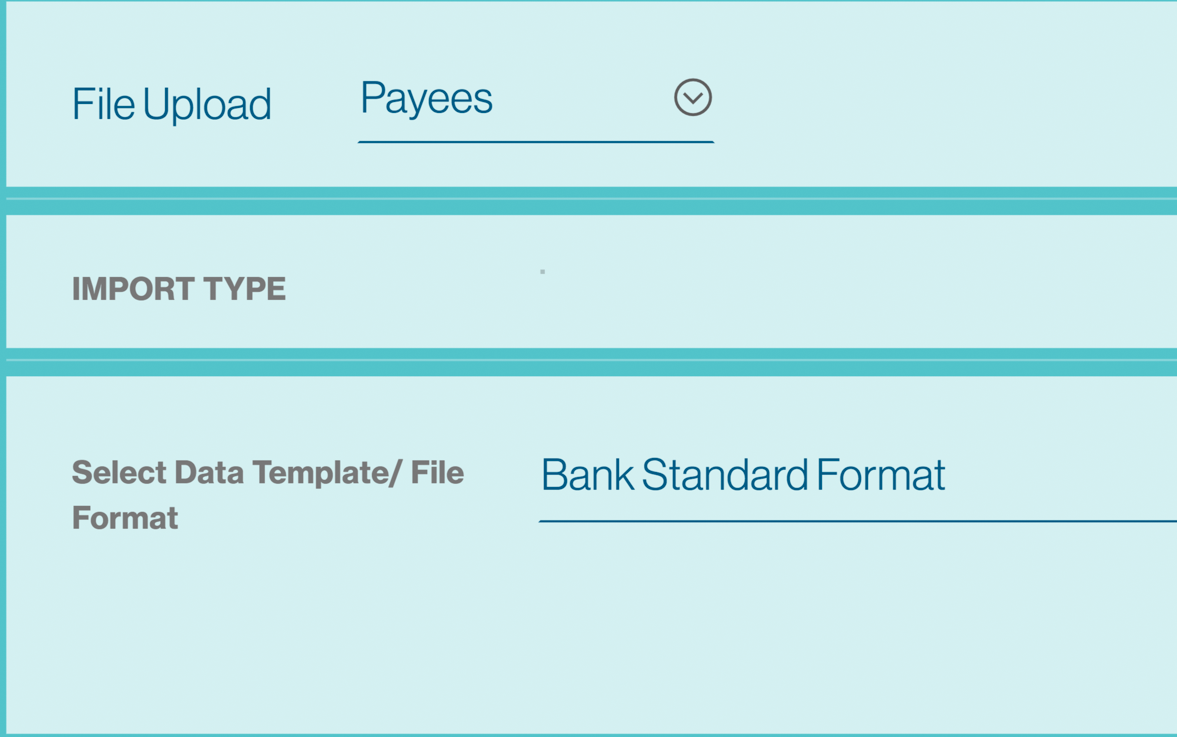
You will see a screen similar to the below to capture information on the upload file.
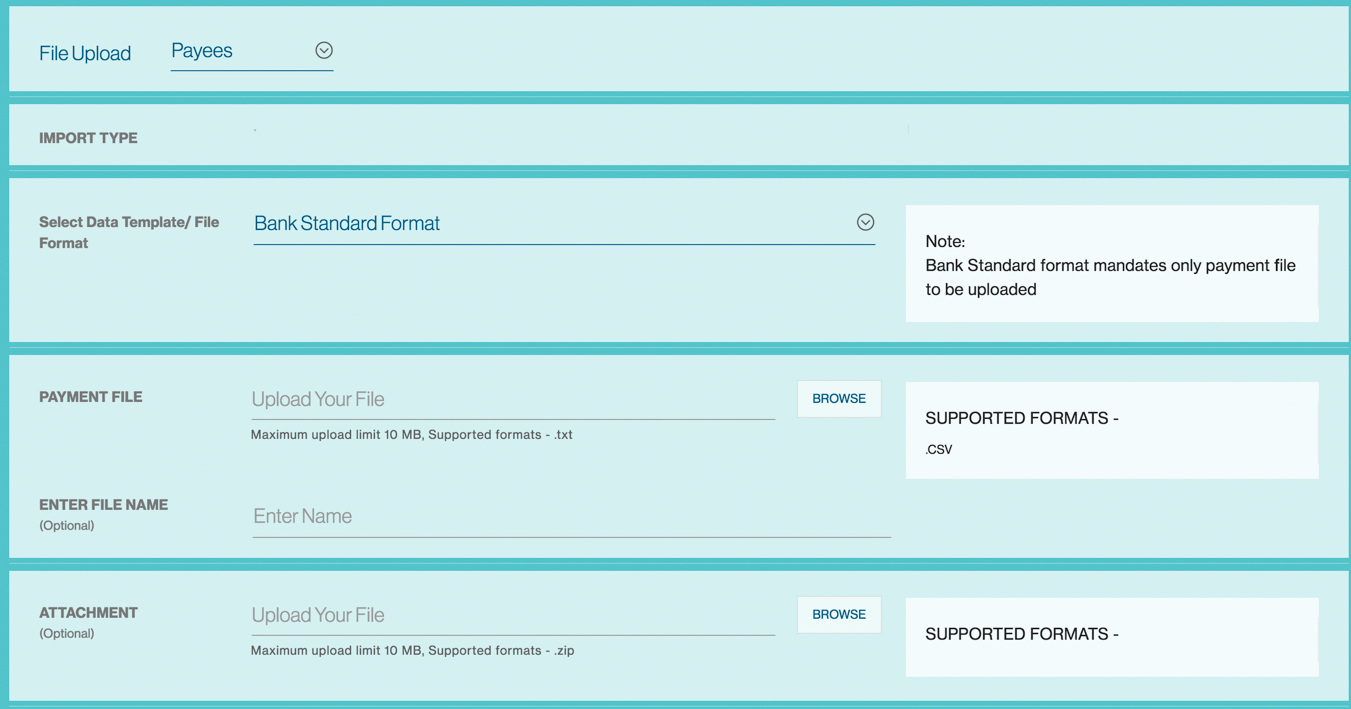
Choose “File Upload” as Payees or other Payee file types based on the file that you are uploading. By Default, “Payees” will be displayed.
Then select the list of existing “Data Templates / File Format”.
By Default, ‘Bank Standard Format’ will be displayed.
Choose the file and Import ( Maximum upload limit: 10 MB. Supported formats: *.csv ).

You can provide a relevant “File Name” of the file. For example, “Payees Aug 2017”.

Click “Import” button to process the file.
You will get the confirmation message once the file imported successfully.

To check whether there are errors or duplicates to your uploaded file, go to “Menu > Manage > Files” Search for the file by entering the File Reference or File name.

| File Status | Description |
|---|---|
| Upload Successful | The payees have been uploaded successfully are in “Submitted for Approval” or “Draft” status for further processing. Users can click on the the file reference and view the reason for payees being marked as draft. Users can then edit the payee online to amend and send to approver. |
| Upload Failed | The file has not been uploaded successfully. The file format is not compatible or is incorrect. User can click on the file reference view / download the error log. |
| Uploaded with errors | The file has been uploaded successfully. Some of the payees uploaded are of incorrect format and hence are “Invalid” Click on thefile reference view / download the error log. The invalid records are not uploaded and hence will need to be uploaded afresh after rectifying the discrepancies |
| Upload In-Progress | It means that the file upload is in progress and you must wait for it to finish. |
Upon processing, the payees within the file will be available through the “Manage > Payee” screen and further action (e.g.) “Authorise”, “Edit”, etc can be performed.
Refer to the relevant section in this site for any further information relating to authorising, editing and etc of these payees.
Payees Bulk Import File Format
File Format Syntax
- Each record should end with a new line character.
- The number of fields in each record should match the file format specifications described in this document.
- The Start/End character for each field can be left blank or with double inverted commas
- The field separator is a comma
- Escape characters are not supported.
- If a field value has a comma, specify the entire field value within “ ” a pair of double inverted commas.
- All date fields should be in dd/mm/yyyy format.
- Numeric fields with null or space values will be recognised as 0.00 by default.
- Removing space characters from fields are not supported.
File Format
Comma Separated Value (.CSV)
Maximum File Size
Maximum 2,000 records per CSV file. Up to 10MB.
Character Sets And Encoding
- Numeric characters: 0 to 9
- Upper-case letters: A to Z
- Special Characters: Blank “ ” Full stop “.” Ampersand “&” Hyphen “-“ Slash “/” Plus Sign “+” Asterisk “*” Percentage “%” Dollar “$”
- Character encoding: Information in local language fields should be encoded with Base64 if native character set is used. If English or UTF-8 characters are used, base64 encoding is not mandatory.
Examples of payee / beneficiary records
BID12345678,Mr Tester One,Address line 1,SG,1.23457E+11,SG,SIN,11111111,Tester One,AC,DBS
BID87654321,Gang Xi,CN,9876543210199,CN,SHA,22222222,许刚 , AC, 中国银行股份有限公司 北京清华园支行,差旅费
The following are the details of some critical fields of the Payees Bulk Import File.
| Field Order / Name | Field Length | Validation/Remarks/Encoded Fields |
|---|---|---|
| 1. Payee/Beneficiary ID | X(35) | This is a unique ID on Straight2Bank and can be used to search for Payee’s during payment workflow or payee maintenance. This ID can also used during Bulk payments. |
| 2. Payee Name | X(96) | Name of the Payee in English. For MY-KUL RTGS, Payee Name length will be up to 96 characters for RTGS. For ID-JKT ACH, Payee Name length will be up to 70 characters for ACH. For other payment types, payee name up to 35 characters supported. |
| 3. Address 1 | X(70) | Address in English The maximum length of 70 is only applicable if you are paying this beneficiary using ACH or PAY payment type out of Indonesia. In all other cases, only 35 is applicable. |
| 5. Payee Country | X(2) | Please enter the two-letter ISO Country Code. If you are making a ACH or a PAY payment out of Indonesia, this field is mandatory. |
| 6. Payee Account Number | X(34) | To capture Payee’s bank account number. This field is not mandatory if the Payee is used for cheque payments such as Local Bank Cheque or Corporate Cheque. |
| 8. Payment Country | X(2) | Two-letter ISO Country Code of the country where the debit account is opened. |
| 9. Payment City | X(3) | Three-letter ISO city code of the city where the debit account is opened. |
| 11. Payee Bank Code | X(11) | SWIFT BIC Code US - CHIPS/FEDWIRE Code UK – CHAPS Code |
| 12. Bank Local Code | X(17) | Local ACH Bank Code This field would be used to fetch the Payee Bank Code if Payee Bank Code is not available in file. |
| 13. Bank Branch Code | X(5) | Where relevant, local clearing bank and branch code will be used to identify the beneficiary bank for local transfer. |
| 17. Payee Name1 (Local Language) |
X(80) | Any information provided in this field should be encoded with Base64 if native character set is used. If English or UTF-8 characters are used, then base64 is not mandatory. |
Bulk Import Payments
The “Bulk Import” feature allows you to upload several payments generated out of Enterprise Resource Planning (ERP) or accounting software onto Straight2Bank in bulk. It saves time in re-doing these transactions on Straight2Bank and improves efficiency.
The upload file may be in a standard, bank defined format or a template created using Universal Adaptor to convert from any format to the bank format and process the instructions within it.
Choose from “Menu > Import > Payments”
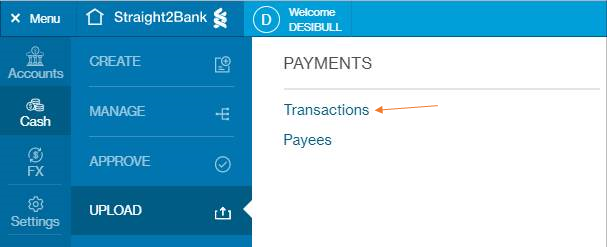
You will see a screen similar to the below to capture information on the upload file.

Choose “File Upload”: Payments, SMEPayment, or other Payment file types based on the file that you are uploading. By Default, “Payments” will be displayed.
Then select the list of existing “Data Templates / File Format”. For regular Payment Bulk Import, it is always “iPayment CSV” and the Template Formats shows all the UDA templates available to the user. By Default, ‘Bank Standard Format’ will be displayed.

Choose the file and Import ( Maximum upload limit: 10 MB. Supported formats: *.csv ).
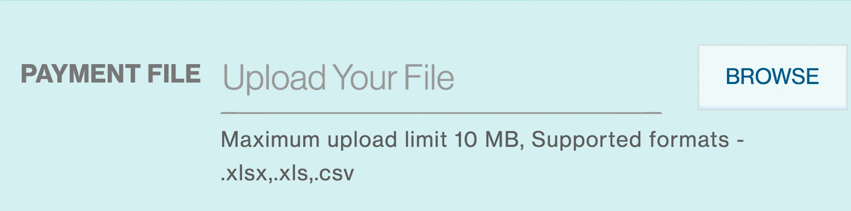
You can provide a relevant “File Name” of the file. For example, “Payments 20170801”.

Click “Import” button to process the file.
You will get the confirmation message once the file imported successfully.

To check whether there are errors or duplicates to your uploaded file, go to “Menu > Manage > Files” Search for the file by entering the File Reference or File name.

| File Status | Description |
|---|---|
| Upload Successful | The payment instructions have been uploaded successfully and transactions are in “Submitted for Approval” or “Draft” status for further processing. Users can click on the the file reference and view the reason for transactions being marked as draft. Users can then edit the transaction online to amend and send to bank. |
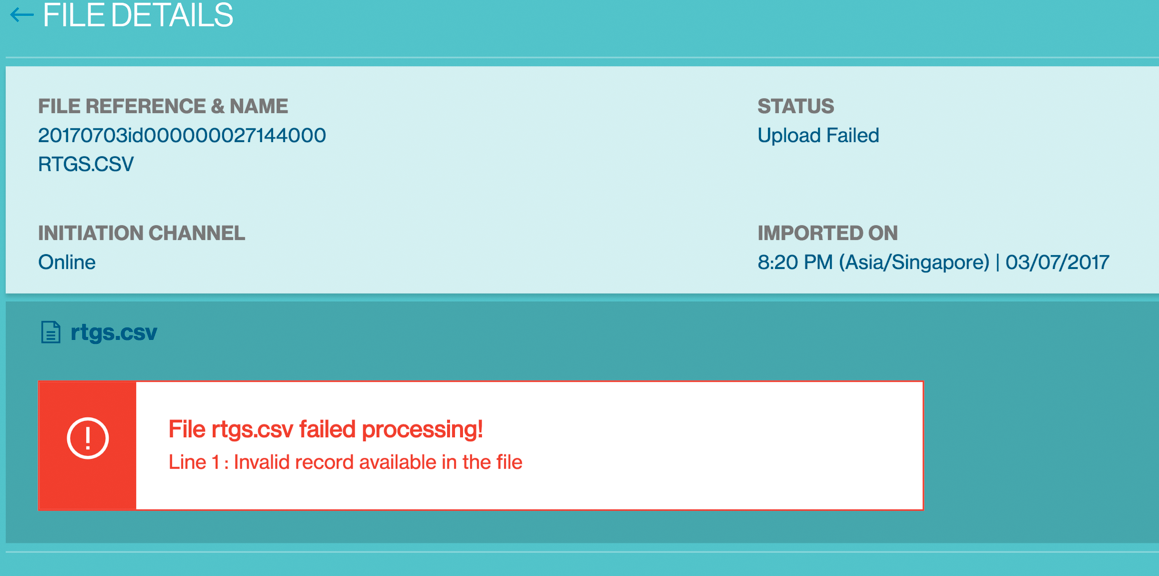
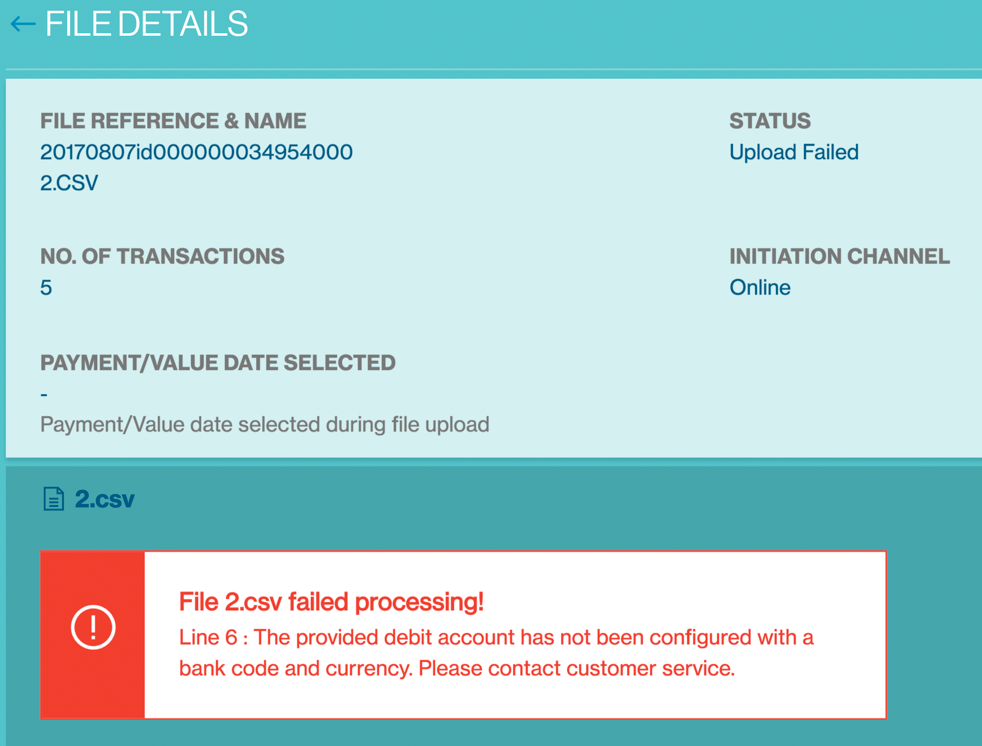
| Upload Failed | The file has not been uploaded successfully. The file format is not compatible or is incorrect. User can click on the file reference view / download the error log. |
| Uploaded with errors | The file has been uploaded successfully. Some of the payments uploaded are of incorrect format and hence are “Invalid” Click on thefile reference view / download the error log. The invalid records are not uploaded and hence will need to be uploaded afresh after rectifying the discrepancies |
| Upload In-Progress | It means that the file upload is in progress and you must wait for it to finish. |
Upon processing, the payments within the file will be available through the “Manage > Payment” screen and further action (e.g.) “Authorise”, “Batch”, “Edit”, etc can be performed.
Refer to the relevant section in this site for any further information relating to batching, editing and etc of these transactions.
Payments Bulk Import File Format
File Format Syntax
- Each record should end with a new line character.
- The number of fields in each record should match the file format specifications described in this document.
- The Start/End character for each field can be left blank or with double inverted commas
- The field separator is a comma
- Escape characters are not supported.
- If a field value has a comma, specify the entire field value within “ ” a pair of double inverted commas.
- All date fields should be in dd/mm/yyyy format.
- Numeric fields with null or space values will be recognised as 0.00 by default.
- Removing space characters from fields are not supported.
File Format
Comma Separated Value (.CSV)
Maximum File Size
Maximum 2,000 records per CSV file. Up to 10MB.
Character Sets And Encoding
- Numeric characters: 0 to 9
- Upper-case letters: A to Z
- Special Characters: Blank “ ” Full stop “.” Ampersand “&” Hyphen “-“ Slash “/” Plus Sign “+” Asterisk “*” Percentage “%” Dollar “$”
- Character encoding: Information in local language fields should be encoded with Base64 if native character set is used. If English or UTF-8 characters are used, base64 encoding is not mandatory.
Examples of payee / beneficiary records
BID12345678,Mr Tester One,Address line 1,SG,1.23457E+11,SG,SIN,11111111,Tester One,AC,DBS
BID87654321,Gang Xi,CN,9876543210199,CN,SHA,22222222,许刚 , AC, 中国银行股份有限公司 北京清华园支行,差旅费
The following are the details of some critical fields of the Payees Bulk Import File.
| Field Order / Name | Field Length | Validation/Remarks/Encoded Fields |
|---|---|---|
| 2. Payment Type | X(4) | Mandatory. If invalid, reject whole file. (e.g.)TT/BT/ACH/PAY/IBC/LBC/CC/BB/CA/RSPC/ XACH/XBT/XPAY/XRTS/XCHQ/TAX/BPAY |
| 9. Debit Account Number | X(34) | Mandatory. To mapping existing Debit account number in Straight2Bank system. |
| 10. Payment/Value Date | X(10) | Mandatory. All date fields should be in dd/mm/yyyy format. |
| 11. Payee Name | X(96) | Name of the Payee in English. For MY-KUL RTGS, Payee Name length will be up to 96 characters for RTGS. For ID-JKT ACH, Payee Name length will be up to 70 characters for ACH. For other payment types, payee name up to 35 characters supported. |
| 16. Payee Bank Code | X(11) | SWIFT BIC Code US - CHIPS/FEDWIRE Code UK – CHAPS Code |
| 17. Payee Bank Local Clearing Code |
X(17) | Local ACH Bank Code This field would be used to fetch the Payee Bank Code if Payee Bank Code is not available in file. |
| 18. Payee branch code | X(5) | Where relevant, local clearing bank and branch code will be used to identify the beneficiary bank for local transfer. |
| 20. Payee Account Number | X(34) | SWIFT BIC Code To capture Payee’s bank account number. This field is not mandatory if the Payee is used for cheque payments such as Local Bank Cheque or Corporate Cheque. |
| 21. Payment Details1 | X(70) | Payment Details in English. Not a critical field. |
| 38. Payment Currency | X(3) | Mandatory. If invalid, reject whole file. |
| 39. Payment amount | X(10) | Mandorty. Numeric check and greater than 0. |
| 50. Payee Name1 (Local Language) |
X(80) | Any information provided in this field should be encoded with Base64 if native character set is used. If English or UTF-8 characters are used, then base64 is not mandatory. |
| 56. Payment Details1 (Local Language) |
X(70) | Any information provided in this field should be encoded with Base64 if native character set is used. If English or UTF-8 characters are used, then base64 is not mandatory. |
| 62. Payee ID | X(35) | If provided and the payee ID is found in the Payee Table, the payee details will be overwritten by values in the Payee Table. If Payee ID provided cannot be found in the Payee Table, payee details from import file will be imported. |
Convert TXT source file to CSV
Some payments bulk import source files generated out of Enterprise Resource Planning (ERP) or accounting software is in TXT format. Here are steps to convert TXT source file to excel CSV file.
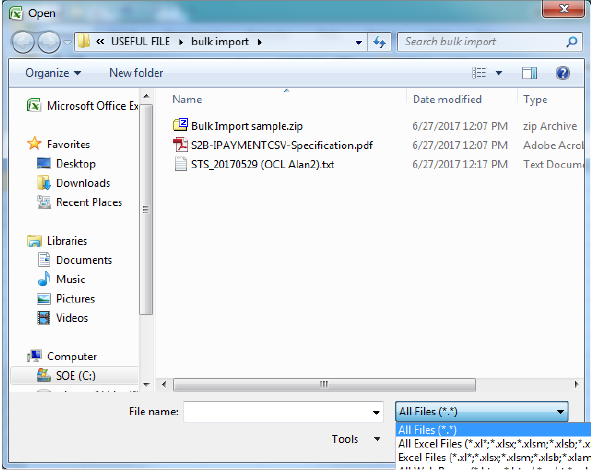
Click open in Microsoft excel and choose TXT source file (Select “All Files” in dropdown list).
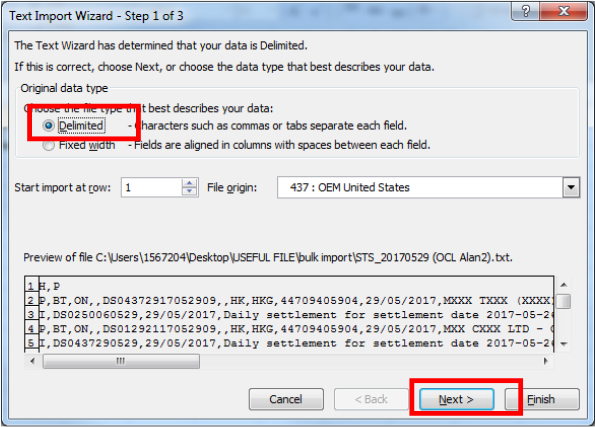
An additional screen “Text Import Wizard” will appear - Choose “Delimited” then click “next”.
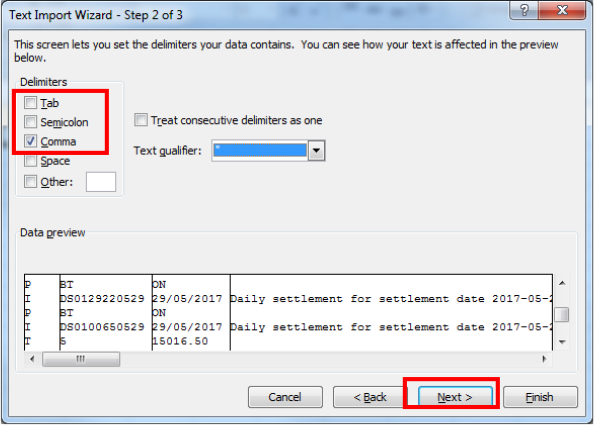
Select “Comma” as delimiters, then click “next”.
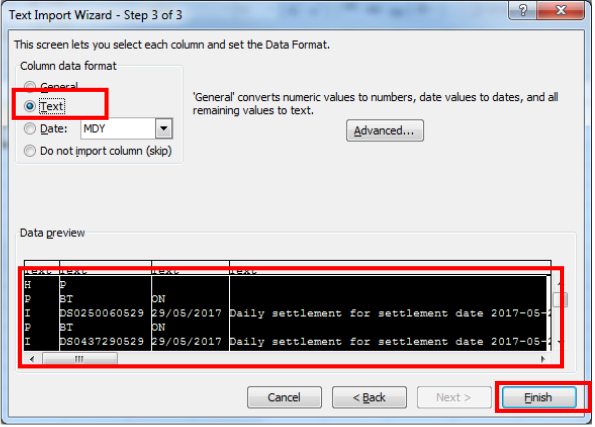
Select “Text” as column data format, the data preview screen will highlight the entire column. Finally, proceed by clicking on “Finish”.
After clicking on finish, payment detail will be generated in excel file.
We can simply check on the Excel file whether the data match with proper field.
Refer to the Payments Bulk Import File Format for details on this.
Bulk Import for Payroll Upload
China
china-payroll-standard-template.zip
Hong Kong
hongkong-payroll-standard-template.zip
India
india-payroll-standard-template.zip
Malaysia
malaysia-payroll-standard-template.zip
Singapore
iHost-to-Host
Standard Chartered's Straight2Bank Access-Internet Host-to-Host capability allows you to upload a pre-formatted data file exported from your back office system to Straight2Bank for processing. It saves time in re-doing these transactions on Straight2Bank and improves efficiency.
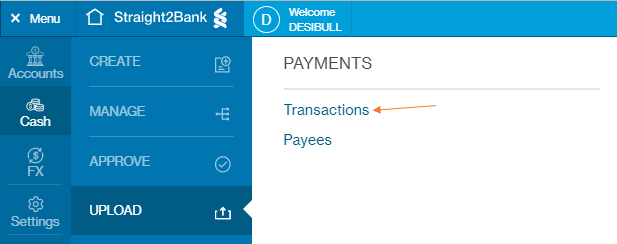
To perform a file upload, choos e from “Menu > Import > Payments”
You will see a screen similar to the below to capture information on the upload file .
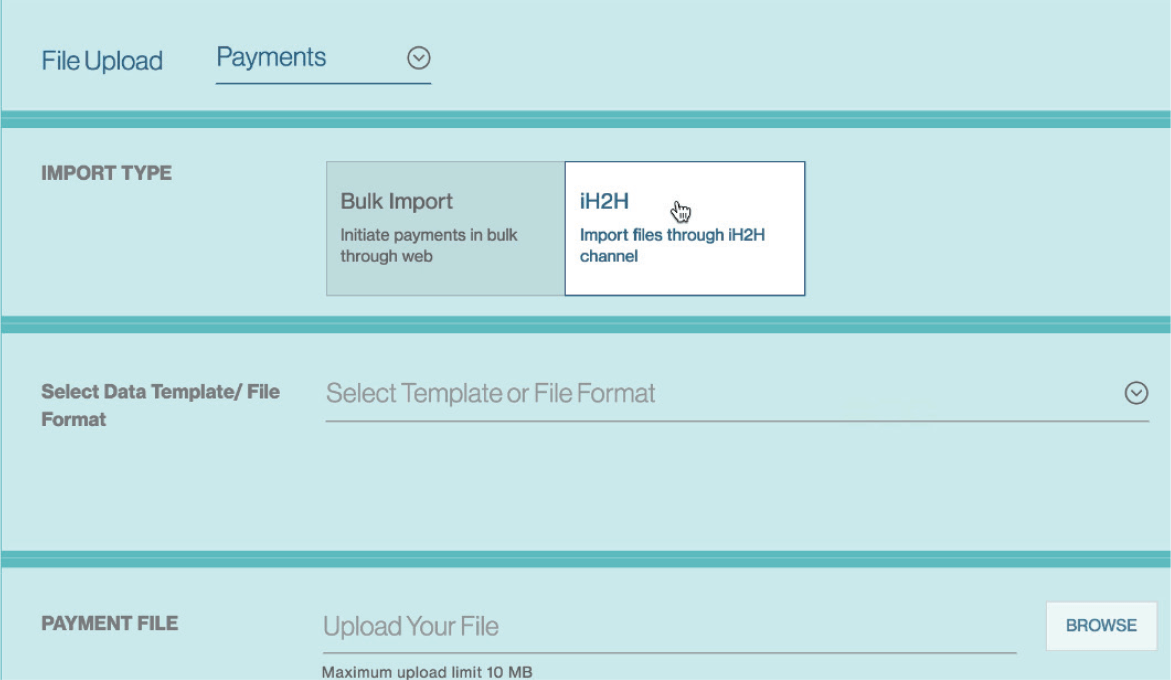
Choose “iH2H” to import files through iH2H channel.
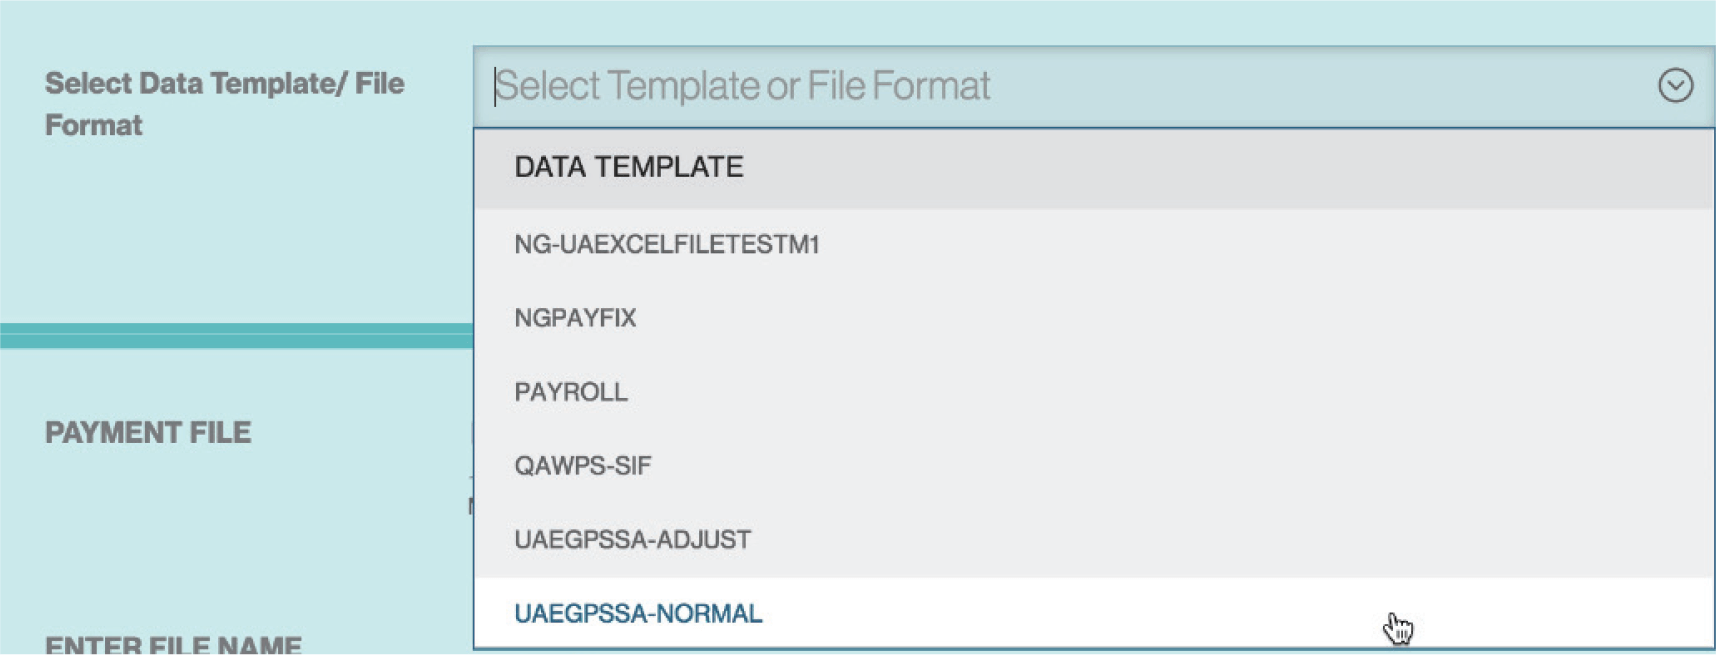
Then select the appropriate “Template or File Format” from the drop down list.
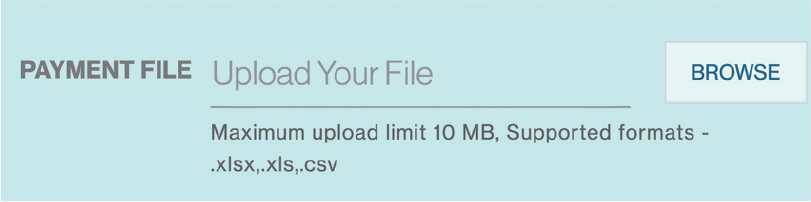
Click on the "Browse" button to search for the file y ou wish to import
( Maximum upload limit: 10 MB. Supported formats: *.csv ).
You can provide a relevant “File Name” of the file. For example, “Payments 123”.

Click “Continue” button to process the file.

You will see the “Authenticate Import” screen prompt as below after you have clicked on the “Continue” button.
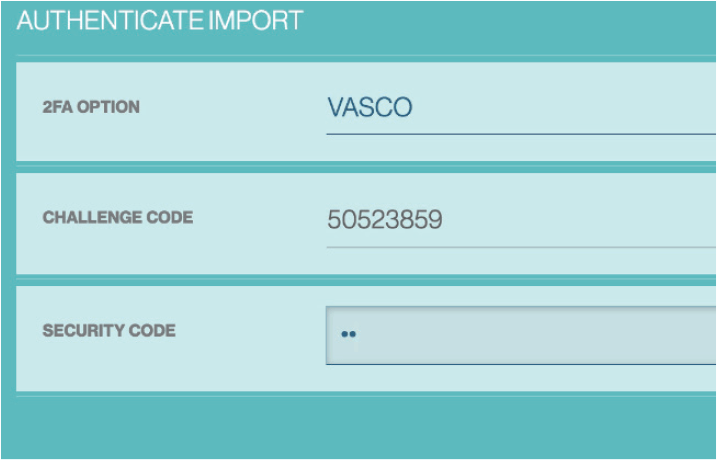
Your Vasco token is required at this point. To generate the Vasco token response for authorisation:
Turn on the Vasco Token and enter PIN
Turn on the Vasco token by pressing the On button.
Proceed to enter your personalised PIN (setup during Token activation) to activate the Token.

Display “APPLI _”
The screen will display “APPLI _” upon successful login.

Enter the number “2”
Enter the number “2” on the token keypad for Transaction Authorisation - “APPLI 2”.

Input the “Challenge Code”
You will be prompted to key in a set of numbers on the Token. Input the “Challenge Code” response from the Straight2Bank into the Token shown as below.

Enter the “Response Code”
The Token will generate and display a new set of numbers as the “Response Code”. Enter this set of numbers in the “En ter Code From Security” field on Straight2Bank screen and click Send to Bank Now.

You will receive a confirmation screen.

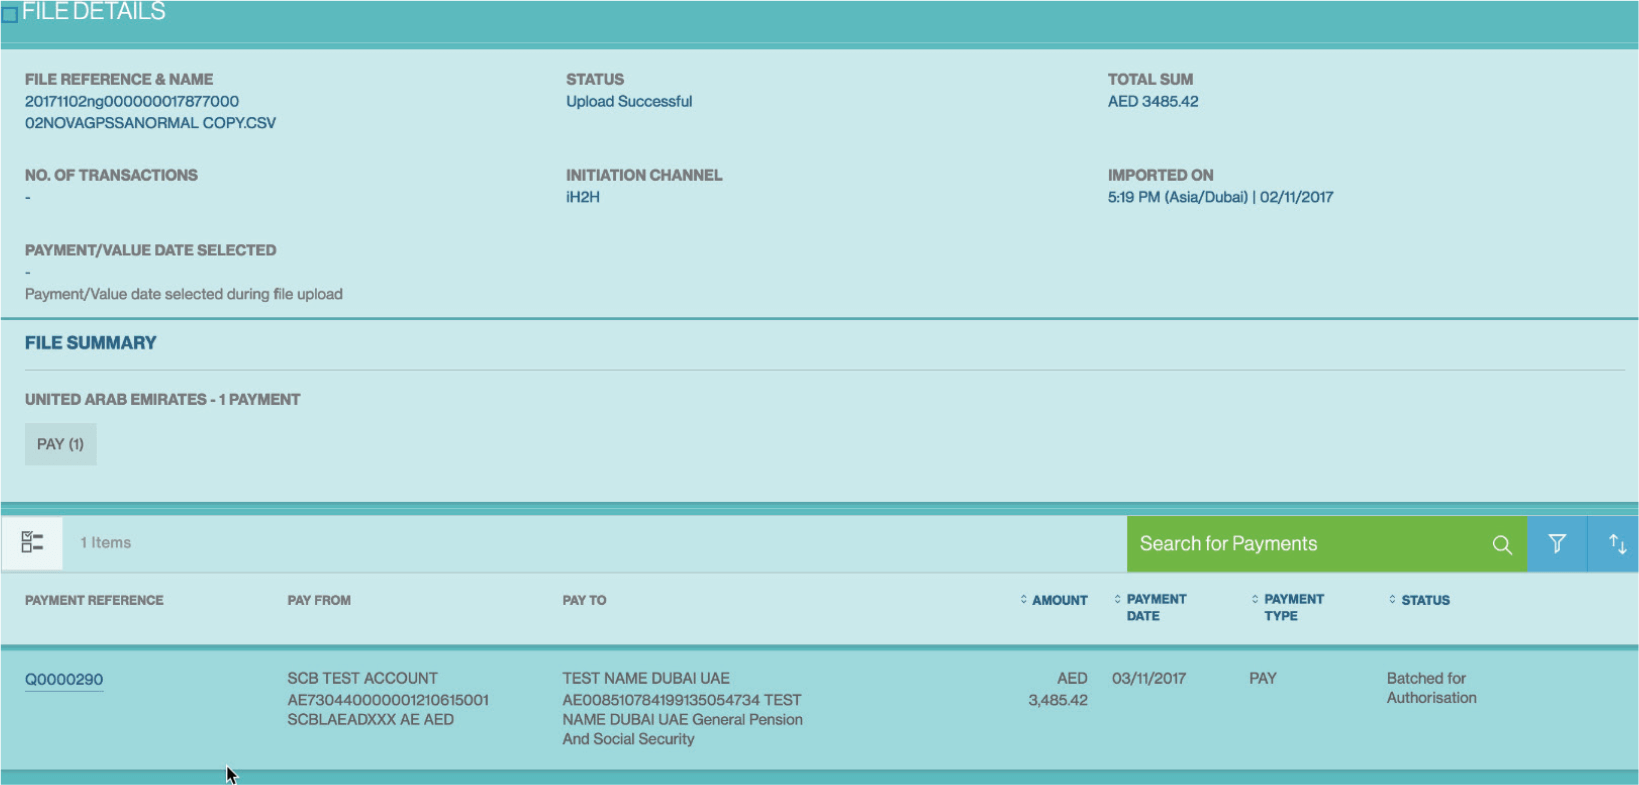
To check whether there are errors or duplicates to your uploaded file, go to “Menu > Manage > Files”
Search for the file b y entering the File R eference or File name .

| File Status | Description |
|---|---|
| Upload Successful | The payment instructions have been uploaded successfully and transactions are in “Submitted for Approval” or “Draft” status for further processing. Users can click on the the file r eference and view the reason for transactions being marked as draft. Users can then edit the transaction online to amend and send to bank. |
| Upload Failed | The file has no t been uploaded success fully. The file f ormat is not compatible or is incorrect. User can click on the file r eference view / download the error log. |
| Uploaded with errors | The file has been uploaded success fully. Some of the payments uploaded are of incorrect format and hence are “Invalid” Click on thefile reference view / download the error log. The invalid records are not uploaded and hence will need to be uploaded afresh after rectifying the discrepancies |
| Upload In-Progress | It means that the file upload is in pr ogress and you must wait for it to finish. |
Approvers are able to approve the file b y performing the steps below:
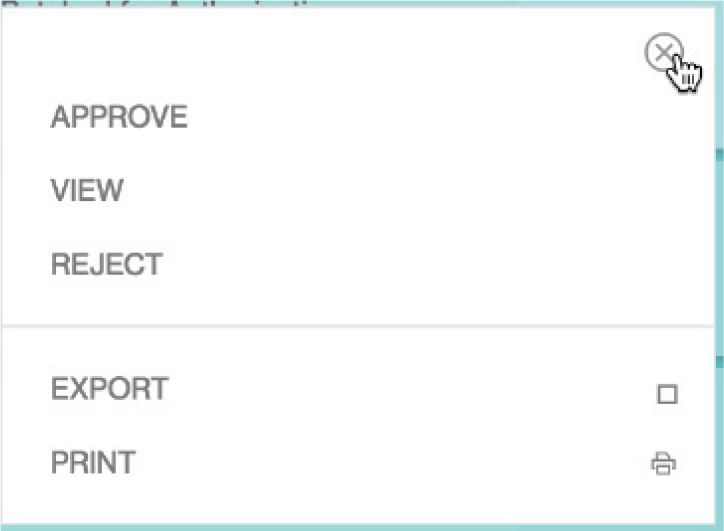
Login as Approver, the payments within the file will be available through the “Approve > Batches” screen.
Further action (e.g.) “Approve”, “View”, “Reject”, etc can be performed.
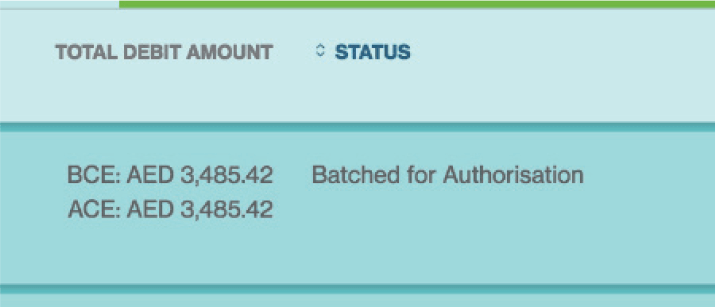
Upon successfully approval, the payments within the file will be available through the “Manage > batches” screen and click on “Send to Bank”

Payment Linked Request for Quote (PLRFQ) function
The RFQ capability allows clients to book an online, real-time FX rate for an individual payment or a batch of payments. Clients have to be first given the entitlements for this capability and all existing payment types support this RFQ function except for the following –
- Corporate Cheque
- Instant Bank Fund Transfer
- Bank to Bank Transfer
- Request for Transfer
- Tax Payments
This capability is available for payments initiated out of accounts held in –
| Hong Kong | Singapore | India | UAE | Bahrain |
| Oman | Qatar | Botswana | Kenya | Uganda |
| Zambia | UK | US |
Payment Initiation
If you are making a payment which requires FX, after selecting the payment type, the screen will prompt for a FX type.
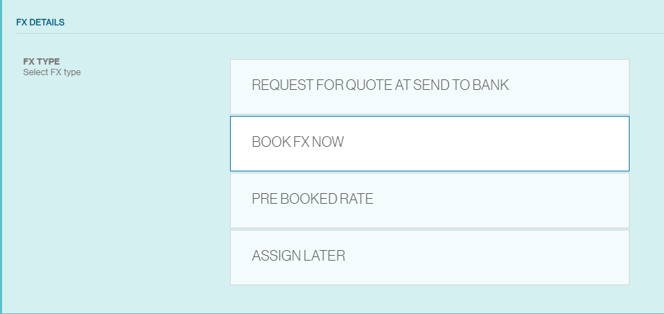
Select BOOK FX NOW and it will route to the FX screen to get the quote. Click GET QUOTE to get a real-time FX quote.
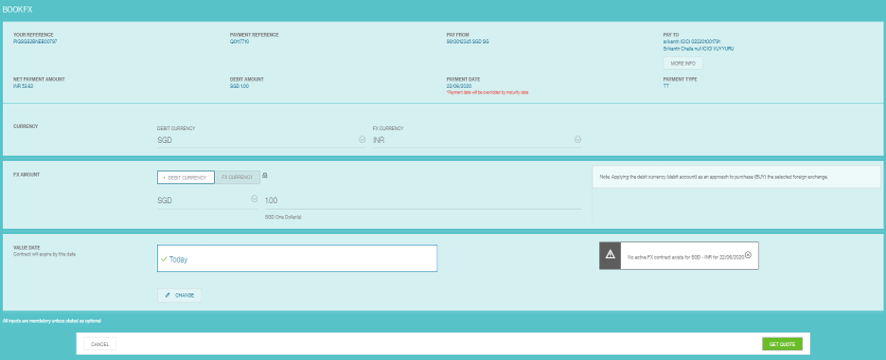
The FX quote will be valid for 20 seconds and will be refreshed automatically.

Click ‘Accept Quote’ if you are agreeable to the FX rate.

Once you accept the FX quote, this deal will be automatically linked to the payment

Payment Approval
For payment approval, users can send the payment reference number found in the payment summary to their approvers.

Payments that require approval are found under Menu > Approve > Payment with the status Submitted for Authorization.