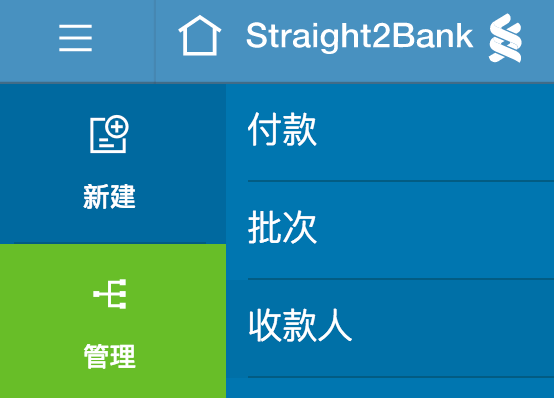
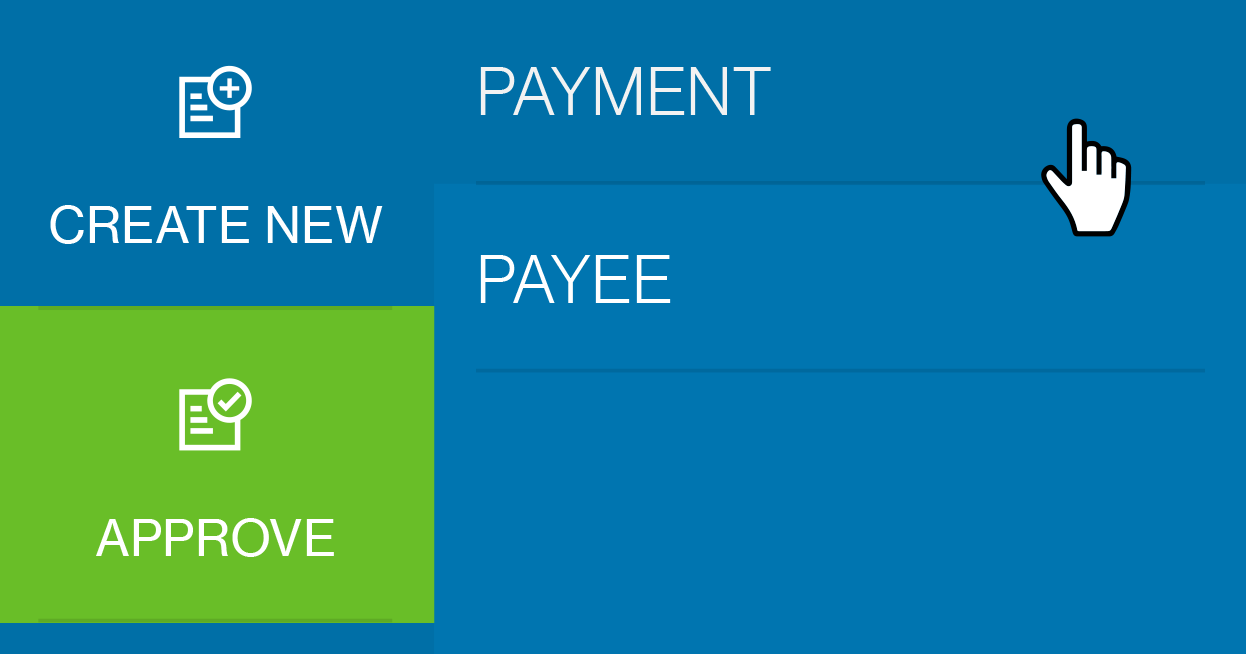
付款功能概述
Straight2Bank通過以下功能將提升付款流程的效率:
- 強大的檔案上傳和下載能力
- 客製化的交易和報告範本
- 內建驗證(針對法規要求或必填欄位)
- 欄位自動帶入,無需重複輸入資訊
- 客製化的多層級授權矩陣
- 查詢參考資訊(銀行代碼,匯率)
- 極大化效率的作業流程提示
在Straight2Bank上進行付款只需要簡單的3個步驟,分別是建立付款 (created)、授權 (authorised) 和發送往銀行處理 (subsequently submitted to the Bank for processing)。
以下為作業流程的概述:
建立付款
- 以「批次」或「手動」 選項建立付款
- 可以用多種方式建立付 款指示(不論是境內或跨 境付款)
- 建立的付款隨後可被授 權處理
授權
- 即時電子郵件通知授權人 有關授權請求
- 在授權批次付款前對交易 明細進行檢視
- 提供多層級授權矩陣
- 可透過網頁或是行動裝置
發送往銀行
- 線上交易狀態即時更新
- 成功授權後送往銀行進 行處理
- 根據付款類型和幣別等 進行處理
- 顯示「已發送往銀行」 的狀態
在Straight2Bank上的付款類型
「Straight2Bank渣打企業網路銀行」提供各種付款服務,如境內付款、跨境付款,稅款/法定付款、電子 支票和金融同業 (FI) 付款。
以下概述Straight2Bank提供的各種付款類型及其用途:
ACH代付 (Direct Credit)
此付款類型僅用於小額批次國內付款,通常用於境內。付款是以批次型式處理,因此是在白天的預訂截止時間 內進行。付款將在2-3天內根據國內清算能力完成處理。
本地銀行轉帳 (Local Bank Transfer)
採用RTGS (Real-Time Gross Settlement)機制。通常用於緊急和大額的交易,並以當地貨幣進行清 算,收費高於(ACH) 付款。支援外幣支付,具體取決於付款帳戶所屬國家/地區。
SCB行內轉帳 (Book Transfer)
此付款類型僅用於將資金轉移到渣打銀行的另一個帳戶。收款人帳戶也可以是屬於客戶自己的另一個帳戶。 通常只支援本地幣別帳戶的轉帳,但在某些市場也支援涉及外匯的跨貨幣轉帳。此外,在許多市場有提供24 小時的行內轉帳服務。
薪資 (Payroll)
此付款類型僅可用於支付薪資。可以使用此付款選項進行單筆付款或批次付款。根據收款人的銀行帳戶不同 ,付款可能將使用ACH 或SCB行內轉帳(Book Transfer)的形式支付。
稅款/法定付款 (Tax/Statutory Payments)
主要提供於非洲市場和印度。使客戶能夠方便地線上進行公司稅務繳納、關稅付款和各種其他稅款線上支付。
電匯 (Telegraphic Transfer)
跨境和國際支付服務可用於多個市場,超過100種貨幣的匯款。電匯外幣付款為即時處理,並根據貨幣的不 同於1-2天內結算,交易處理費取決於受益方銀行。各種外匯如線上外匯報價、銀行匯率及合約匯率皆支援 交叉貨幣付款。
轉帳要求 (Request for Transfer)
轉帳要求 (SWIFT MT101) 也稱為RFT,允許客戶使用Straight2Bank從另一家銀行持有之帳戶付款。 此功能允許客戶通過Straight2Bank集中管理與任何銀行持有之帳戶。
公司支票 (Corporate Cheque)
此付款類型僅可用於支付薪資。可以使用此付款選項進行單筆付款或批次付款。根據收款人的銀行帳戶不同 ,付款可能將使用ACH 或SCB行內轉帳(Book Transfer)的形式支付。
台幣銀行支票 (Local Bank Cheque)
由銀行印刷的實體支票,可由客戶領取,或由本行代表客戶交付給收款人。當支票印刷時,客戶帳戶將被扣 除相應款項。
外幣銀行支票 (International Bank Cheque)
由銀行印刷之紙本支票,並由本行代表客戶交付給收款人。付款以外國貨幣為主,送出給國內的客戶。
可用性和控管
每種付款類型都有單獨的頁面,並在公司層級和使用者層級進行控管。使用者層級的控管分為兩個:
功能面
資料面
功能面的控管是指啟用使用者在選單中可選擇的付款類型,例如電匯 (Telegraphic Transfer)、本地銀行 轉帳(Local Bank Transfer)等。而資料面的控管是指限制/允許使用者可使用一個或多個帳戶。
例如,使用者A只能對帳號1使用電匯 (Telegraphic Transfer)的付款類型;然而使用者B卻可以對帳戶1和 帳戶2使用電匯 (Telegraphic Transfer)和本地銀行轉帳(Local Bank Transfer)的付款類型。
這些控制可以透過客戶端管理員(Customer Administrator)或是銀行端管理員(Bank Administrator)進 行變更。
Straight2Bank提供的各種付款類型也取決於付款帳戶的所在地區,因此並非所有前述之付款類型都能在所 有市場使用。
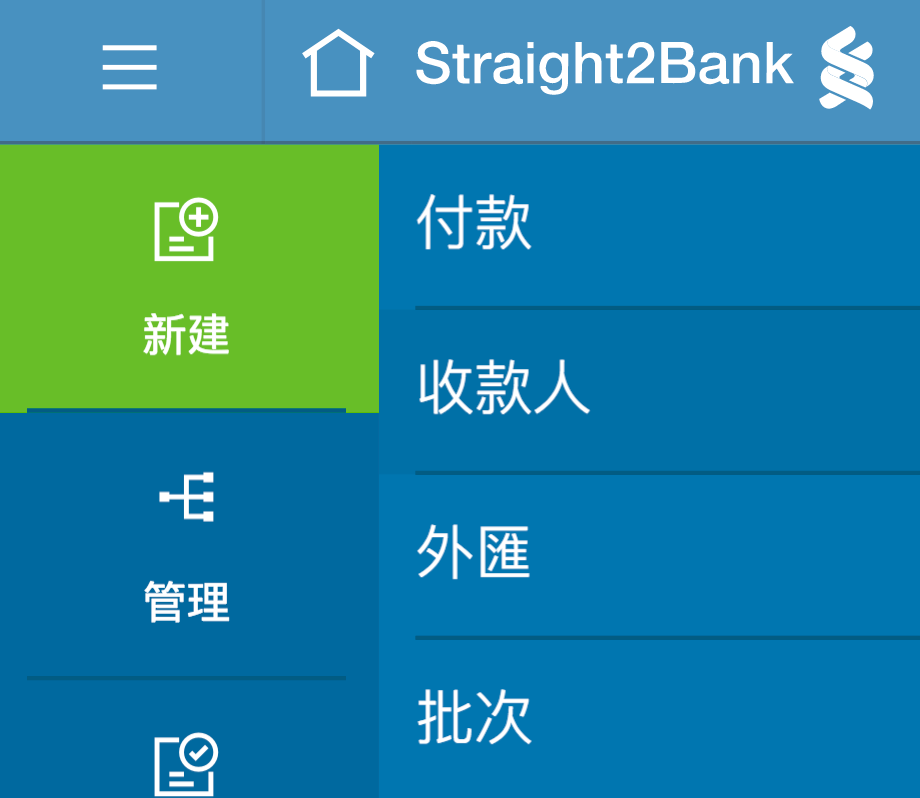
建立付款


手動建立付款是在Straight2Bank上建立付款的方式之一。
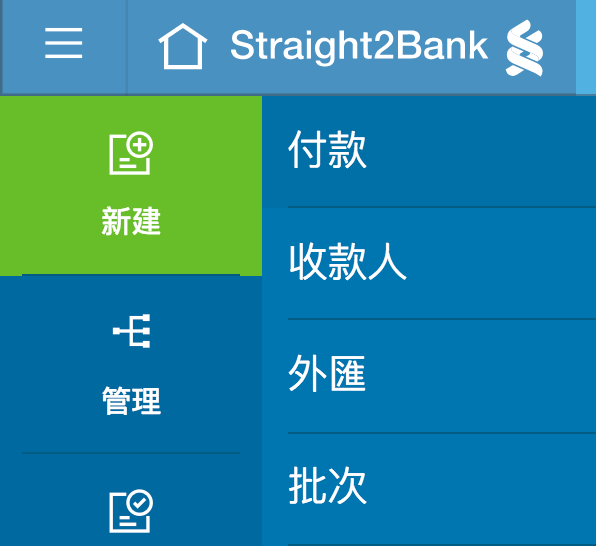
點選左上角「新建 > 付款」。
在此頁面上的所有空格皆為必填,除非標註為可選填者。填寫交易內容細節,包括:
付款參考編號 (Payment Reference)
此欄位是自動帶入。編號是唯一的,此欄位最多可以接受16個字元。

付款來自/付款人 (Pay From)
從下拉式列表中選擇「付款帳戶」。

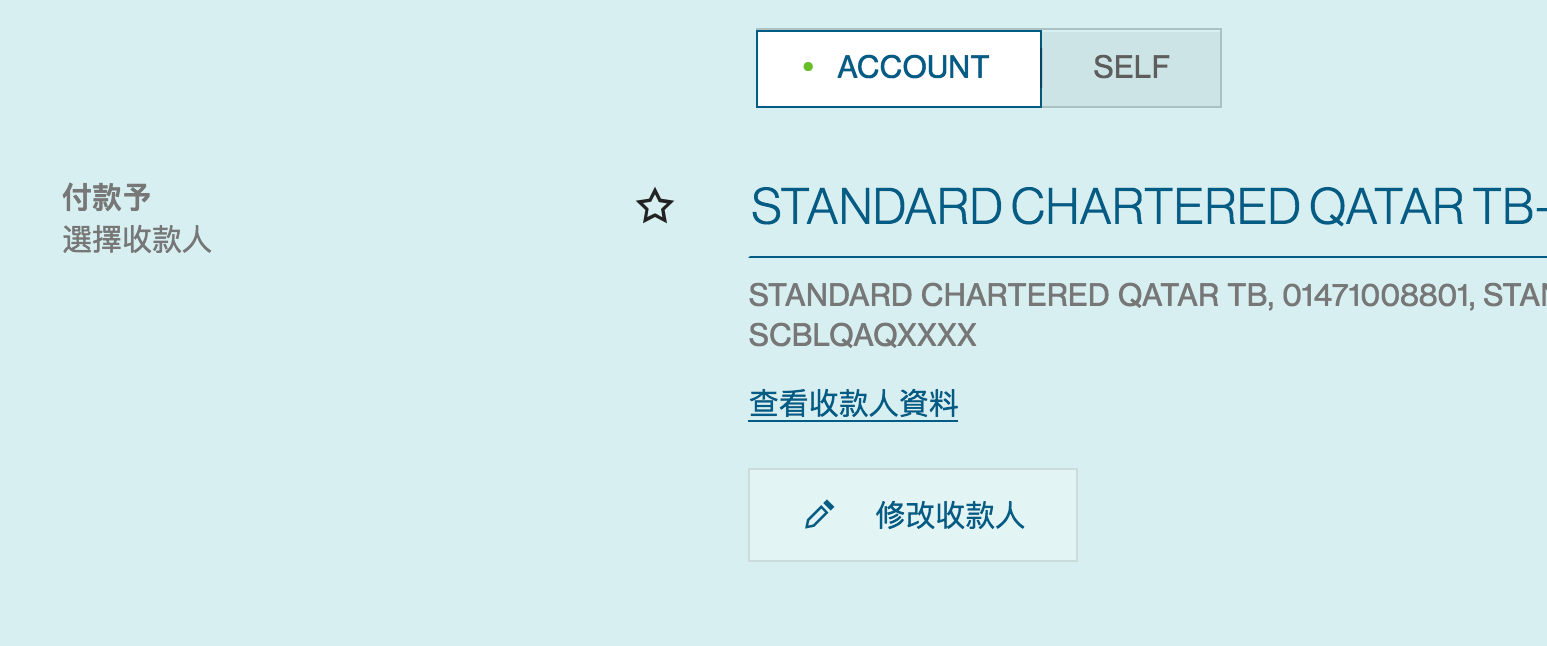
付款予/收款人 (Pay To)
輸入關鍵字搜尋或從下拉式列表中選擇現有的「收款人/受款人帳戶」。系統將擷取收款人的詳細資訊以 用於此付款,或儲存在Straight2Bank上以便之後再次使用。 詳細資訊請參閱 收款人/受款人維護 章節。
金額 (Amount)
點選「付款金額 (Payment Currency)」/「扣款金額 (Debit Currency)」,輸入交易金額(金額 大寫會顯示以供參考)。
跨境付款的支付金額和貨幣對相關。詳細資訊請參閱 以付款/扣款優先金額進行跨境付款 章節。

付款時間表 (Payment Schedule)
選擇付款「扣帳日期」或「生效日期」 - 銀行進行付款處理的日期。但這並非受款人可收到金額的實際 日期,因為這將取決於付款類型、結算類型和假期等因素。

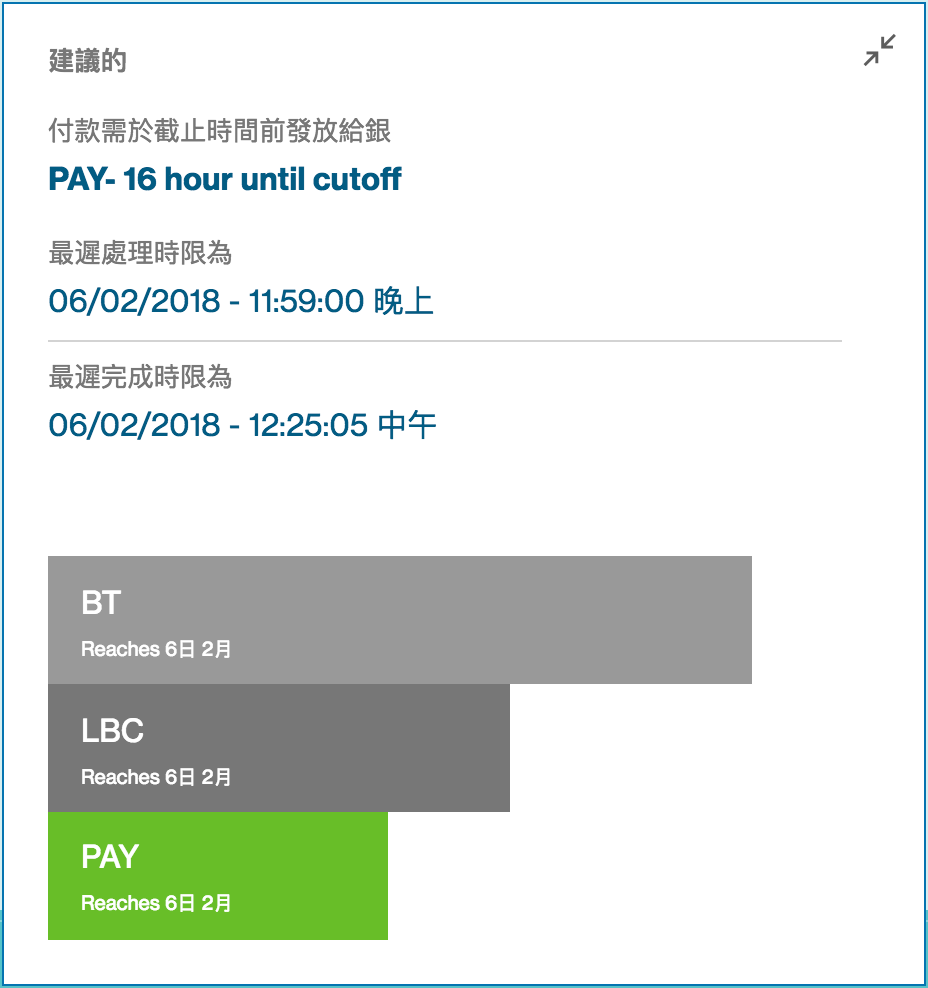
付款類型 (Payment Type)
選擇「付款類型」 - Straight2Bank提供各種付款類型,如境內付款、跨境付款、稅務/法定付款、 電子支票和金融同業 (FI) 付款。
詳細資訊請參閱 在Straight2Bank上的付款類型 章節。
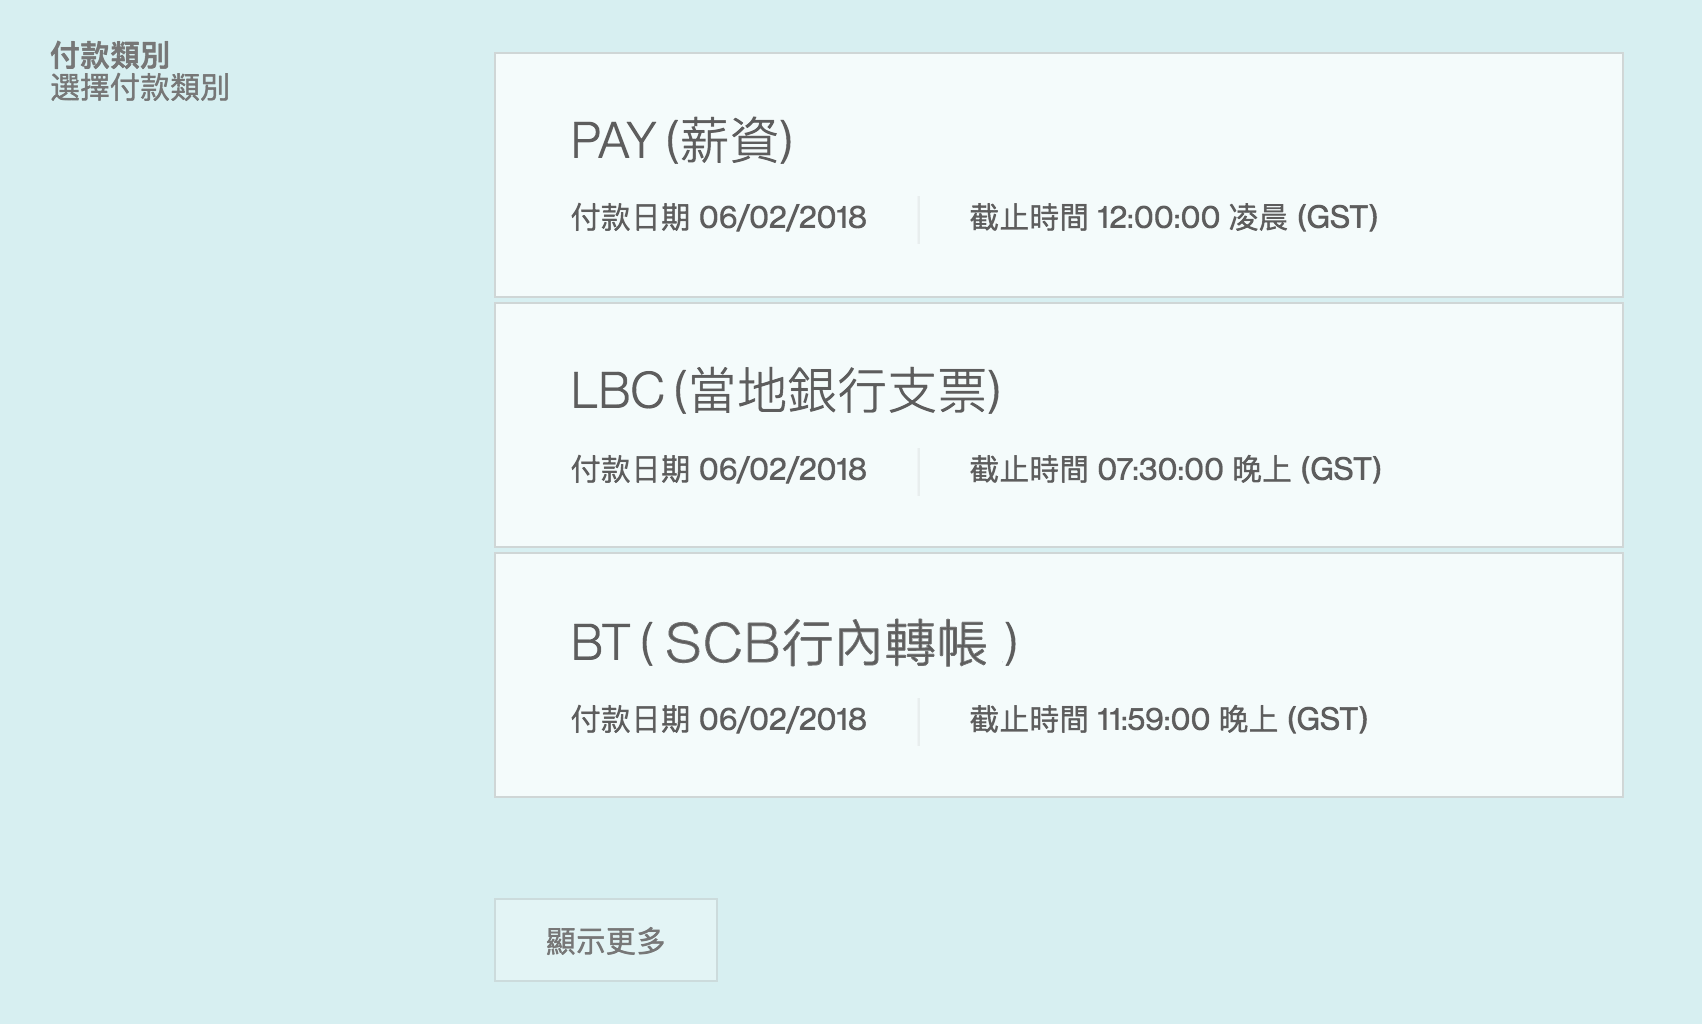
倒數至截止時間 (cutoff time) 及預估處理時間 ( turnaround times)會一起顯示於右側。此部分所 顯示之時間僅供參考,實際時間可能因情況有所不同。
一旦完成付款填寫後,收費資訊 (Charges Information)、選擇性的發票 (invoice) 和規定申報資訊 (regulatory reporting) 將可供填寫。
在付款頁面的最後,有對此筆付款相關的各種選項,包括:

取消 (Cancel)
允許您取消此筆交易建立並返回上一頁。
儲存及關閉 (Save & Close)
輸入的付款資訊將儲存為草稿(「草稿」(Draft)狀態),您可於稍後繼續完成。
儲存為範本 (Save as Template)
輸入的付款資訊將儲存為範本,您可於稍後使用。
繼續 (Continue)
此選項可讓您對於付款摘要頁面上輸入的付款資訊進行線上驗證。
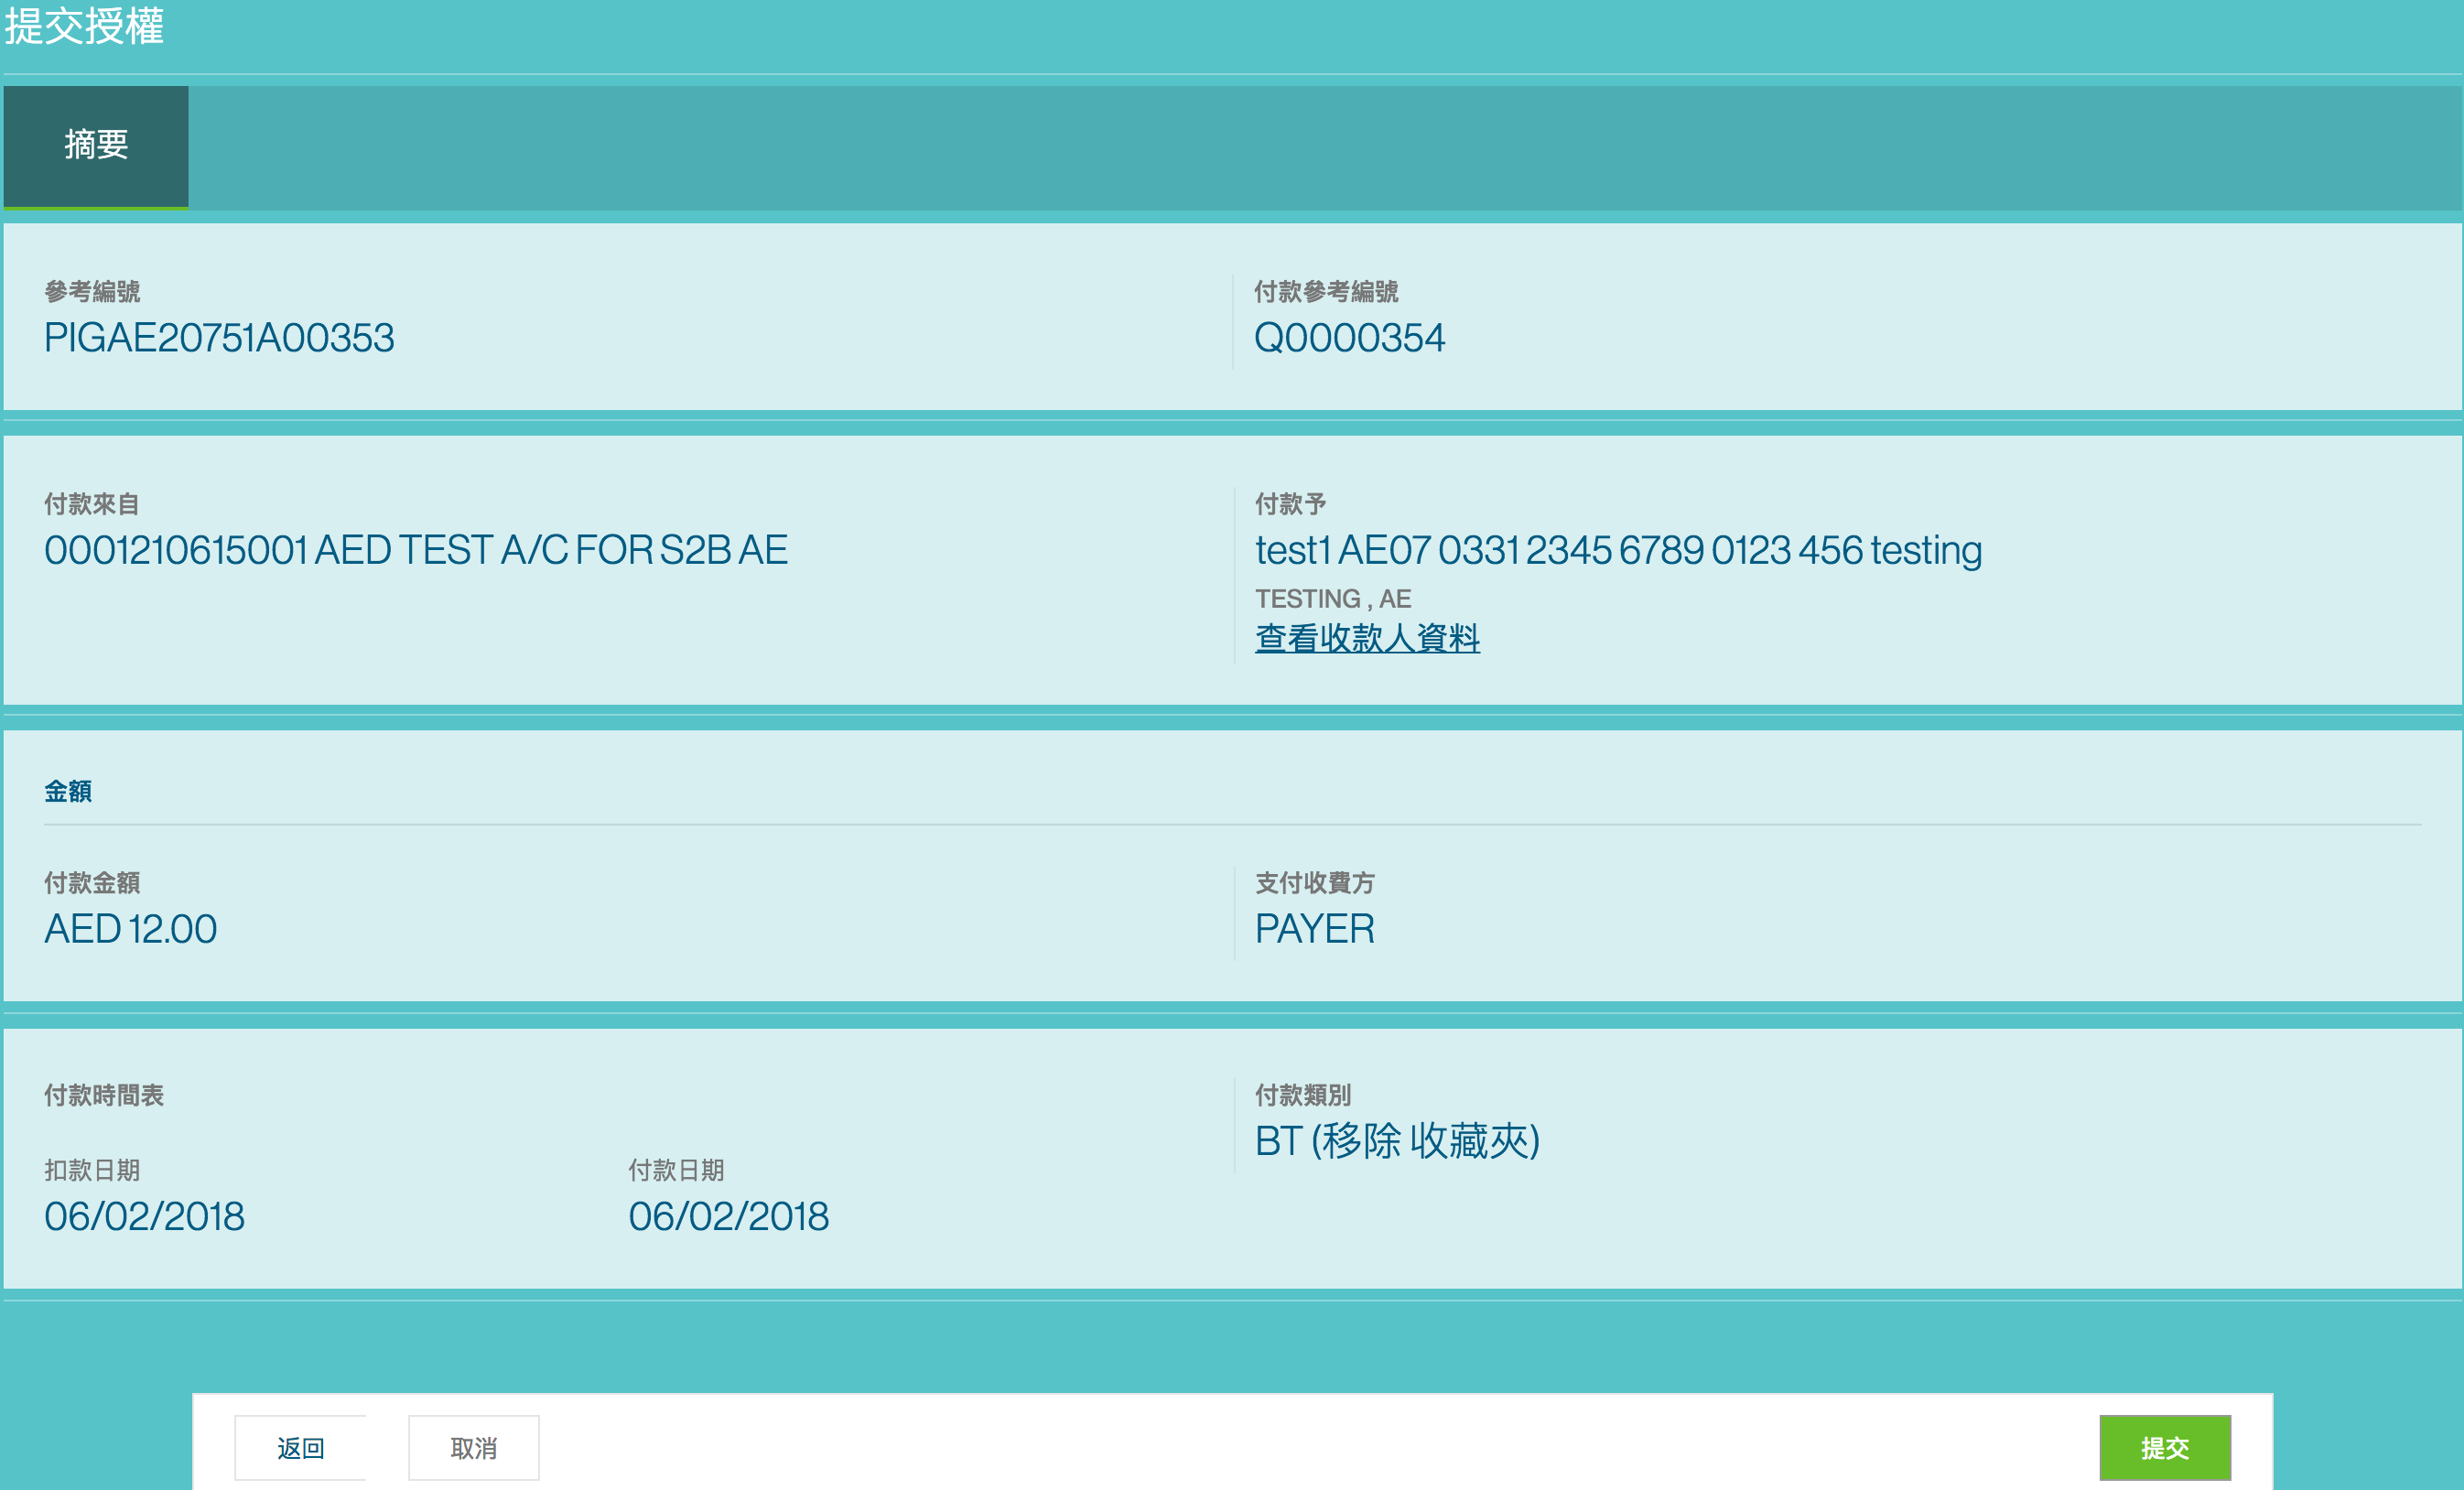
確認付款摘要頁面上的所有資訊無誤後,點選「提交 (Submit)」。
在下一個頁面,您可以選擇並向相應的授權人發送提醒 (alert to the appropriate approver) 。 詳細資訊請參閱 授權付款 章節。
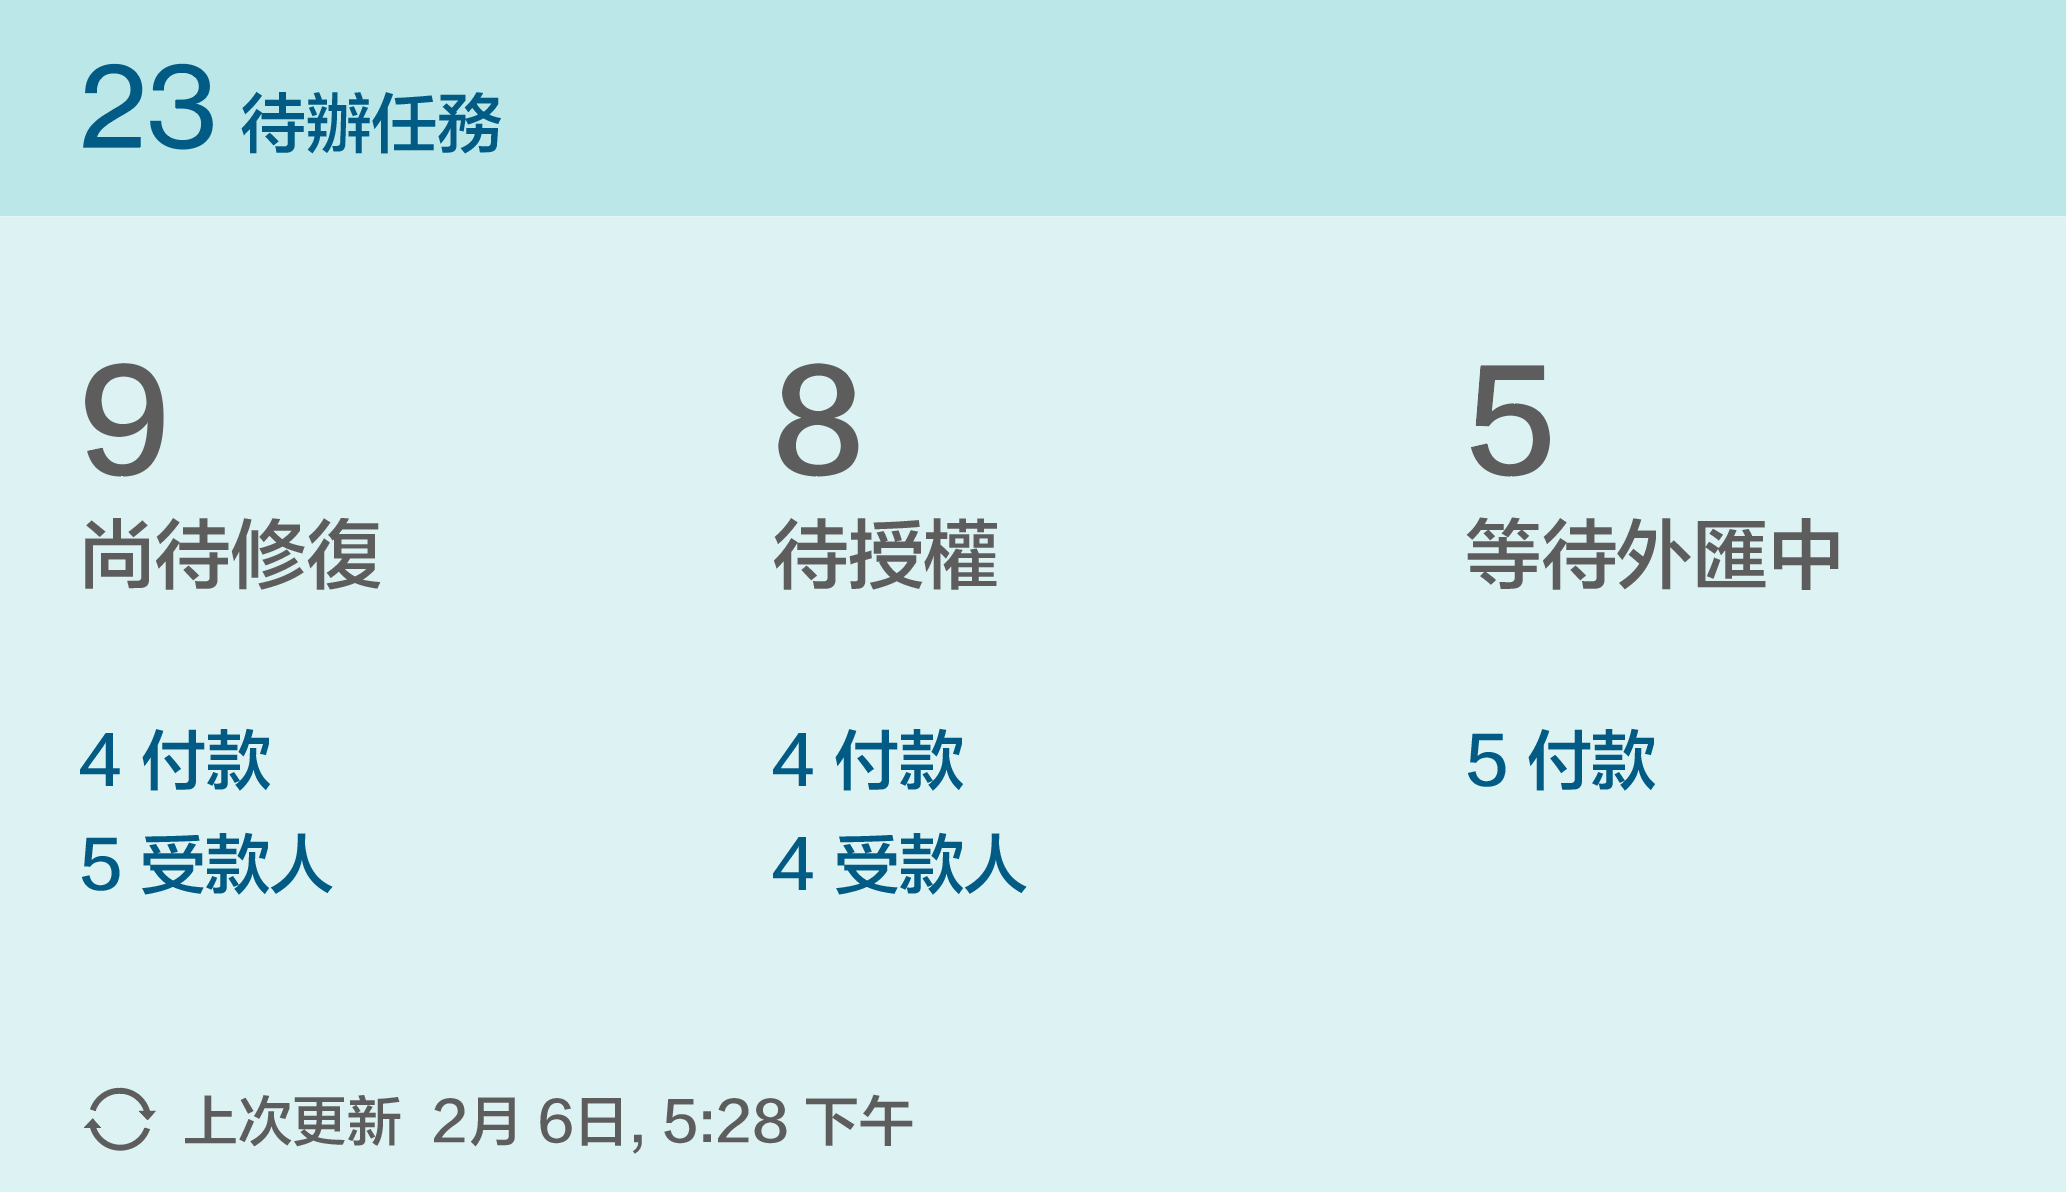
T要查看等待授權的付款清單,您可以查看 管理付款清單頁面。
一旦授權完成,狀態將更改為「已完整授權」(Fully Authorized)或「已完整簽署」。
以付款/扣款貨幣優先,進行跨境付款
此功能可讓您選擇以「付款貨幣 (Payment Currency)」或「扣款貨幣 (Debit Currency)」指示交易金 額,透過Straight2Bank進行跨境付款。
預設選項為「付款貨幣 (Payment Currency)」,而扣款金額將根據付款金額計算。 但如果您希望優先以扣款貨幣指示交易金額,請點選「扣款金額 (DEBIT CCY)」標籤。

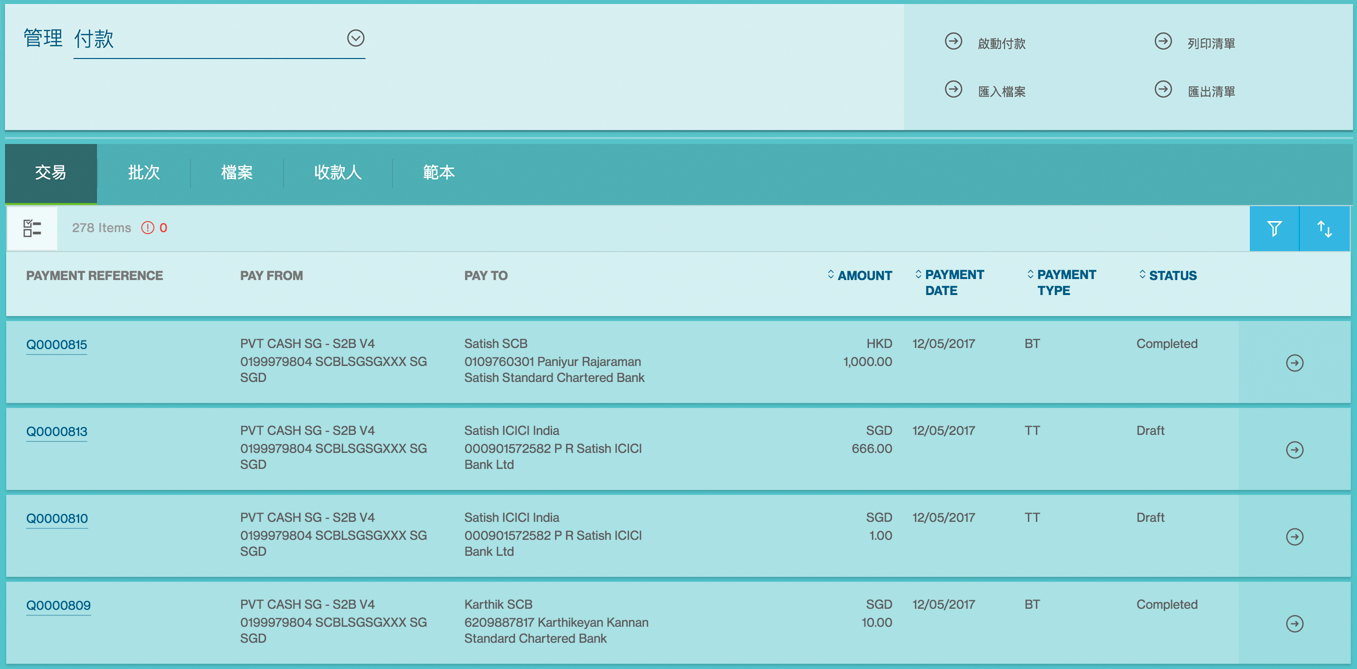
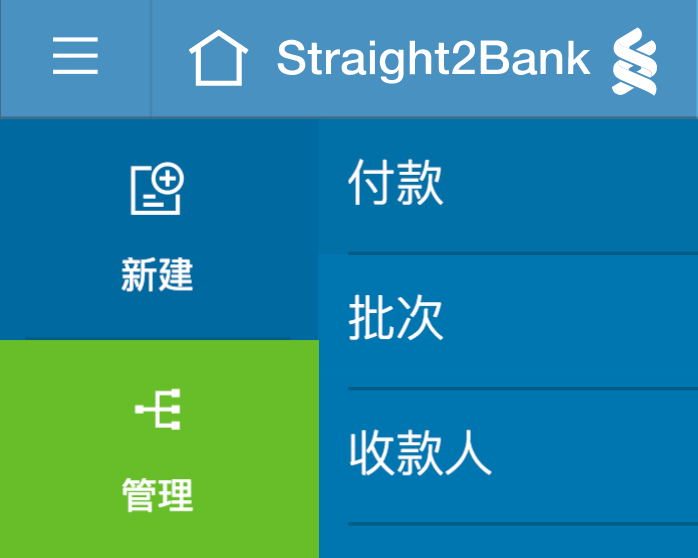
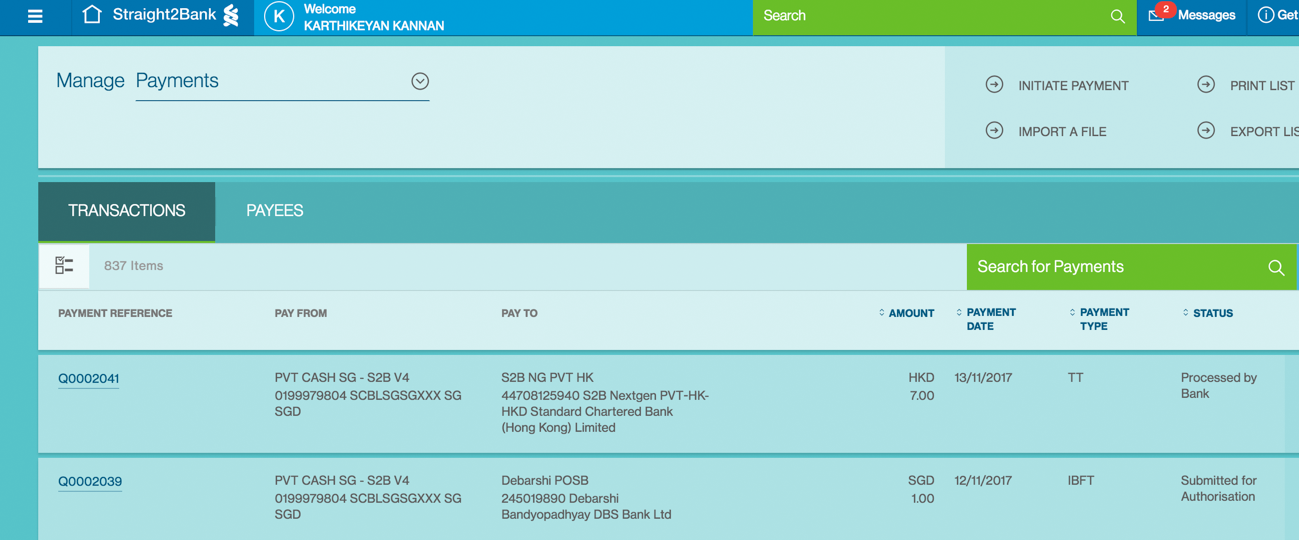
管理付款
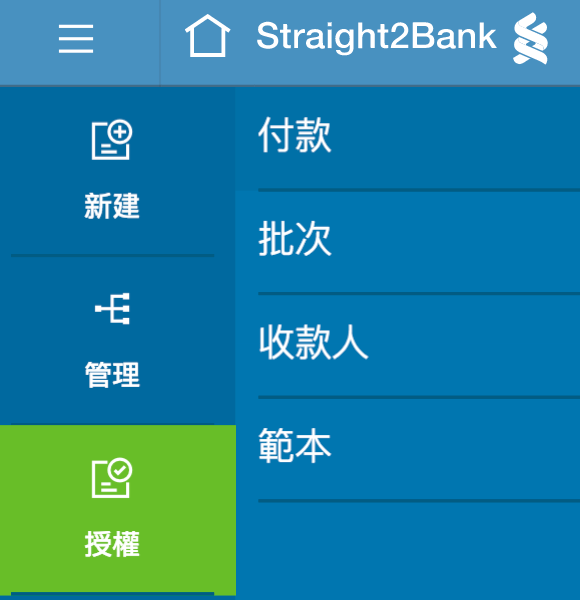
點選左上角「選單 (Menu) > 管理 (Manage) > 付款 ( Payment)」。

列標題
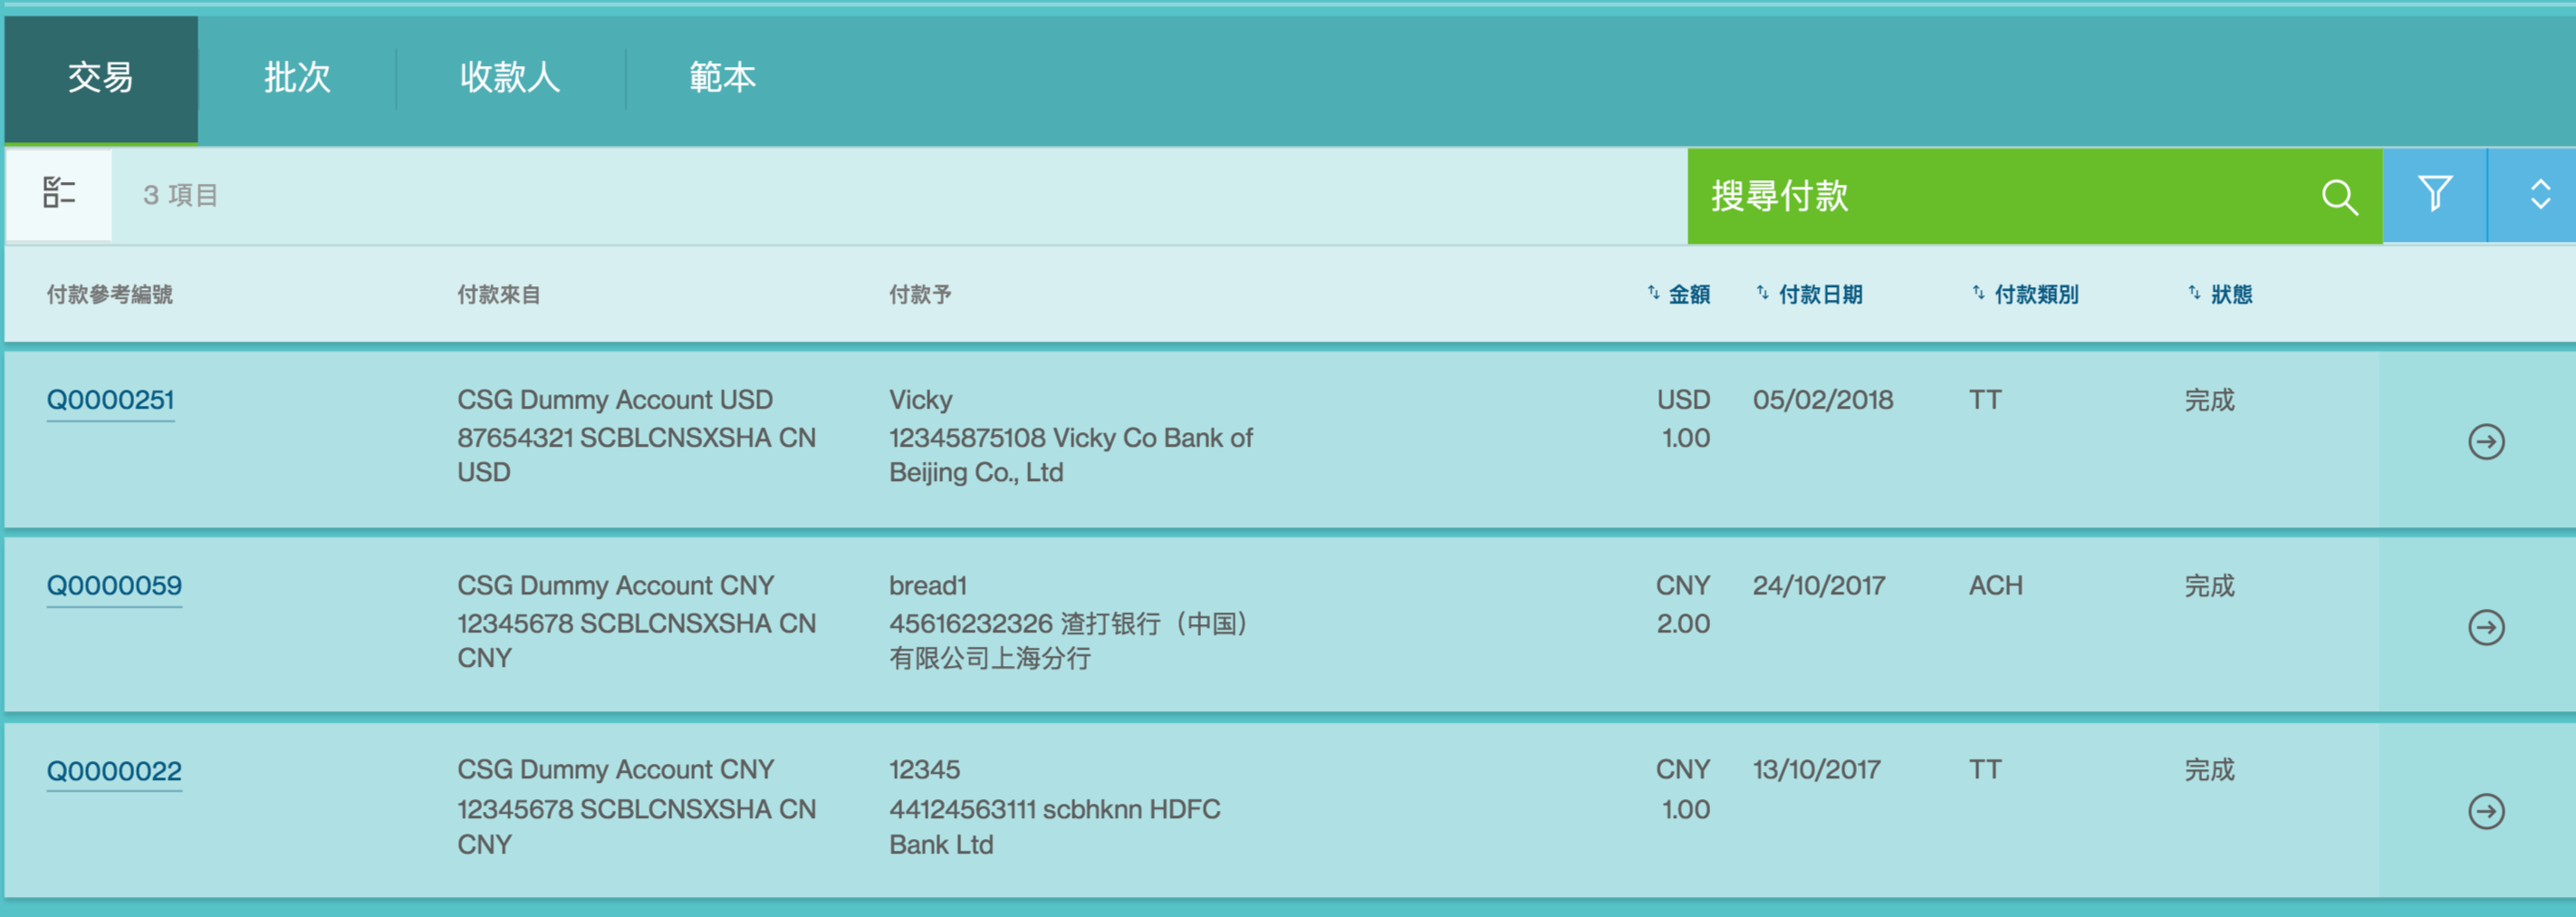
此頁面將付款資訊以含有下方標題的表格顯示:
- 付款參考編號
- 付款來自 (付款人) - 付款帳戶名或別名、付款帳號
- 付款予 (收款人) - 收款人帳戶名或收款人別名、收款人帳號、收款人銀行名稱
- 金額 - 付款幣別及金額
- 付款日期
- 付款類型
- 交易狀態 - 詳細資訊請參閱 了解交易狀態 章節。
排序和篩選功能
您可以點選列標題對表格資料的某一列按昇冪或降冪順序排序。
篩選按鈕 - 點擊後系統將顯示篩選條件,包括金額、付款日期、交易狀態等。勾選選項旁的方塊,付款清單會 自動更新,僅顯示與篩選條件相符的資料。

排序按鈕 - 點擊後系統將給出額外的排序選項。 每種排序類別都可按昇冪或降冪排列。預設狀態下,資料將 按列標題顯示的預設順序列出。此排序設置不會保存,如果您重新啟動系統,它將恢復為預設狀態。

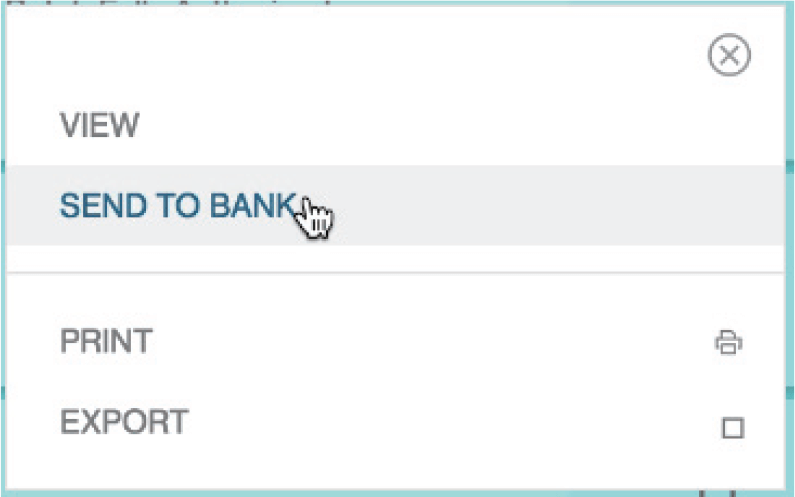
付款操作選單
此按鈕為您提供與付款有關的各種服務和功能。

付款操作選單中顯示的操作列表取決於付款狀態和使用者執行各種操作的權限。
以下是適用於「管理付款」功能的主要操作:
- 通知授權人 - 不適用於已送往修復的付款
- 編輯 - 您可以編輯尚未被授權的付款
- 刪除
- 複製
- 列印
- 匯出
- 修復
- 發送往銀行
列印付款
此功能協助使用者列印付款指示清單或付款明細。
首先,點選左上角「選單 (Menu) > 管理 (Manage) > 付款 ( Payment)」,訪問管理付款清單頁面 (Manage Payments List Screen)。
列印付款清單
您可以選擇一個或多個付款指示來使用「列印付款清單」功能。選定的付款指示將可在列印頁面進行列印。「 列印付款清單」顯示的列標題如下:
- 付款參考編號
- 付款來自 (付款人) – 付款帳戶名或別名、付款帳號
- 付款予 (收款人) - 收款人帳戶名或收款人別名、收款人帳號、收款人銀行名稱
- 金額 - 付款幣別及金額
- 付款日期
- 付款類型
- 交易狀態 - 詳細資訊請參閱 了解交易狀態 章節。

列印付款明細
操作和「列印付款清單」相似,您可以通過點擊付款指示右側的操作選單來列印選定的付款明細。

「列印」頁面的內容將基於使用者的資料權限列出交易明細。
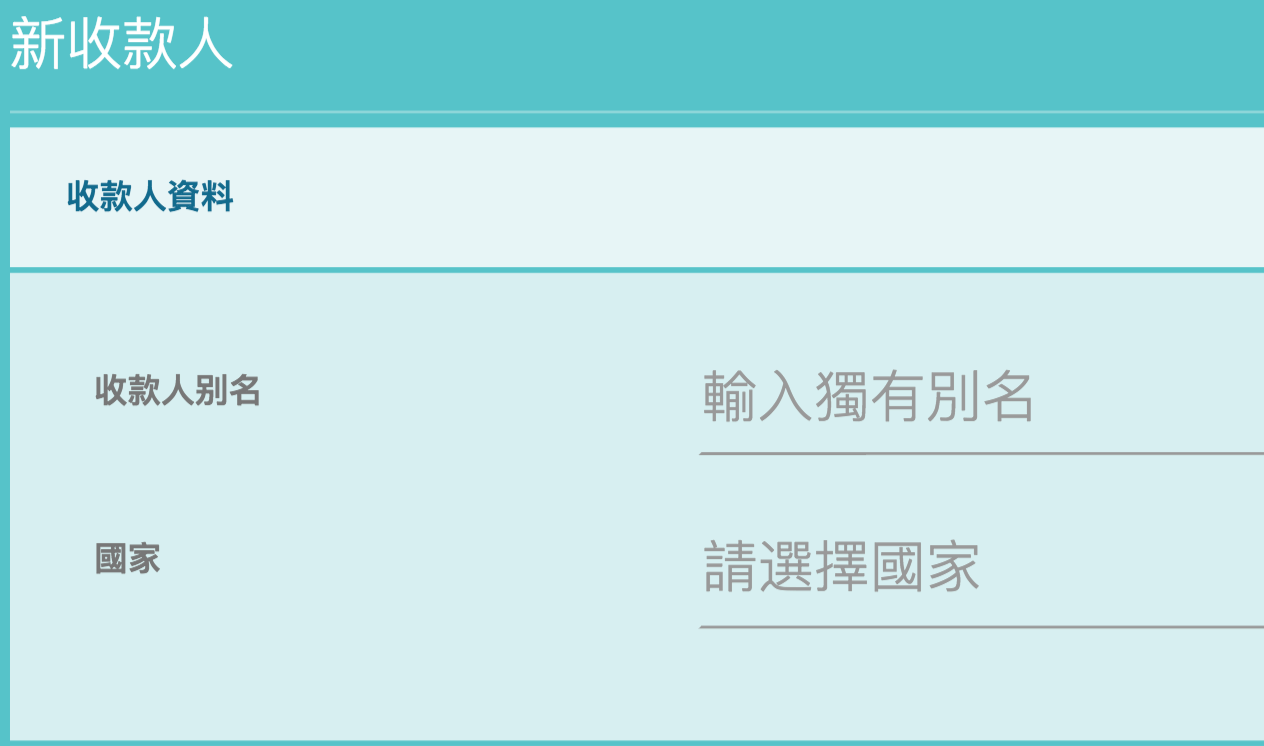
建立收款人

在Straight2Bank上建立收款人的權限是控制在使用者層級。一般情況下,所有使用者都可以建立收款人, 除非有特定要求為某使用者刪除此權限。
點選左上角「選單 > 新建 > 收款人」建立新收款人 (Payee Creation) 。
建立新收款人 (New Payee)的頁面將自動擷取所有必填和可填欄位的資訊。頁面主要欄位包括:
收款人別名
收款人別名必須是唯一的(不可重複),此欄位最多可以輸入35個字元。收款人別名可於付款建立流程或 收款人維護時用來搜尋收款人。
國家
國家是收款人開戶行國家,影響收款銀行資訊。
收款人名稱
收款人的英文姓名,此欄位最多可以輸入35個字元。

收款銀行資料
收款人的開戶行資訊,如銀行名稱、銀行地址、銀行代碼、分行代碼等。根據所使用的付款類型,某些 欄位將為必填。從下拉式列表中選擇國家,並使用搜尋功能選擇銀行。中介銀行的資訊也可填寫用於跨 境電匯付款。

帳戶號碼
收款人銀行帳號(若付款類型為支票,此項非必要欄位)。

最後,點選「繼續」按鈕,確認付款摘要頁面上的所有資訊無誤後,點選「提交 (Submit)」。

在下一個頁面,您可以選擇並向相應的授權人發送提醒通知 (alert to the appropriate approv er)。

要查看待授權的收款人清單,您可以查看管理收款人清單頁面。一旦授權通過,狀態將更改為「已完整授權」 (或「已完整簽署」)。
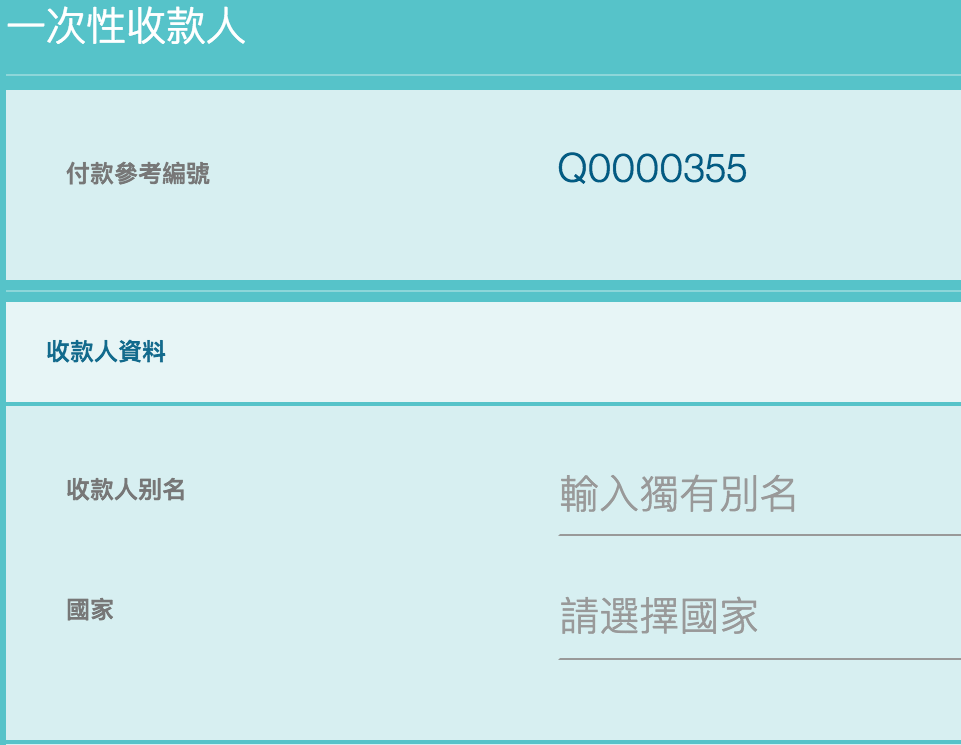
建立一次性收款人
收款人/受款人並非必須事先於Straight2Bank上設置和維護才能使用。使用者可以選擇對尚未在 Straight2Bank上設置的收款人發起付款和薪資指令。
您可以在建立付款的流程中選擇「建立一次性收款人 (Create One-Time Payee)」,並在之後才進行授 權處理。

點選「建立一次性收款人 (Create One-Time Payee)」按鈕後,將跳出一個額外的頁面「一次性收款人」 用於填寫必填及可選填的資訊。
主要欄位包括:
收款人別名
收款人別名必須是唯一的(不可重複),此欄位最多可以輸入35個字元。收款人別名可於付款建立流程或 收款人維護時用來搜尋收款人。
國家
國家是收款人開戶行國家,影響收款銀行資訊。
收款人名稱
收款人的英文姓名,此欄位最多可以輸入35個字元。

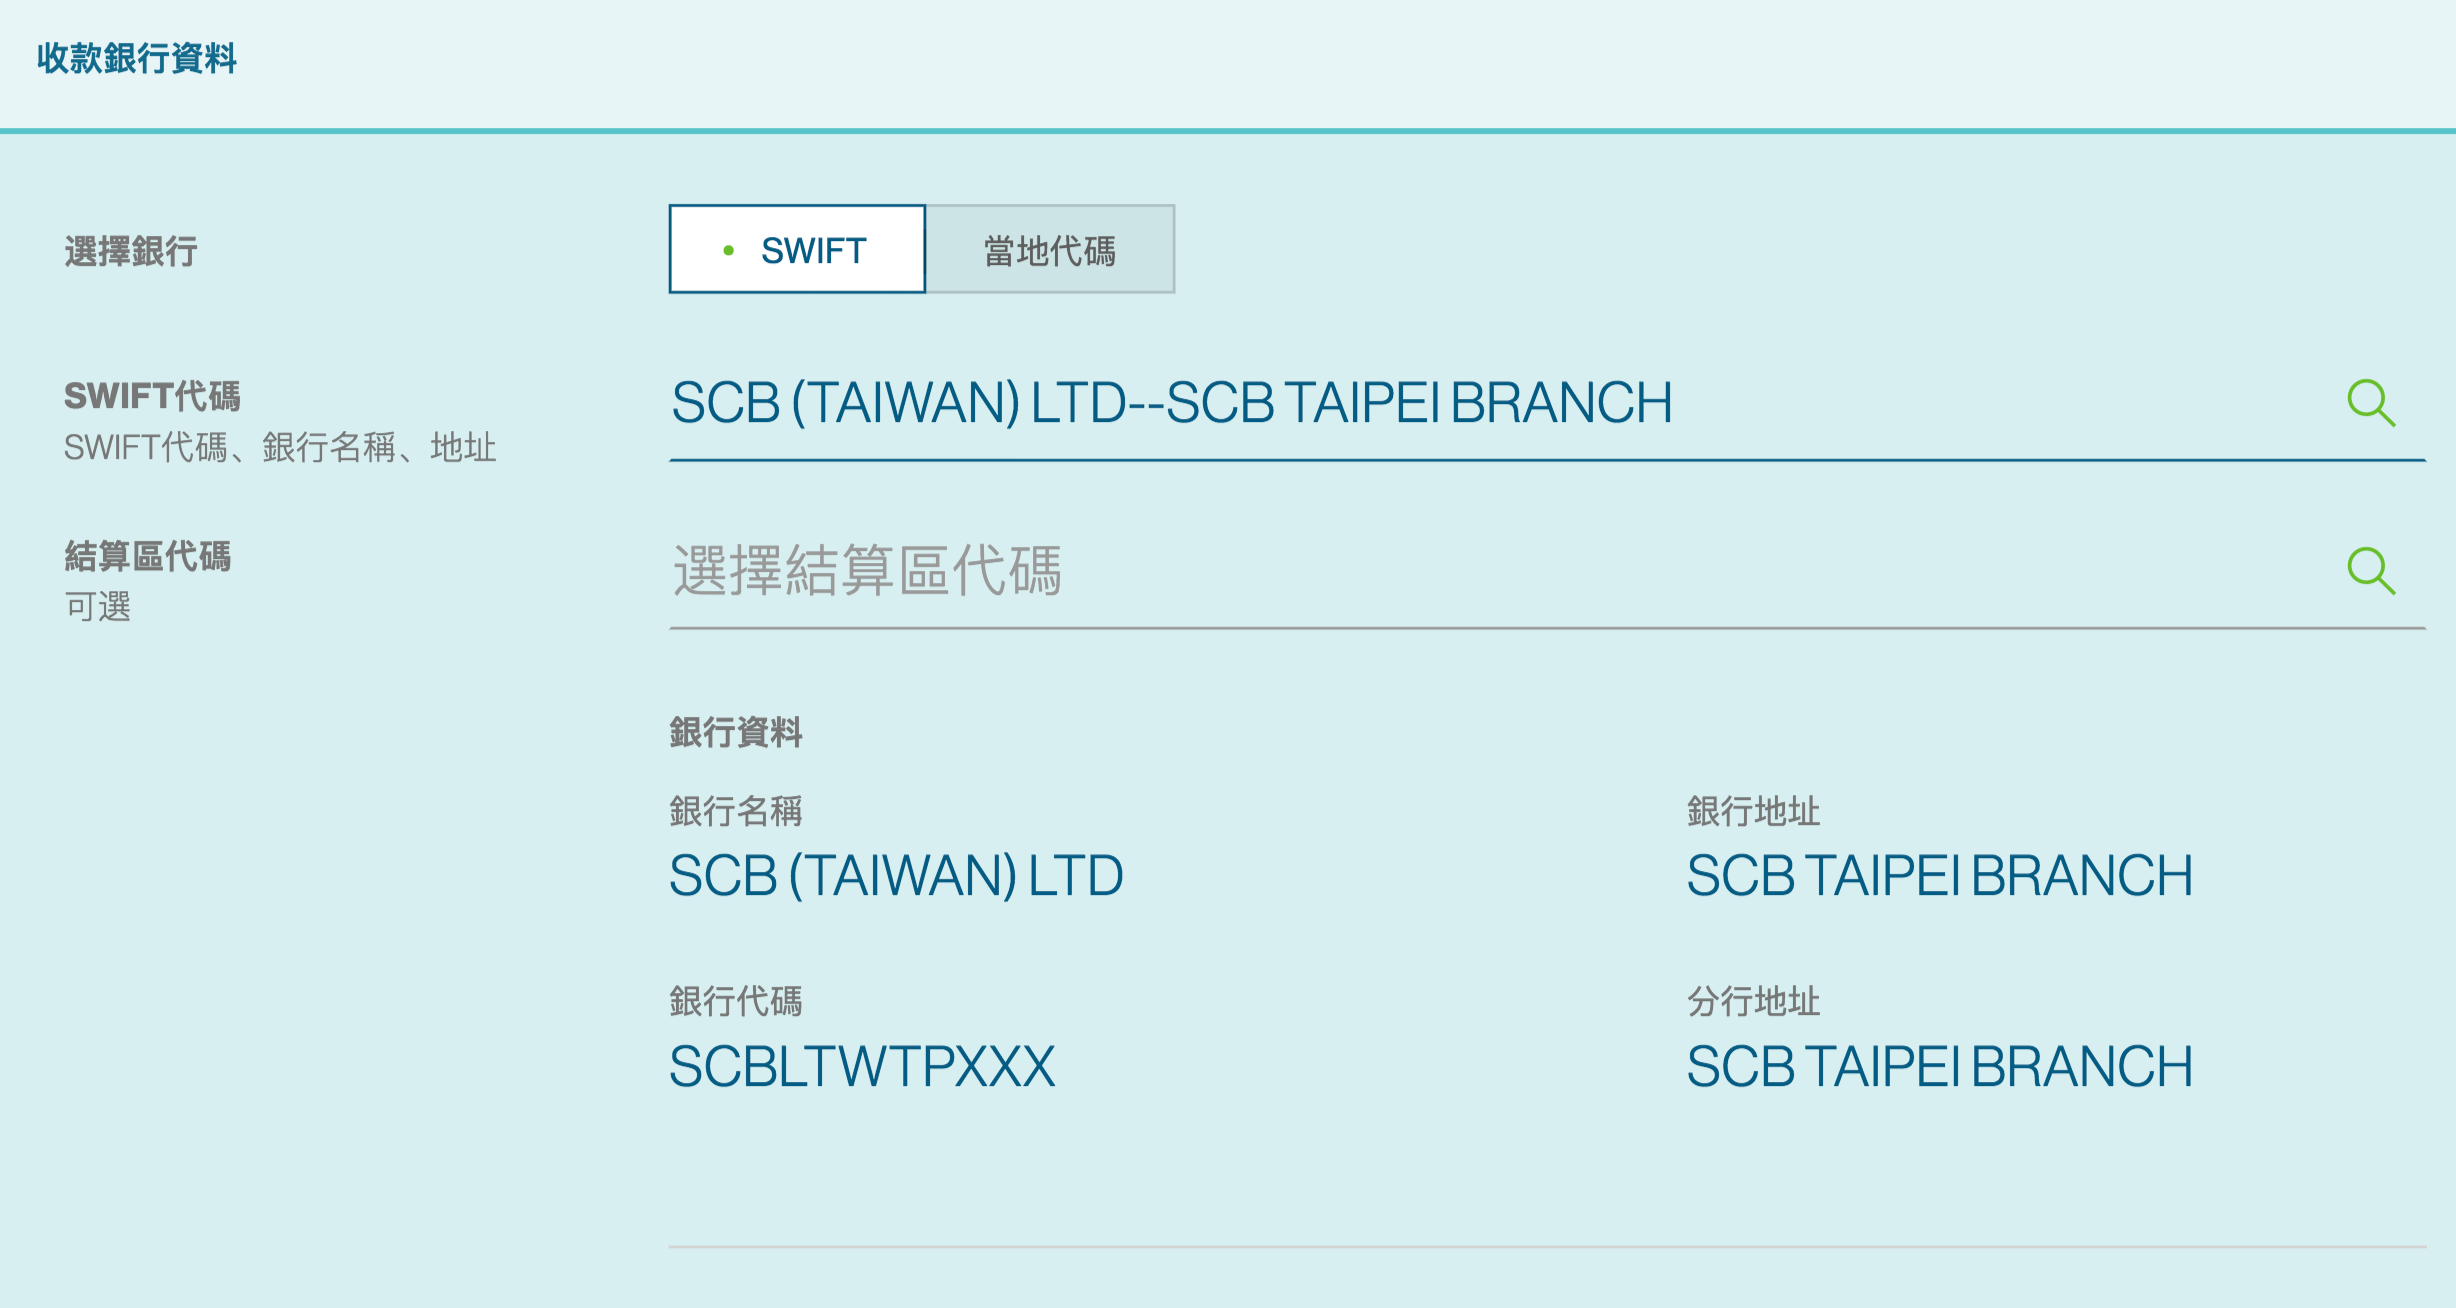
收款銀行資料
收款人的開戶行資訊,如銀行名稱、銀行地址、銀行代碼、分行代碼等。根據所使用的付款類型,某些 欄位將為必填。從下拉式列表中選擇國家,並使用搜尋功能選擇銀行。中介銀行的資訊也可填寫用於跨 境電匯付款。
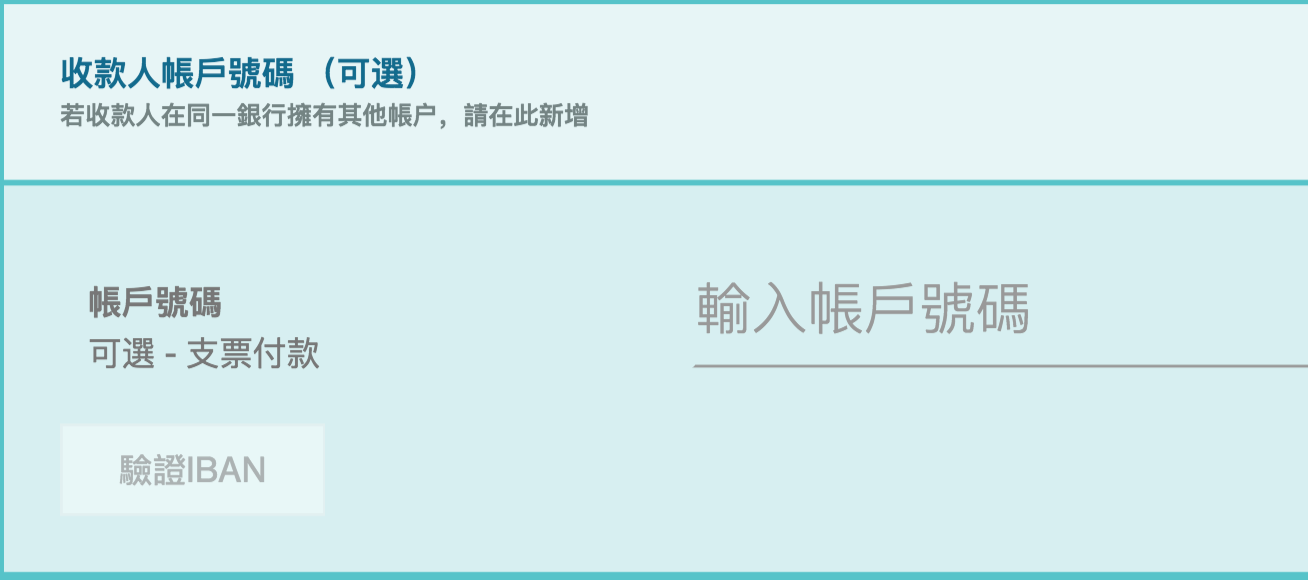
帳戶號碼
收款人銀行帳號(若付款類型為支票,此項非必要欄位)。
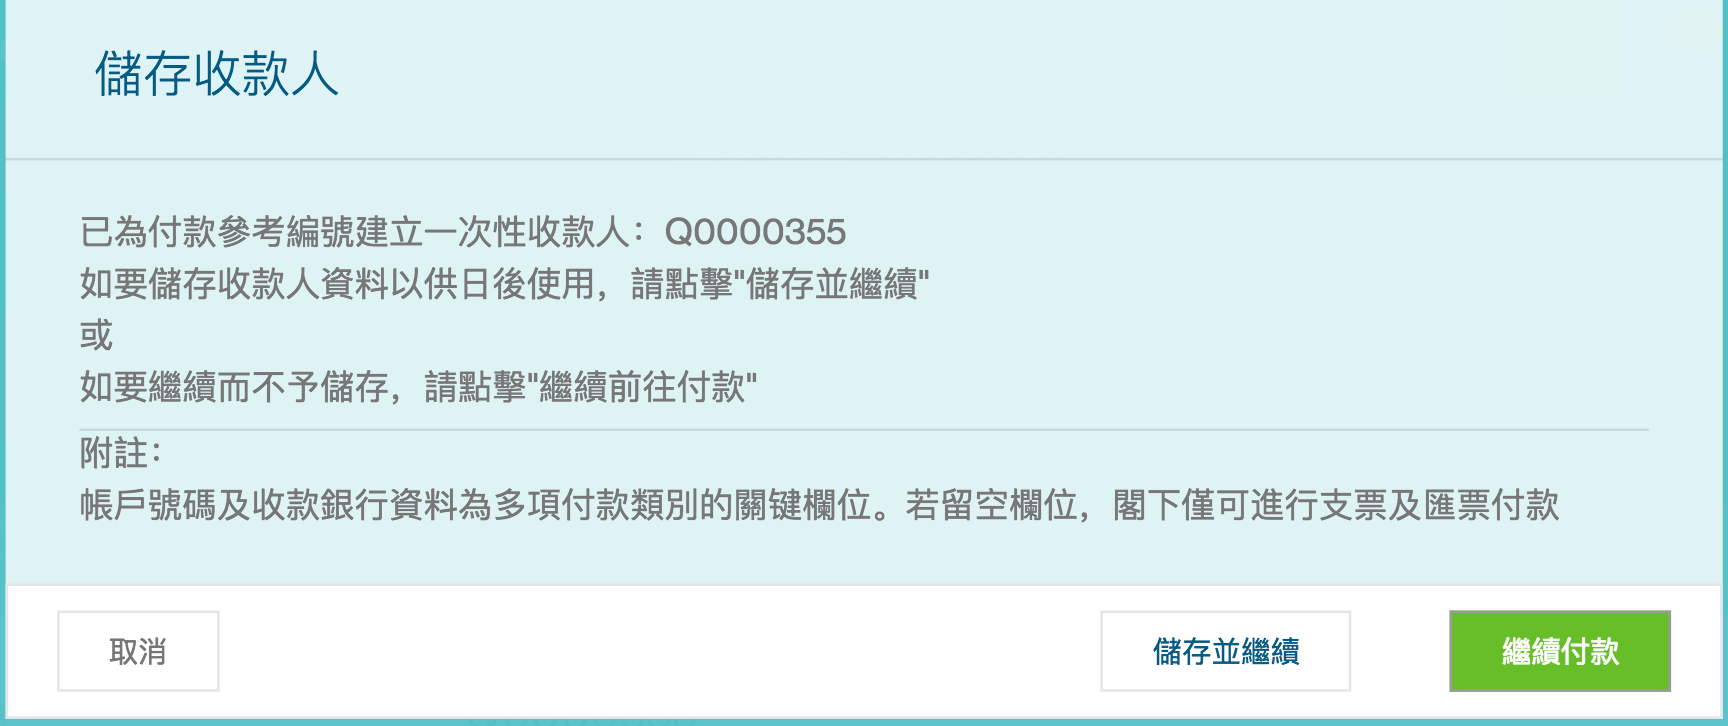
最後,點選「繼續 (Continue)」按鈕,將跳出一個額外的頁面,允許您註冊收款人資訊以供後續使用,或繼 續向尚未註冊收款人進行付款 。
管理收款人
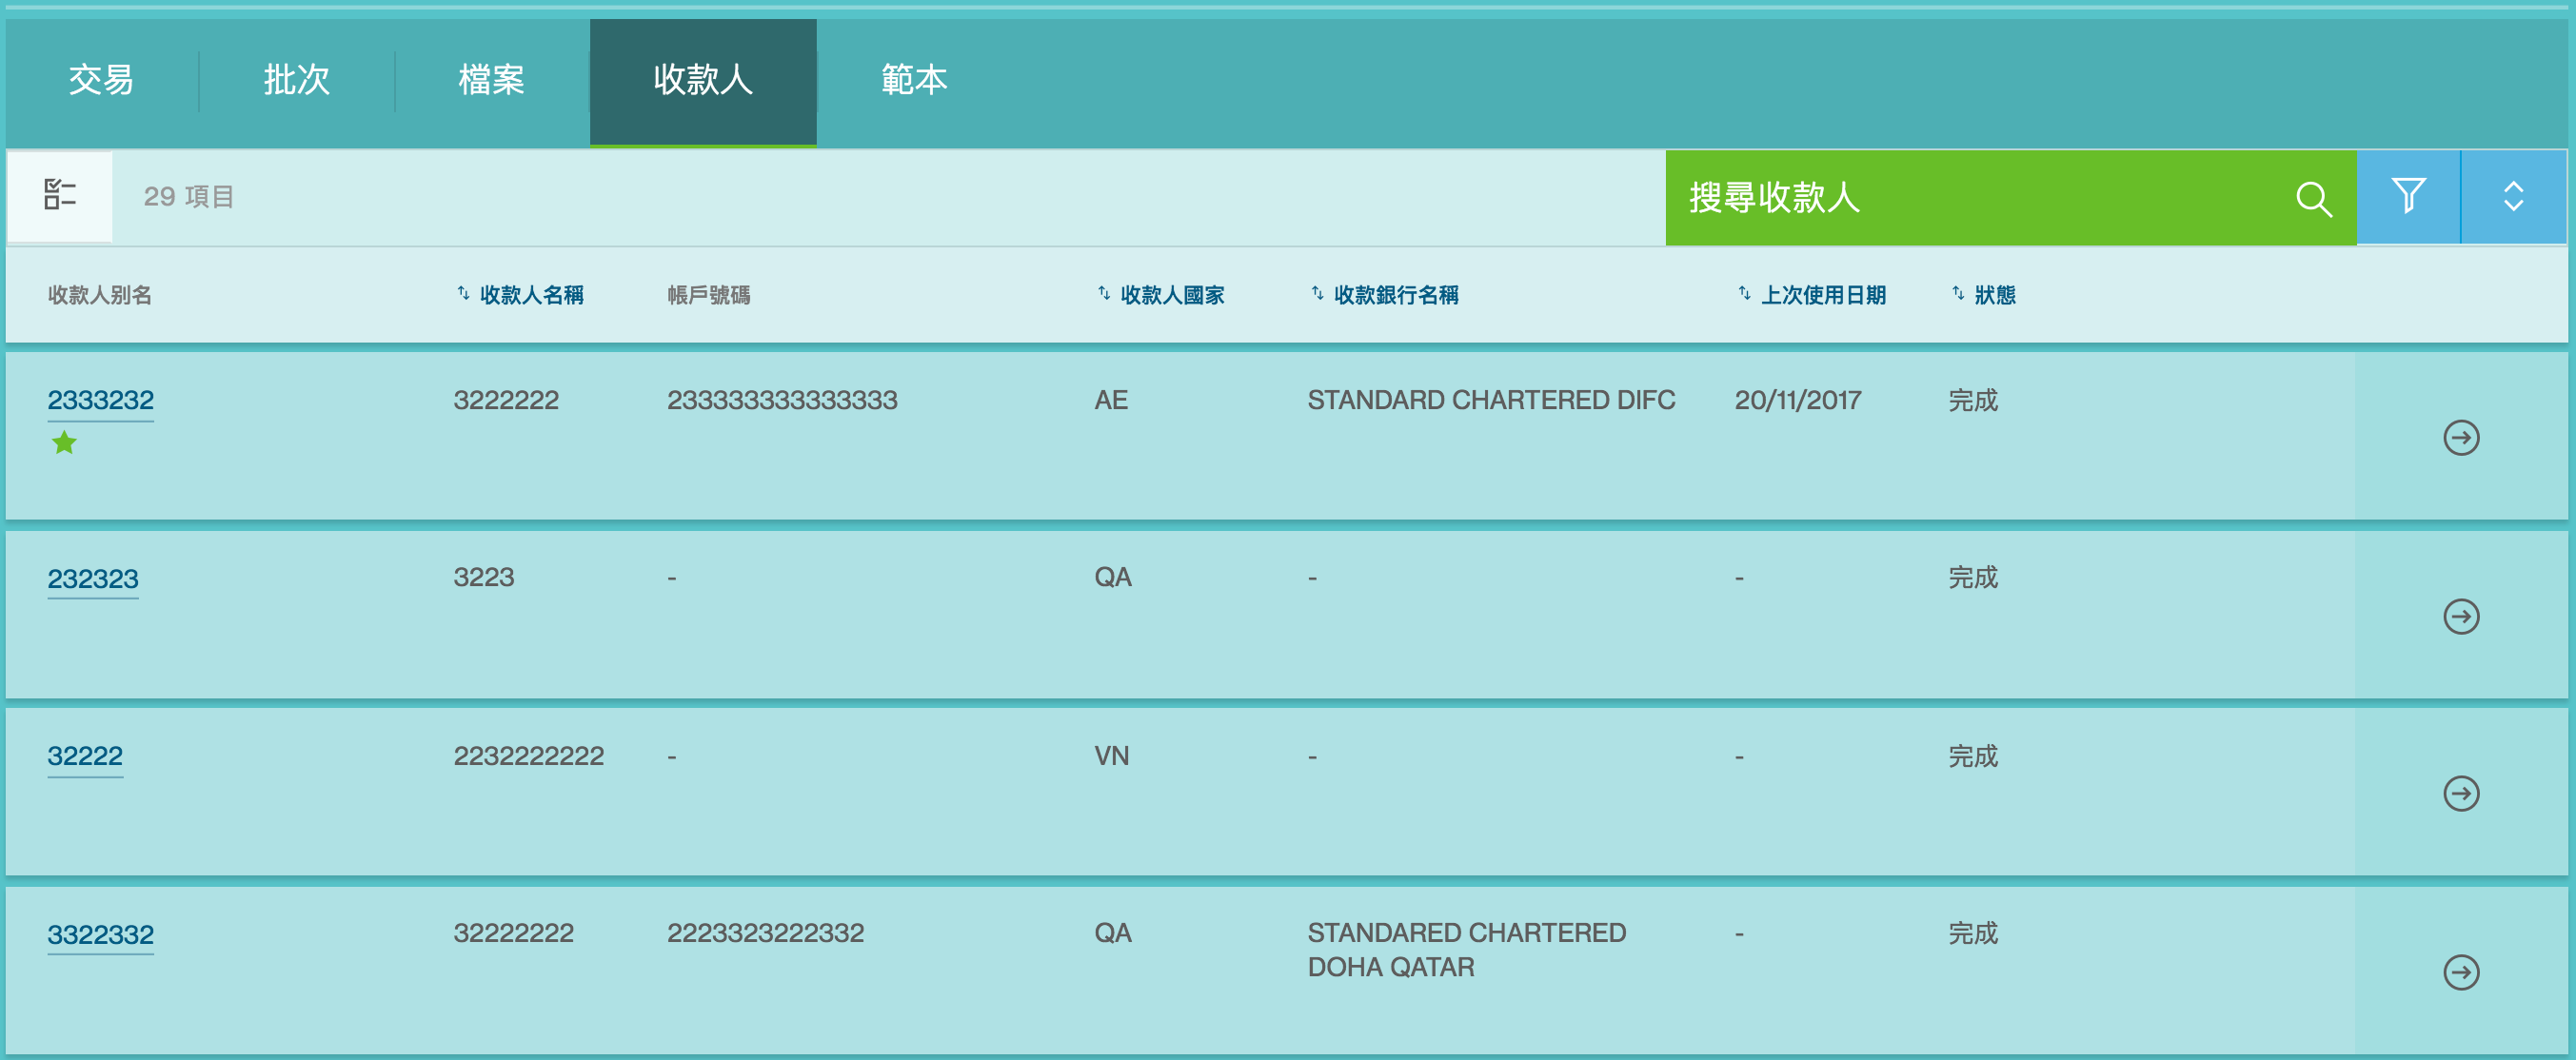
點選左上角「選單 (Menu) > 管理 (Manage) > 收款人 ( Payee)」,即可訪問管理收款人清單頁面。
列標題
此頁面將收款人資訊以含有下方標題的表格顯示:
- 收款人別名
- 收款人姓名
- 帳戶號碼
- 收款人國家
- 收款人銀行名稱
- 交易狀態

排序和篩選功能
您可以點選列標題對表格資料的某一列按昇冪或降冪順序排序。
篩選按鈕 - 點擊後系統將顯示篩選條件,包括金額、付款日期、交易狀態等。勾選選項旁的方塊,付款清單會 自動更新,僅顯示與篩選條件相符的資料。
優先排序按鈕 - 點擊後系統將給出額外的排序選項。 每種排序類別都可按昇冪或降冪排列。預設狀態下,資 料將按列標題顯示的預設順序列出。此排序設置不會保存,如果您重新啟動系統,它將恢復為預設狀態。
收款人操作選單
這些操作選項讓您使用有關收款人的各種服務及功能。
顯示於操作選單之選項將根據收款人的狀態及使用者權限而有所不同。.
以下是適用於「管理收款人」功能的主要操作:
- 標記收藏
- 通知授權人
- 編輯
- 刪除
- 列印
- 匯出
- 修復
- 發起付款
授權收款人
預設狀態下,收款人/受款人需要先被授權才能使用。這讓您在Straight2Bank上進行付款時提供更安全的 控管。
建立收款人的功能將基於您的使用者權限。有關如何在Straight2Bank上建立收款人的說明,請參閱 建立收款人 和 建立一次性收款人 章節。
進行收款人授權
有多種方式可以讓您在Straight2Bank上授權收款人:
個人主頁
待授權的收款人將在個人主頁的 優先任務介面 和 代辦任務介面 顯示。
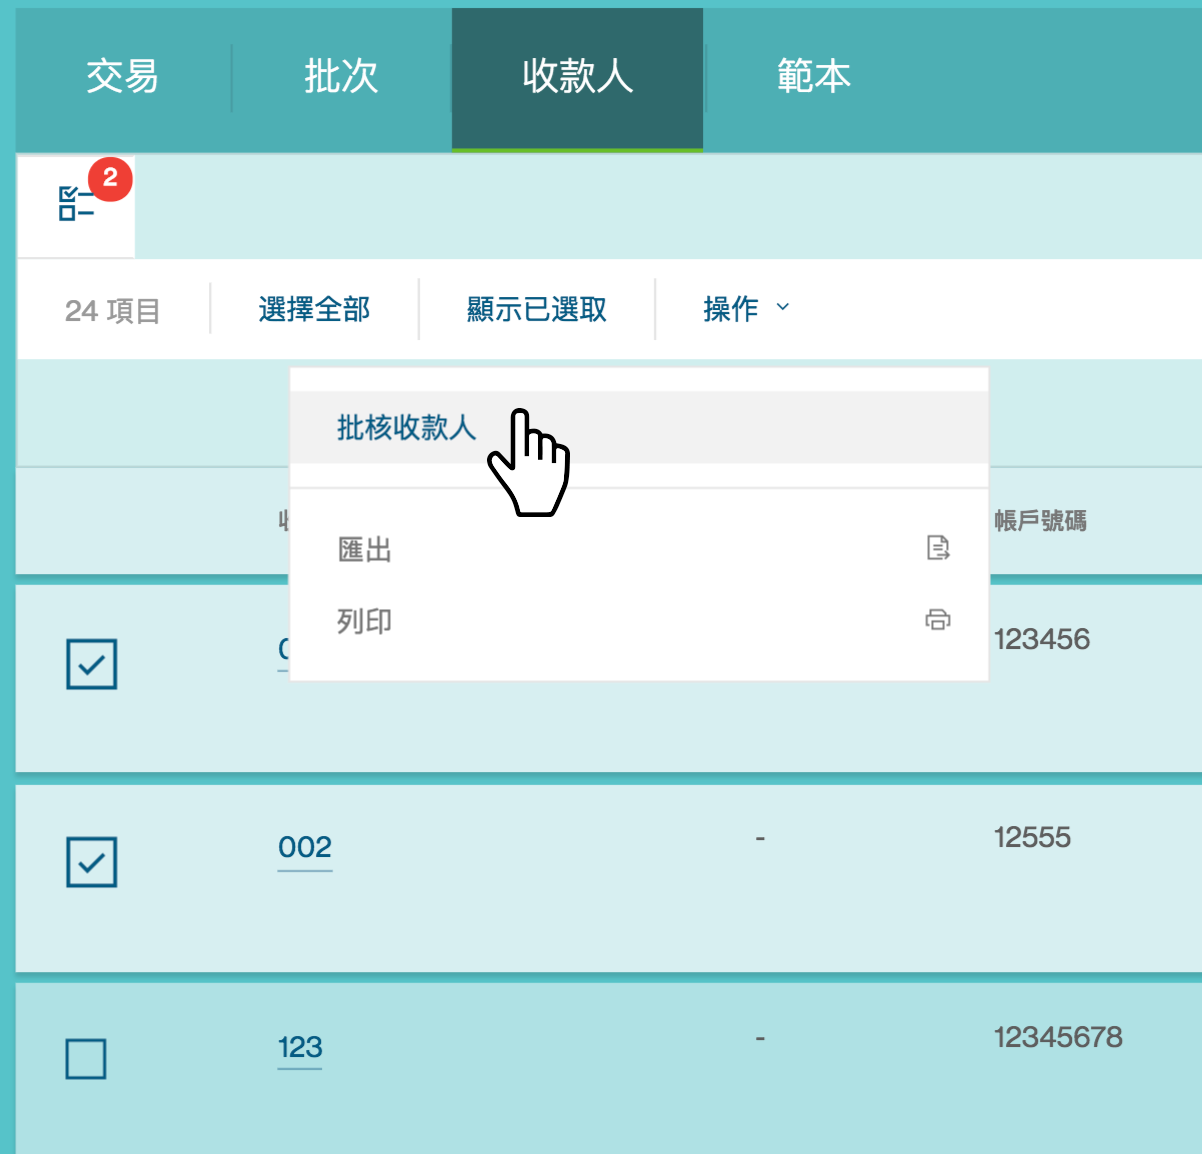
授權收款人清單頁面-操作選單
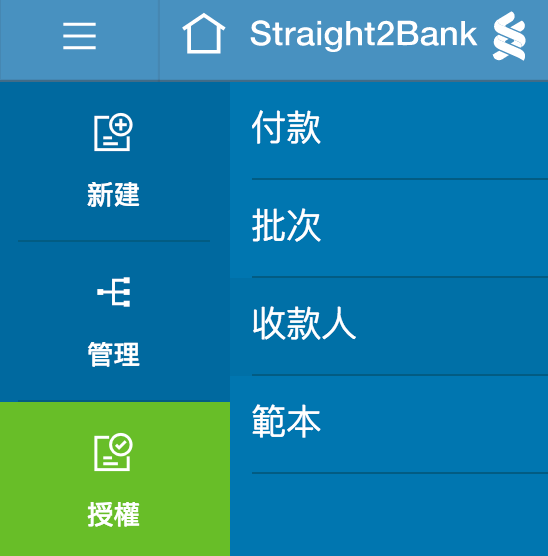
待授權的收款人將在 授權收款人清單頁面 顯示──點選左上角「選單 (M enu) > 授權 ( Approve) > 收款人(Payee)」。您可以透過點選收款人操作選單來授權所選收款人。
收款人明細顯示
授權收款人清單頁面將列出所有可用的現有收款人。 您可以通過點選「篩選」或「排序」按鈕自訂排列各種資 料顯示的方式。
點選收款人別名,將出現新的頁面顯示待授權的收款人明細。

批次授權
點選左上角的複選按鈕,並選擇需要授權的收款人(勾選核取方塊)。
透過「操作 (Actions)」選單即可選擇授權收款人選項。
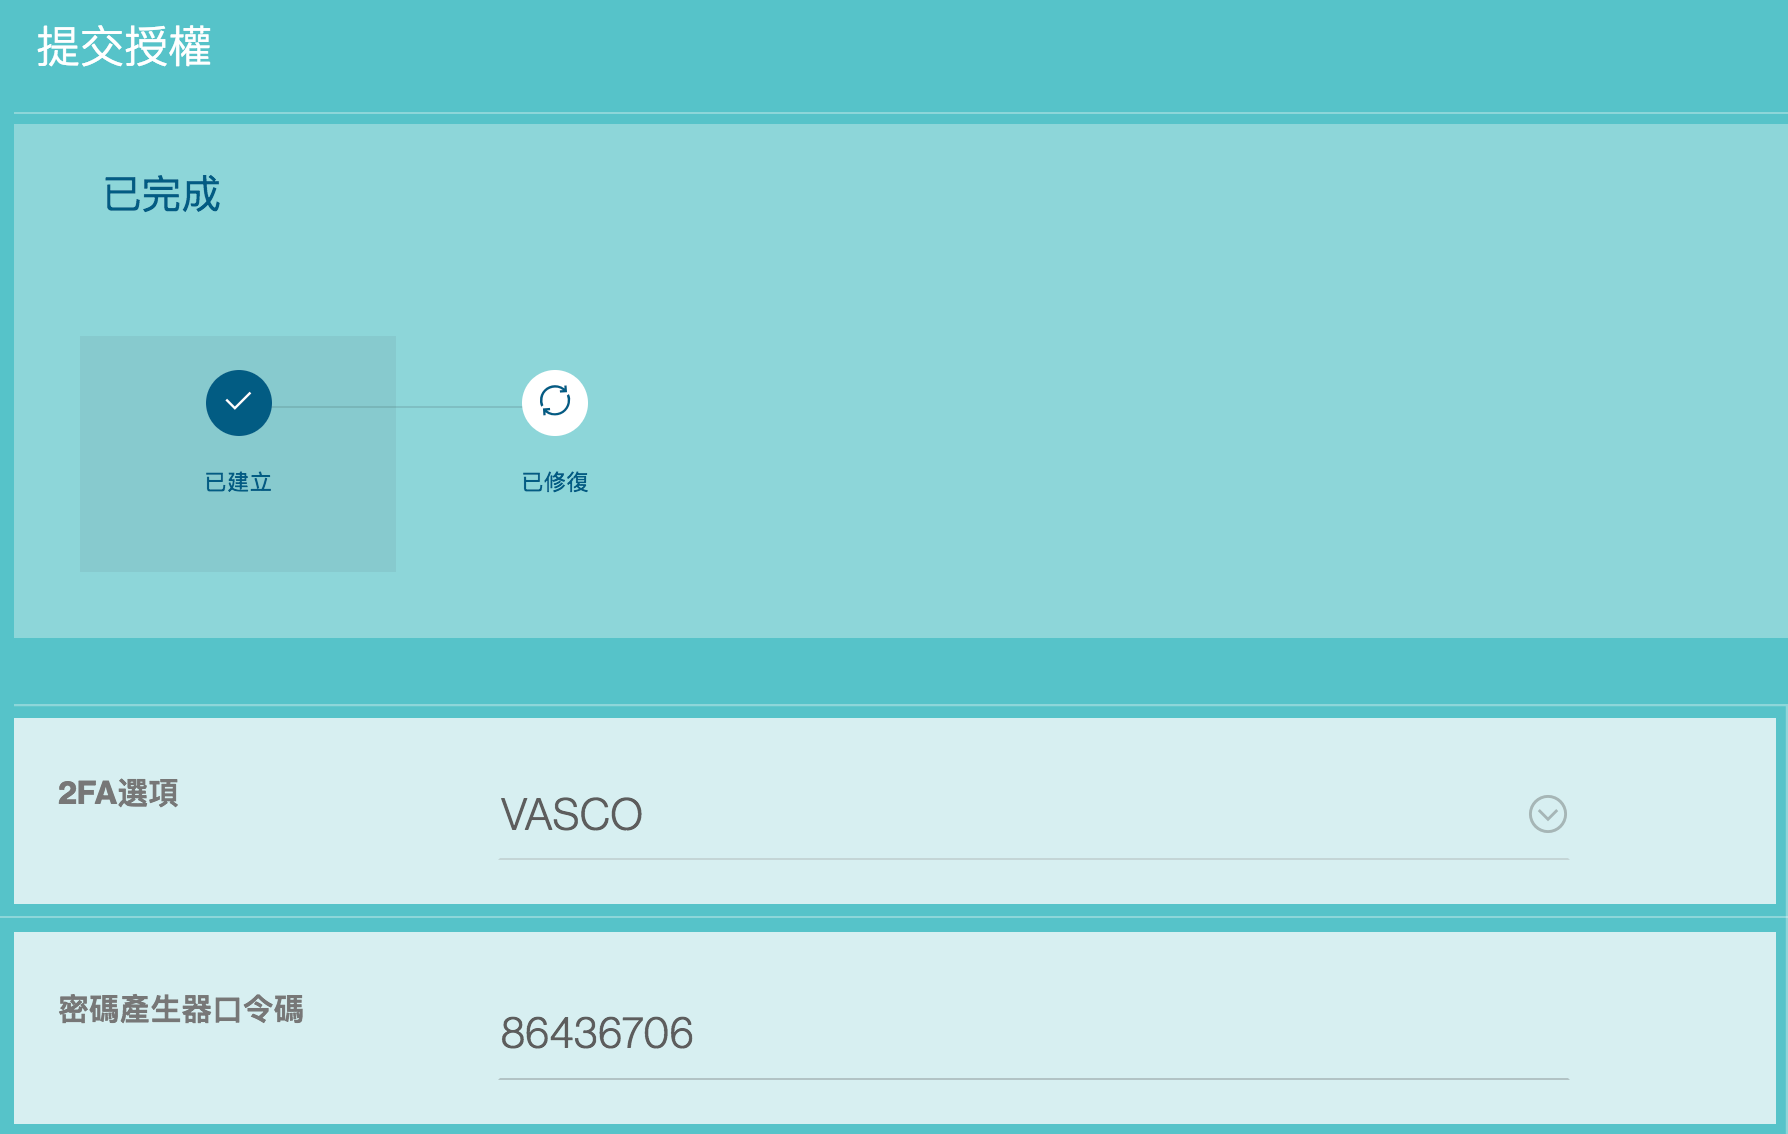
使用Vasco密碼產生器授權收款人
如果您是授權人,您的網路銀行操作人將通知您需要授權的批次編號/付款參考編號(或收款人別名)。 或者 ,您將收到一封電子郵件,提醒您登入Straight2Bank進行授權。
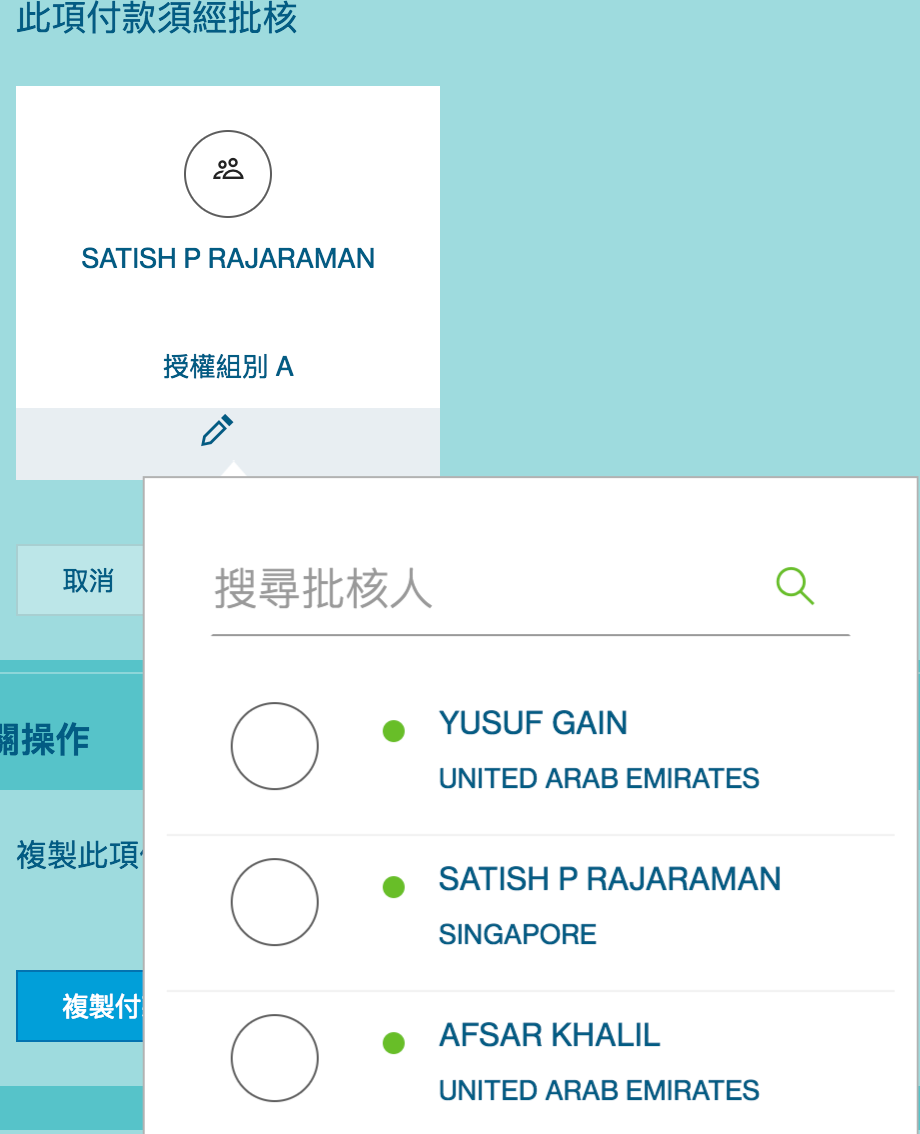
在「操作選單/個人主頁任務介面」中點選「授權收款人 (Approve Payee)」按鈕後,將顯示「提交授權」 (Submit Approval)的頁面:

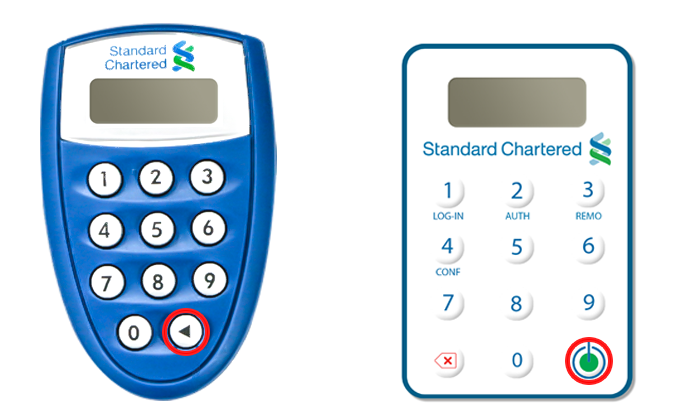
此時需要拿出您的Vasco密碼產生器。授權人可以通過執行以下步驟來授權收款人:
開啟Vasco密碼產生器並輸入開機PIN碼
按住開機按鈕,並輸入個人開機PIN碼(啟用密碼產生器時設定的PIN碼)以開啟密碼產生器。
顯示「APPLI _」
成功登入後,密碼產生器將顯示「APPLI _」

按下按鈕「2」
按下按鈕「2」以進行交易授權,密碼產生器將顯示「APPLI 2」

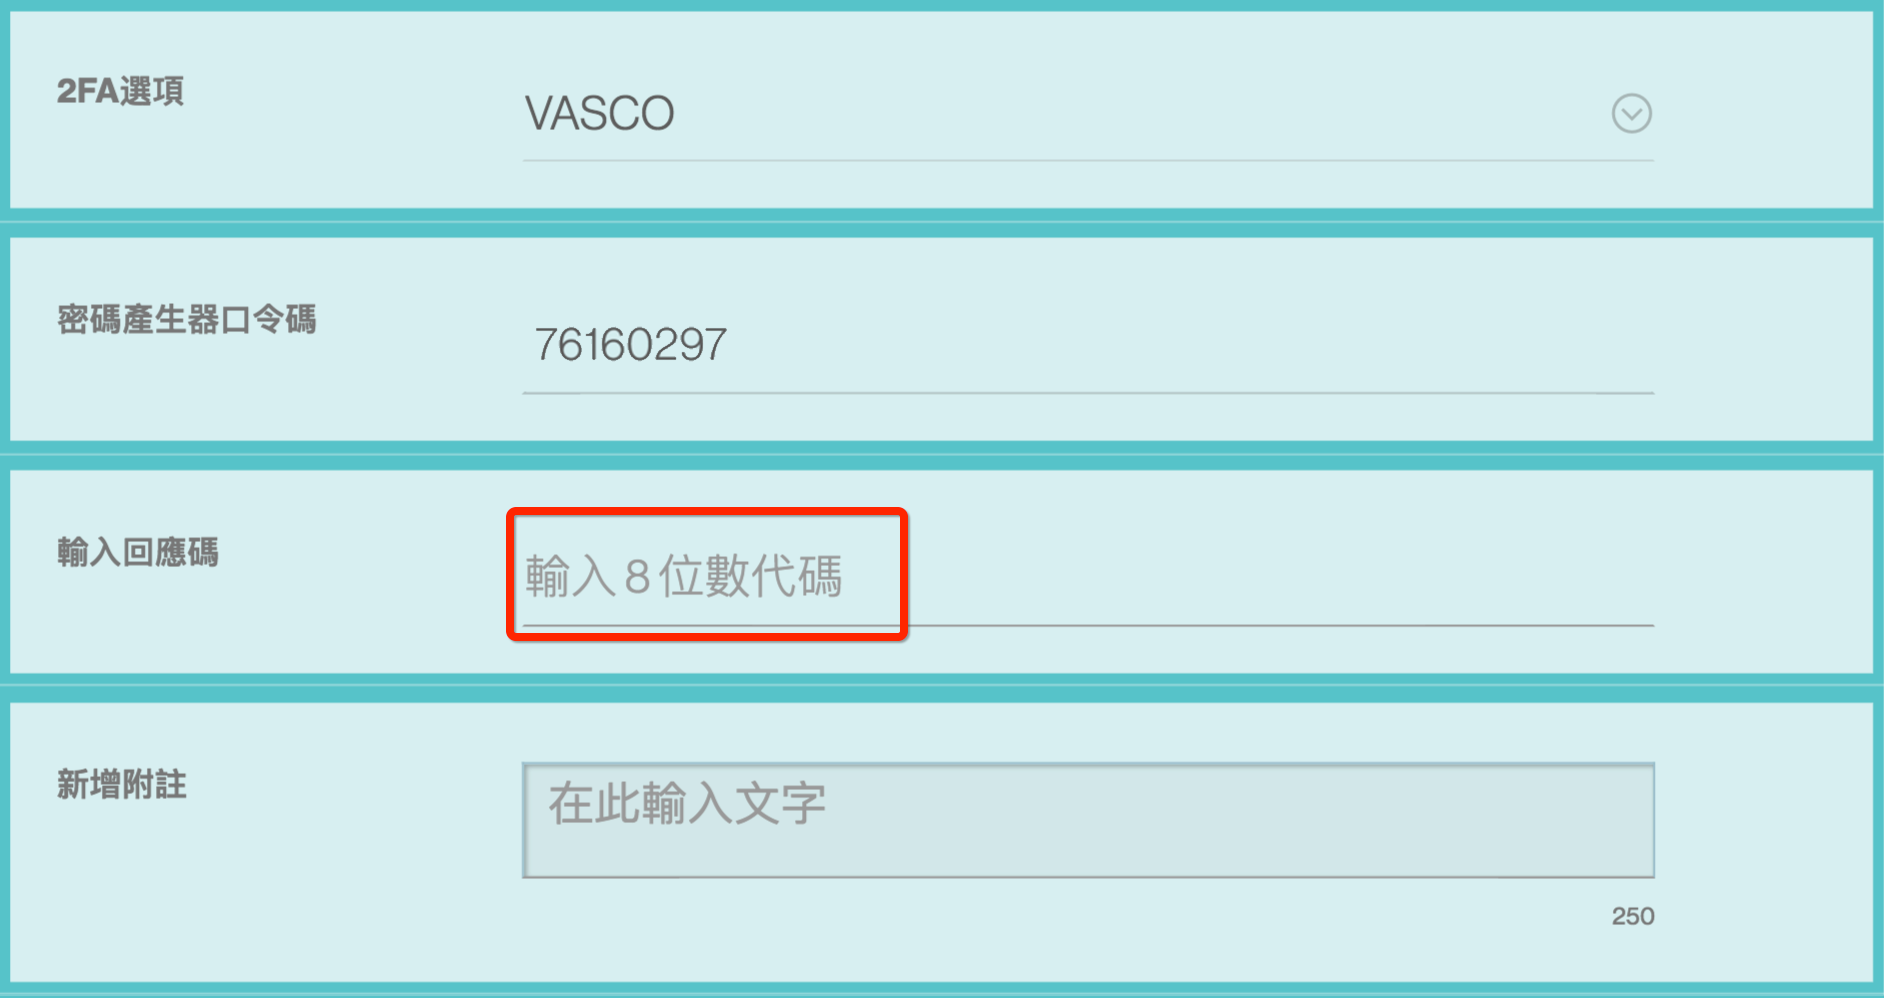
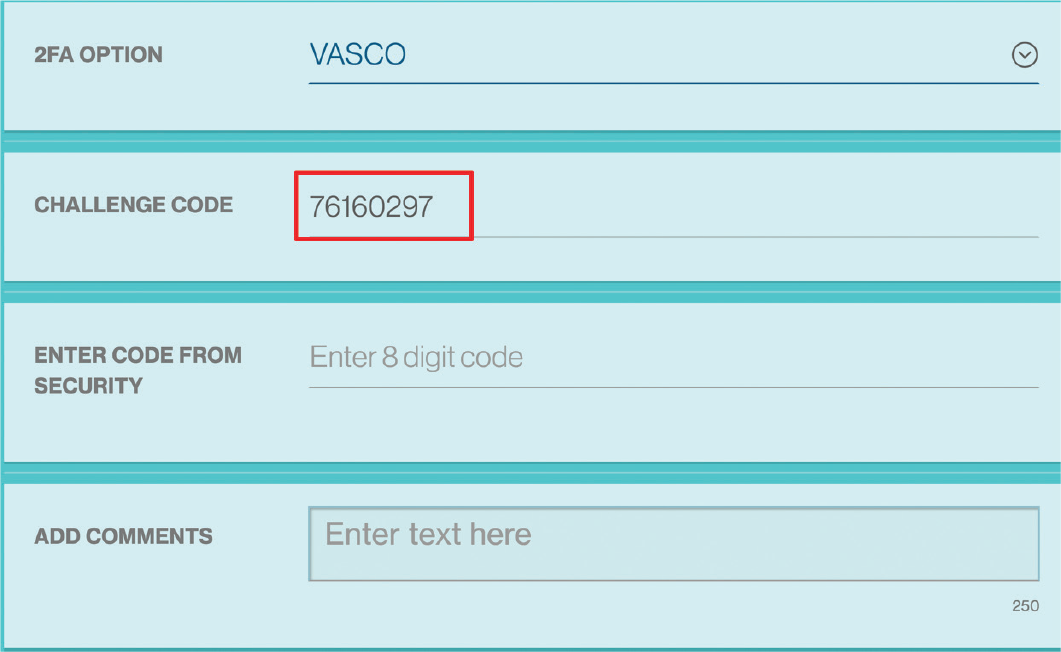
輸入「Challenge Code口令碼」
在密碼產生器輸入Straight2Bank 上顯示的一組「Challenge Code口令碼」(如圖中紅色框中 所示)
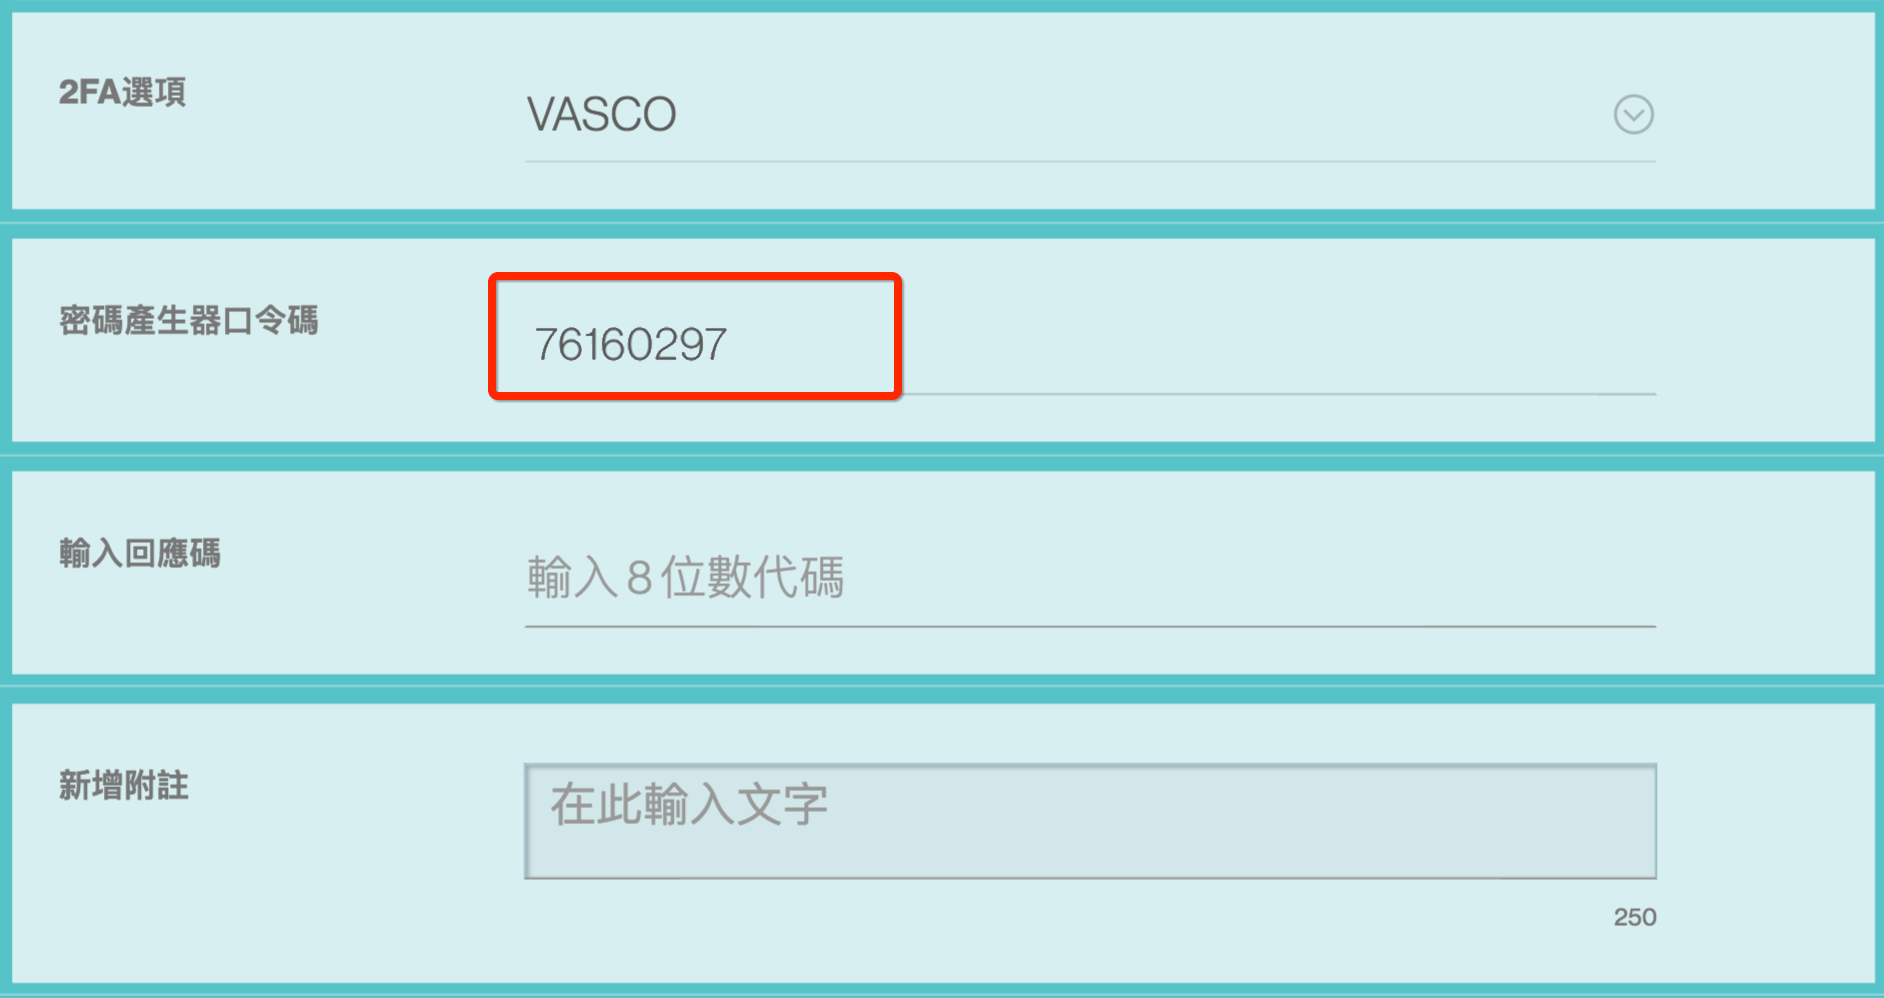

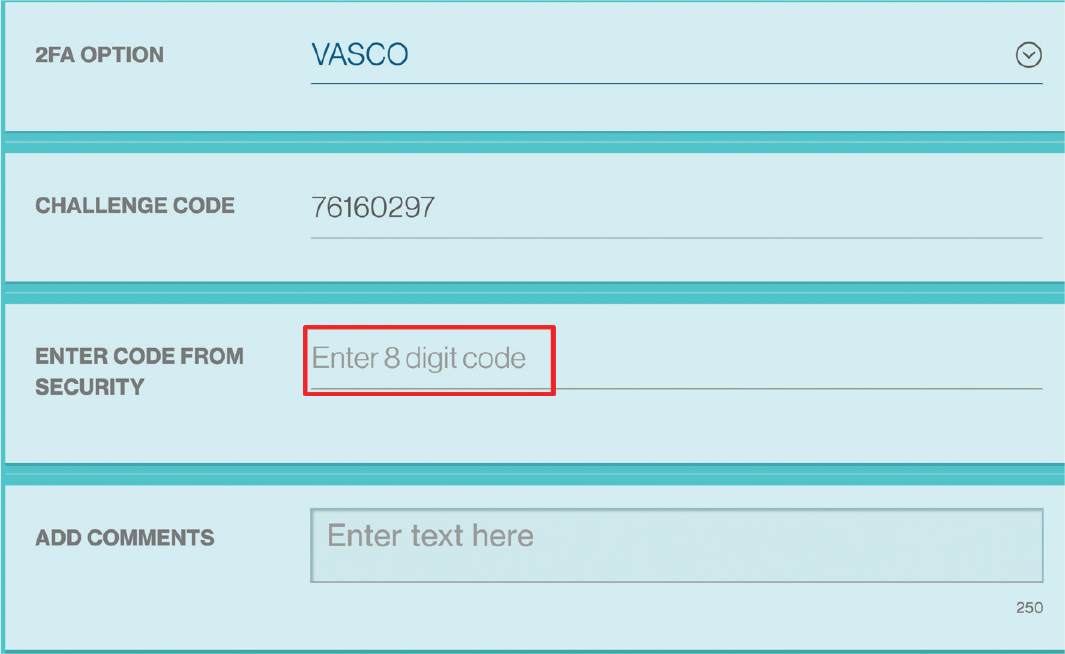
輸入「Response Code回應碼」
密碼產生器會立即生成一個8位數回應代碼,並在Straight2Bank頁面中的「2FA密碼」(Enter Code From Security) 欄位輸入該組代碼,並點選「授權 (Approve)」。
您將收到確認通知,並查看「管理收款人」清單中的更新狀態。
已授權的收款人帳戶將可於付款流程中使用。
發送往修復
授權人除了可拒絕交易及收款人建立指令之外,也可以選擇發送付款修復指令,針對所需欄位插入備註。
待授權的付款將在「選單 (Menu) > 授權 ( Approve) > 付款 ( Payment)」顯示。
授權付款清單頁面將列出所有顯示「已完成 (Completed)」狀態的現有交易(代表付款已被建立並已提交以 供進一步操作,如授權或批次處理)。您可以透過篩選和排序功能自訂本頁面的資料。

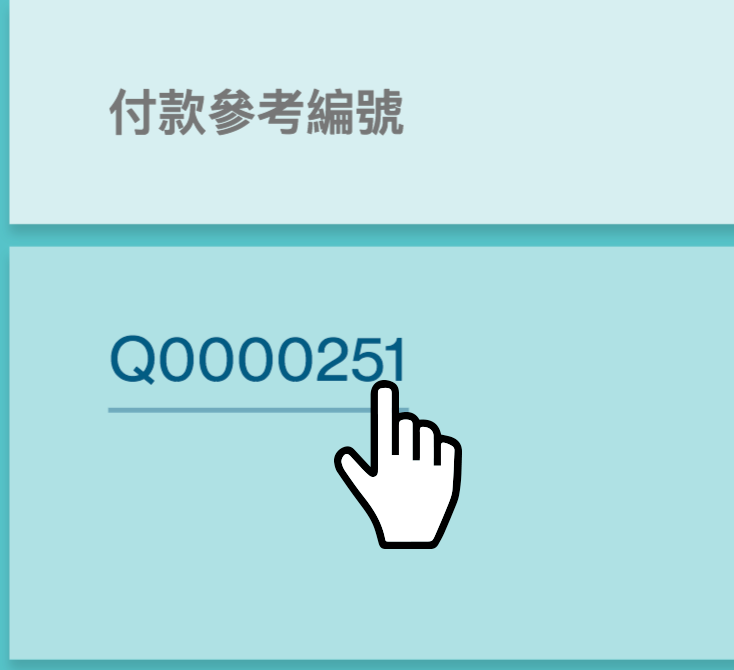
點擊付款參考編號 (Payment Reference Number),將出現新的頁面顯示待授權的付款摘要。

點擊所選付款的操作選單按鈕,選擇發送往修復 (Send for Repair) 選項。
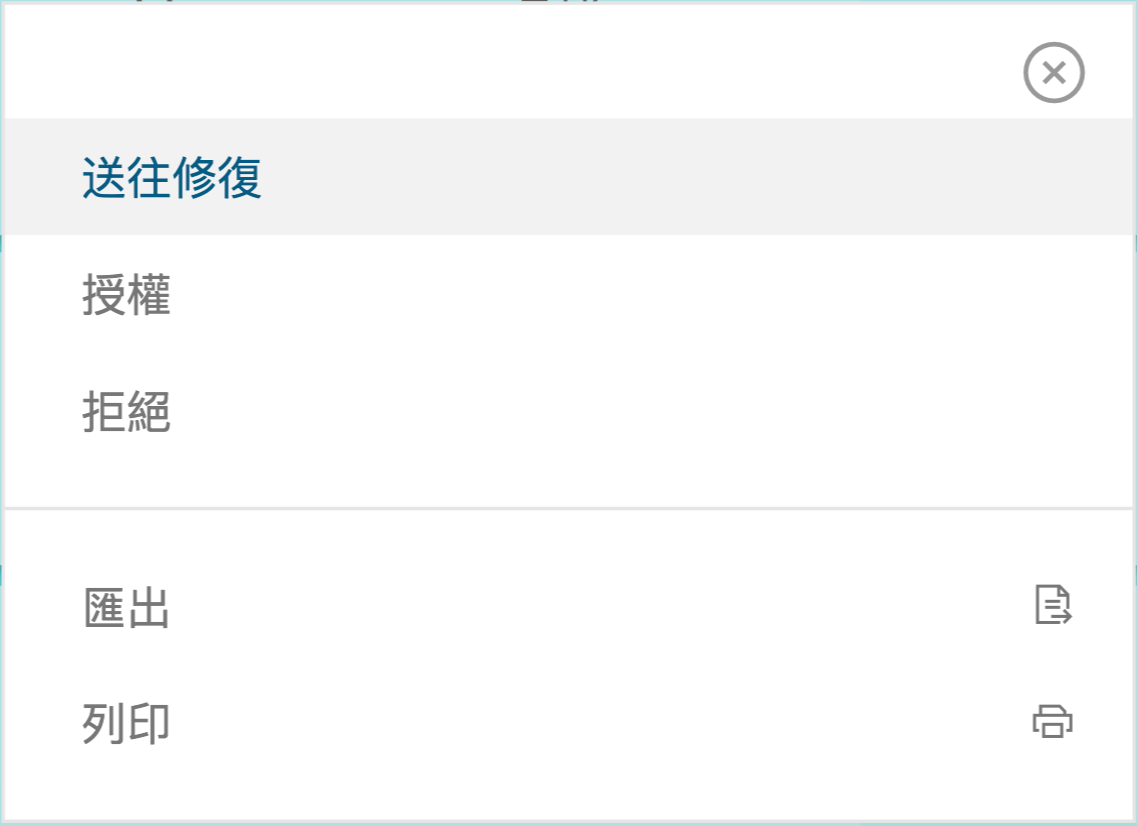
您必須提供相應的修復評註 (comments for repair),以便付款發起人或其他使用者可以據此採取進一步的 處理。
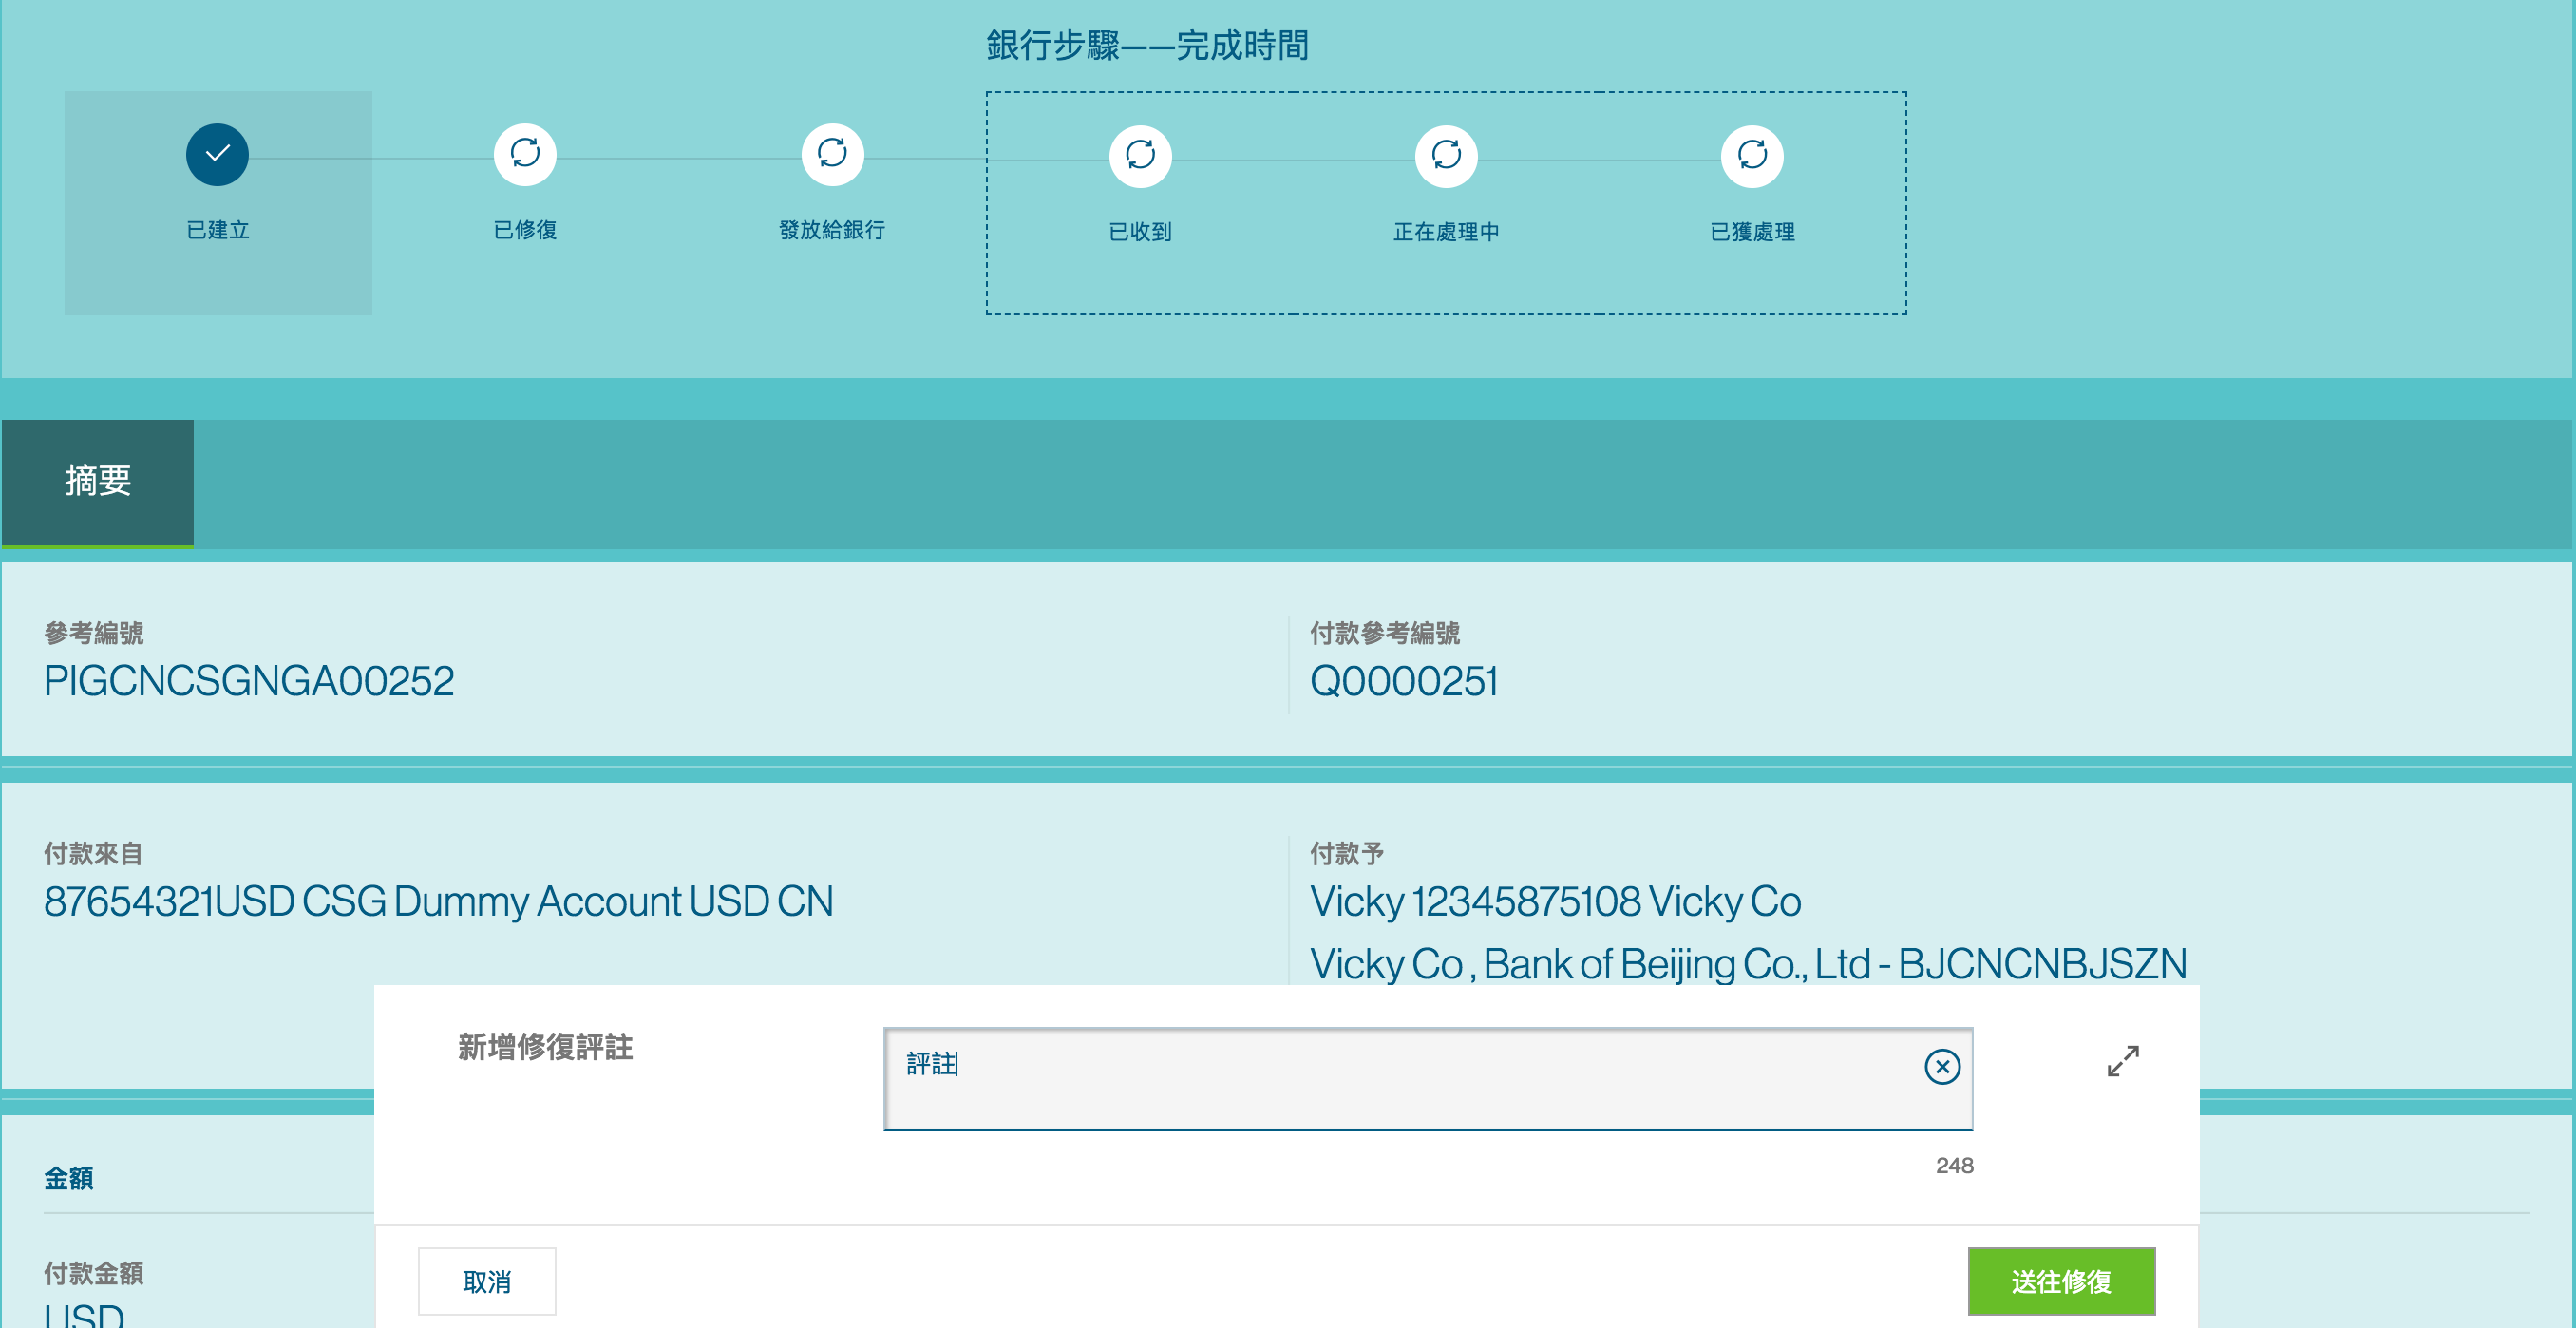
在管理付款清單頁面,該筆付款的交易狀態將更改為「尚待修復 (Pending Repair)」。
拒絕付款
一旦具備「授權人」的權限設定,您也可以拒絕Straight2Bank上的付款指示。如此,所選的付款指示將被 拒絕,不再接受任何進一步的授權相關功能(即亦不能被其他授權人授權或拒絕),並且付款指示的交易狀態 將顯示為「被授權人拒絕」(Rejected by Approver)。
待授權的付款將在左上角「選單 (Menu) > 授權 ( Approve) > 付款 ( Payment)」顯示。

授權付款清單頁面將列出所有顯示「已完成 (Completed)」狀態的現有交易(代表付款已被建立並已提交以 供進一步操作,如授權或批次處理)。您可以透過篩選和排序功能自訂本頁面的資料。

點擊付款參考編號 (Payment Reference Number),將出現新的頁面顯示待授權的付款摘要。

點擊所選付款的操作選單按鈕,選擇拒絕 (Reject) 選項。
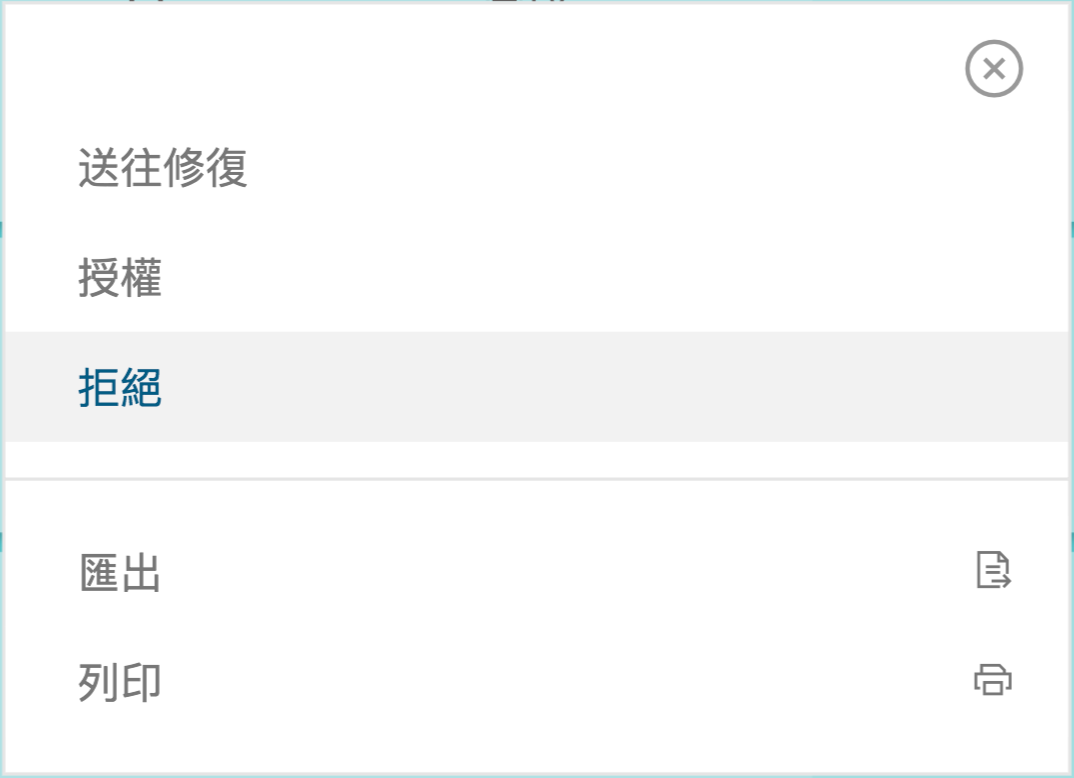
您必須提供相應的拒絕評註 (Reject Comments),以便付款發起人或其他使用者可以據此採取進一步的處 理,例如編輯、重新提交或刪除付款。
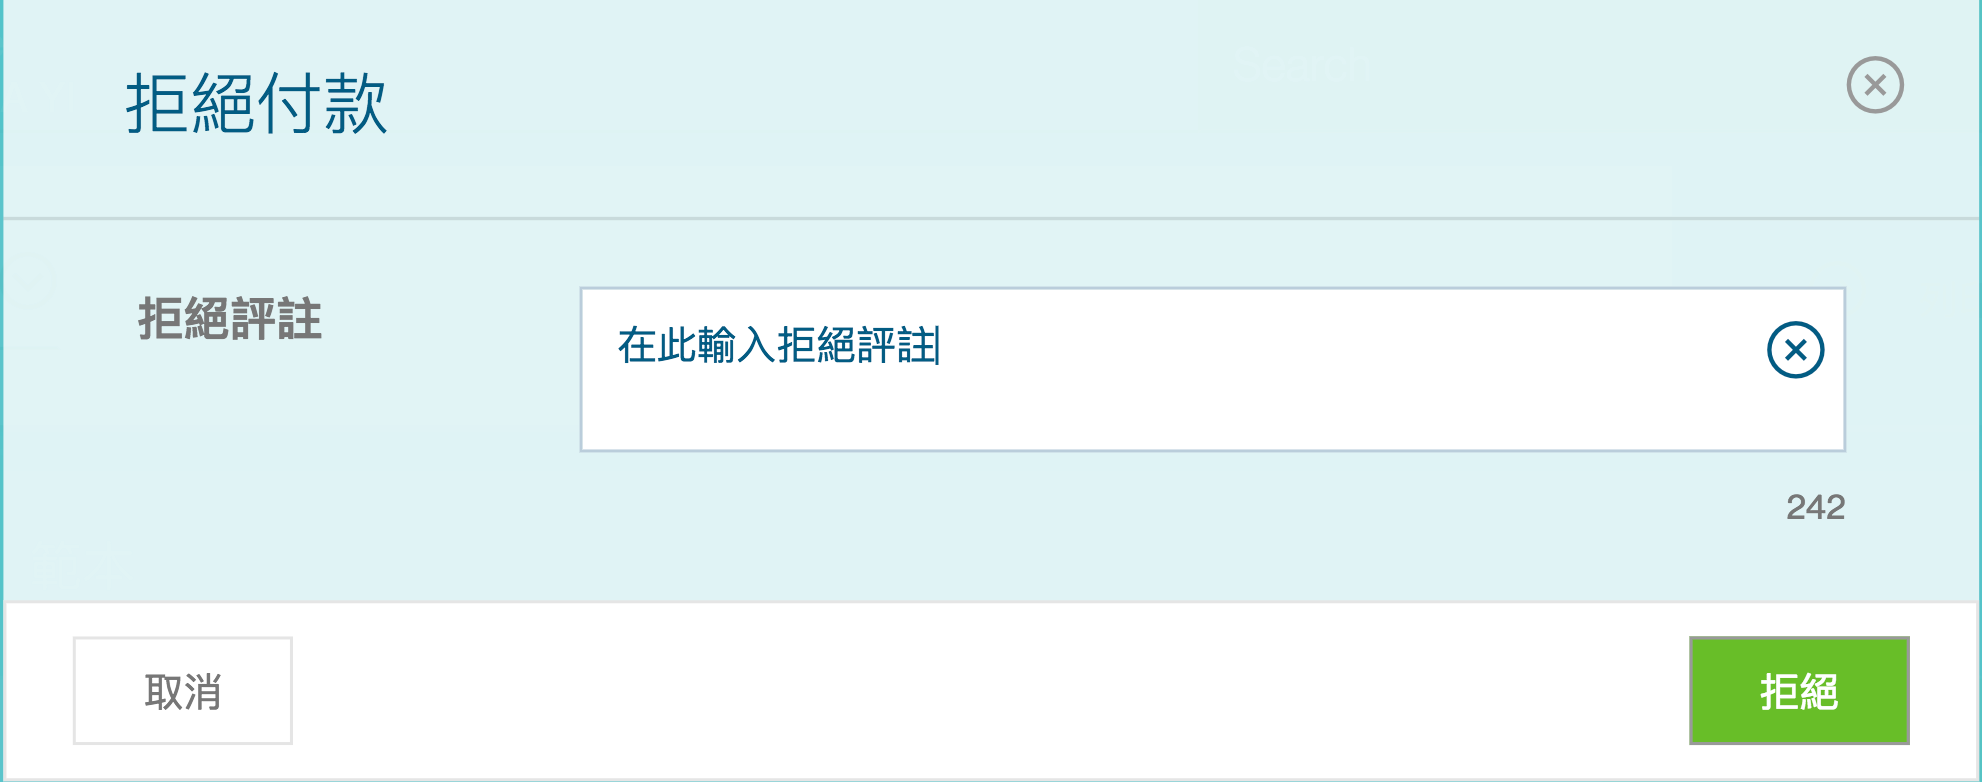
在 管理付款清單頁面,該筆付款的交易狀態會更改為「被授權人拒絕 (Rejected by Approver)」。
授權並送出付款
Straight2Bank上的付款設定最多可支援8層級授權組合,例如A、A+B、A+B+C等。單筆或批次付款指示 皆可適用。
建立付款的功能將基於您的使用者權限。
有關如何在Straight2Bank上建立付款的說明,請參閱 建立付款 章節。
授權付款
有多種方法可以讓您在Straight2Bank上授權付款:
個人主頁
待授權的付款指示將在個人主頁的 優先任務介面 和 代辦任務介面 顯示。

授權付款清單頁面-操作選單
待授權的付款指示將在授權付款清單頁面 (Approve Payments List Screen) 顯示 - 點選左上角 「選單 (Menu) > 授權 (Approve) > 付款 (Payment)」。您可以透過點選操作選單來授權所選 付款指示。

付款明細
授權付款清單頁面將列出所有顯示「已完成 (Completed)」狀態的現有交易(代表付款已被建立並已提交以 供進一步操作,如授權或批次處理)。您可以透過篩選和排序功能自訂本頁面的資料。
點擊付款參考編號 (Payment Reference Number),將出現新的頁面顯示待授權的付款摘要。
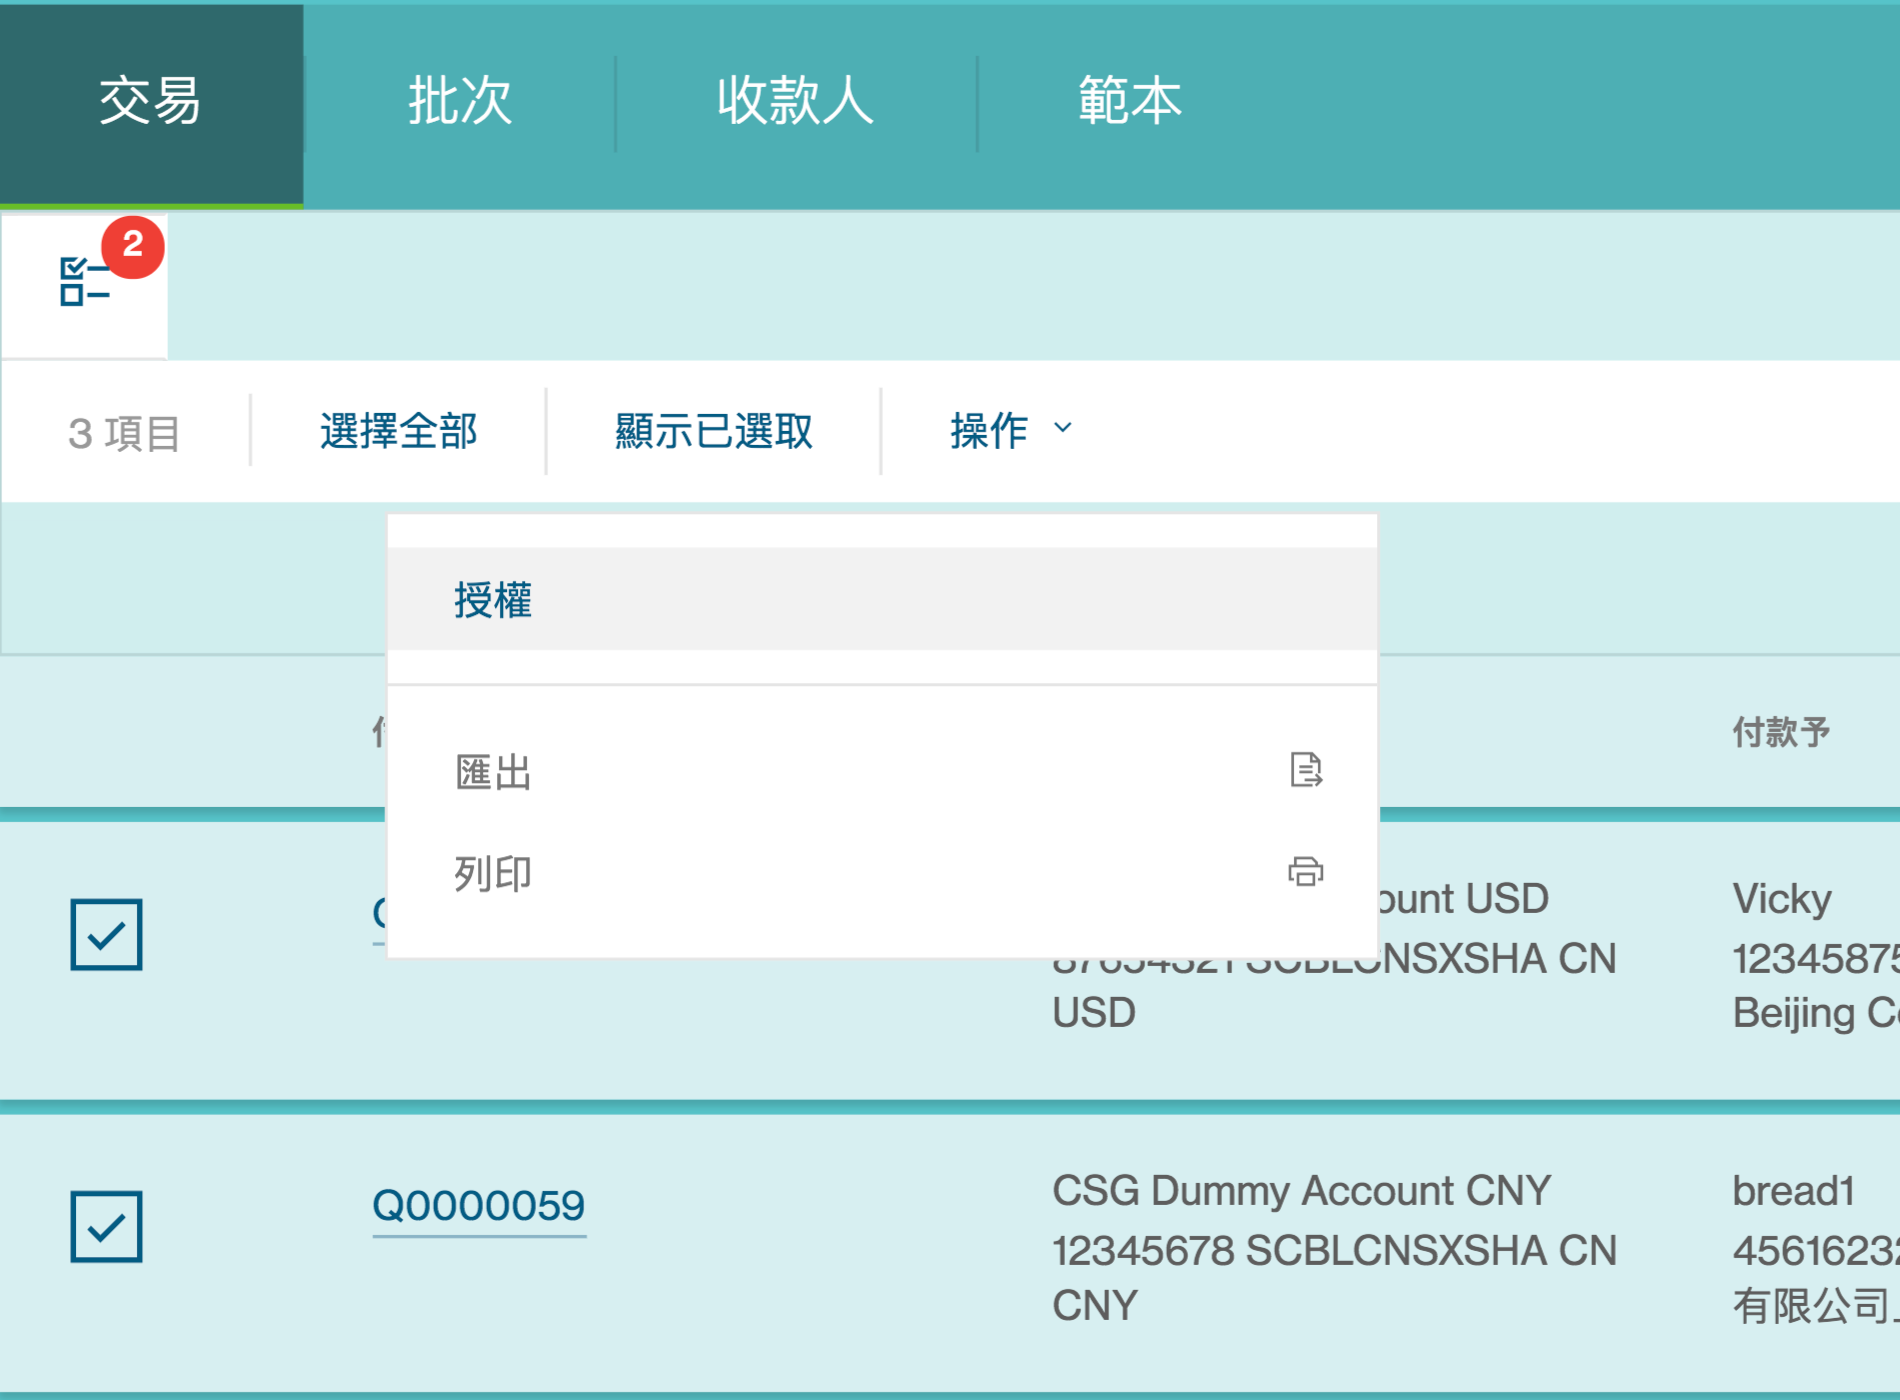
批次授權
點選左上角的複選按鈕,並選擇需要授權的付款(勾選核取方塊)。
透過「操作 (Actions)」選單即可選擇授權 (Approve) 選項。
使用Vasco密碼產生器授權付款
如果您是授權人,您的網路銀行操作人將通知您需要授權的批次號碼/付款參考編號。 或者,您將收到一封電 子郵件,提醒您登入Straight2Bank進行授權。
在「操作選單/個人主頁任務介面」中點選「授權 (Approve)」按鈕後,將顯示「提交授權」的頁面:
此時需要拿出您的Vasco密碼產生器。授權人可以通過執行以下步驟來授權付款:
開啟Vasco密碼產生器並輸入開機PIN碼
按住開機按鈕,並輸入個人開機PIN碼(啟用密碼產生器時設定的PIN碼)以開啟密碼產生器。

顯示「APPLI _」
成功登入後,密碼產生器將顯示「APPLI _」

按下按鈕「2」
按下按鈕「2」以進行交易授權,密碼產生器將顯示「APPLI 2」

輸入「Challenge Code口令碼」
在密碼產生器輸入Straight2Bank 上顯示的一組「Challenge Code口令碼」(如圖中紅色框中 所示)


輸入「Response Code回應碼」
密碼產生器會立即生成一個8位數回應代碼,並在Straight2Bank頁面中的「2FA密碼」(Enter Code From Security) 欄位輸入該組代碼,並點選「授權 (Approve)」。

發送往銀行
此功能允許您選擇一個或多個付款指示,發送至銀行以供進一步處理。
待發送至銀行 (Send to Bank) 的付款指示將在個人主頁的 優先任務介面 和 代辦任務介面 顯示。
匯兌服務
Straight2Bank上的多種付款類型都支援跨幣別交易,如電匯 (telegraphic transfer) 以及取決於付款帳 戶國家和付款類型的付款服務。Straight2Bank提供可用於跨幣別交易的不同類型的匯兌服務。
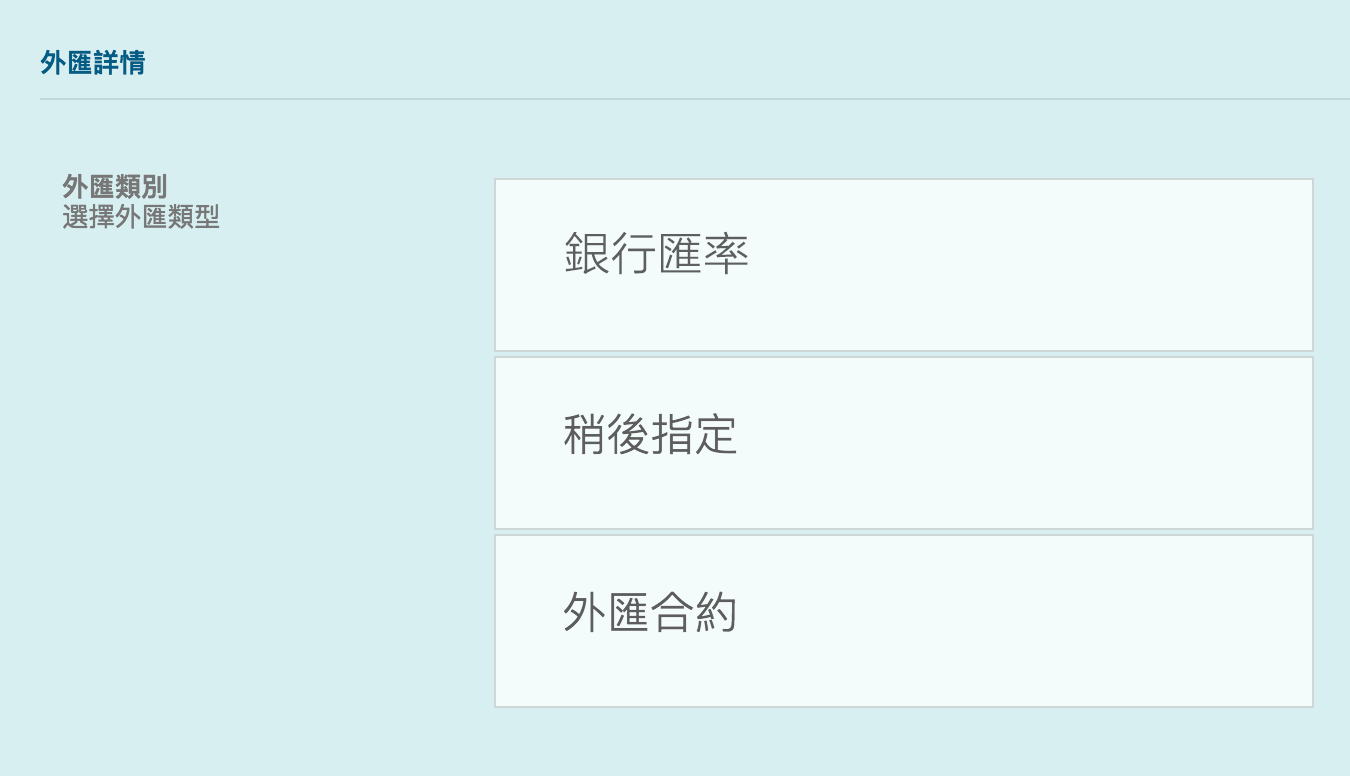
銀行匯率
此功能讓您在發送付款指示往銀行並進行處理時,讓銀行指定付款的匯率。有些貨幣可能不支援其他 匯兌服務類型,此時這將是唯一的選項。
稍後指定
點選後,在管理付款清單頁面中,該筆付款的交易狀態會更改為「待進行匯兌 (Pending FX)」。
外匯合約
此功能允許您在付款指示的建立流程中,使用預定線上匯率(台灣不適用)或是您的外匯合約匯率於單 筆付款。如此,您便可在完成付款指示並將其發送往銀行進行處理之前鎖定匯率。多筆付款指示可採 用單筆外匯合約或是多筆外匯合約可用於單筆付款。Straight2Bank上也有報表可提供相關匯率使 用資訊及細節。
Request for Quote (RFQ) at Send to Bank
RFQ is an online “Request for Quote” capability that allows you to book an online , real-time FX rate for an individual payment or a batch of payments. This feature will be available to users who have the “Send to Bank” capability and supported is 13 markets globally and may be optionally turned off at user level.
All existing payment types except the below support this feature;
- Corporate Cheque
- Instant Bank Fund Transfer
- Bank to Bank Transfer
- Request for Transfer, and
- Tax Payments
While nearly 130+ currencies are supported by the RFQ capability, restricted currencies such as MYR and CNY (to name a few) are not available for RFQ during Send to Bank.
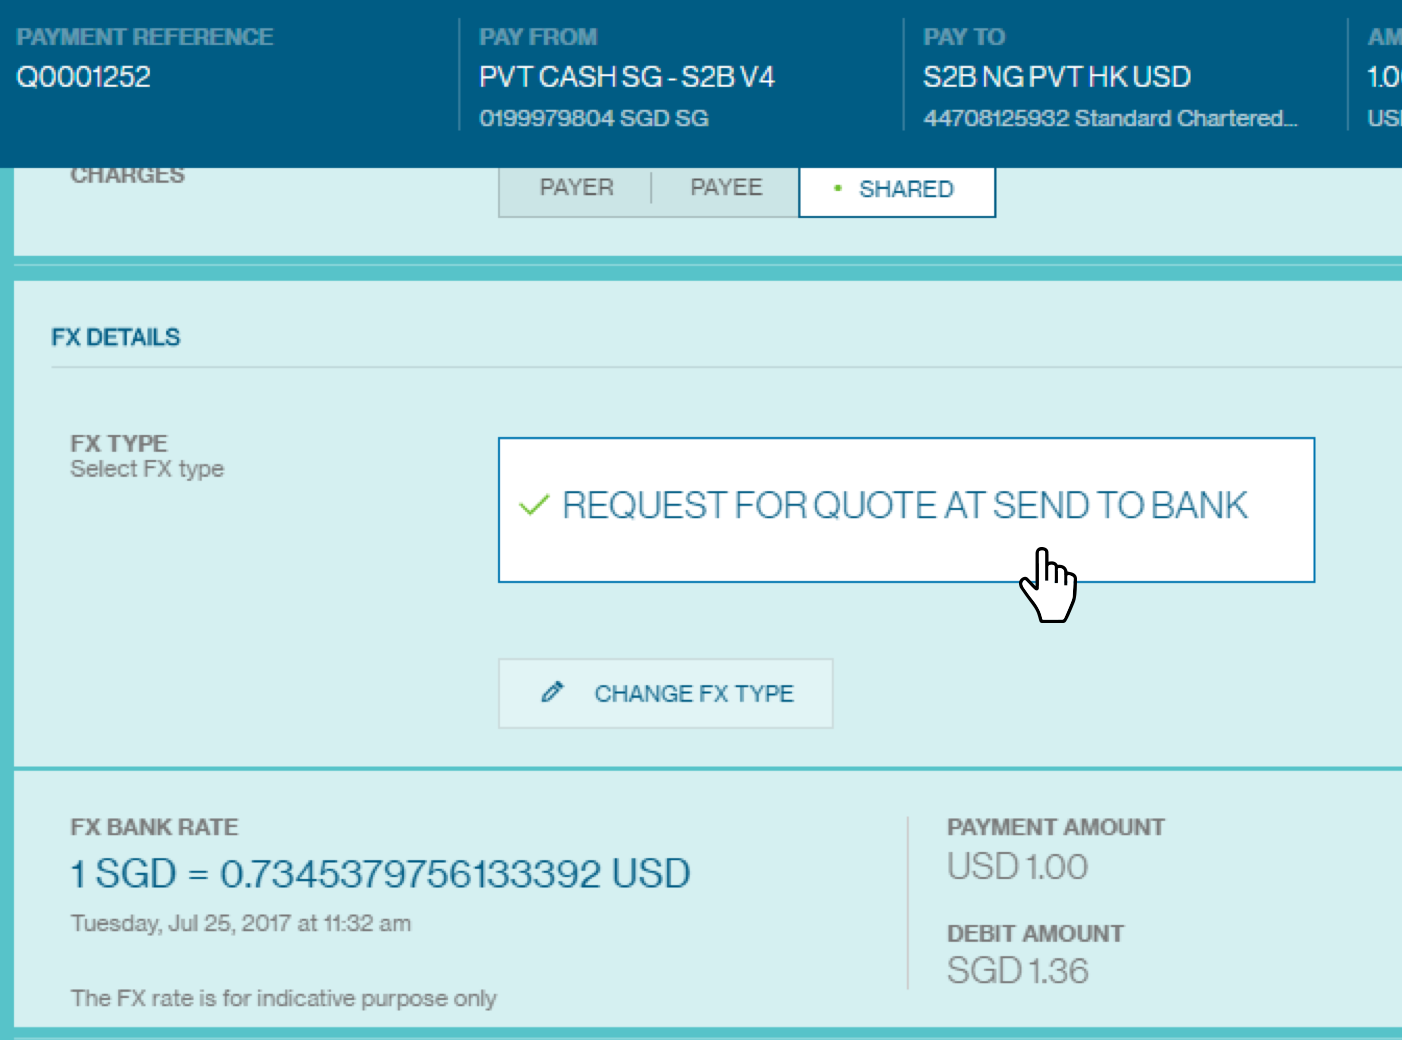
During the payment initiation journey, after entering the fields in the Pay from / Pay to information and Amount / Currency, then proceed to click on “Telegraphic Transfer”. You will see the “FX Details” section and an option to Select FX type.
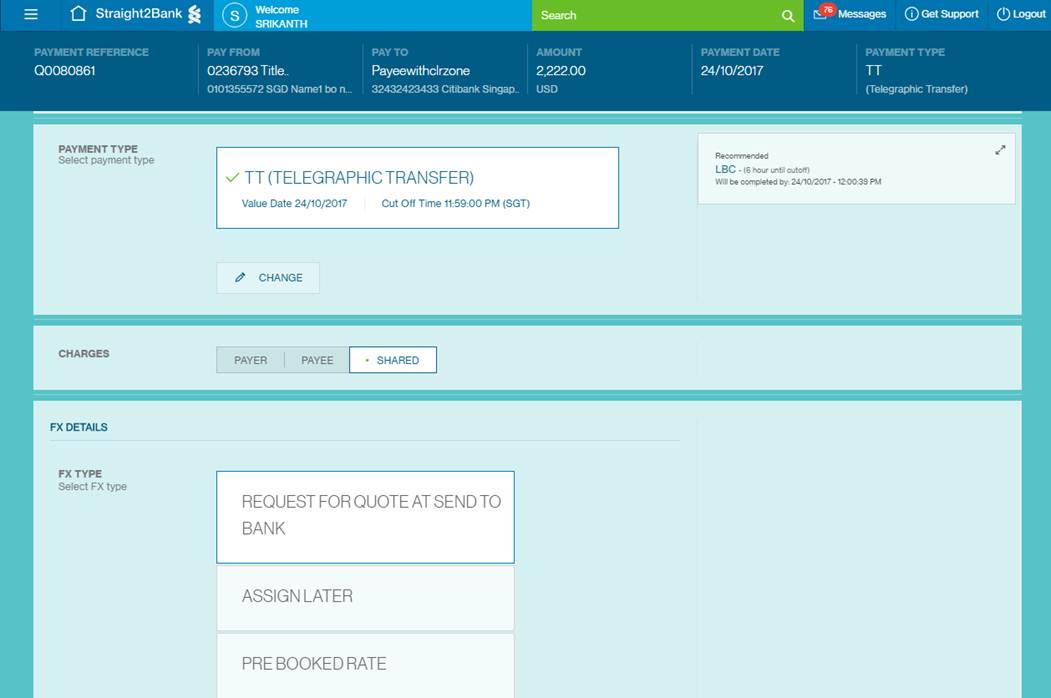
Click on “Request for Quote at Send to Bank”.
Upon completing providing the payment information, Click On “Submit”.
For authorisation, your will need to inform authoriser of the batch reference number that requires authorisation with Send to Bank RFQ.
Under the Approve menu, choose the "Payment".
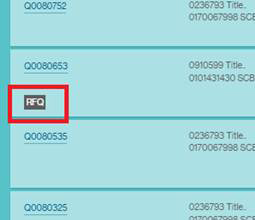
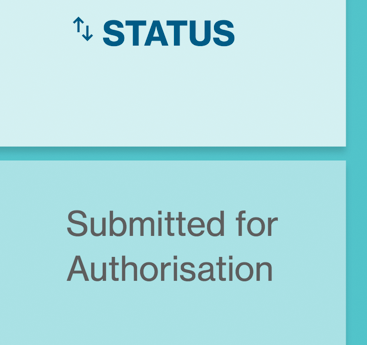
The list of all payments that are in “Submitted for Authorisation” status and based on the logged in user’s data entitlements will be lis ted. Approver will be able t o find the transaction for Send to Bank RFQ via the “RFQ” icon found beneath payment reference.
Clicking on Payment Reference, new page will provide summary of the payments that have been submitted pending Send to Bank RFQ / authorisation.
Click on the action menu, choose “Approve and Send to Bank with RFQ”.
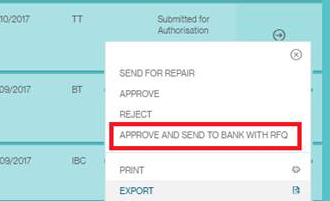
Clicking on the option you will then book a real-time FX when performing “Approve” and “Send to Bank”.
The FX quote will be valid for 20 seconds by when you may accept or reject the rate.
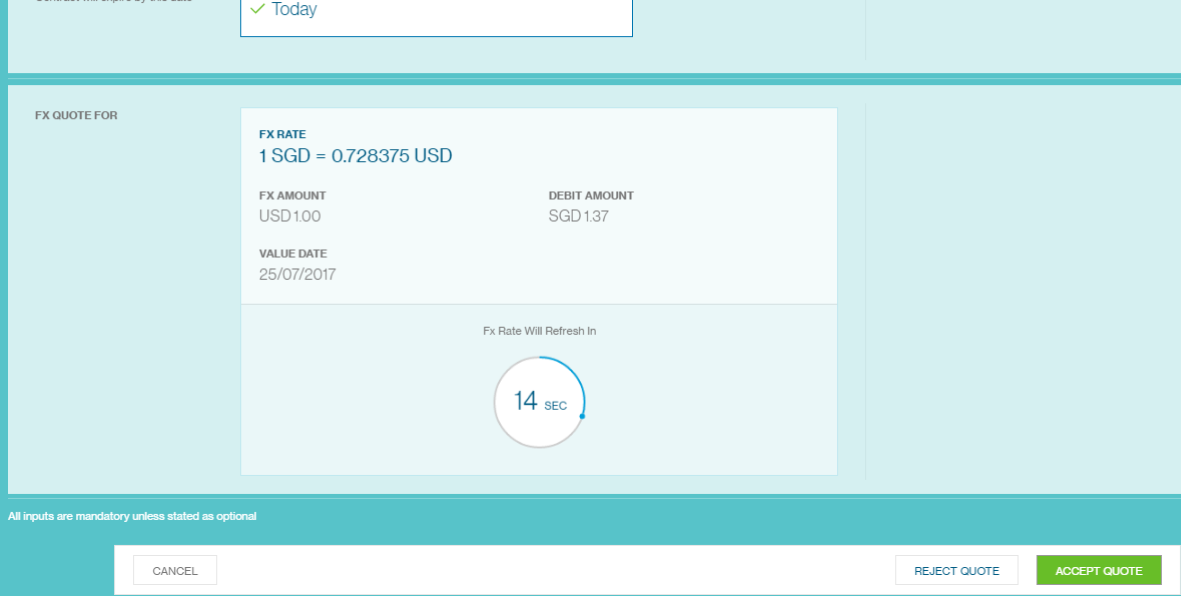
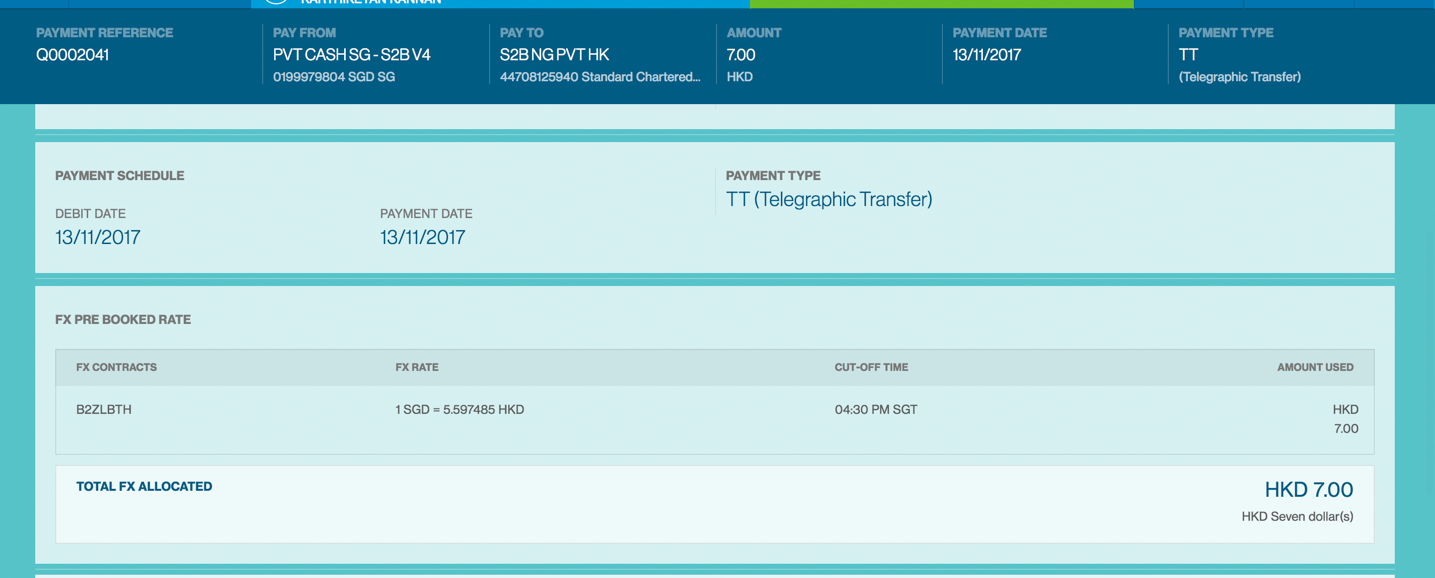
After the user performed “Approve and Send to Bank with RFQ” and if user want to check the FX rate of the deal, user can click on “Menu > Manage > Payments”.
Clicking on Payment Reference Number, new page will provide summary of the payments that have been processed by bank.
The FX rate will appear same to the FX rate of RFQ process during Send to Bank.
外匯合約
此功能允許您在付款指示的建立流程中,為單筆或批次付款指示預訂線上外匯匯率(台灣不適用)。 點選左上角「選單 (Menu) > 新建 ( Create) > 外匯合約 ( FX Contract)」進行訪問。
輸入付款帳號、外匯幣別、外匯金額和生效日期(計值日期)等資訊。
如果您點選「取得報價」(Get Quote)選項,您將被帶到外匯報價頁面以進一步接受或拒絕預訂線上外匯匯率。

Overview of Batching
The “Batching” feature on Straight2Bank provides convenience to clients during the payments authorisation workflow. Several payments can be selected to create one or few batches and enable easy authorisation of payment instructions before being submitted to the bank for further processing.
Batching is however an optional step in the transaction initiation workflow and payments can be authorised and submitted as individual transactions to the Bank for processing. This feature is available to Straight2Bank users with appropriate Functional and Data Entitlements. Only those payment instructions that are in “Complete” status will be eligible for batching as online validation of payments will have to be done in order to submit them to the Bank for further processing.
Broadly, there are 3 methods in which payment instructions on Straight2Bank can be batched:
Manual Batching
Select one or more payments and batch them together to create batches based on pre-defined batching rules for approval.
Auto Batching
System compiles payments that are eligible for batching to apply pre-defined batching rules and create multiple batches based on batching rules for approval.
Add to an Existing Batch
Select payments to add to an already existing batch which is created based on pre-defined batching rules for approval.
Parameterised Batching
An optional feature available for clients who may want to define up to 3 parameters to be used for batching of payment instructions.
| Branch Code | Debit A/C Country Code | Payee Address 1 in BO | Payee / Beneficiary Name in BO | Payment / Value Date |
| Clearing Zone Code for Cheques | Debit A/C No | Payee bank local clearing code | Payment Currency | Pick Up Location |
| Customer Memo | Debit Bank ID | Payee ID | Payment Details 1 in BO | Processing Mode |
| Customer Reference | Drawee bank code for IBC | Payee / Beneficiary A/C No | Payment Details 2 in BO | Service Type |
| Debit A/C City Code | On Behalf Of (OBO) Info | Payee / Beneficiary Bank Code | Payment Type | Transaction ID |
Manual Batching
Manual Batching will allow the user to manually select payment instructions and create a payment batch. The following steps should be followed to create a payment batch manually.
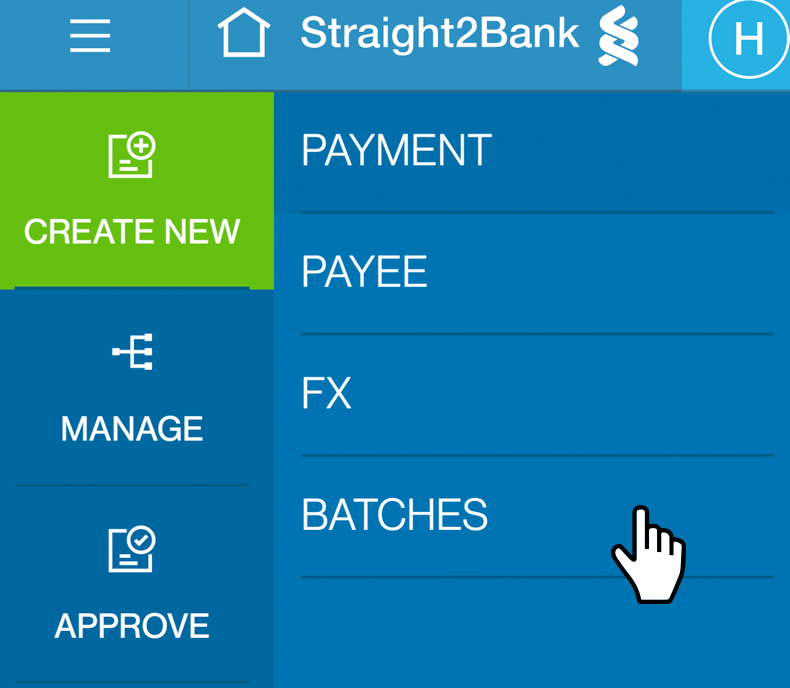
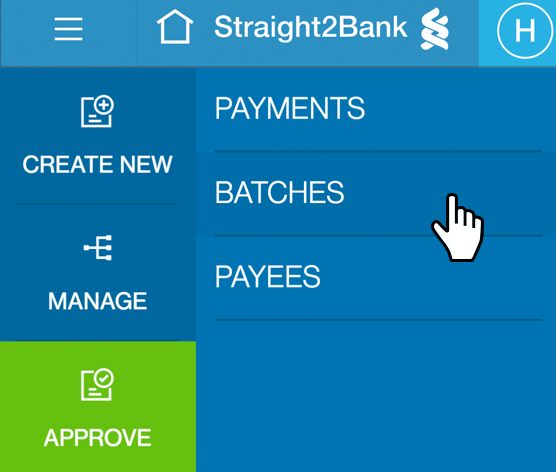
Click on “Batches” option available under “Create New”.

The list of all payments that are in “Submitted for Authorisation” status and based on the logged in user’s data entitlements will be listed.

All the payments on the page that are required to go together in a batch can be individually selected or you can simply select all by clicking the “Select All” button.
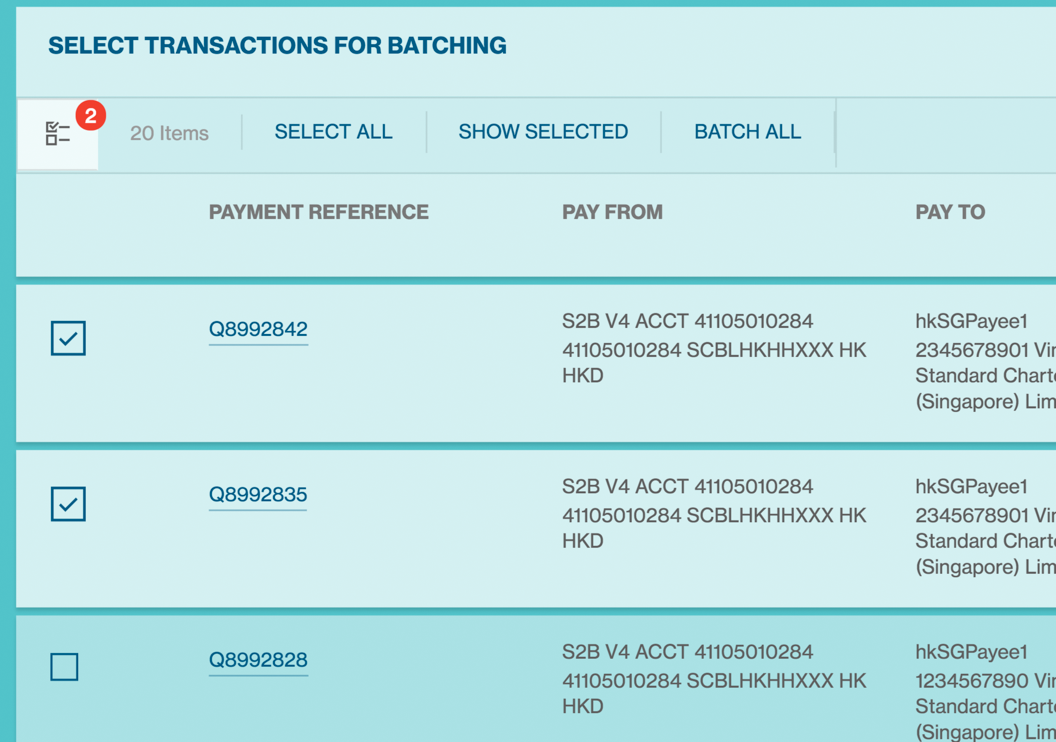
Upon selecting multiple instructions, click on “Create Batch” at the right bottom.

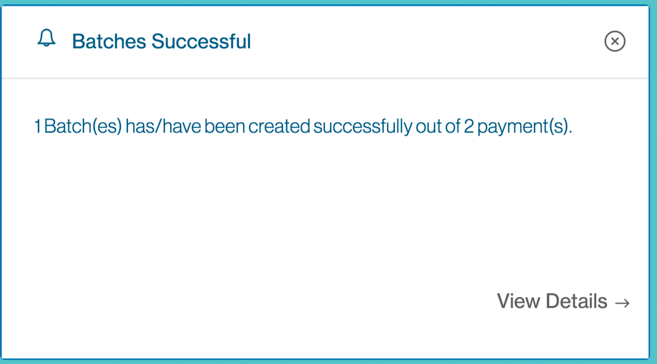
System will provide an acknowledgment indicating that “Batch Creation in Progress”.

Once successful, you can check the Manage Batch list screen to view the list of batches awaiting authorisation. Once approved, the status will change to “Fully Authorized”.
System Rules for Batching Payments
The below rules will be applied when a batch is manually created:
Authorisation Matrix
All the selected payment instructions should be of the same matrix number. If all the selected payments do not have the same matrix number, then the system will throw a validation to select payments that belong to the same matrix number. The matrix number for every submitted payment will depend on “Debit Account Number” or “Payment Type” or “Payee / Beneficiary”. This is by default based on the “Debit Account Number” setup.
FX Criteria
Whether the payments involve foreign exchange (FX) or not. If there is a mix of FX and Non-FX payments, separate payment batches will be created based an additional set of rules that will include (this behaviour does not apply for all markets, but selected markets);
- FX Type (i.e.) System Rate / Contract Rate
- Country (i.e.) the location where the Debit Account is held
- Currency Pair (i.e.) currency pairs will be grouped
- Amount Priority (i.e.) whether it is
based on Payment Amount or Debit Amount priority
- Payment Debit Date,
- Payment Value Date, and
- Parameters defined by the Client during On-boarding (e.g.) Payment Type, Beneficiary and
others
(refer to subsequent section for more details on this)
Based upon the above parameters, one or more batches will be created. Each of the batches will be assigned with a system generated batch reference.
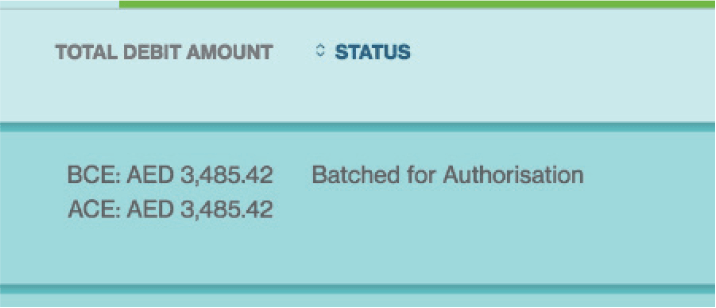
The newly created batches will be of the status “Batched for Authorisation” and further options available, based on the user’s functional entitlements will be displayed beneath the batch.

Auto Batching
The “Auto Batch” feature on Straight2Bank is an alternative to the “Manual Batch” feature. This feature will automatically create payment batches based on the preset batching rules within Straight2Bank without requiring the user to manually create batches. The following steps should be followed to automatically create payment batches.
Click on “Batches” option available under “Create New”.
The list of all payments that are in “Submitted for Authorisation” status and based on the logged in user’s data entitlements will be listed.
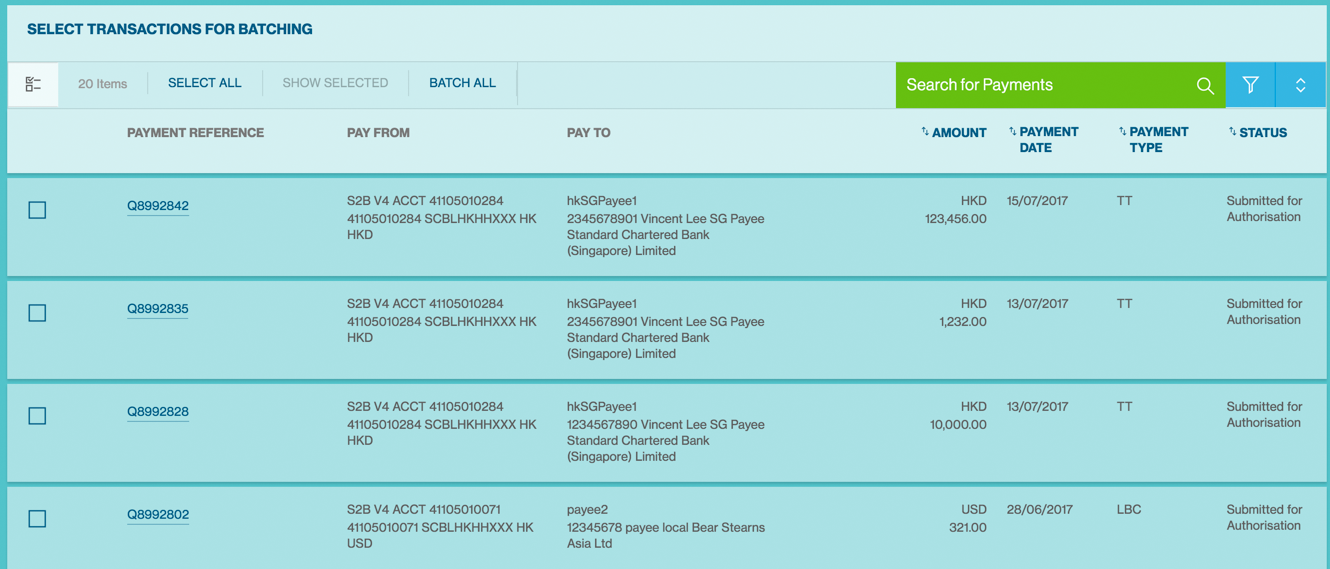

All the payments on the page that are required to go together in a batch can be automatically batched by clicking the “Batch All” button.
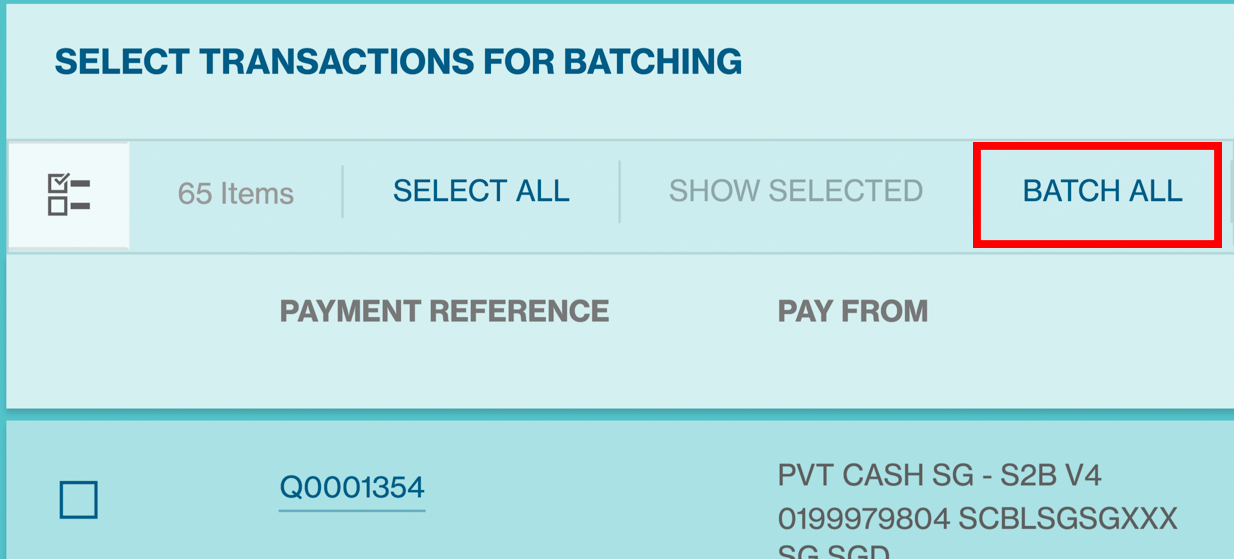
Upon clicking batch all button will provide an acknowledgment of the request together with number of payment instructions. Click “Yes” to continue.
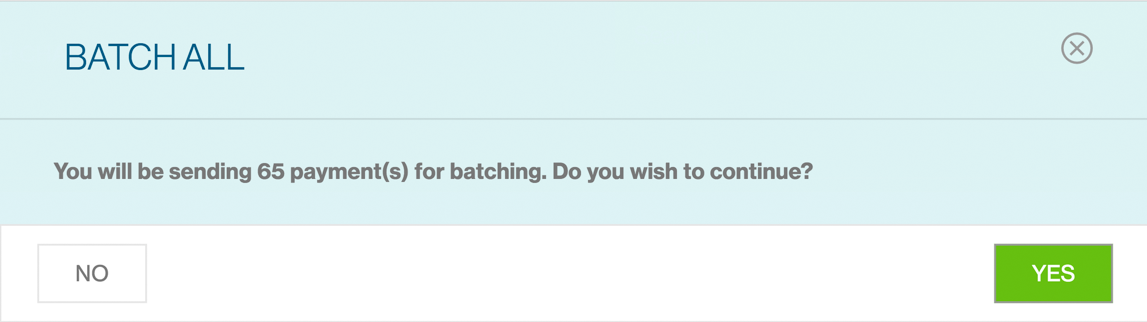
System will indicate that “ Batch Creation in Progress”.

Once successful, you can check the Manage Batch list screen to view the list of batches awaiting authorisation. Once approved, the status will change to “Fully Authorized”.
System Rules for Batching Payments
The below rules will be applied when a batch is manually created:
Authorisation Matrix
All the selected payment instructions should be of the same matrix number. If all the selected payments do not have the same matrix number, then the system will throw a validation to select payments that belong to the same matrix number. The matrix number for every submitted payment will depend on “Debit Account Number” or “Payment Type” or “Payee / Beneficiary”. This is by default based on the “Debit Account Number” setup.
FX Criteria
Whether the payments involve foreign exchange (FX) or not. If there is a mix of FX and Non-FX payments, separate payment batches will be created based an additional set of rules that will include (this behaviour does not apply for all markets, but selected markets);
- FX Type (i.e.) System Rate / Contract Rate
- Country (i.e.) the location where the Debit Account is held
- Currency Pair (i.e.) currency pairs will be grouped
- Amount Priority (i.e.) whether it is
based on Payment Amount or Debit Amount priority
- Payment Debit Date,
- Payment Value Date, and
- Parameters defined by the Client during On-boarding (e.g.) Payment Type, Beneficiary and
others
(refer to subsequent section for more details on this)
Based upon the above parameters, one or more batches will be created. Each of the batches will be assigned with a system generated batch reference.
The newly created batches will be of the status “Batched for Authorisation” and further options available, based on the user’s functional entitlements will be displayed beneath the batch.
Add to Existing Batch
The “Add to Existing Batch” feature on Straight2Bank allows is an alternative to the “Manual Batch” feature. This feature will automatically create payment batches based on the preset batching rules within Straight2Bank without requiring the user to manually create batches.
Click on “Batches” option available under “Create New”.
The list of all payments that are in “Submitted for Authorisation” status and based on the logged in user’s data entitlements will be listed.
All the payments on the page that are required to go together in a batch can be individually selected or you can simply select all by clicking the “Select All” button.
Upon selecting one or more payment instructions, click on “Add to Existing Batch” at the bottom.

A prompt screen with existing payment batches that are in “Batched for Authorization” status will be available. This list will have only those batches that match the batching rules (Authorisation Matrix, Foreign Exchange rules and Optional parameters setup for batching) of the selected payment and hence, it could be possible that despite multiple batches available in “Batched for Authorization” status, not all of them are listed here.
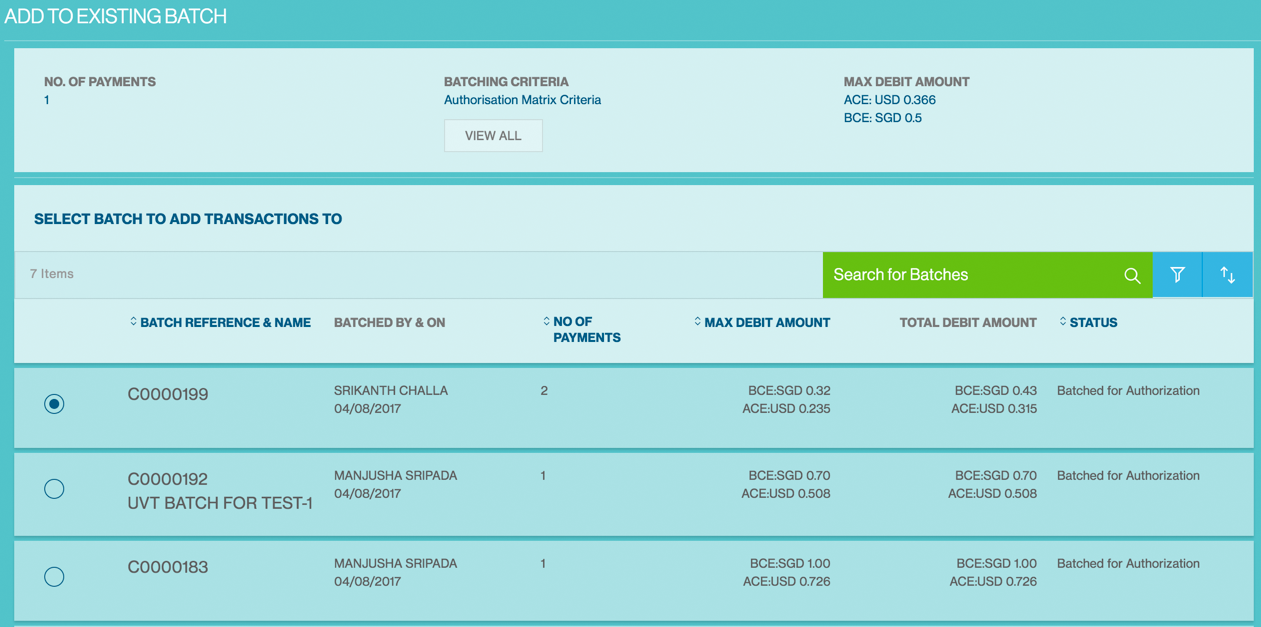
The selected batch will then be updated to include the chosen payment instructions for further action.

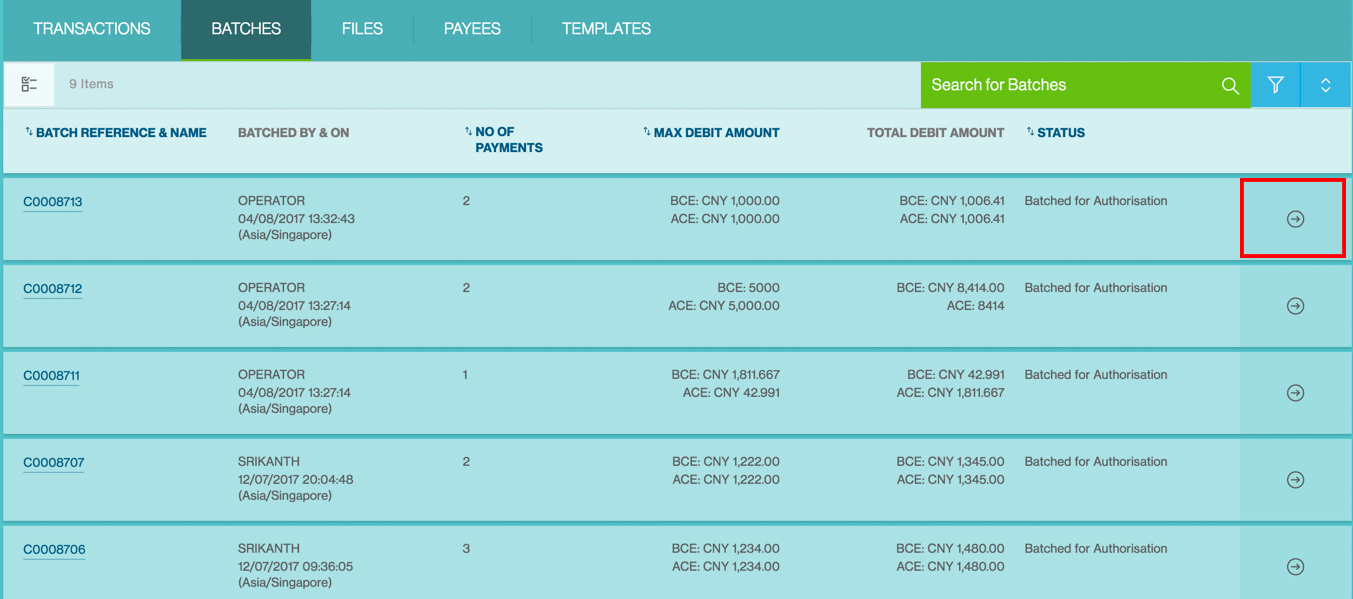
Manage Batch
Payment batches that are in “Batched for Authorization” status (i.e.) before being authorised will be available for editing, printing or un-doing by the same user who had created the batch or any other users belonging to the Group.
This section provides information on editing / printing a payment batch and remove one or more instructions or to undo an existing batch for various reasons. This option is dependent on the user’s ‘Functional’ and ‘Data’ entitlements.
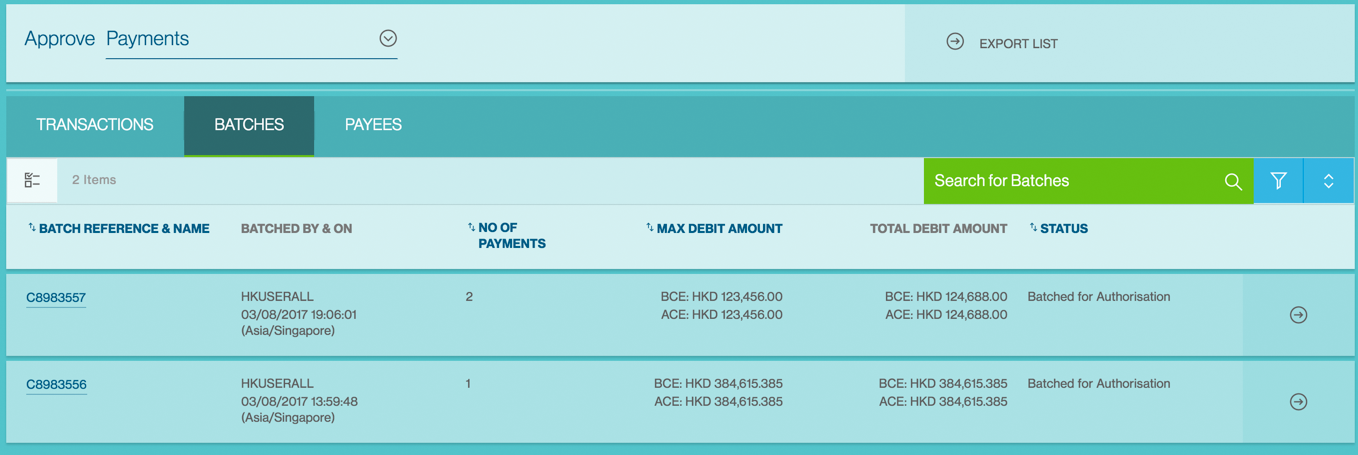
The Manage Batches Screen will be available from the Menu> Manage> Batches.
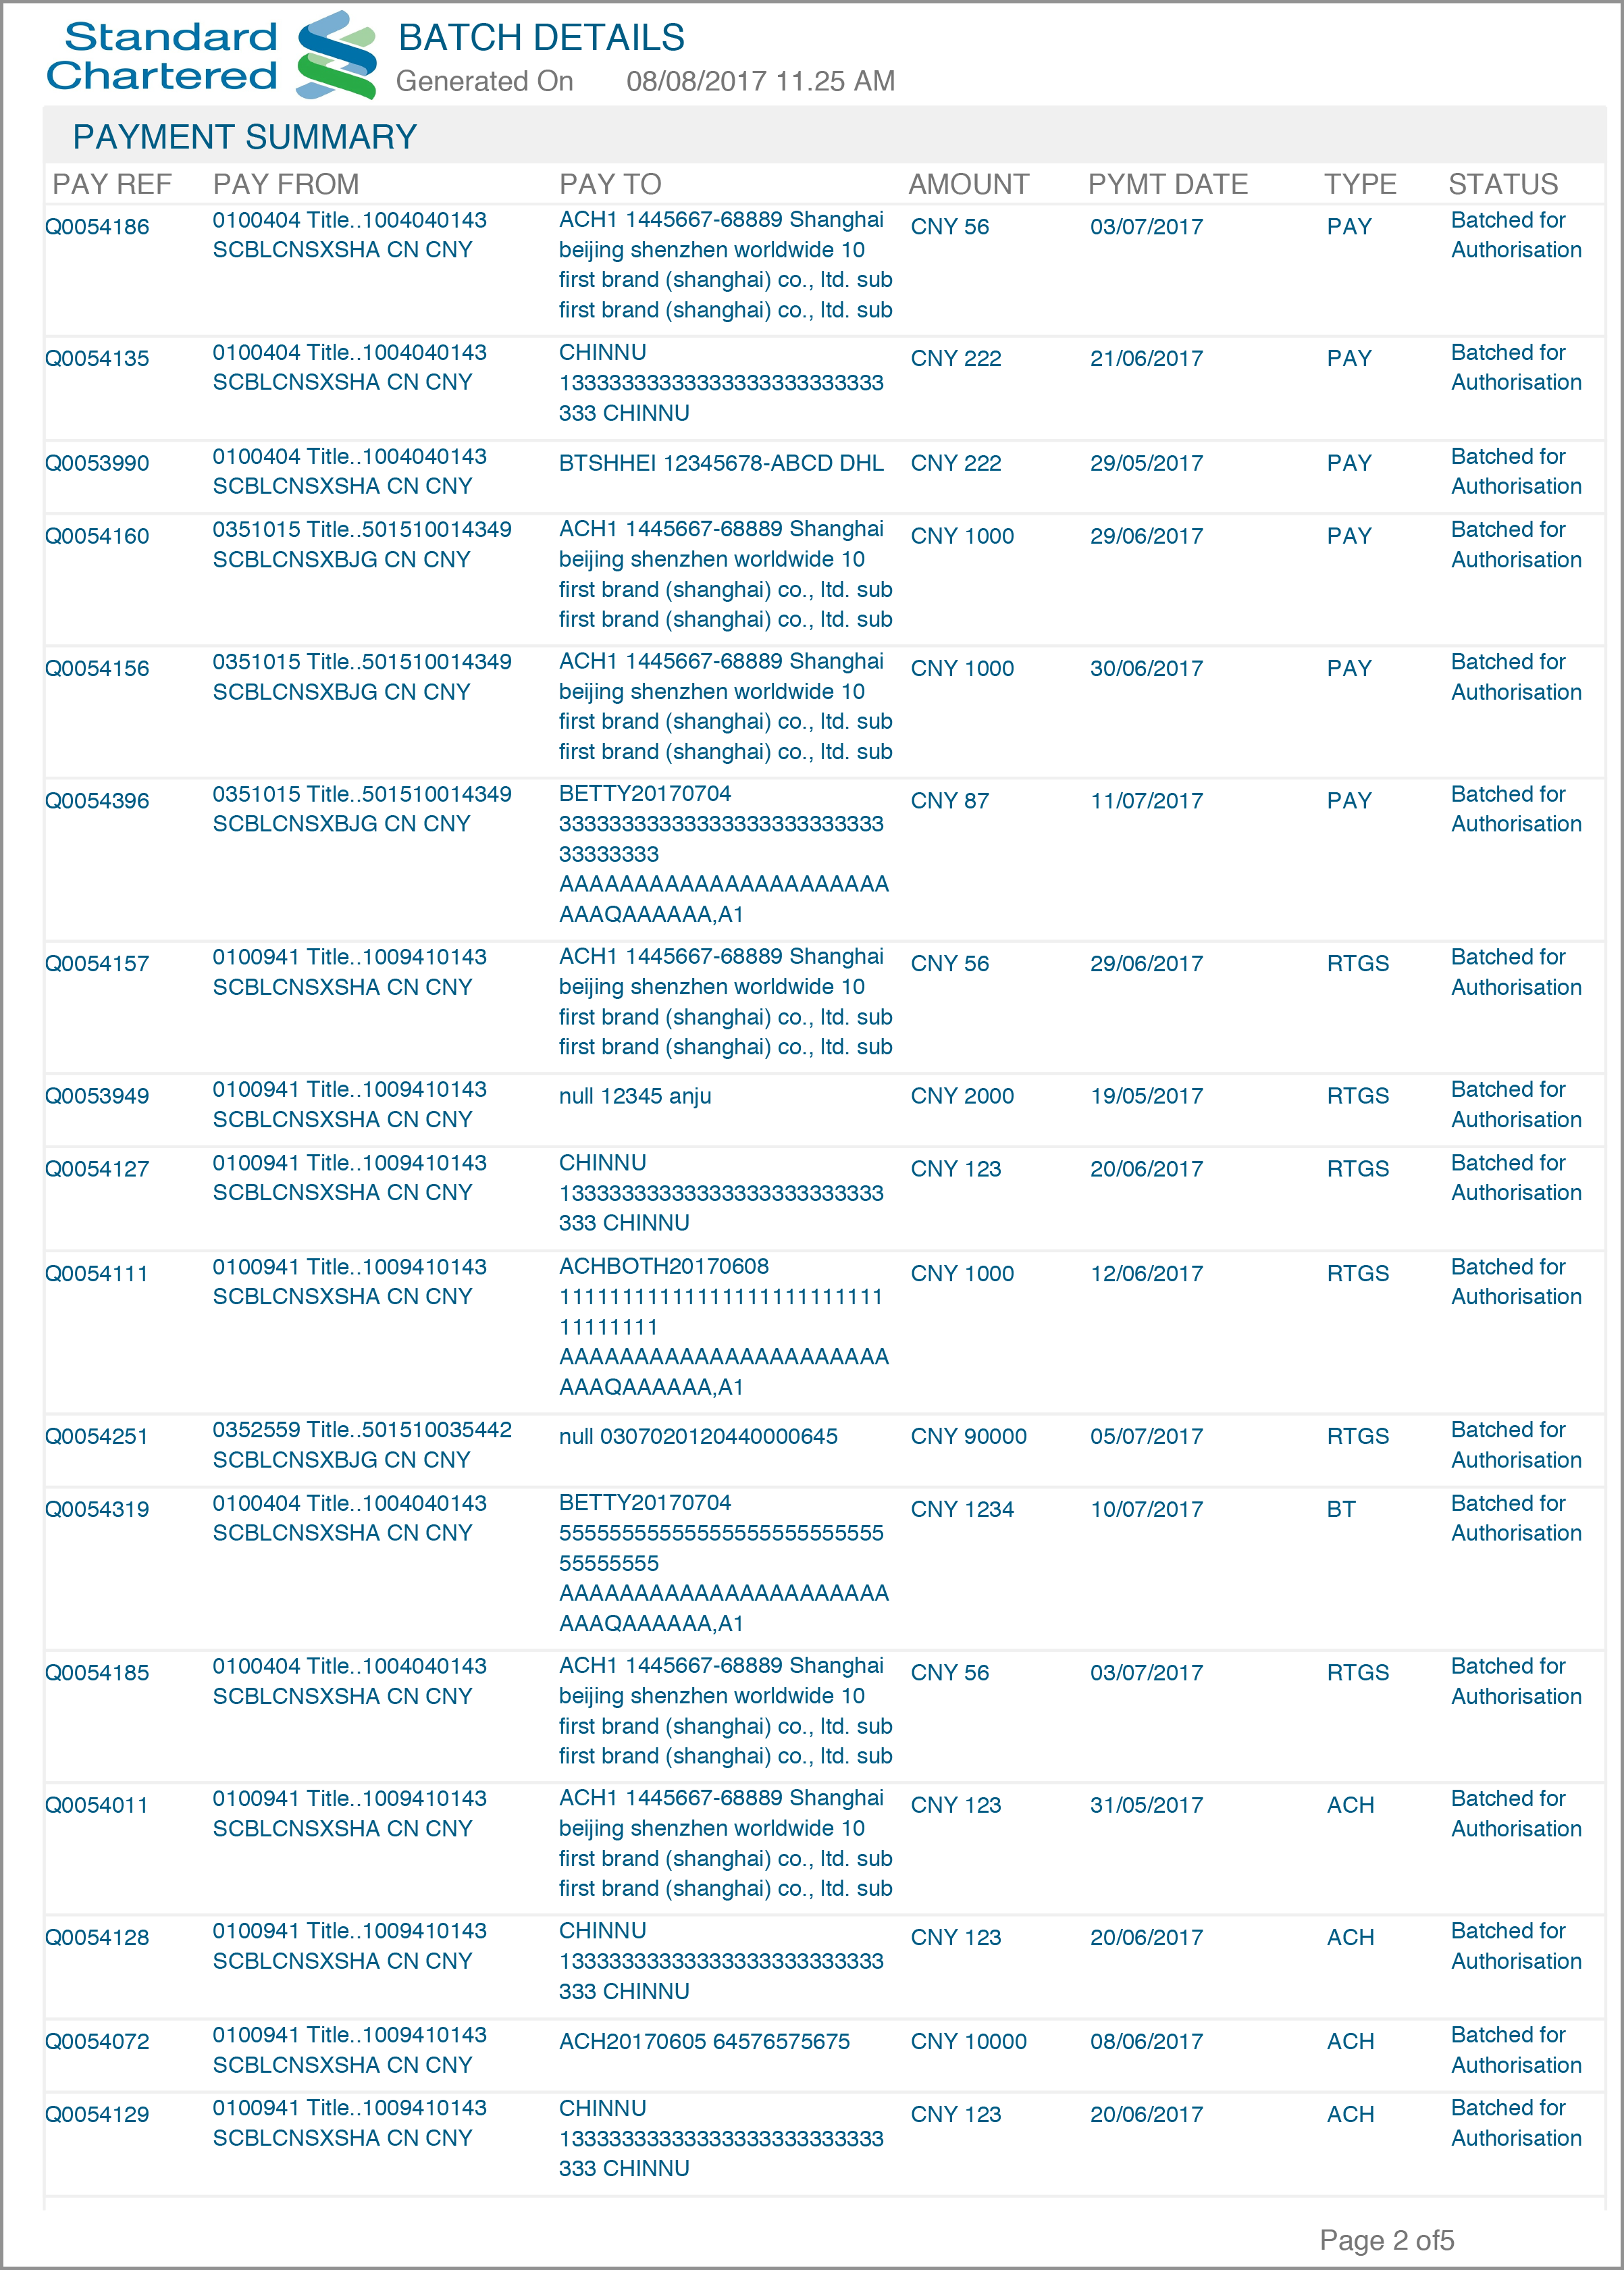
Column Headers
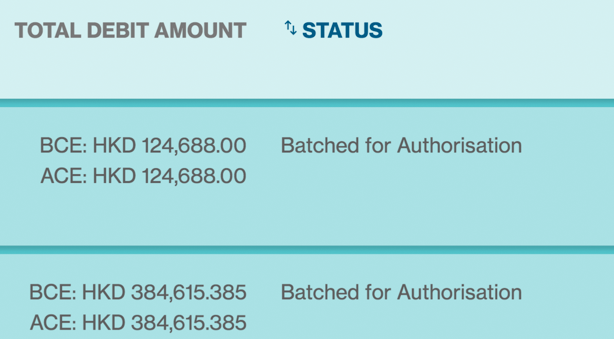
This page displays the payments as a table with the following headers:
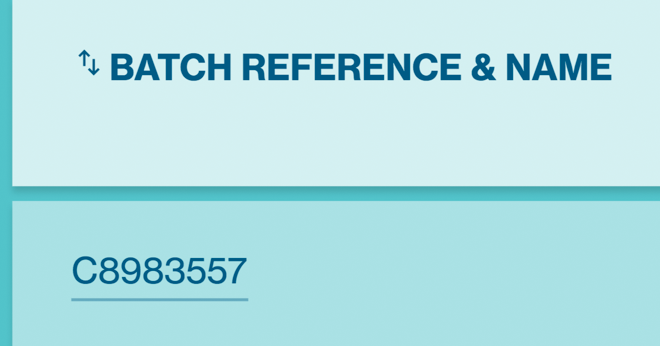
- Batch Reference & Name
- Batched By & On
- No. of Payments
- Max Debit Amount
- Total Debit Amount
- Status
Sort and Filter Function
You can click each of the headers predefined as sortable to sort the table data in ascending order order. Clicking one more time on the sortable headers will sort the table values in descending order.
Filter button - When click on this button, the system shows a filter with the filter criteria including Amount, Payment Date, Status, etc. On Check of the checkbox next to any of the values as per below, system updates the Payment List Display to display only results containing the values matching the checked filter.

Priority Sort - On Click, the system expands the sort options which are configurable at system level. Each sort category will have a 2 way switch - Ascending / Descending indicator for you to select. By default the categories will be listed in the order of header display. This settings are not saved and it will revert to the default state if you relaunch the application

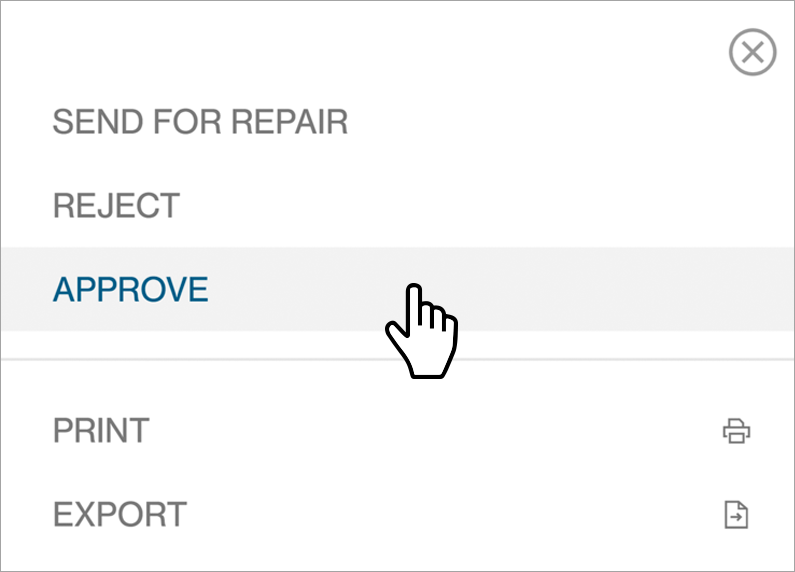
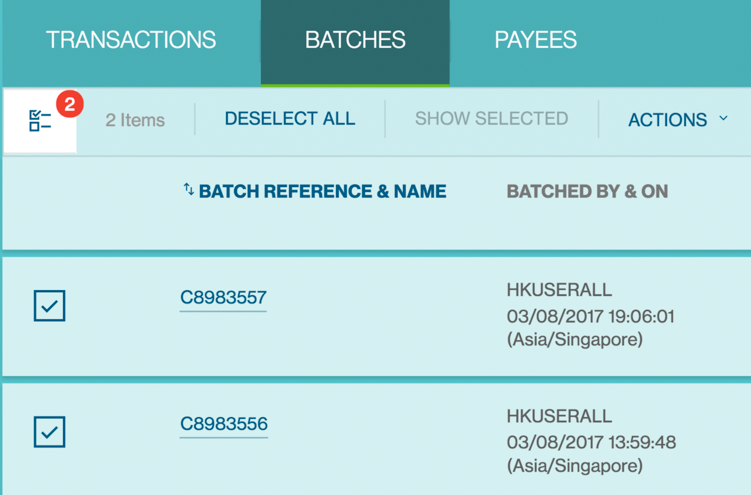
Batches Action Menu
Upon choosing one of the listed batches and clicking on “Action” button, you will be presented with the batches action menu.

The list of actions shown in the action menu depends on the status of the batches and the user entitlements to perform various actions.
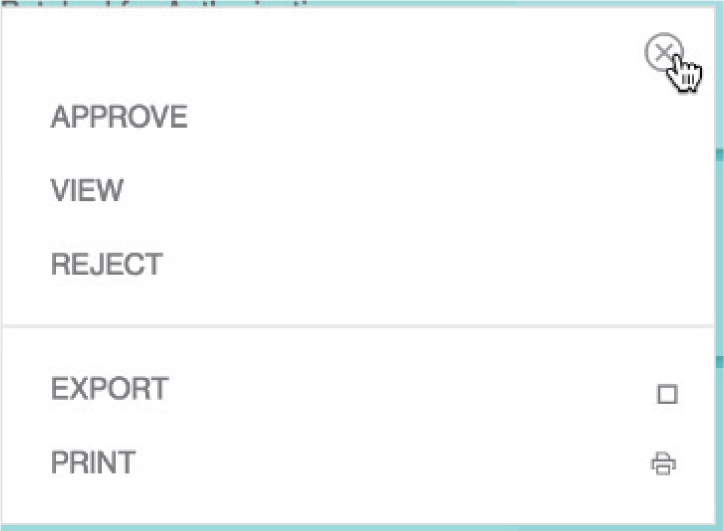
The following are some key actions that apply to a batch under Manage batches:
- View
- Copy
- Undo
- Delete
- Edit
- Alert Approver
- Export
Remove One or More Payment Instructions
Upon choosing one of the listed batches and clicking on the “Edit” option available under action menu.
You will be presented with the “Edit Batch” screen allowing one or more payment instructions to be removed from the batch.
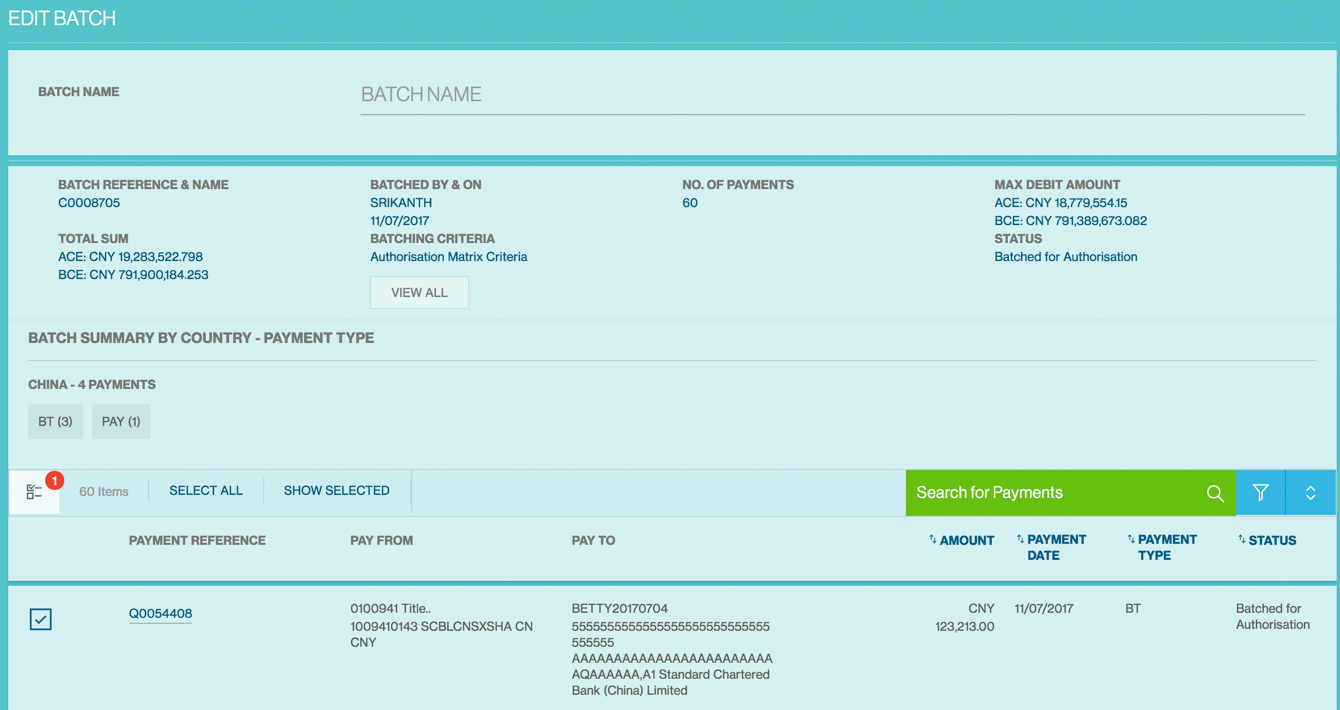
One or more instructions may be selected and click on “Remove from Batch” button at the bottom to update the batch accordingly.

Print Batch
The “Print Batch” feature available on Straight2Bank helps in printing the details of the batch as seen on-screen. This feature will be available from any Manage batch view / listing screen for batches that are in various statuses (e.g.) “Batched for Authorization”, “Partially Signed”, “Released to Bank”, etc.
Upon choosing one of the listed batches and clicking on the “Print” option available under action menu.
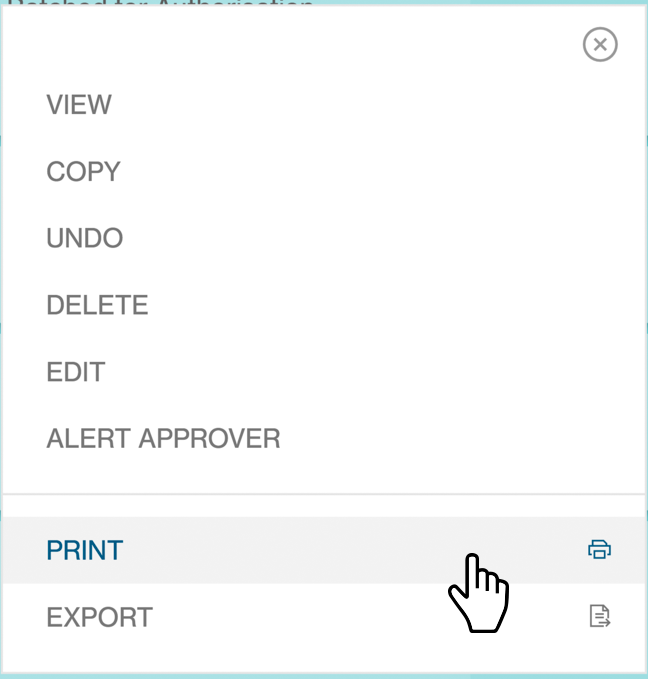
One or more batches may be selected to use the “Print Batch Instructions” feature. Payments within all the selected batches will be available in the print view screen to enable printing.
Approve Batch
Up to 8 levels of authorisation can be setup for batches on Straight2Bank (e.g.) A, A+B, A+B+C, etc.
Creation of batches on Straight2Bank is based on your user entitlement. Refer to the "Manual Batching" section for instructions on how to create batches on Straight2Bank.
Entry Points
In fact, there are several ways that let you approve batches on Straight2Bank:
Main page - Dashboard
Batches that are pending approval will be available on Individual Task Card and Pending Task Card on main page.
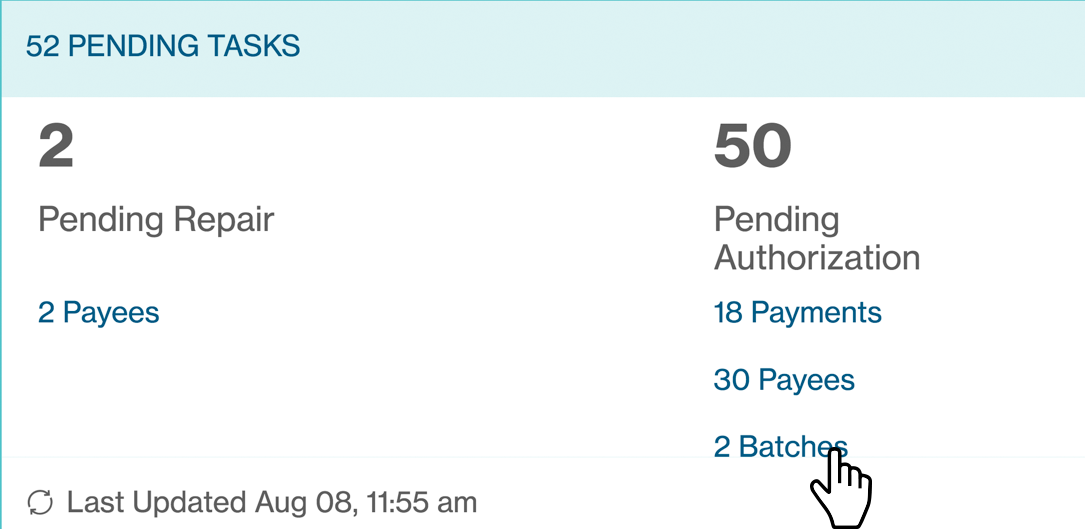
Approve Payment List Screen - Action Menu
Batches that are pending approval will be available on the Approve Batches List Screen- from the Menu> Approve> Batches.
You can approve selected batch by clicking Action Menu.
Batch Detail Display
The Approve Batches List Screen will list all the existing batches that are in “Batched for Authorisation” Status. This screen has various data fields that may be customised optionally by clicking on Filter or Sort button.
Clicking on Batch Reference & Name, new page will provide summary of the payments in the batch that have been submitted pending approval. You can choose to “Approve”, “Send for Repair” or “Reject” the batch.
MultiSelect
Click on MultiSelect button and select Payments needs approval (tick check box). Approve option will be available from Actions menu.
Use a Vasco Token for Approval
For authorisation, your operator(s) will inform you of the payment details or batch reference that requires authorisation with support documents. Alternatively you will receive an e-mail alert to log into Straight2Bank for authorisation.
Once you have clicked the “Approve” button in Action Menu / Dashboard Task card, the “Submit Approval” screen will be shown:
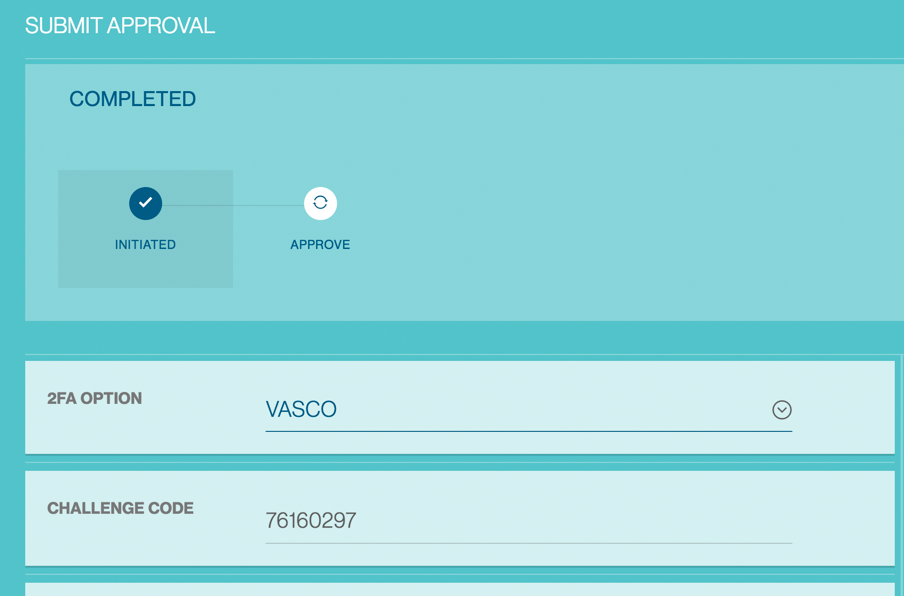
Your Vasco token is required at this point. Approvers are able to approve a payee by performing the steps below:
Turn on the Vasco Token and enter PIN
Turn on the Vasco token by pressing the On button.
Proceed to enter your personalised PIN (setup during Token activation) to activate the Token.

Display “APPLI _”
The screen will display “APPLI _” upon successful login.

Enter the number “2”
Enter the number “2” on the token keypad for Transaction Authorisation - “APPLI 2”.

Input the “Challenge Code”
You will be prompted to key in a set of numbers on the Token. Input the “Challenge Code” response from the Straight2Bank into the Token shown as below.

Enter the “Response Code”
The Token will generate and display a new set of numbers as the “Response Code”. Enter this set of numbers in the “Enter Code From Security” field on Straight2Bank screen and click Approve.
Send to Bank
The “Send To Bank” feature on Straight2Bank allows you to select one or more payment instructions to be released to the Bank for further processing.
Payments that are pending Send to Bank will be available on Individual Task Card, Pending Task Card on main page and Manage Payments List Screen
Universal Data Adapter
Not all ERP or Accounting Software generate an industry standard output file that can be uploaded into Straight2Bank without making any changes. The Universal Data Adaptor capability overcomes this challenge by allowing you to define a onetime mapping through a simple graphical user interface and use the template for subsequent uploads without making any changes to ERP / Accounting Software or even the spreadsheets that you may use.
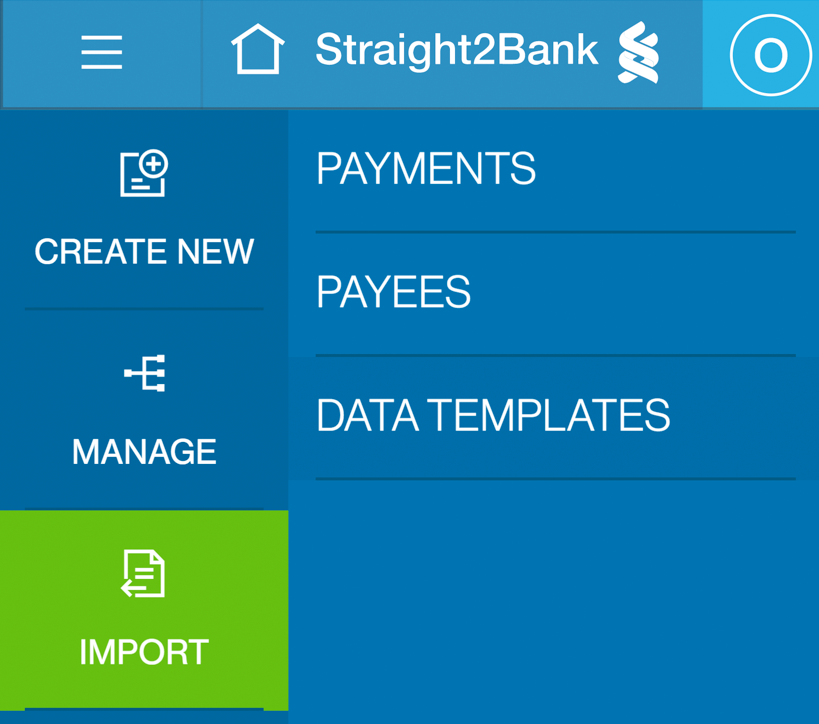
The Universal Data Adaptor capability is profile based feature available under “Menu > Import > Data Templates”. You will need to contact your Relationship Manager or the Bank to subscribe to this service if you do not have access.
You will see a screen similar to the below to capture information on the upload file.

By Default, “Data Templates” will be displayed in “File Upload”
Choose a data template file and Import ( Maximum upload limit: 10 MB. Supported formats: *.txt ).
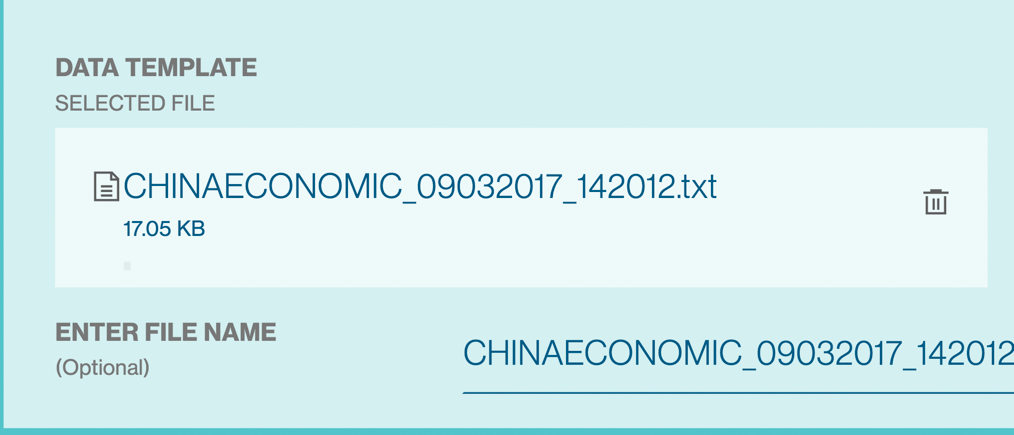
Click “Import” button to process the file.
You will get the confirmation message once the file imported successfully.

To check whether there are errors or duplicates to your uploaded file, go to “Menu > Manage > Data Templates”. Search for the file by entering the template reference or File name.
This page displays the data templates as a table with the following headers:
Template Reference:
Template Name will be displayed.
Product & Template Type:
For Product as ‘Payments’, Template Type will be ‘Payees’, ‘Payments’, ‘Payments without Identifier’, ‘Payments with Invoices’. For Product as ‘Reporting’, Template Type will be ‘Operating Account
Statement’.
Template Purpose
Options will be Import File/Export File.
File Format Type
Options will be Delimited / Fixed Format / Excel
Status
Once the file is successfully uploaded, it would be decrypted and stored as a data template in the list. The Status of data template should be “Fully Authorized”.
Upon clicking on the template reference, the characteristics of the file format and how the data is organised within the file will be displayed.
| Field Name | Description |
|---|---|
| Template Reference | An unique, user-friendly identifier of the template to easily retrieve during upload or maintenance. |
| Template Type | Further categorisation of the transaction type. For Payments products, the value available are: - Payee: To create mapping template for payee / beneficiary records. - Payments: To create mapping template for payments containing payment and invoice records in the same file. - Payments with Multiple Files: To create template where payment and invoice records are in different files. - Payments without Identifier: To create template where the file contains only payment records and no identifier. Every line in the file will be treated as one payment item. |
| Template Purpose | Options will be Import File/Export File. |
| Template Shared | If value is “Yes”, the template created would be available to all the Users belonging to the Group. |
| File Format Type | Describe how fields coexist within the file. Options available are “Delimited”, “Fixed Length”, and “Excel File (.xls / .xlsx)”. |
| Field Separator | Applicable to “Delimited” file format type only. It’s the character that separates each field in the file. It can be <comma>, <tab>, <space>, etc. |
| Field Wrapper | Mandatory for “Delimited” file format type only. It’s the character that, when doubled, enfolds each field in the file. It can be <double quotes>, <single quotes>, etc. Defaulted to <double quotes>. |
| Character Encoding | This input allows defining how the characters are encoded within the file format to be mapped. The default selection is ASCII and should be kept if the file does not contain any local language characters. Other options are Chinese Traditional (BIG5), Chinese Simplified (GBK), Thai, Japanese (Shift JIS). |
| No. of Lines to Ignore from Top / Bottom |
Indicates the number of lines to skip from the top and from the bottom of the input file during data conversion. |
| File Merge Type | Applicable for “Payments with Multiple Files” template type only. It determines how the records on the invoice file are merged into the corresponding payment record on the payment file. Options are ‘Sequence’ or ‘Indexed’. |
| Replace invalid SWIFT Characters |
When value is “Yes”, the following invalid SWIFT characters in the input file will be replaced with a space: * ~ \ | ` ! @ # $ % _ { } [ ] ; " <> & . By default, the option is “No”. |
The Payment details will automatically highlight and show validation description to the source value upon clicking on the “Field No.” button on left sidebar.
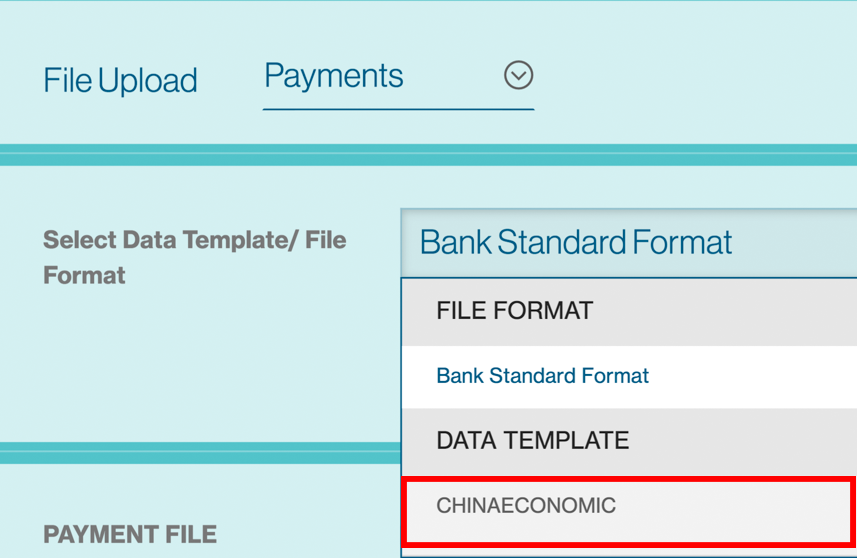
Choosing Payments as the Import type, the list of templates that you may have setup via UDA, or setup by the Bank will be available for selection and file upload.
Bulk Import Payees
The “Bulk Import” feature allows you to upload several payees details onto Straight2Bank in bulk. It saves time in creating these payees on Straight2Bank and improves efficiency.
The upload file may be in a standard, bank defined format or a template created using Universal Adaptor to convert from any format to the bank format and process the instructions within it.
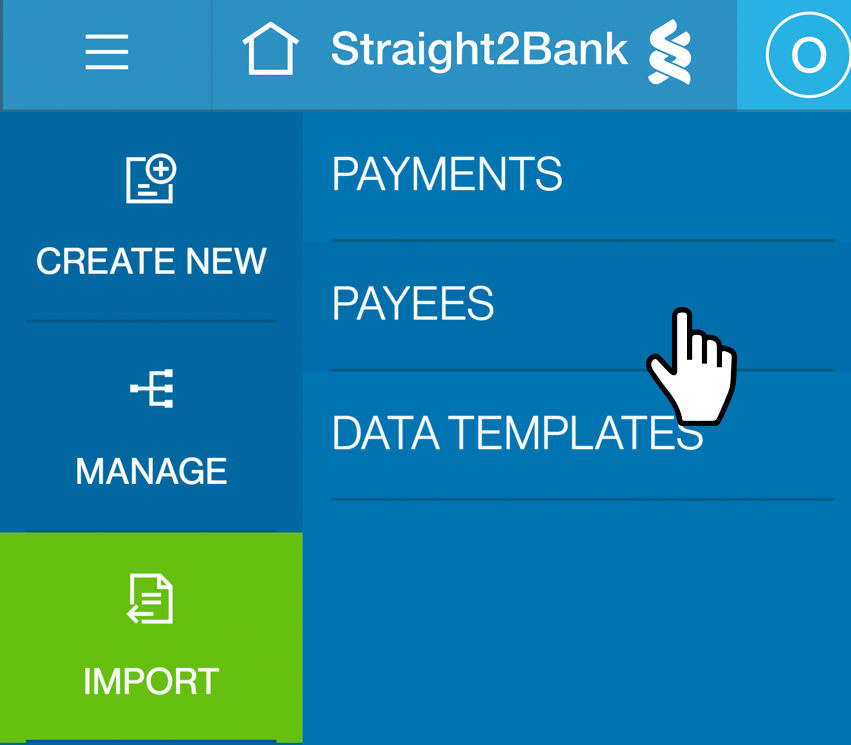
Choose from “Menu > Import > Payees”
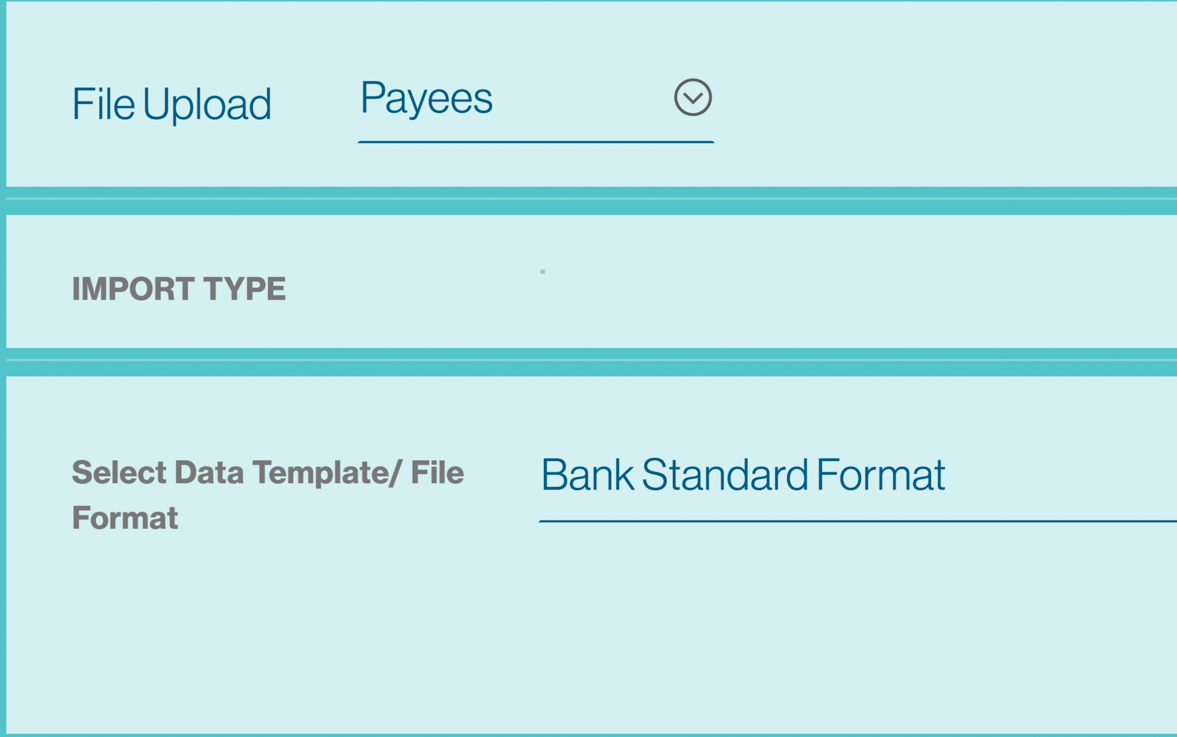
You will see a screen similar to the below to capture information on the upload file.

Choose “File Upload” as Payees or other Payee file types based on the file that you are uploading. By Default, “Payees” will be displayed.
Then select the list of existing “Data Templates / File Format”.
By Default, ‘Bank Standard Format’ will be displayed.
Choose the file and Import ( Maximum upload limit: 10 MB. Supported formats: *.csv ).

You can provide a relevant “File Name” of the file. For example, “Payees Aug 2017”.

Click “Import” button to process the file.
You will get the confirmation message once the file imported successfully.

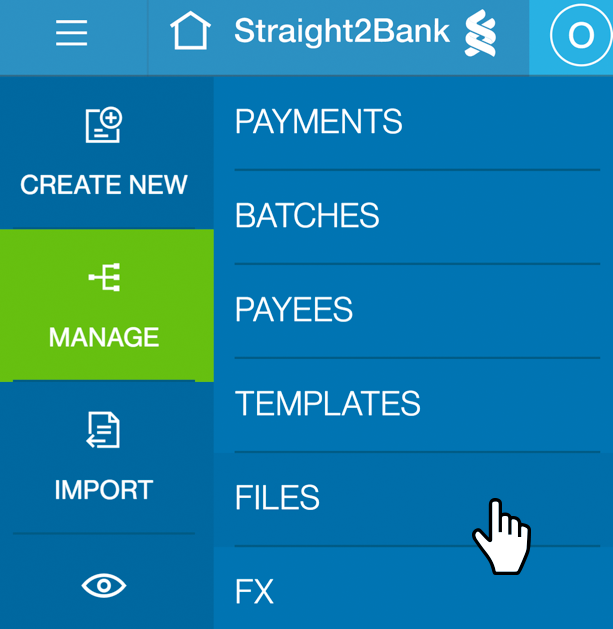
To check whether there are errors or duplicates to your uploaded file, go to “Menu > Manage > Files” Search for the file by entering the File Reference or File name.
| File Status | Description |
|---|---|
| Upload Successful | The payees have been uploaded successfully are in “Submitted for Approval” or “Draft” status for further processing. Users can click on the the file reference and view the reason for payees being marked as draft. Users can then edit the payee online to amend and send to approver. |
| Upload Failed | The file has not been uploaded successfully. The file format is not compatible or is incorrect. User can click on the file reference view / download the error log. |
| Uploaded with errors | The file has been uploaded successfully. Some of the payees uploaded are of incorrect format and hence are “Invalid” Click on thefile reference view / download the error log. The invalid records are not uploaded and hence will need to be uploaded afresh after rectifying the discrepancies |
| Upload In-Progress | It means that the file upload is in progress and you must wait for it to finish. |
Upon processing, the payees within the file will be available through the “Manage > Payee” screen and further action (e.g.) “Authorise”, “Edit”, etc can be performed.
Refer to the relevant section in this site for any further information relating to authorising, editing and etc of these payees.
Payees Bulk Import File Format
File Format Syntax
- Each record should end with a new line character.
- The number of fields in each record should match the file format specifications described in this document.
- The Start/End character for each field can be left
blank or with double inverted commas
- The field separator is a comma
- Escape characters are not supported.
- If a field value has a comma, specify the entire field value within “ ” a pair of double inverted
commas.
- All date fields should be in dd/mm/yyyy format.
- Numeric fields with null or space values will be recognised as 0.00 by default.
- Removing space characters from fields are not supported.
File Format
Comma Separated Value (.CSV)
Maximum File Size
Maximum 2,000 records per CSV file. Up to 10MB.
Character Sets And Encoding
- Numeric characters: 0 to 9
- Upper-case letters: A to Z
- Special Characters: Blank “ ” Full stop “.” Ampersand “&” Hyphen “-“ Slash “/” Plus Sign “+” Asterisk “*” Percentage “%” Dollar
“$”
- Character encoding: Information in local language fields should be encoded with Base64 if native character set is used. If English or UTF-8 characters are used, base64 encoding is not mandatory.
Examples of payee / beneficiary records
BID12345678,Mr Tester One,Address line 1,SG,1.23457E+11,SG,SIN,11111111,Tester One,AC,DBS
BID87654321,Gang Xi,CN,9876543210199,CN,SHA,22222222,许刚 , AC, 中国银行股份有限公司 北京清华园支行,差旅费
The following are the details of some critical fields of the Payees Bulk Import File.
| Field Order / Name | Field Length | Validation/Remarks/Encoded Fields |
|---|---|---|
| 1. Payee/Beneficiary ID | X(35) | This is a unique ID on Straight2Bank and can be used to search for Payee’s during payment workflow or payee maintenance. This ID can also used during Bulk payments. |
| 2. Payee Name | X(96) | Name of the Payee in English. For MY-KUL RTGS, Payee Name length will be up to 96 characters for RTGS. For ID-JKT ACH, Payee Name length will be up to 70 characters for ACH. For other payment types, payee name up to 35 characters supported. |
| 3. Address 1 | X(70) | Address in English The maximum length of 70 is only applicable if you are paying this beneficiary using ACH or PAY payment type out of Indonesia. In all other cases, only 35 is applicable. |
| 5. Payee Country | X(2) | Please enter the two-letter ISO Country Code. If you are making a ACH or a PAY payment out of Indonesia, this field is mandatory. |
| 6. Payee Account Number | X(34) | To capture Payee’s bank account number. This field is not mandatory if the Payee is used for cheque payments such as Local Bank Cheque or Corporate Cheque. |
| 8. Payment Country | X(2) | Two-letter ISO Country Code of the country where the debit account is opened. |
| 9. Payment City | X(3) | Three-letter ISO city code of the city where the debit account is opened. |
| 11. Payee Bank Code | X(11) | SWIFT BIC Code US - CHIPS/FEDWIRE Code UK – CHAPS Code |
| 12. Bank Local Code | X(17) | Local ACH Bank Code This field would be used to fetch the Payee Bank Code if Payee Bank Code is not available in file. |
| 13. Bank Branch Code | X(5) | Where relevant, local clearing bank and branch code will be used to identify the beneficiary bank for local transfer. |
| 17. Payee Name1 (Local Language) |
X(80) | Any information provided in this field should be encoded with Base64 if native character set is used. If English or UTF-8 characters are used, then base64 is not mandatory. |
Bulk Import Payments
The “Bulk Import” feature allows you to upload several payments generated out of Enterprise Resource Planning (ERP) or accounting software onto Straight2Bank in bulk. It saves time in re-doing these transactions on Straight2Bank and improves efficiency.
The upload file may be in a standard, bank defined format or a template created using Universal Adaptor to convert from any format to the bank format and process the instructions within it.
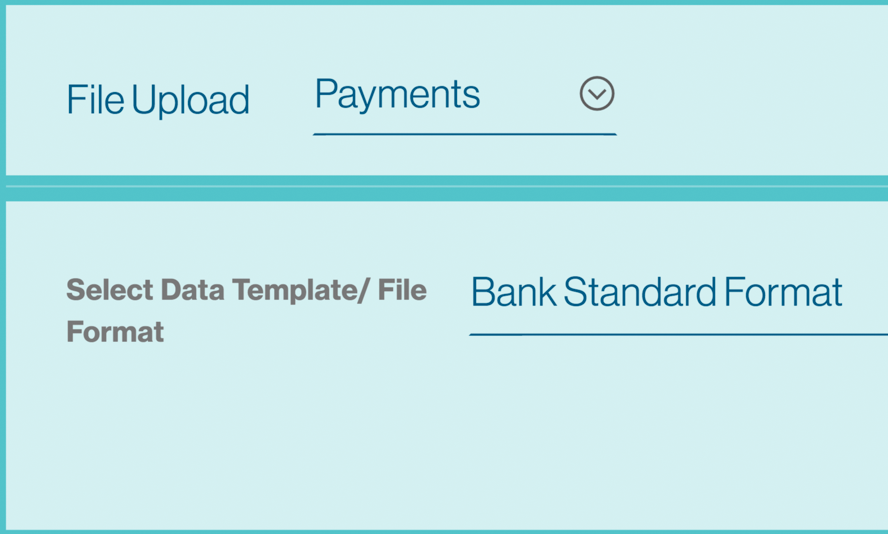
Choose from “Menu > Import > Payments”

You will see a screen similar to the below to capture information on the upload file.
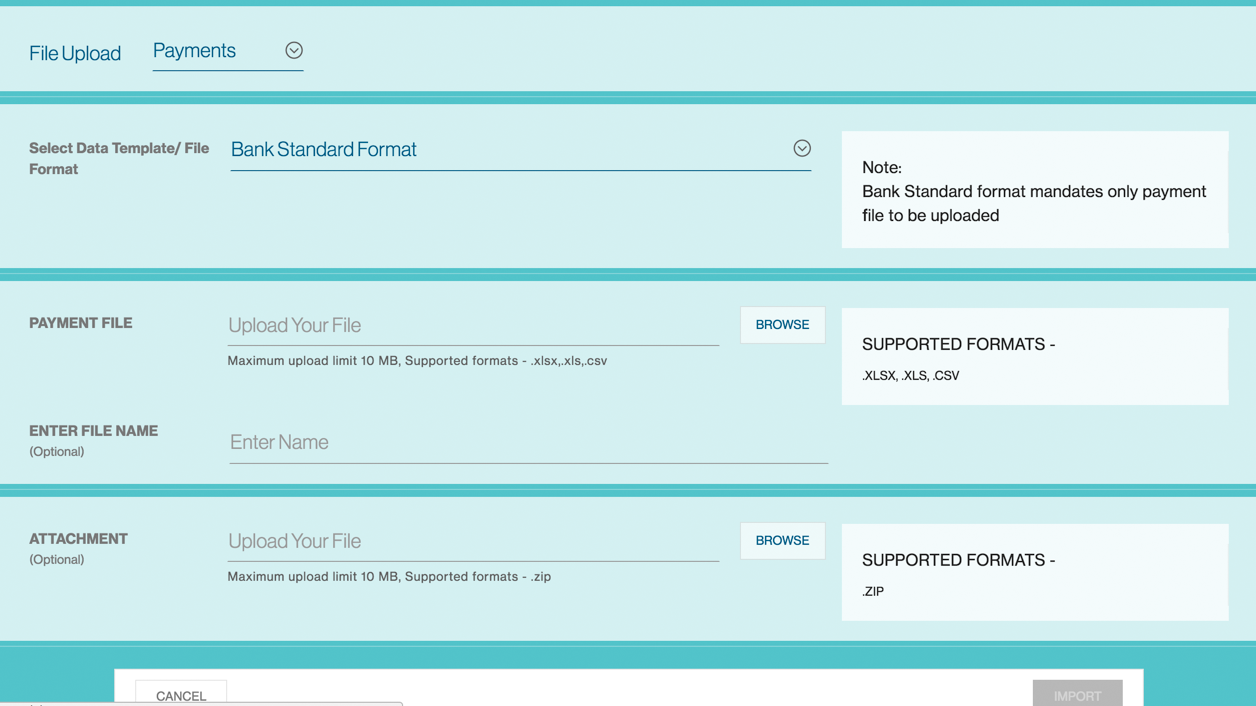
Choose “File Upload”: Payments, SMEPayment, or other Payment file types based on the file that you are uploading. By Default, “Payments” will be displayed.
Then select the list of existing “Data Templates / File Format”. For regular Payment Bulk Import, it is always “iPayment CSV” and the Template Formats shows all the UDA templates available to the user. By Default, ‘Bank Standard Format’ will be displayed.
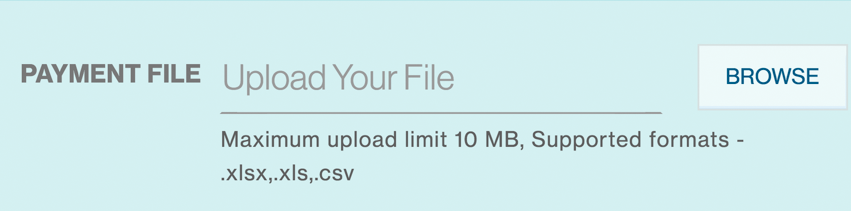
Choose the file and Import ( Maximum upload limit: 10 MB. Supported formats: *.csv ).
You can provide a relevant “File Name” of the file. For example, “Payments 20170801”.

Click “Import” button to process the file.
You will get the confirmation message once the file imported successfully.

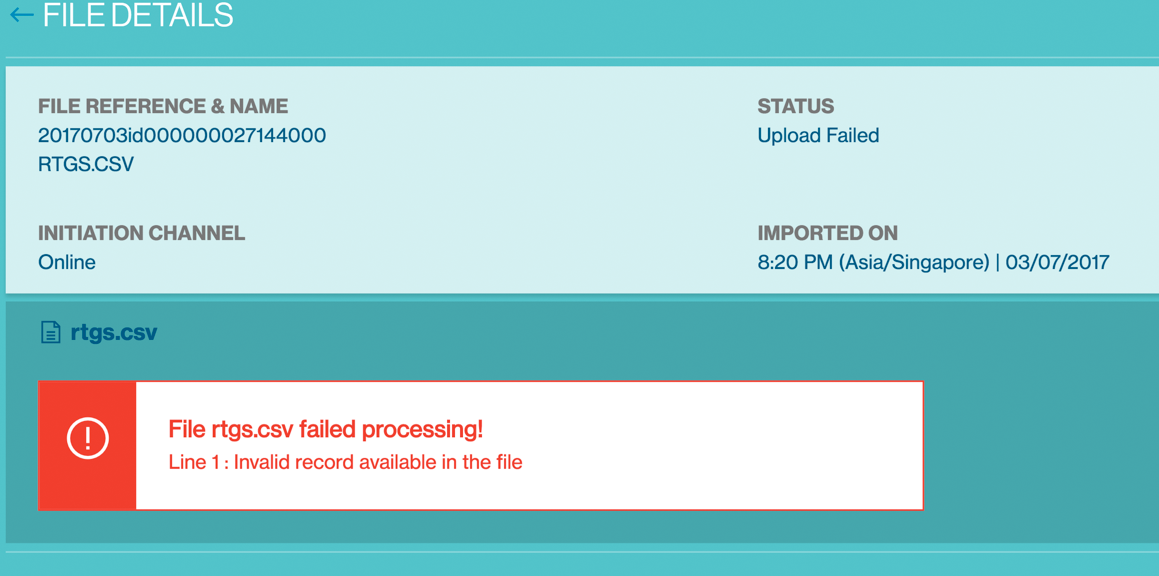
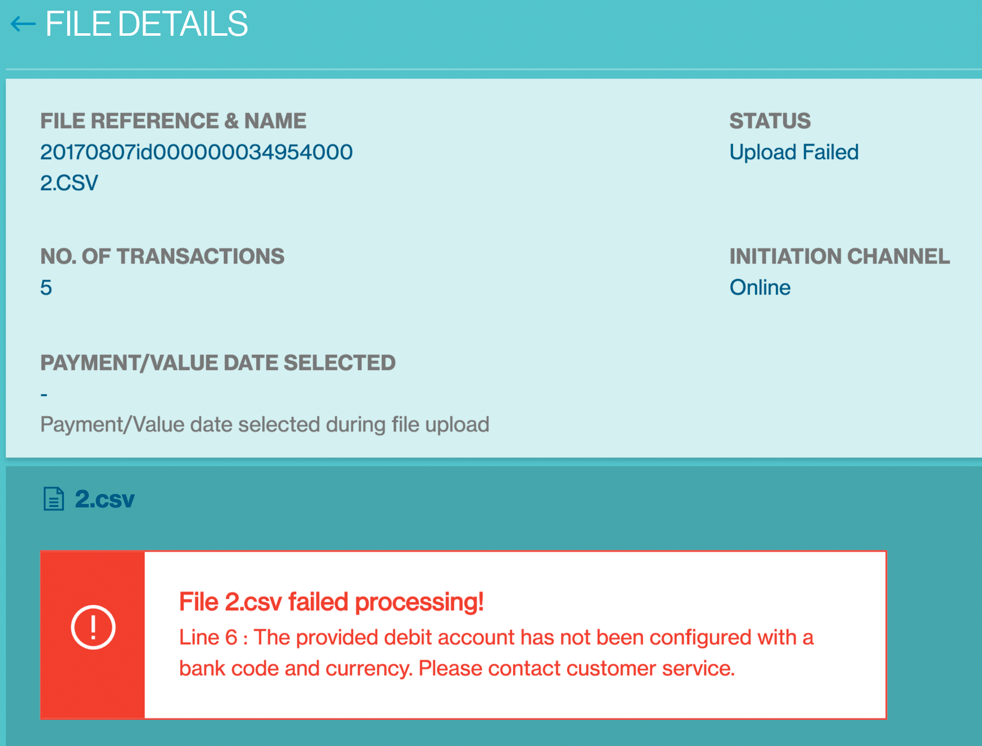
To check whether there are errors or duplicates to your uploaded file, go to “Menu > Manage > Files” Search for the file by entering the File Reference or File name.

| File Status | Description |
|---|---|
| Upload Successful | The payment instructions have been uploaded successfully and transactions are in “Submitted for Approval” or “Draft” status for further processing. Users can click on the the file reference and view the reason for transactions being marked as draft. Users can then edit the transaction online to amend and send to bank. |
| Upload Failed | The file has not been uploaded successfully. The file format is not compatible or is incorrect. User can click on the file reference view / download the error log. |
| Uploaded with errors | The file has been uploaded successfully. Some of the payments uploaded are of incorrect format and hence are “Invalid” Click on thefile reference view / download the error log. The invalid records are not uploaded and hence will need to be uploaded afresh after rectifying the discrepancies |
| Upload In-Progress | It means that the file upload is in progress and you must wait for it to finish. |
Upon processing, the payments within the file will be available through the “Manage > Payment” screen and further action (e.g.) “Authorise”, “Batch”, “Edit”, etc can be performed.
Refer to the relevant section in this site for any further information relating to batching, editing and etc of these transactions.
Payments Bulk Import File Format
File Format Syntax
- Each record should end with a new line character.
- The number of fields in each record should match the file format specifications described in this document.
- The Start/End character for each field can be left
blank or with double inverted commas
- The field separator is a comma
- Escape characters are not supported.
- If a field value has a comma, specify the entire field value within “ ” a pair of double inverted
commas.
- All date fields should be in dd/mm/yyyy format.
- Numeric fields with null or space values will be recognised as 0.00 by default.
- Removing space characters from fields are not supported.
File Format
Comma Separated Value (.CSV)
Maximum File Size
Maximum 2,000 records per CSV file. Up to 10MB.
Character Sets And Encoding
- Numeric characters: 0 to 9
- Upper-case letters: A to Z
- Special Characters: Blank “ ” Full stop “.” Ampersand “&” Hyphen “-“ Slash “/” Plus Sign “+” Asterisk “*” Percentage “%” Dollar
“$”
- Character encoding: Information in local language fields should be encoded with Base64 if native character set is used. If English or UTF-8 characters are used, base64 encoding is not mandatory.
Examples of payee / beneficiary records
BID12345678,Mr Tester One,Address line 1,SG,1.23457E+11,SG,SIN,11111111,Tester One,AC,DBS
BID87654321,Gang Xi,CN,9876543210199,CN,SHA,22222222,许刚 , AC, 中国银行股份有限公司 北京清华园支行,差旅费
The following are the details of some critical fields of the Payees Bulk Import File.
| Field Order / Name | Field Length | Validation/Remarks/Encoded Fields |
|---|---|---|
| 2. Payment Type | X(4) | Mandatory. If invalid, reject whole file. (e.g.)TT/BT/ACH/PAY/IBC/LBC/CC/BB/CA/RSPC/ XACH/XBT/XPAY/XRTS/XCHQ/TAX/BPAY |
| 9. Debit Account Number | X(34) | Mandatory. To mapping existing Debit account number in Straight2Bank system. |
| 10. Payment/Value Date | X(10) | Mandatory. All date fields should be in dd/mm/yyyy format. |
| 11. Payee Name | X(96) | Name of the Payee in English. For MY-KUL RTGS, Payee Name length will be up to 96 characters for RTGS. For ID-JKT ACH, Payee Name length will be up to 70 characters for ACH. For other payment types, payee name up to 35 characters supported. |
| 16. Payee Bank Code | X(11) | SWIFT BIC Code US - CHIPS/FEDWIRE Code UK – CHAPS Code |
| 17. Payee Bank Local Clearing Code |
X(17) | Local ACH Bank Code This field would be used to fetch the Payee Bank Code if Payee Bank Code is not available in file. |
| 18. Payee branch code | X(5) | Where relevant, local clearing bank and branch code will be used to identify the beneficiary bank for local transfer. |
| 20. Payee Account Number | X(34) | SWIFT BIC Code To capture Payee’s bank account number. This field is not mandatory if the Payee is used for cheque payments such as Local Bank Cheque or Corporate Cheque. |
| 21. Payment Details1 | X(70) | Payment Details in English. Not a critical field. |
| 38. Payment Currency | X(3) | Mandatory. If invalid, reject whole file. |
| 39. Payment amount | X(10) | Mandorty. Numeric check and greater than 0. |
| 50. Payee Name1 (Local Language) |
X(80) | Any information provided in this field should be encoded with Base64 if native character set is used. If English or UTF-8 characters are used, then base64 is not mandatory. |
| 56. Payment Details1 (Local Language) |
X(70) | Any information provided in this field should be encoded with Base64 if native character set is used. If English or UTF-8 characters are used, then base64 is not mandatory. |
| 62. Payee ID | X(35) | If provided and the payee ID is found in the Payee Table, the payee details will be overwritten by values in the Payee Table. If Payee ID provided cannot be found in the Payee Table, payee details from import file will be imported. |
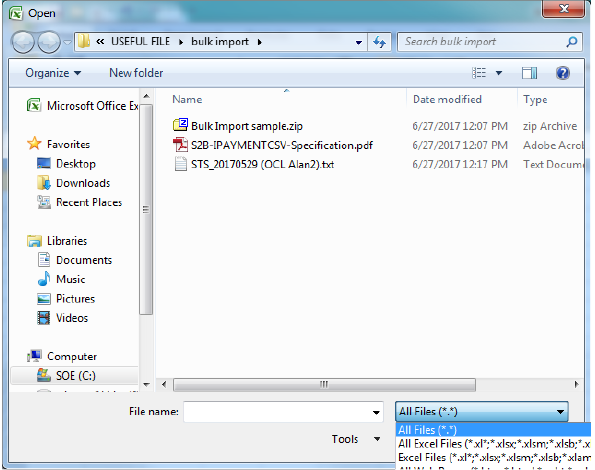
Convert TXT source file to CSV
Some payments bulk import source files generated out of Enterprise Resource Planning (ERP) or accounting software is in TXT format. Here are steps to convert TXT source file to excel CSV file.
Click open in Microsoft excel and choose TXT source file (Select “All Files” in dropdown list).
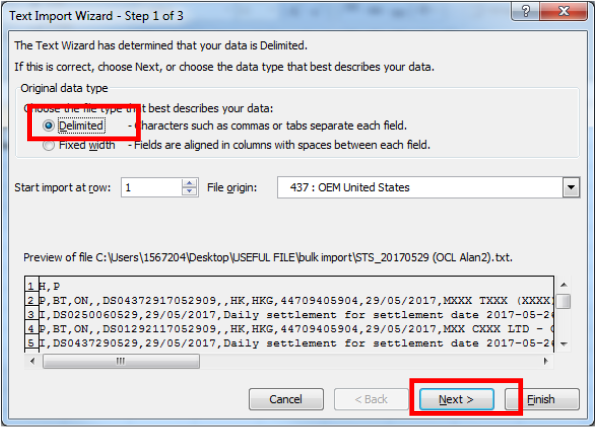
An additional screen “Text Import Wizard” will appear - Choose “Delimited” then click “next”.
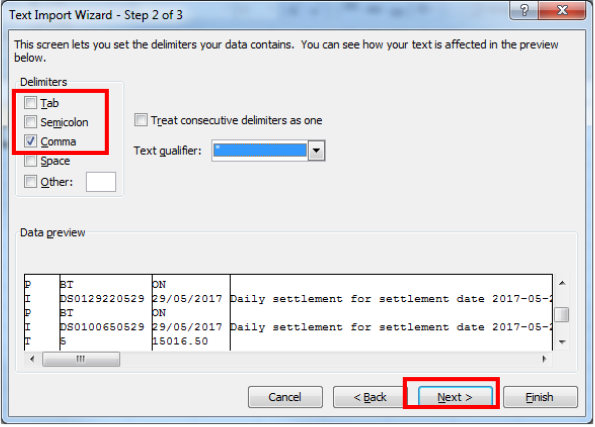
Select “Comma” as delimiters, then click “next”.
Select “Text” as column data format, the data preview screen will highlight the entire column. Finally, proceed by clicking on “Finish”.
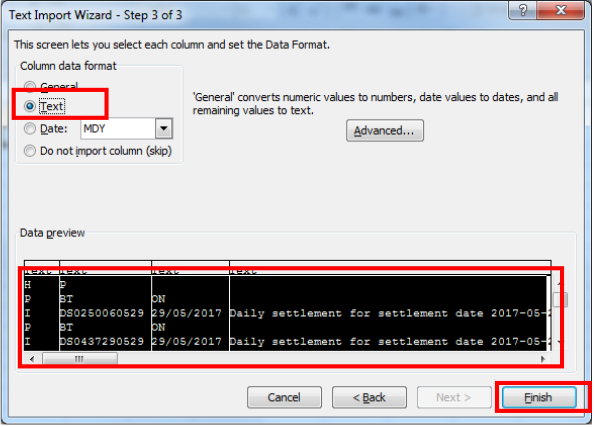
After clicking on finish, payment detail will be generated in excel file.
We can simply check on the Excel file whether the data match with proper field.
Refer to the Payments Bulk Import File Format for details on this.
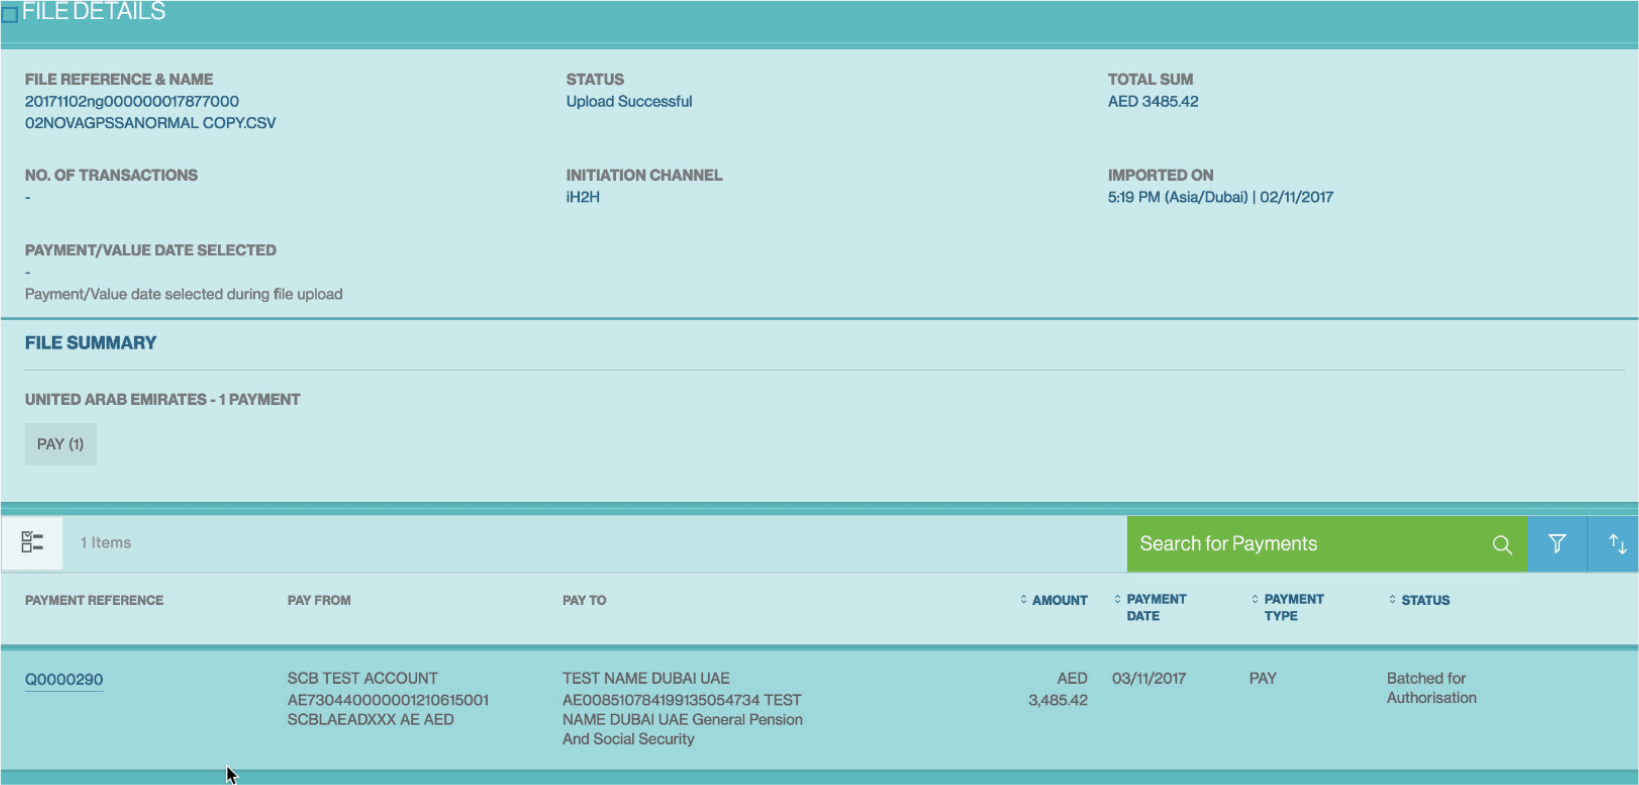
iHost-to-Host
Standard Chartered's Straight2Bank Access-Internet Host-to-Host capability allows you to upload a pre-formatted data file exported from your back office system to Straight2Bank for processing. It saves time in re-doing these transactions on Straight2Bank and improves efficiency.
To perform a file upload, choos e from “Menu > Import > Payments”
You will see a screen similar to the below to capture information on the upload file .
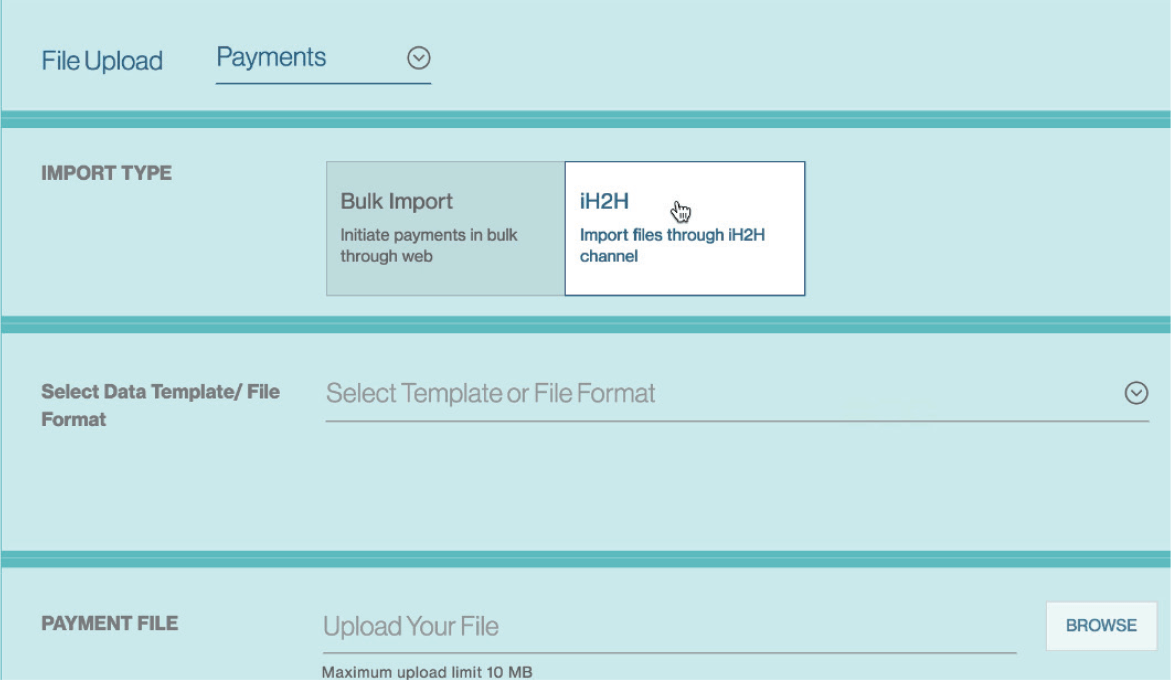
Choose “iH2H” to import files through iH2H channel.
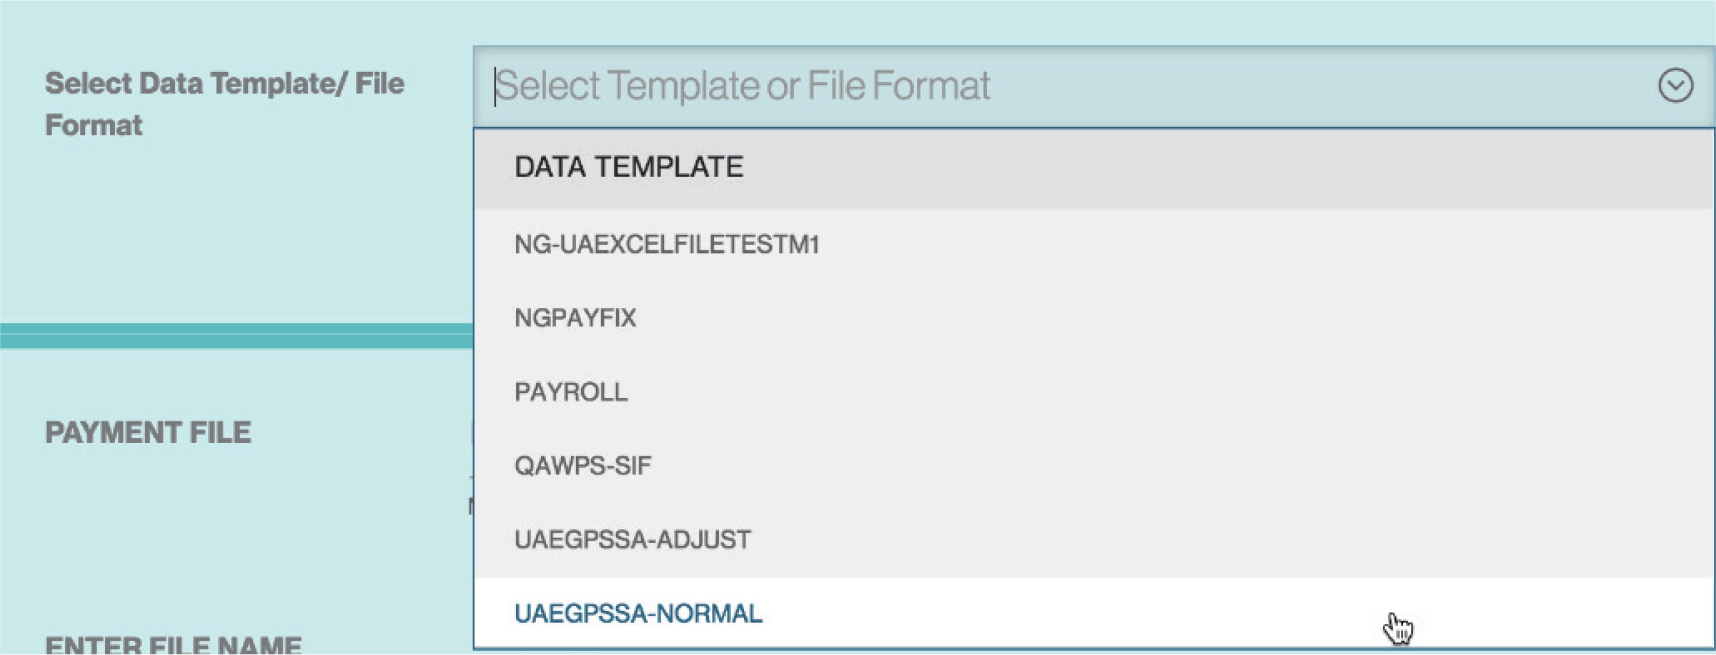
Then select the appropriate “Template or File Format” from the drop down list.
Click on the "Browse" button to search for the file y ou wish to import
( Maximum upload limit: 10 MB. Supported formats: *.csv ).
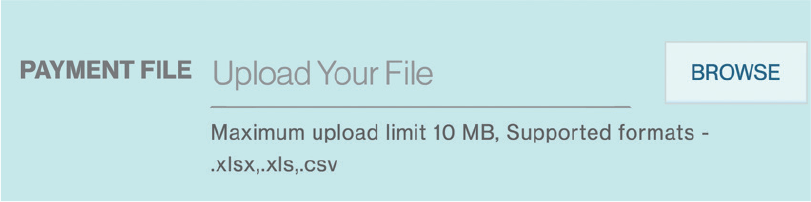
You can provide a relevant “File Name” of the file. For example, “Payments 123”.

Click “Continue” button to process the file.

You will see the “Authenticate Import” screen prompt as below after you have clicked on the “Continue” button.
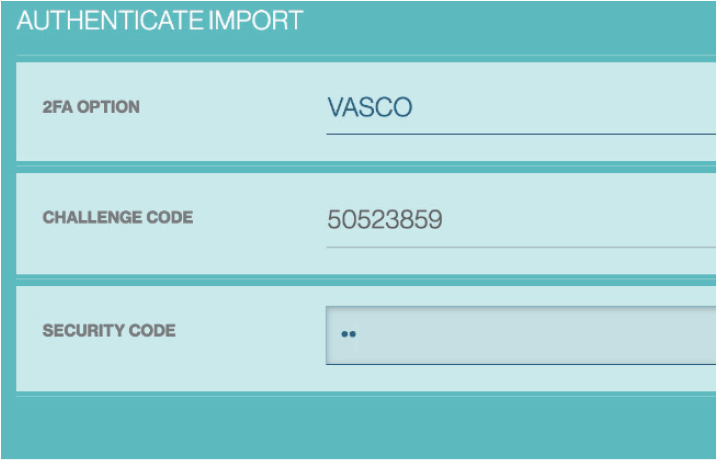
Your Vasco token is required at this point. To generate the Vasco token response for authorisation:
Turn on the Vasco Token and enter PIN
Turn on the Vasco token by pressing the On button.
Proceed to enter your personalised PIN (setup during Token activation) to activate the Token.

Display “APPLI _”
The screen will display “APPLI _” upon successful login.

Enter the number “2”
Enter the number “2” on the token keypad for Transaction Authorisation - “APPLI 2”.

Input the “Challenge Code”
You will be prompted to key in a set of numbers on the Token. Input the “Challenge Code” response from the Straight2Bank into the Token shown as below.
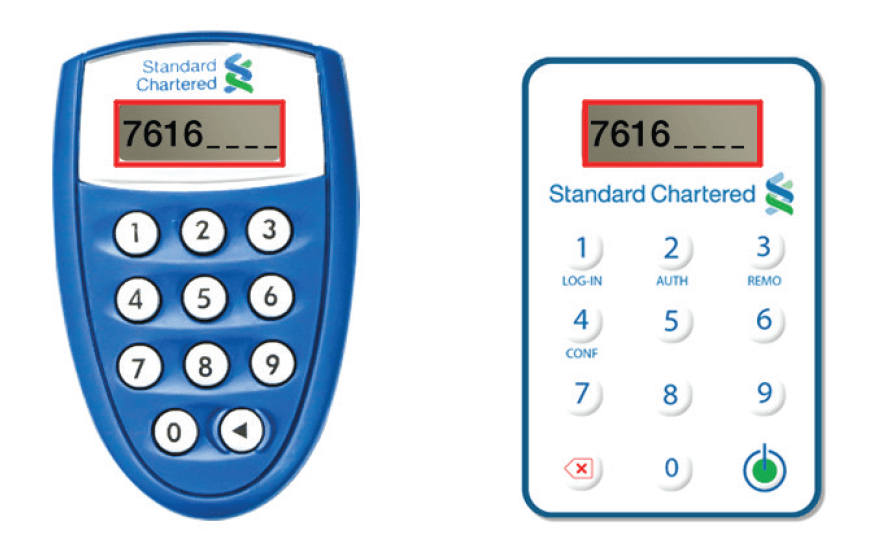
Enter the “Response Code”
The Token will generate and display a new set of numbers as the “Response Code”. Enter this set of numbers in the “En ter Code From Security” field on Straight2Bank screen and click Send to Bank Now.

You will receive a confirmation screen.

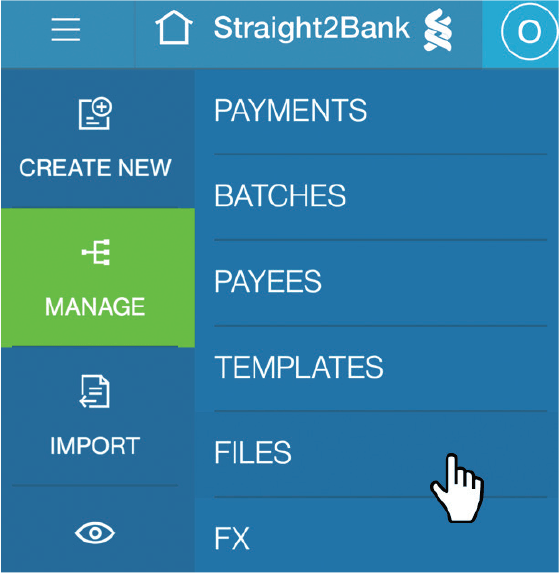
To check whether there are errors or duplicates to your uploaded file, go to “Menu > Manage > Files”
Search for the file b y entering the File R eference or File name .
| File Status | Description |
|---|---|
| Upload Successful | The payment instructions have been uploaded successfully and transactions are in “Submitted for Approval” or “Draft” status for further processing. Users can click on the the file r eference and view the reason for transactions being marked as draft. Users can then edit the transaction online to amend and send to bank. |
| Upload Failed | The file has no t been uploaded success fully. The file f ormat is not compatible or is incorrect. User can click on the file r eference view / download the error log. |
| Uploaded with errors | The file has been uploaded success fully. Some of the payments uploaded are of incorrect format and hence are “Invalid” Click on thefile reference view / download the error log. The invalid records are not uploaded and hence will need to be uploaded afresh after rectifying the discrepancies |
| Upload In-Progress | It means that the file upload is in pr ogress and you must wait for it to finish. |
Approvers are able to approve the file b y performing the steps below:
Login as Approver, the payments within the file will be available through the “Approve > Batches” screen.
Further action (e.g.) “Approve”, “View”, “Reject”, etc can be performed.
Upon successfully approval, the payments within the file will be available through the “Manage > batches” screen and click on “Send to Bank”