- Get Started
- Create Direct Debit Mandates
- Create Direct Debit Instructions
- Approve
- Manage
- File format
- Reports
Overview of Collections
Straight2Bank allows you to effectively streamline your collection process through the Direct Debit collection service.
This service effectively gives you the access to course your company’s collections digitally and straight-through via Straight2Bank by leveraging on the applicable local clearing system/network. This permits your company to effectively deduct from your customers’ (or subscribers) accounts upon successful enrolment with member banks. This effectively improves your company’s working capital position as collection process is streamlined and predictability of funds.
The process outlined in this section highlights Straight2Bank features and categorized into the following points:
- Creation, amendment and cancellation of Direct Debit Mandates (DDA) via web, bulk import & H2H and its corresponding delivery to the downstream local clearing ; Recieve & approve an incoming mandate initiated by the payer from the payer bank
- Creation of Direct Debit instructions (DDI) via web, bulk import & H2H and its corresponding delivery to the downstream local clearing
- Online reporting features that allows you to check on select items’ statuses. Extensive reporting capabilities for your electronic and paper collection instruments
- Extensive file upload and download capabilities for transaction initiation and reporting
- Customisable templates for transaction initiation and reporting
- Built-in validations (for regulatory requirements, mandatory fields)
- Field auto population, eliminating the need to re-key information
- Customisable multi-level authorisation matrices
Initiation
- Create the mandate (DDA) for payer enrollment
- Create the debit request (DDI)
- Available in variety of ways: Online, Bulk Import and H2H
Authorisation
- Alert notification to subsequent approvers
- Detailed visibility of submitted instructions (DDA & DDI) for enhanced control and oversight
Submission
- Immediate instruction delivery to downstream clearing system and partners
- Status update on all instructions as per downstream clearing cycle
Online Direct Debit Mandate Creation
This page outlines the step-by-step guide on how to create a new Direct Debit Mandates Batch online
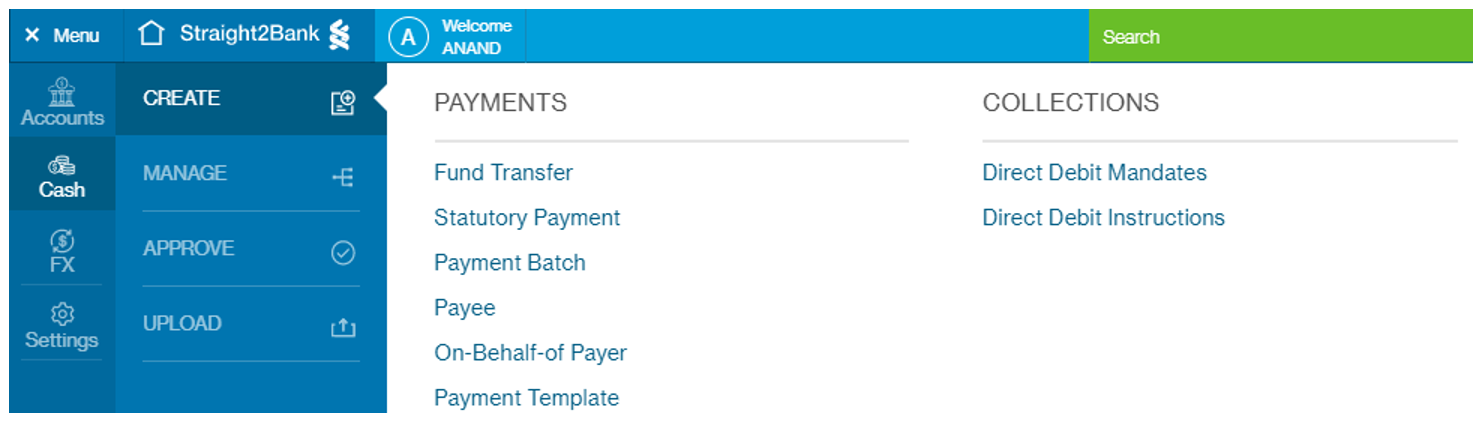
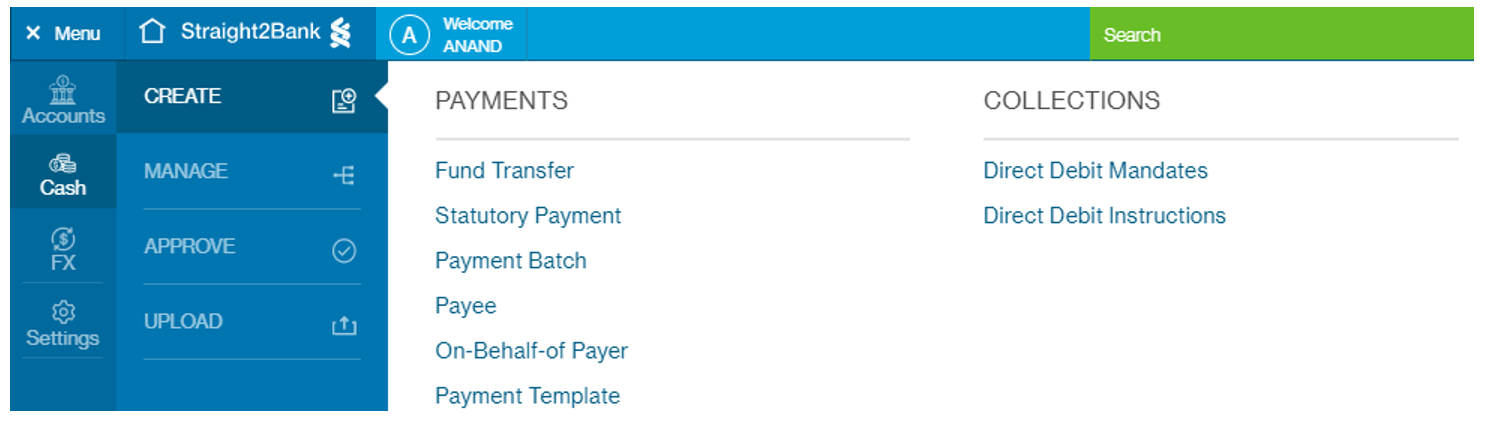
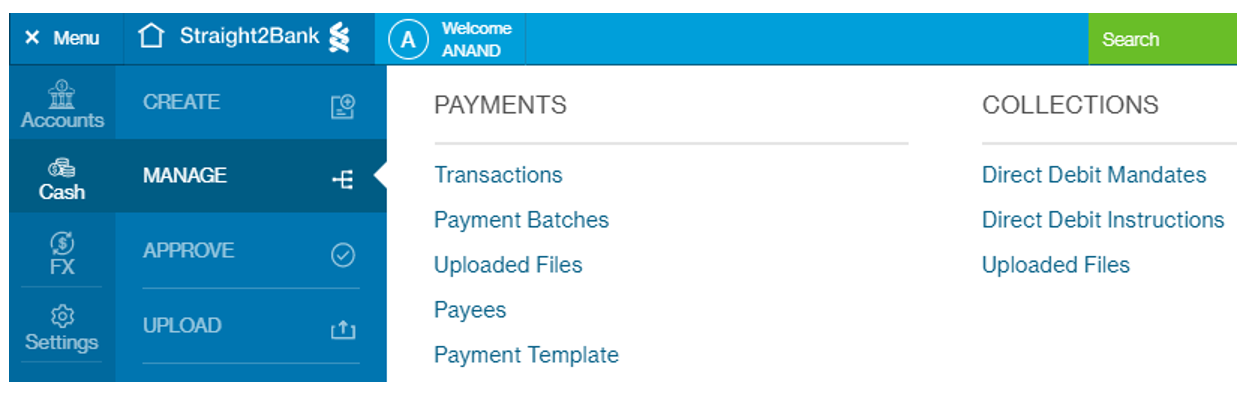
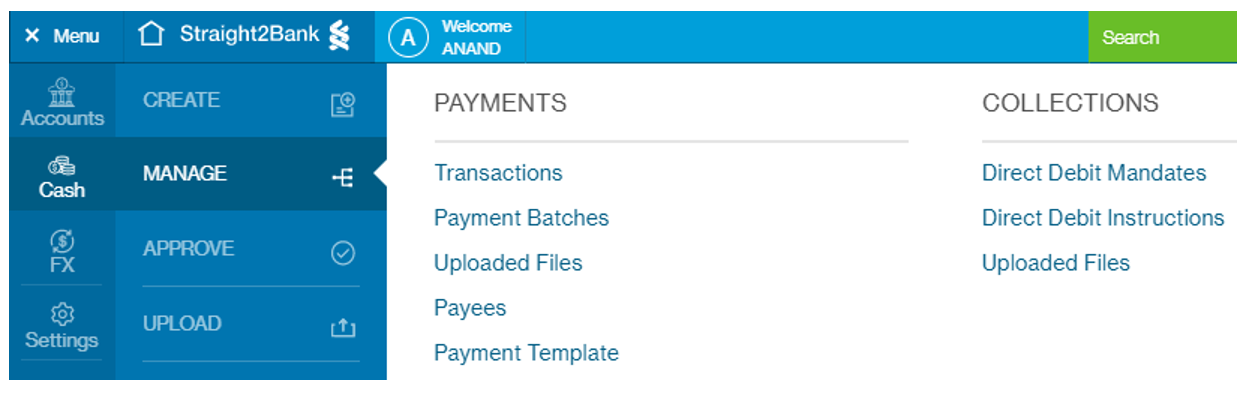
Step 1 - Go to Menu > Cash > Create > Direct Debit Mandates
Step 2 - Enter batch name. This is defaulted to a system-generated unique batch reference, but client can provide their own reference.

Step 3 - Search and select the credit account. Type the account number or currency or account name or bank code (min 3 char) to search for the credit account.

Step 4 - Click "Add New Mandate" to add a mandate to the batch

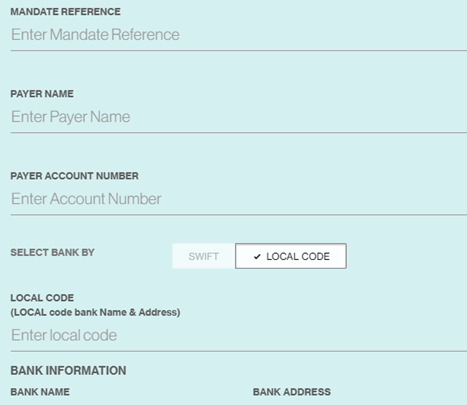
User can create the mandate either by filling up all details, or copying from an existing mandate and modifying from there. To copy from an existing mandate, search a mandate by typing mandate reference or payer name or payer account or payer bank.

Step 5 - Enter Mandate Reference. This is defaulted to a system-generated unique transaction reference, but client can provide their own reference. This needs to be unique within the group if local clearing allows only unique reference.

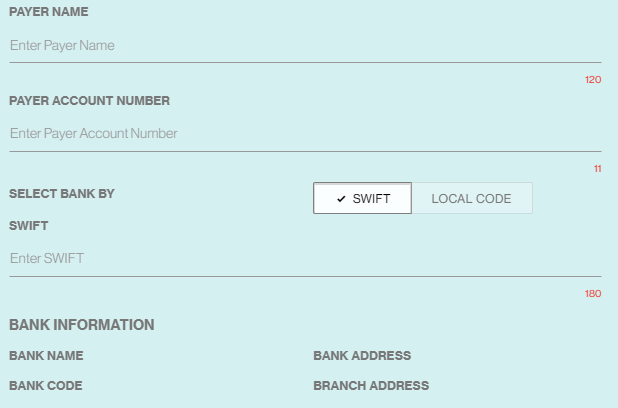
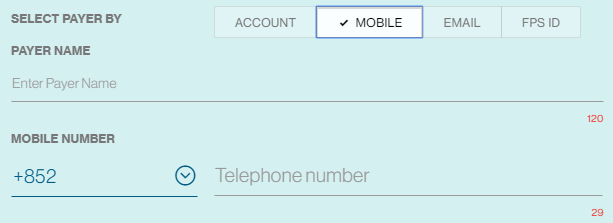
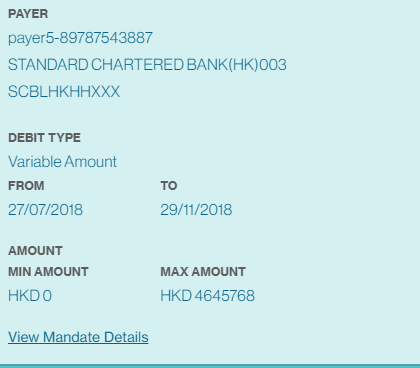
Step 6 - Enter Payer name and payer account, and search and select the payer bank.
* For countries supporting collection from proxy identifiers like mobile, email etc, select the payer identifier type and enter the respective payer identifier value - e.g. To collect from a mobile number, enter the mobile number instead of account.
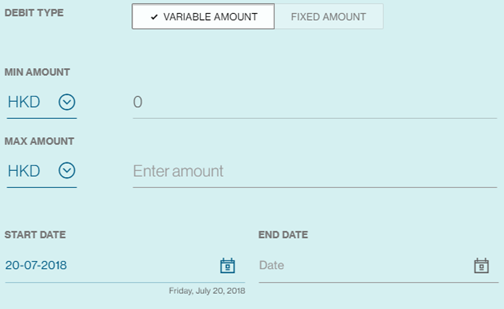
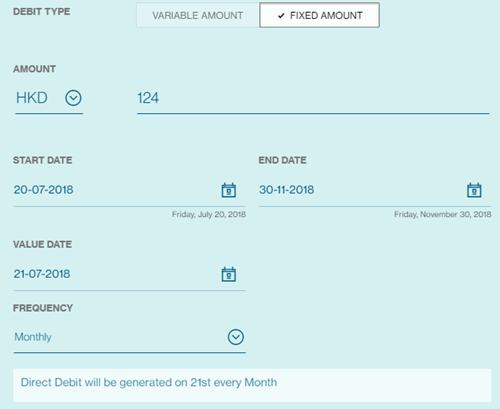
Step 7 - Select debit type and fill in remaining mandate details
Variable Amount:
Direct debit can be initiated within the defined amount limit.
Provide the min and max amount.
Enter the mandate validity period by providing the start date and end date
Fixed Amount:
Direct debit will be generated automatically with a fixed amount and scheduled date.
Provide the fixed amount
Enter the mandate validity period by providing the start date and end date
Enter the value date on which first direct debit will occur
Step 8 - Provide additional details as required in the country in the "Additional information" section.

Step 9 - Click “Save” to save the mandate and go back to the mandate batch screen. Or click "Save & Add Another" to create one more mandate to the batch.

Saved mandates are listed in the batch:

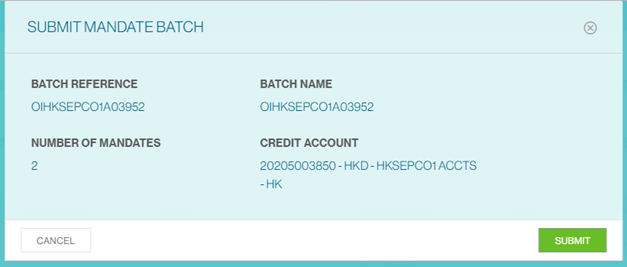
Step 10 - Click "Submit" to submit the mandate batch for approval.
Or Click "Save & Close" to save the mandate batch as draft.

Step 11 - Review the mandate batch and confirm submission
Step 12 - Mandate batch is submitted.
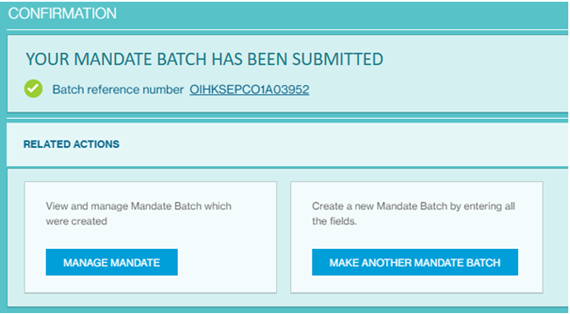
If you want to view your mandate batch, you can click on the Batch Reference hyperlink.
The approval flow will be dependent on your authorization rules set-up, the batch will be routed to the appropriate approval flow and corresponding approver.
Approval types supported for mandate:
- Auto approve
- Self approve
- Maker - Checker
Bulk Import Direct Debit Mandate Creation
The Bulk-Import feature allows you to efficiently upload multiple direct debit mandates generated out of the client's Enterprise Resource Planning (ERP) onto Straight2Bank in a seamless bulk mannger. The bulk-import upload file can be supported in multiple formats - standard bank defined format, industry format or customized formats, using Universal Adaptor, to process the instructions within it.
Upload File
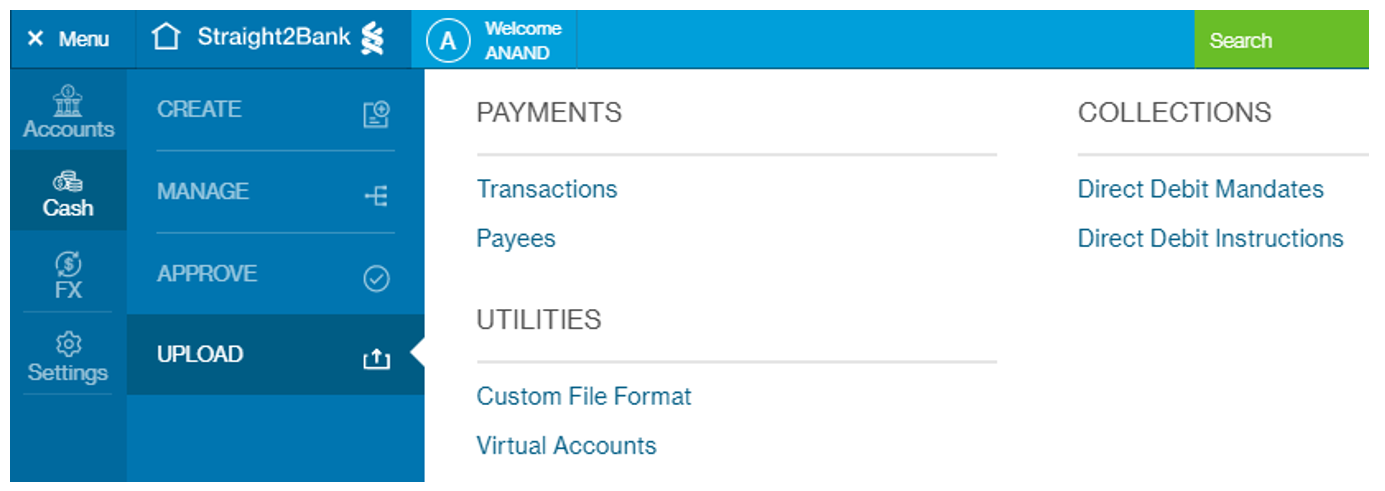
Step 1 - Go to “Menu > Cash > Upload > Direct Debit Mandates ”
Step 2 - Validate the transaction type that you'll upload.

Step 3 - Select the applicable format of the file that will be used for uploading. For details on the file format, please click here

Step 4 - Drag & Drop your data file or browse your file to upload.

Notes:
- Only one file can be uploaded at a given instance;
- The applicable file is displayed.
- File can be cancelled or user has the option to replace with another file
- Customize the file name.
Step 5 - Click on "Import" to upload the file. The progress displays as 100% once upload is completed.
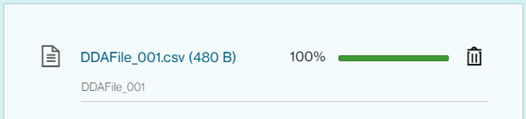
A confirmation page is displayed with your file upload reference

Online Direct Debit Instruction Creation
This blog provides a step-by-step guide on how to create a new Direct Debit Batch via S2B Nextgen web.
Step 1 - Go to Menu > Cash > Create > Direct Debit Instructions
Step 2 - Enter batch name. This is defaulted to a system-generated unique batch reference, but client can provide their own reference.

Step 3 - Search and select the credit account. Type the account number or currency or account name or bank code (min 3 char) to search for the credit account.

If the selected credit account belongs to a country where Real-Time direct debit is supported, indicate whether to create a Real-time direct debit batch or not.

Step 4 - Click "Add Direct Debit" to add a Direct Debit instruction to the batch.

User can create the direct debit instruction either by filling up all details, or copying from an existing direct debit instruction and modifying from there. To copy from an existing direct debit instruction, search by typing your direct debit reference or mandate reference or payer name or payer account.
Step 5 - Enter Your Reference. This is defaulted to a system-generated unique transaction reference, but client can provide their own reference. If the client group is configured to allow only unique reference, this needs to be unique within the group.

Step 6 - Search and select an active direct debit mandate from the mandate library using the following fields (type min 3 char to search). The direct debit mandate must belong to the same credit account.
- Mandate Reference Number
- Payer Name
- Payer Account or other supported payer identifiers*
- Payer Bank Code
- Payer Bank Name
Based on the information registered in the mandate, payer details (name, account* and bank) and other mandate details will be retrieved and populated.
* For countries supporting collection from proxy identifiers like mobile, email etc (currently only applicable to Hong Kong), payer identifier is displayed & used for initiating the direct debit instruction.
System will perform basic validations based on the direct debit mandate.
- Mandate must be in active status
- Direct Debit value date must be within the mandate start date and end date.
- For a Fixed mandate type, by default back-office processing system will automatically generate the recurring direct debit instructions based on the predefined frequency and amount as per the registered mandate. Unless the auto-generation is disabled in back-office system, S2B will not allow user to initiate a direct debit instruction for fixed mandate.
Step 7 - In case the mandate is not available in the library (e.g. due to mandate is maintained in payer bank or manually maintained), user can also key in the mandate reference and all required payer details to initiate the direct debit instruction
Step 8 - Enter value date

Step 9 - Enter collection amount
- Currency is defaulted to the credit account currency.
- Direct Debit amount must be within the mandate min/max amount limit. For a mandate with a fixed amount, the direct debit amount must not vary

Step 10 - Provide additional details as required in the country in the "Additional information" section.

Step 11 - Click “Save” to save the direct debit instruction and go back to the batch screen. Or click "Save & Add Another" to create one more direct debit instruction to the batch.

Saved direct debit instructions are listed in the batch. You can edit or delete the direct debit from the batch.

Step 12 - Click "Submit" to submit the batch for approval. Or Click "Save & Close" to save the batch as draft.

Step 13 - Review the batch summary and confirm to submit
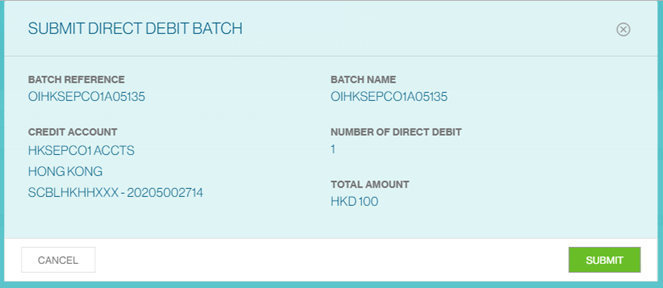
Step 14 - Direct Debit Batch is submitted.
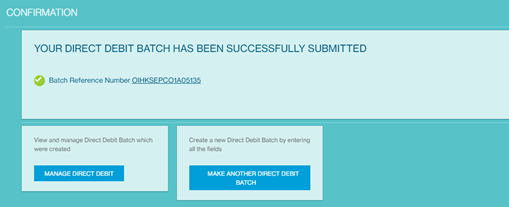
If you want to view your direct debit batch, you can click on the Batch Reference hyperlink.
The approval flow will be dependent on your authorization rules set-up, the batch will be routed to the appropriate approval flow and corresponding approver.
Approval types supported for DDI:
- Auto approve
- Self approve
- Maker - Checker
Bulk Import Direct Debit Instruction Creation
The Bulk-Import feature allows you to efficiently upload multiple direct debit instructions generated out of the client's Enterprise Resource Planning (ERP) onto Straight2Bank in a seamless bulk mannger. The bulk-import upload file can be supported in multiple formats - standard bank defined format, industry format or customized formats, using Universal Adaptor, to rocess the instructions within it.
Upload File
Step 1 - Go to “Menu > Cash > Upload > Direct Debit Instructions”

Step 2 - Validate the transaction type that you'll upload.

Step 3 - Select the applicable format of the file that will be used for uploading. For details on the file format, please click here

Step 4 - Drag & Drop your data file or browse your file to upload.

Notes:
- Only one file can be uploaded at a given instance;
- The applicable file is displayed.
- File can be cancelled or user has the option to replace with another file
- Customize the file name.
Step 5 - Click on "Import" to upload the file. The progress displays as 100% once upload is completed.

A confirmation page is displayed with your file upload reference.

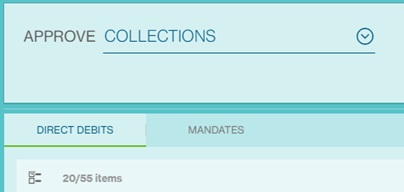
Approve Direct Debit Mandates
This page outlines the steps on how to approve and release Direct Debit Mandates/Direct Debit online.
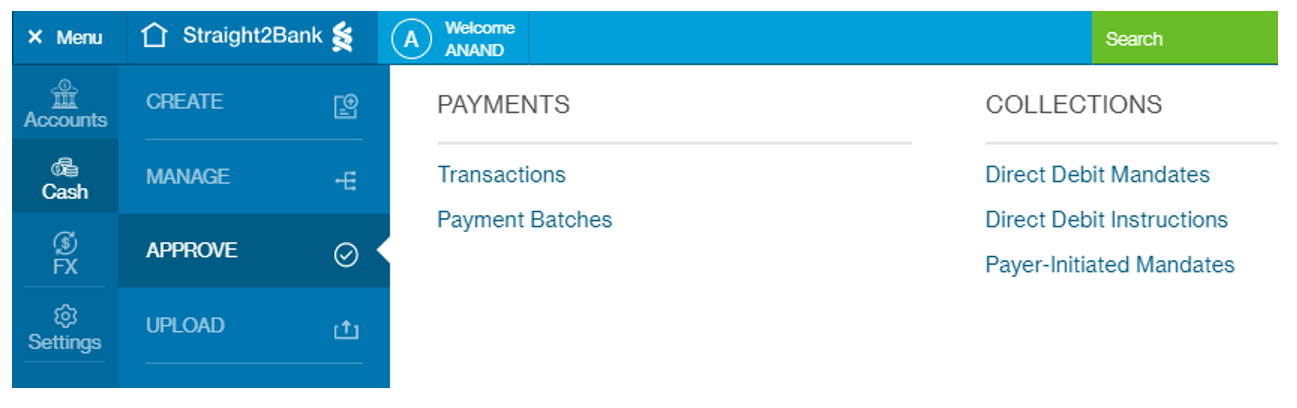
Step 1: Go to Menu > Cash > Approve > Direct Debit Mandates
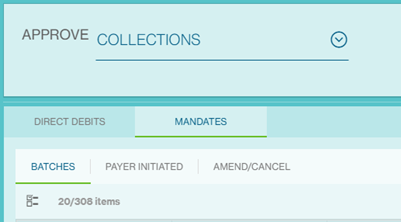
Step 2: Direct Debit Mandates and Direct Debit Instructions are itemized in respective tabs, for your convenience.
The user has the option to select simultaneiously multiple items and appropriate task. For this scenario,
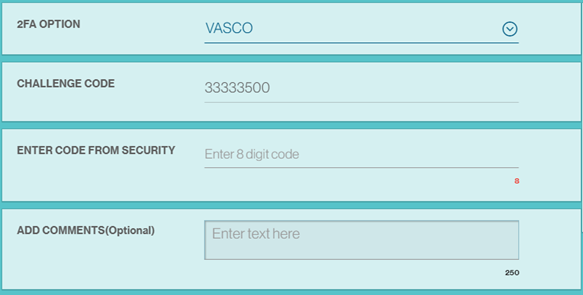
Step 3: use a Vasco Token for Approval
Once you click on the Approve action, a confirmation page will be displayed for you to enter the chanllenge code.
Release to Bank Automatically After Approval
You can release the batch to bank immediately after approval.

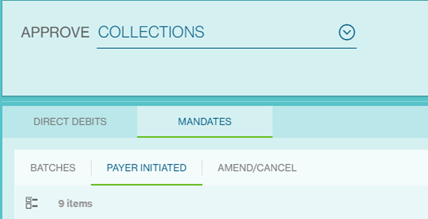
Approve Payer-initiated Mandate
If you receive a mandate initiated by the payer for your acceptance, you can do so in the same Approval screen -> Approve Mandate -> Payer-initiated.
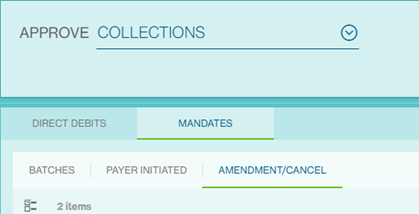
Approve Mandate Amendment/Cancellation requests
If an amendment/cancellation request is submitted for an active mandate, you can approve the request in the same Approve screen -> Approve Mandate -> Amend/Cancel Requests.
Approve Direct Debit Instruction
This page outlines the steps on how to approve and release Direct Debit Mandates/Direct Debit online.
Step 1: Go to Menu > Cash > Approve > Direct Debit Instructions

Step 2: Direct Debit Mandates and Direct Debit Instructions are itemized in respective tabs, for your convenience.
The user has the option to select simultaneiously multiple items and appropriate task. For this scenario,


Step 3: use a Vasco Token for Approval
Once you click on the Approve action, a confirmation page will be displayed for you to enter the chanllenge code.

Release to Bank Automatically After Approval
You can release the batch to bank immediately after approval.

Manage Direct Debit Mandates
This page outlines the steps on how to manage your direct debit mandates captured on Straight2Bank Nextgen. This is a esource page for you to find out about the existing functions you can perform to your direct debit mandates.
The activities are outlined below:
- Retrieve and continue with the drafts that you previously saved
- Repair a mandate batch that has errors
- Release a fully authorized batch to bank for processing
- Track and view batch/transaction details and status
- Print/export the mandate details
- Amend/cancel an active mandate
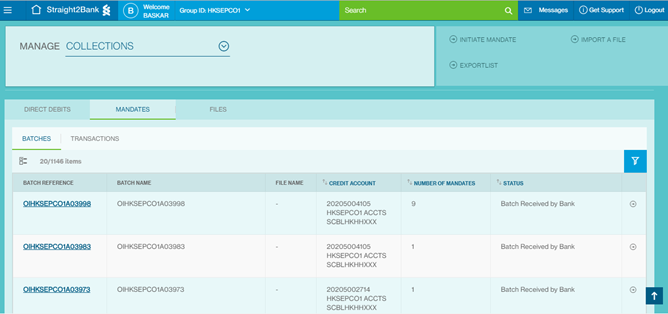
Step 1 - Go to Menu > Cash > Manage > Direct Debit Mandates
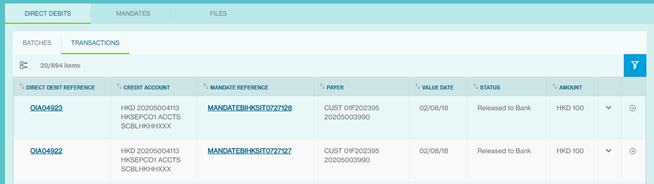
Step 2 - Manage your mandate batches/transactions in the Manage -> Mandates -> Batches/Transactions tab.
Manage Mandate consolidated as Batches:
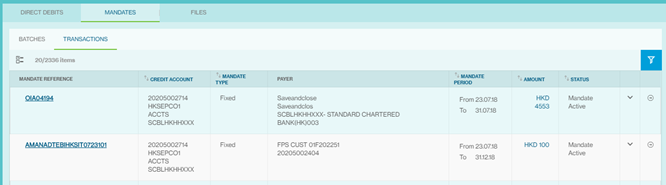
Manage Mandate Transactions:
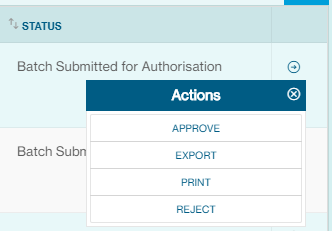
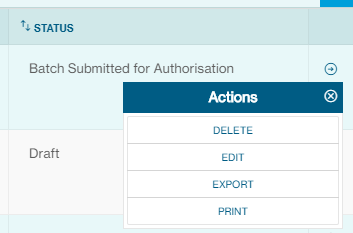
Step 3 - To take actions on a mandate batch/transaction, click the button and select the action you want to take.
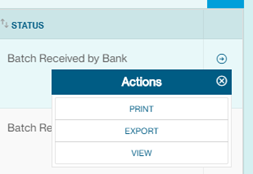
Full list of options available:
PRINT - Print the records which are selected in pdf format
EXPORT - Export the List in xls/csv format
VIEW - View the Mandate Batch/transaction
DELETE - Delete the Mandate Batch
EDIT - Edit the Mandate Batch
SUBMIT - Submit Mandate Batch for approval
REPAIR - Repair the Mandate Batch
RELEASE TO BANK - Send the mandate batch for Bank Processing
AMEND- Amend/modify an active mandate
CANCEL - Cancel/terminate an active mandate
The user can also select multiple items to perform an action by clicking this icon ![]()

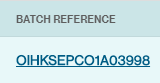
Step 4 - Click on the particular Batch Reference to view the batch details
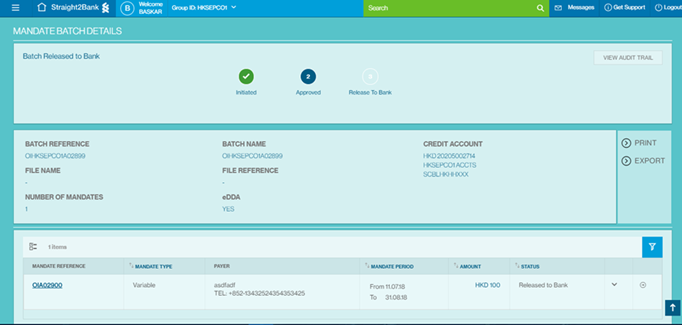
Batch Summary View:
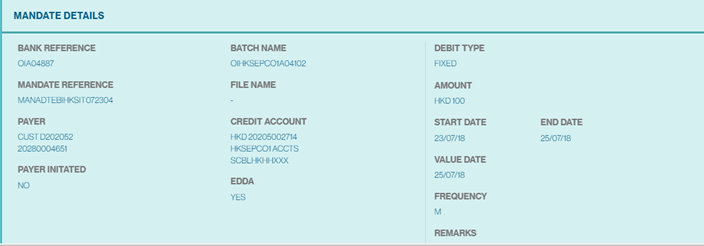
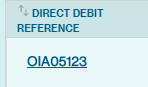
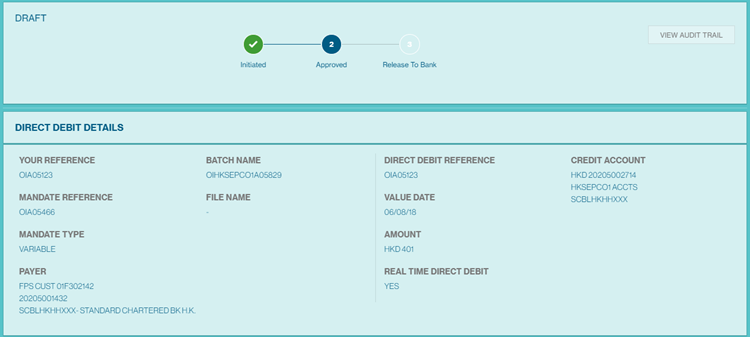
Step 5 - Click on the particular Mandate Reference to View the Mandate details
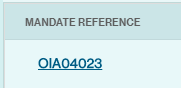
Mandate Detail View:
Manage Direct Debit Instructions
This page outlines the steps on how to manage your direct debit instructions captured on Straight2Bank Nextgen. This is a resource page to find out about the existing functions you can perform on your direct debits instructions.
- Activities that you can perform includes:
- Retrieve and continue with the drafts that you previously saved
- Repair a direct debit batch that has errors
- Release a fully authorized batch to bank for processing
- Track and view batch/transaction details and status
- Print/export the batch/transaction details
Step 1 - Go to Menu > Cash > Manage > Direct Debit Instructions
Step 2 - Manage your Direct Debit batches/transactions in the Manage -> Direct Debits-> Batches/Transactions tab.
Manage Direct Debit Batches:

Manage Direct Debit Instructions:
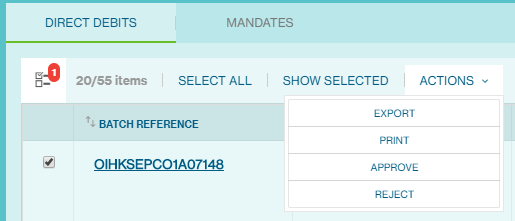
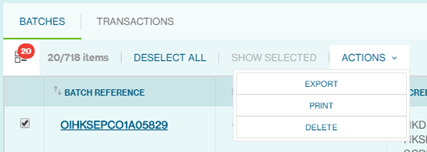
Step 3 - To take actions on a direct debit batch/transaction, click the button and select the action you want to take.
Full list of options available:
PRINT - Print the records which are selected in pdf format
EXPORT - Export the List in xls/csv format
VIEW - View the Mandate Batch/transaction
DELETE - Delete the Mandate Batch
EDIT - Edit the Mandate Batch
SUBMIT - Submit Mandate Batch for approval
REPAIR - Repair the Mandate Batch
RELEASE TO BANK - Send the mandate batch for Bank Processing
The user can also select multiple items to perform an action by clicking this icon ![]()
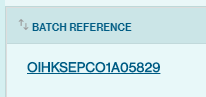
Step 4 - Click on the particular batch Reference to View the batch details
Batch Summary View:
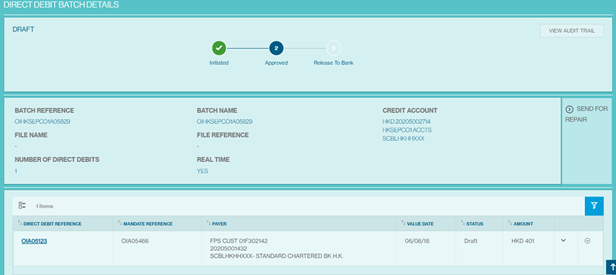
Step 5 - Click on the particular Direct Debit Instruction Reference to View the Direct Debit details
Direct Debit Transaction Details view:
Manage Files
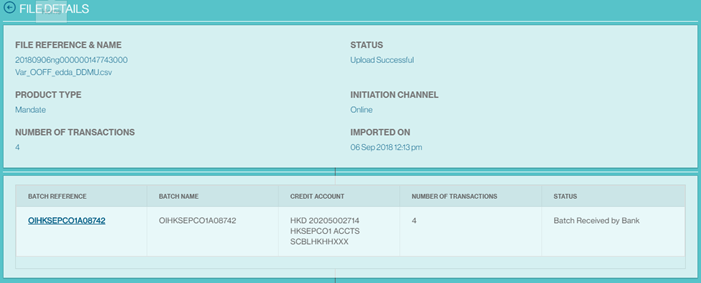
To check your file status, Go to Menu > Cash > Manage > Uploaded Files
All your uploaded files are listed in the Manage Files screen.

| File status | Description |
| Upload Successful | The file has been uploaded successfully and batches are created in “Submitted for Approval” status. |
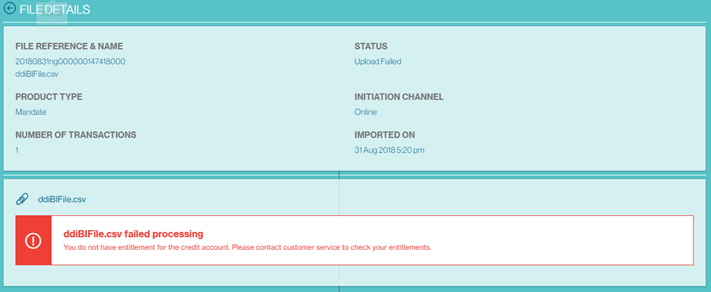
| Upload Failed | The file has not been uploaded successfully. The file format is not compatible or is incorrect. User can click on the file reference to view the fail reason |
| Uploaded with errors | Some of the transactions uploaded are of errors. Click on the file reference to view the details and download the error log. You can correct the erroneous records and upload the file again, or continue to import the entire file and repair the transactions on screen later. |
| Upload In-Progress | It means that the file upload is in progress and you must wait for it to finish. |
Upload Successful
Batch is created in "Submitted for approval" status if auto-approval is disabled. You can click on the batch reference to view the transaction details.
Upload Failed
You'll need to correct the file and upload again.
Uploaded with Errors:
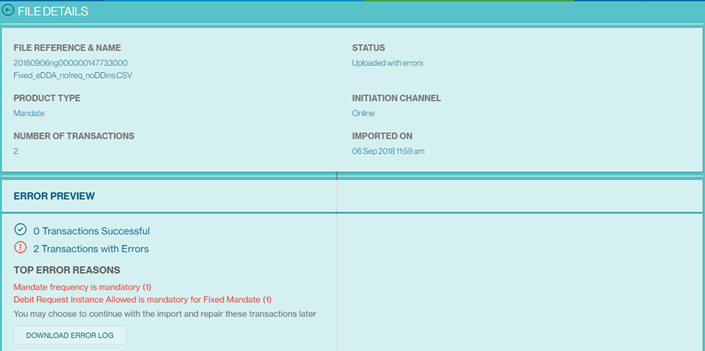
You can download the error log to view the line-by-line error details.
You can discard file and make the corrections in the file and upload again.
You can also click "Continue" to import the entire file including the erroneous records, and repair the transaction on screen later.

If you click "Continue, file will be imported successfully with batch created as "Imported with errors" status.

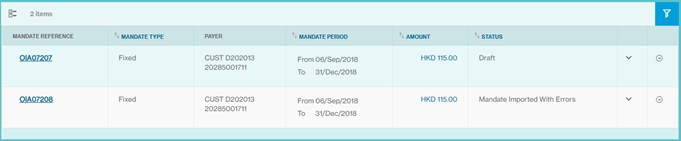
Click on the batch reference, and you'll see the transaction details and which transactions are having errors. Transactions will errors are in "Imported with Errors" status, and transactions without errors are saved as "Draft".
Repair the transactions by using the Edit action.
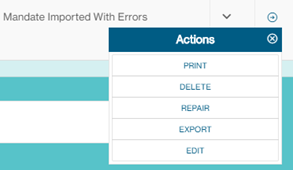
Follow the same steps of editing a mandate or direct debit batch to edit your batches and submit for approval.
File format for Collections services
Direct Debit Mandate
For details on the file format, please click here
Direct Debit Instruction
For details on the file format, please click here