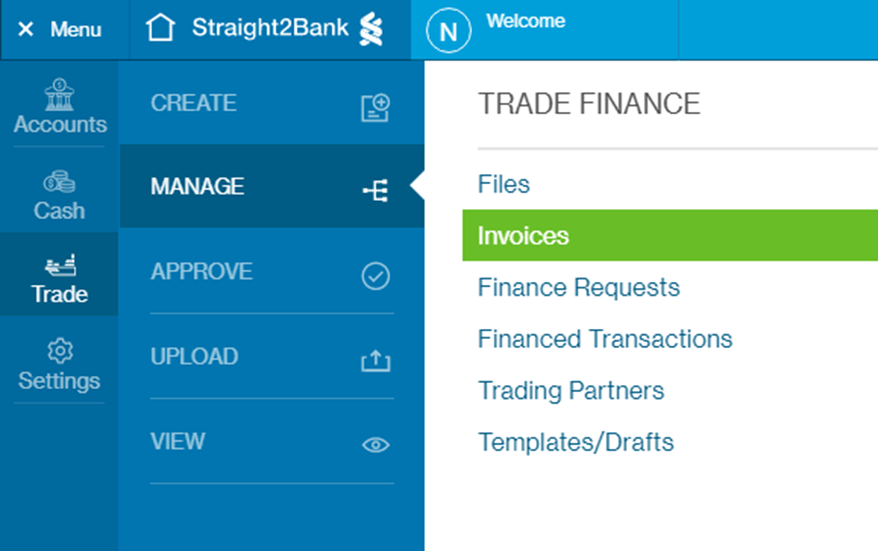
- Overview
- Invoices
- Trading Partners
- Finance Requests
- Financed Transactions
- Proforma Invoice Financing
- Trade Finance Dashboard Cards
- Trade Reports and Alerts
- Digital Trade Counter
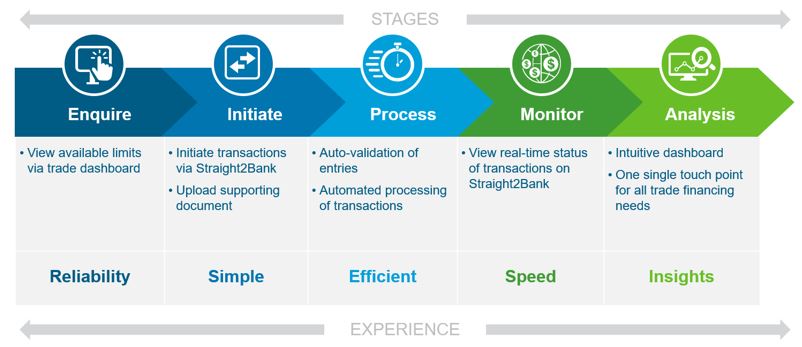
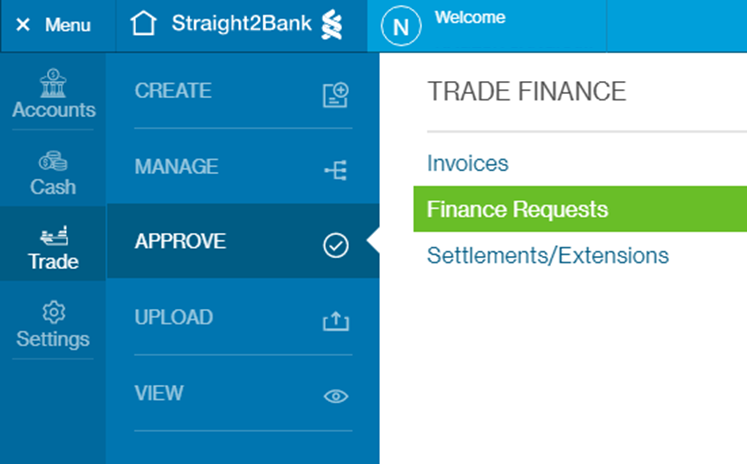
Overview of Trade
S2B NextGen trade is an end to end digital trade platform which allows customers to:
- Initiate Documents: Submit invoice summary details either by uploading an excel sheet or quick creation through the web along with the scanned supporting copies of invoices and shipping documents as PDF to the bank. Built-in validation of documents and auto association of product
- Approve Documents: Authorize documents through multi-level authorization matrix
- Request Finance: Automatic and selective request for finance on a batch of invoices
- Monitor Transactions: Real time view of transaction status updates throughout life cycle of transaction. View all information on advices, interest and charges on the transaction
- Enquire Limits: Real time view of limits and utilization through a multi-level drill down dashboard
- Alerts: Instant email notifications with applicable advices – file upload, document ineligibility, finance release, amendments and settlement
- Request for Indicative Finance Rates from the bank for any Product and tenor
- Reports: Editable and Standard Reports on transactions
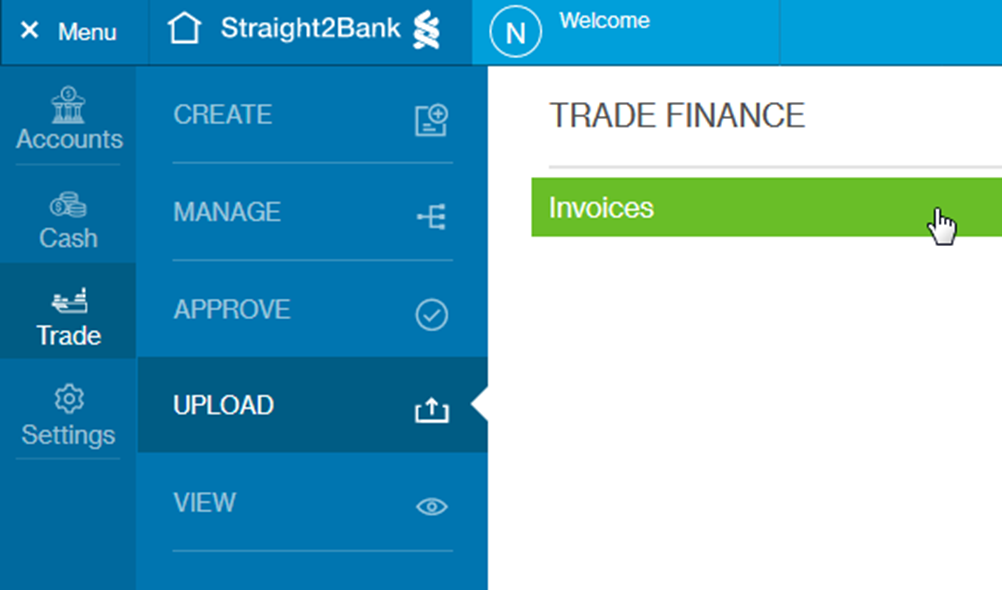
Upload Invoice
Customers can use this option to upload an excel file with a bunch of invoices in the defined bank standard format generated out of Enterprise Resource Planning (ERP) or accounting software in bulk. Along with the summary of the invoices in the excel file, they can also provide the scanned copy of invoices and shipping documents.
The Upload Invoice Screen will be available from the Menu > Trade > Upload > Invoice.
Fill in the invoice details including:
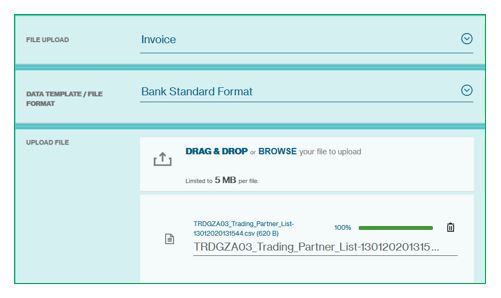
File Upload
Allow to select the file upload option. This fields is auto-populated.
Upload File
Allow to upload the file by clicking on browse button or simple drag drop. The client needs to provide the invoice details in the standard bank format defined by the bank. This file can be xls, xlsx, csv and txt format.
Detailed specification of the bank standard format should be requested from the bank.
Supported Document
Allow to upload the file by clicking on browse button or simple drag drop. The scanned supporting documents copy of invoices and supporting shipping documents need to be uploaded here.

Click on the import button to upload the file. Browser automatically redirects to the next screen and display information.
Uploading Successful
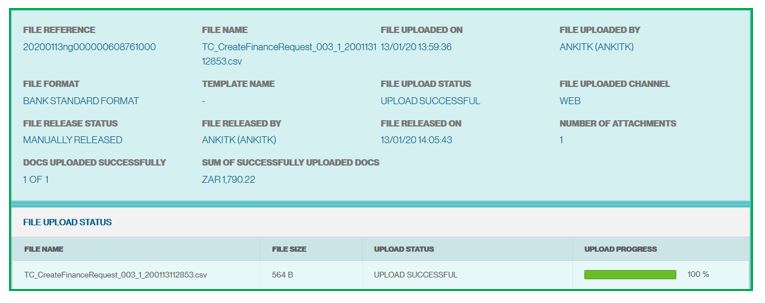
Attachment Details
View all the uploaded attachment with file size. Click on the document to view

Allow to upload another file or option to jump on the manage file.
Click on the Go to Dashboard button to jump to dashboard directly

View the supporting document details

Click on the Show more button to show more details
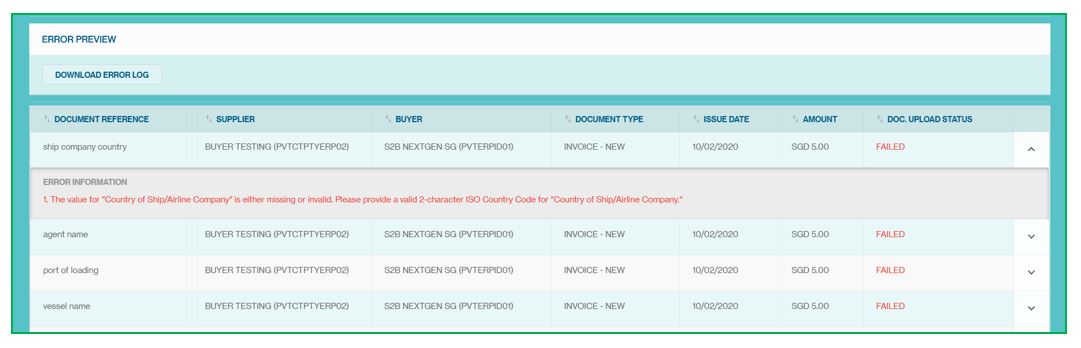
Upload Failed
Post uploading NextGen validates the documents uploaded. In case of any errors, the customer can view all details on this page.
Scroll down to view the error log and user also able to download the Error log file.
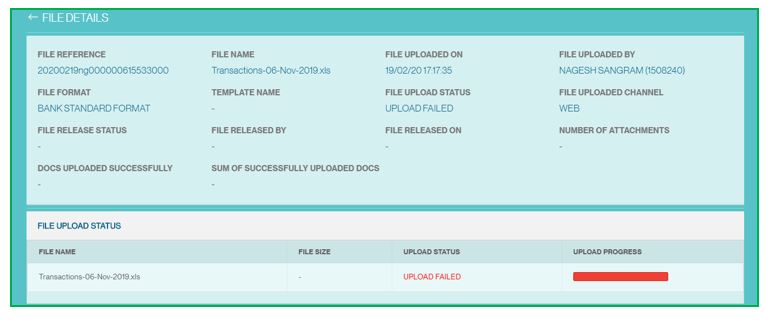
Scroll down to view the error log and user also able to download the Error log file. User can also view all the errors for each of the invoice
To delete the current upload and jump to upload the new file, click on the delete button.

Manage Uploaded File
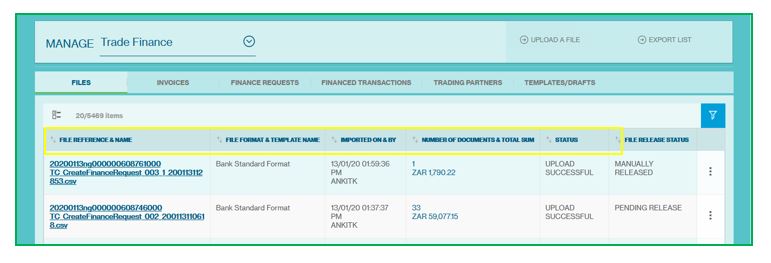
The Manage Upload File Screen will be available from the Menu > Trade > Manage > File.
1Column Headers
This page displays the File Request as a table with the following headers:
- File Reference & Name
- File format & Template Name
- Imported ON &BY
- Number of Total Document and Sum
- Status
- File Release Status
2Sort and Filter Function
You can click each of the headers predefined as sortable to sort the table data in ascending order. Clicking one more time on the sortable headers will sort the table values in descending order
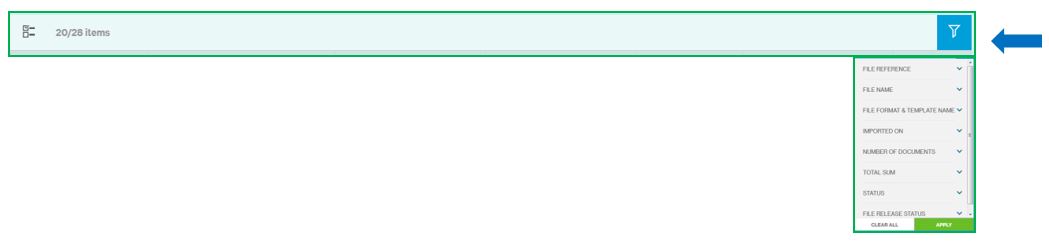
3Multiple File Selection
On click, the system shows the check box option for multiple selections and perform task for all the selection at once. (As image mentioned below)

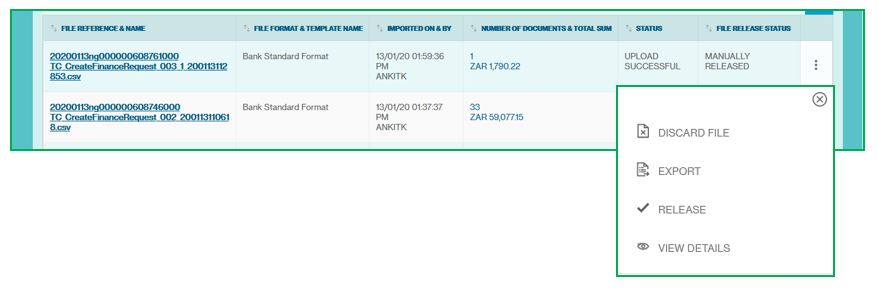
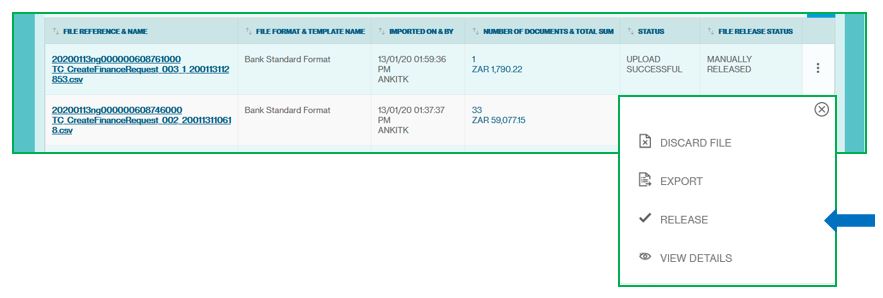
4File Action Menu
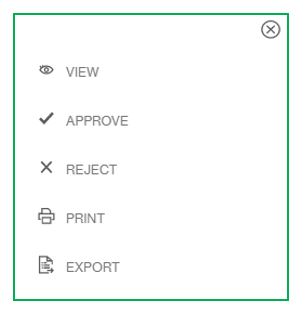
This button provides you various services and functions pertaining to file.
The list of actions shown in the action menu depends on the status of the trading partner and the user entitlements to perform various actions.
The following are some key actions that apply to a trade under upload file:
- Export
- View Details
- Release or Discard File
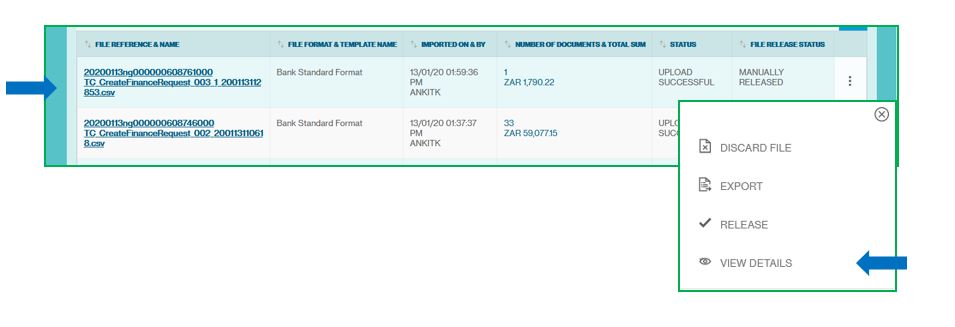
5File Details
Click on the File or click on the view button from the action menu
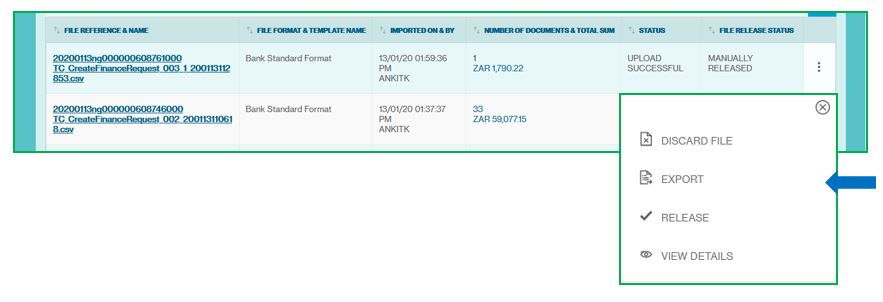
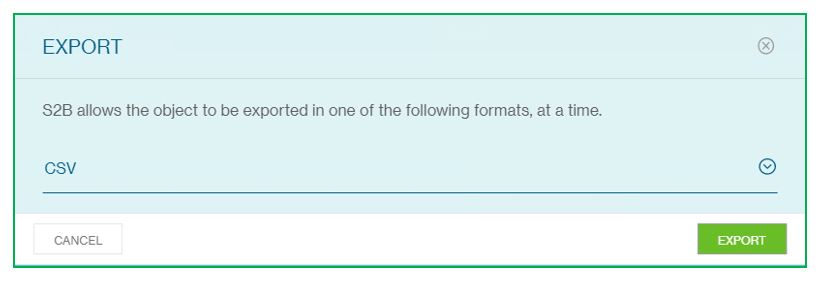
6Export the File Details
Click on the export button to export the details in CSV format
7Release the File
Click on the release button to release the File
The release option is available only if the client is set up as Auto Release as “No”.
It allows opportunity to review the documents in the file before releasing it for further processing. For this set up, post successful upload of the file client needs to review and then release. It is only after this manual release that the invoices are taken up for further processing.
Customer can also choose to discard the file and then upload the file again.
8File Status
| File Status | Description |
|---|---|
| Upload Successful | All invoices in the file have been uploaded successfully and Submitted for Authorization |
| Upload Failed | The file has not been uploaded successfully. Either the file format is not compatible or is incorrect or some validations on the invoices have failed. |
| Uploaded with errors | The file has been uploaded successfully. Some of the invoices uploaded have failed validations while the remaining are successfully through validations. This status appears only when the users are set up during on-boarding to “Allow Partial Upload” |
| Upload In-Progress | It means that the file upload is in progress |
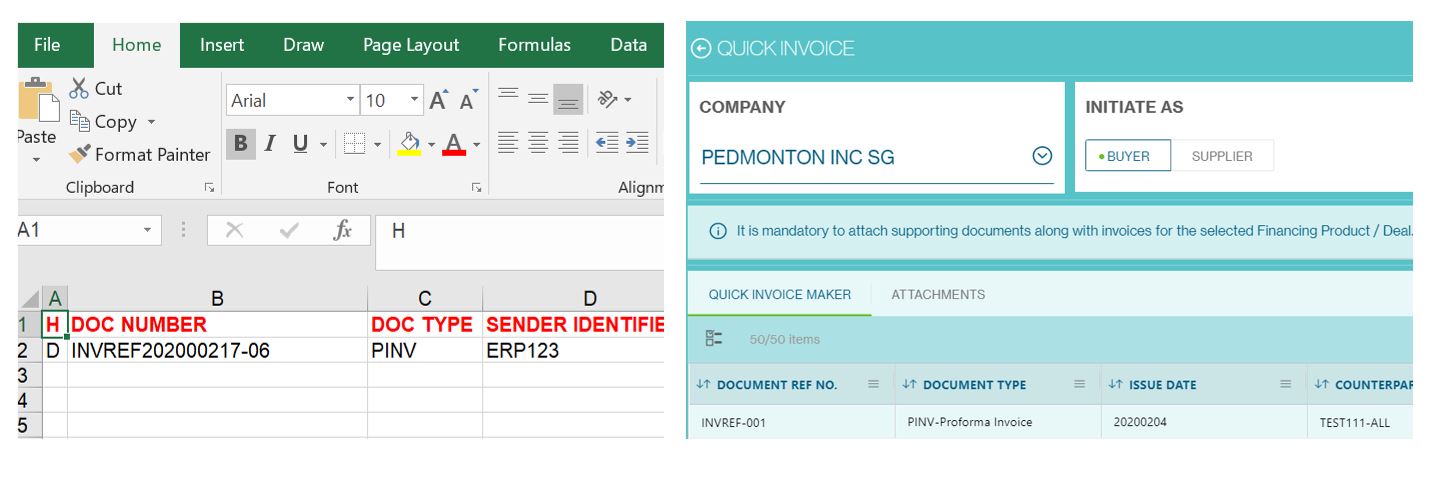
Quick Creation of Invoices
This provides a step-by-step guide on how a user will be able to create Invoices in Trade Finance.
Customers can use this option for quickly creating an invoice using excel like grid. This provides all functionalities which an excel sheet provides.
This saves time by avoiding preparation of an elaborate excel file in the bank standard format. Customers can prepare their own templates by selecting which invoice fields they want to provide, order the fields in a certain sequence which would help them make submissions faster.
The Invoice Creation option is available under (top-left side) Menu > Trade > Create > Invoice.

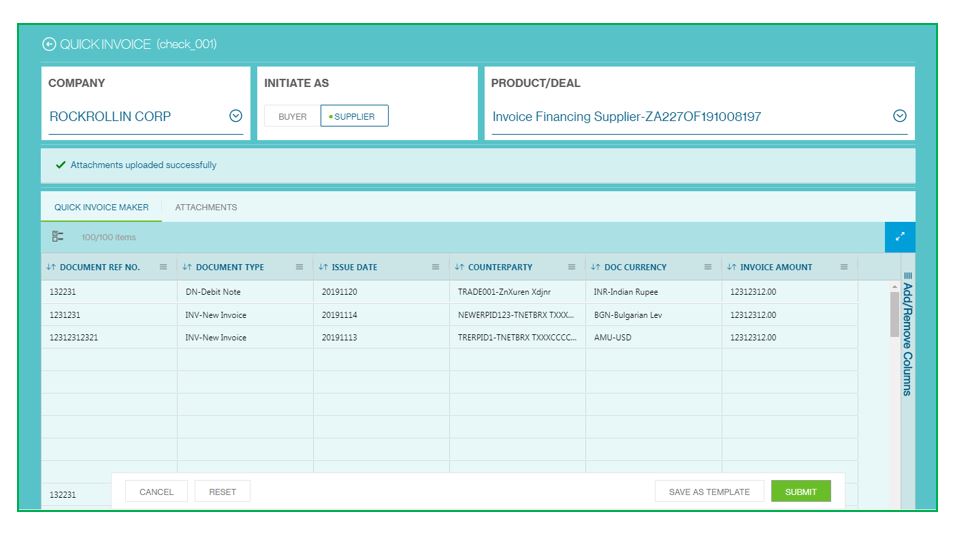
1Create Invoice Information
Company
Select the company from the drop down
Initiate As
Select one option initiate as Supplier or Buyer
Product / Deal
Select the product / deal from the drop down

Quick invoice maker contain two major sections
- Quick Invoice Maker
- Attachments
2Quick Invoice Maker
Double click on the column to add the entry
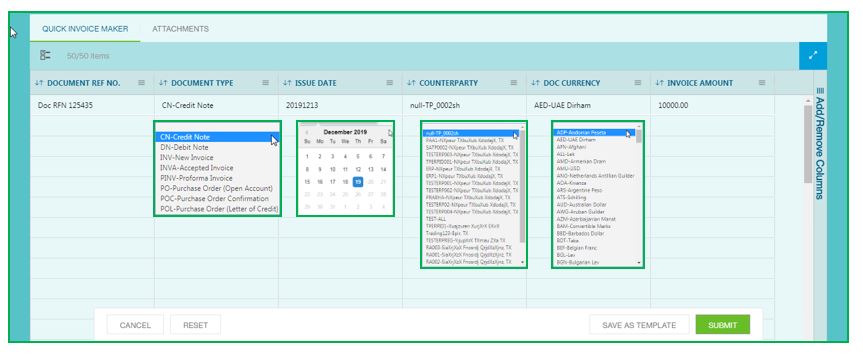
Default columns
Document Ref No
Enter the document reference number
Document Type
Double click on the document type and choose one document type from the drop down. Allowed values: Invoice, Accepted Invoice and Proforma Invoice.
Issue Date
Double click on the issue date and select date
Invoice Currency and Amount
Enter the invoice amount
Counterparty
All registered counterparties are shown here as a drop down
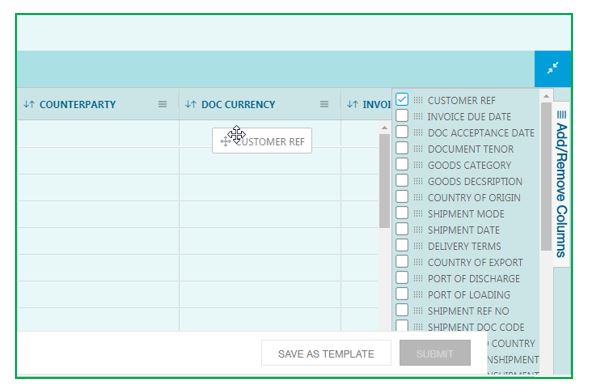
Click on this “Add / Remove Columns” button to add the additional columns
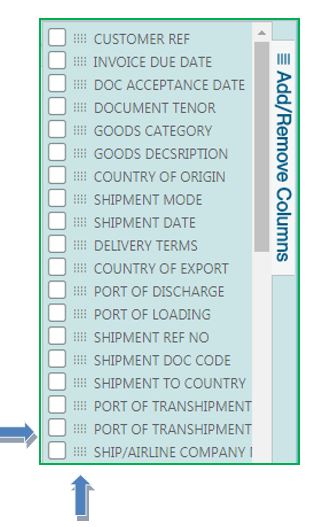
Check the option to add the column or click on this button to drag and drop the column
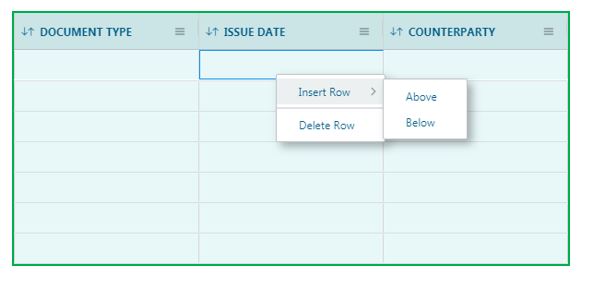
Easy insert and delete the row by right clicking on the table as shown in image below
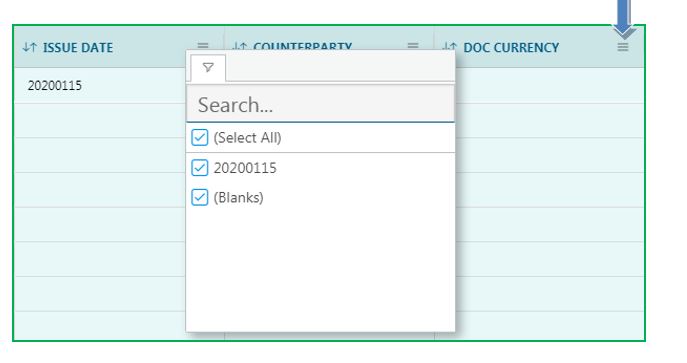
Search easily in the column by click on this icon
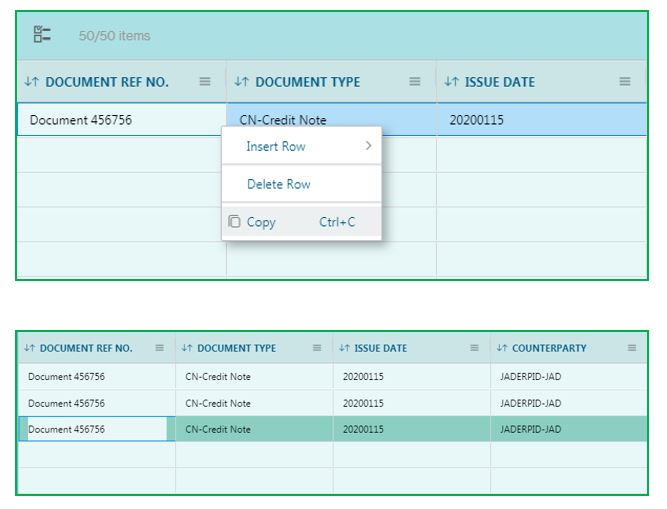
Copy and paste the column by selecting the row and click right on it. The usual keyboard shortcuts for Copy (Ctrl+C) and Paste (Ctrl+V) can be used as well. You can also copy information from an excel sheet and paste into the Create Invoice Grid.
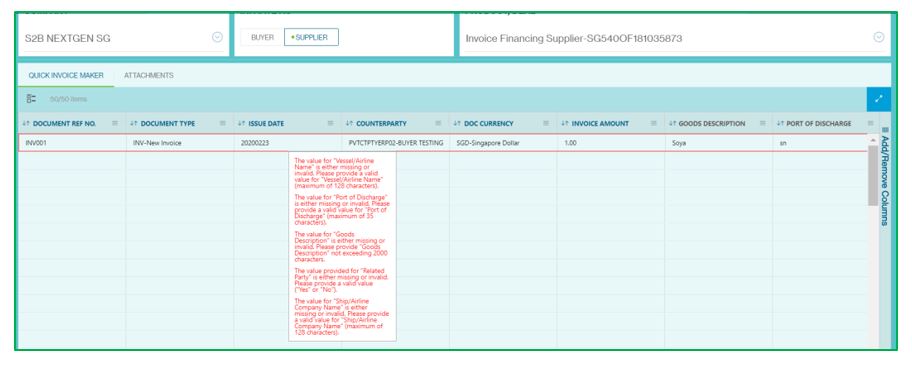
In case, post submitting, the invoice has some errors, then user gets a message stating that there are errors:
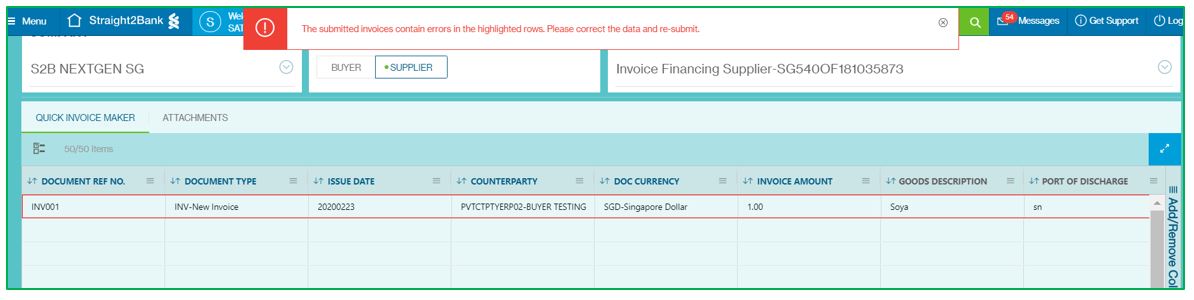
When the customer moves their mouse over the document highlighted in red, the detailed error message can be seen:
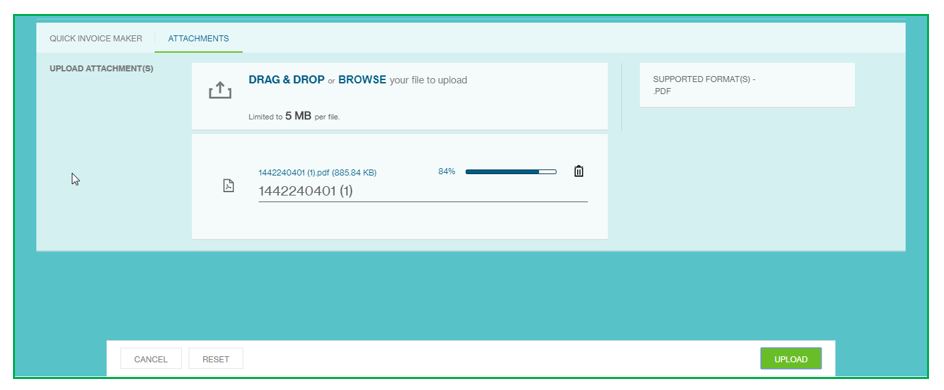
3Attachment
Drag and drop the file or browse from the system and click on the upload button. Customers can provide scanned copy of invoices and shipping documents here.
Finally, proceed by clicking on ‘Continue’. Review all the information on the summary page (as discussed in next page). Option also given to “cancel” the creating of invoice by clicking on the cancel button
Click on the “Submit” button and send it for approval.

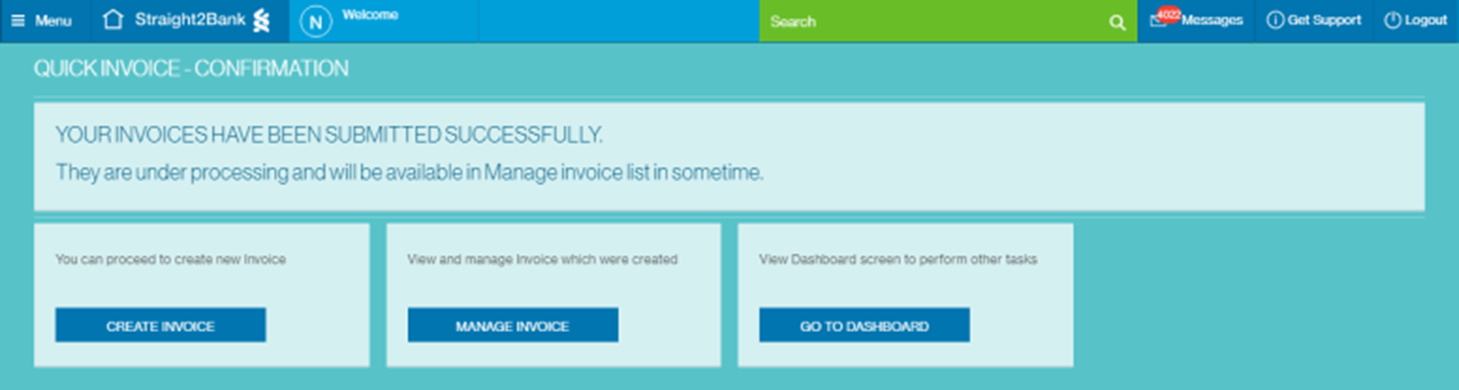
4Confirmation
See the confirmation below.
To manage the invoice, you can see the screen (as paste below), Manage Invoice button to quick jump to Manage invoice option directly from this screen.
5Save As Template
Customer can also use the Save As Template Option next to Submit Button. This allows customers to create a template which can be used for subsequent submissions. Post clicking on Save As Template user needs to provide a name for the Template and Save
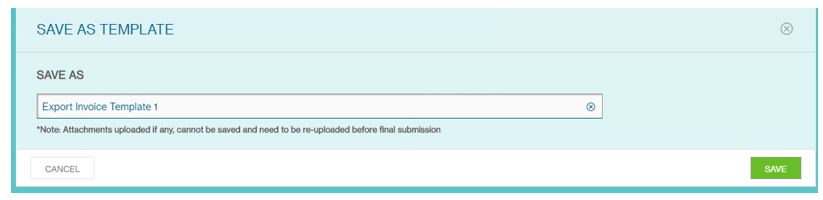
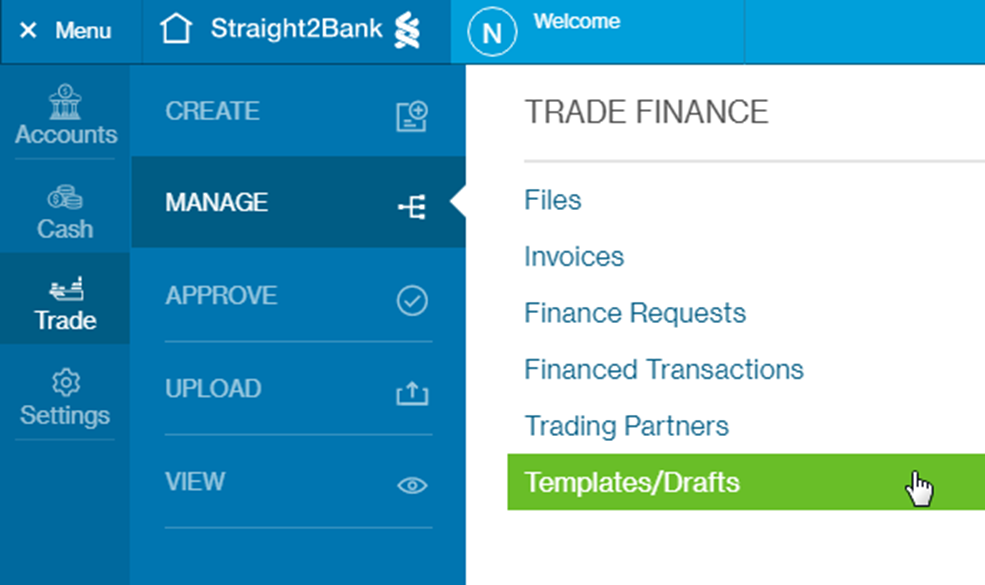
Post saving the templates can be found in Menu > Trade > Manage > Template/Drafts
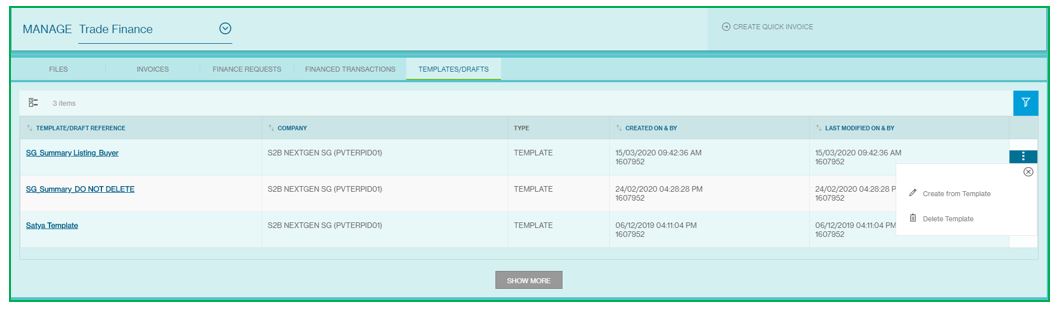
Manage template/drafts
The Manage Template/Drafts Screen will be available from the Menu > Trade > Manage > Template/Drafts.
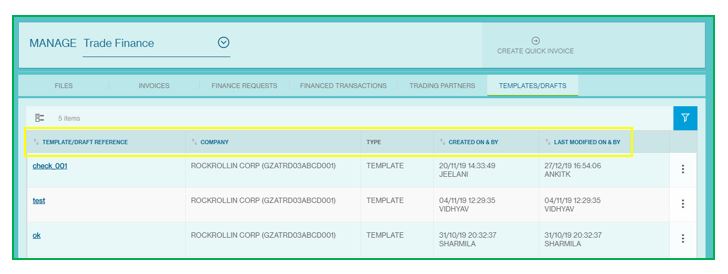
This section lists all the templates which have been created from the Create Invoice section. Customers can create and save a predefined template customized for their needs - by selecting the Company, Role (Buyer/Supplier), Deal, Invoice Attributes, ordering of the invoice attributes. These can be subsequently be used for quick submission of invoices.
1Column Headers
This page displays the Financed Transaction as a table with the following headers:
- Template Reference
- Company
- Type
- Created ON & BY
- Last Modified ON & BY
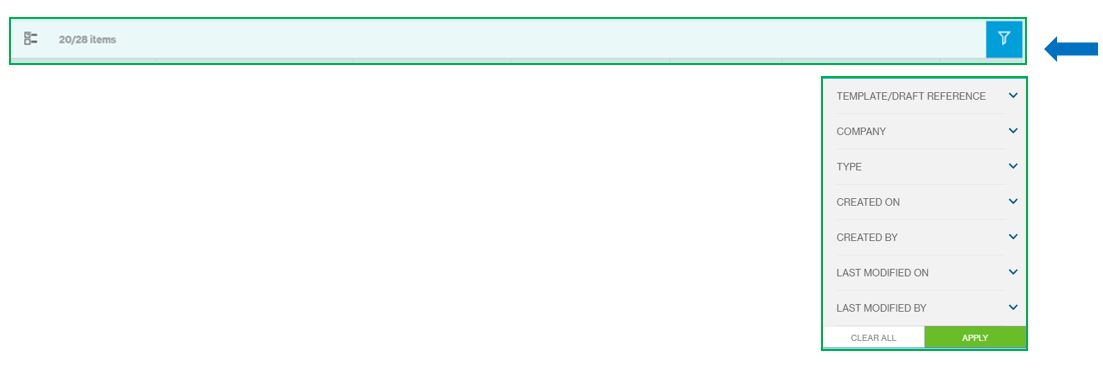
2Sort and Filter Function
You can click each of the headers predefined as sortable to sort the table data in ascending order. Clicking one more time on the sortable headers will sort the table values in descending order
3Multiple Template Selection
On click, the system shows the check box option for multiple selections and perform task for all the selection at once. (As image mentioned below)
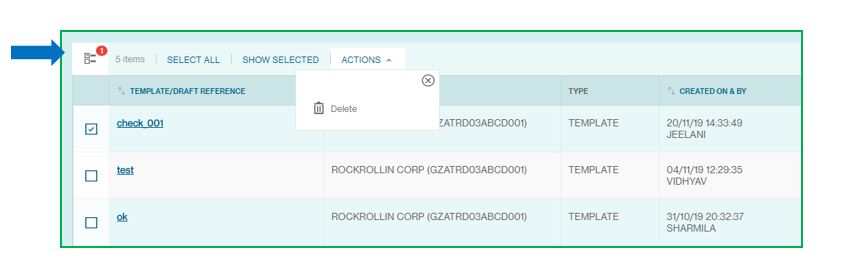
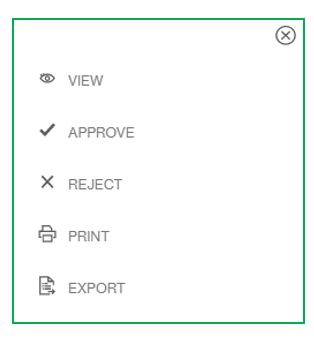
4Template Action Menu
This button provides you various services and functions pertaining to file.
The following are some key actions that apply to a Templates:
- Create from Template
- Delete Template
5Create from Template
Click on the reference or click on the create from template button from the action menu
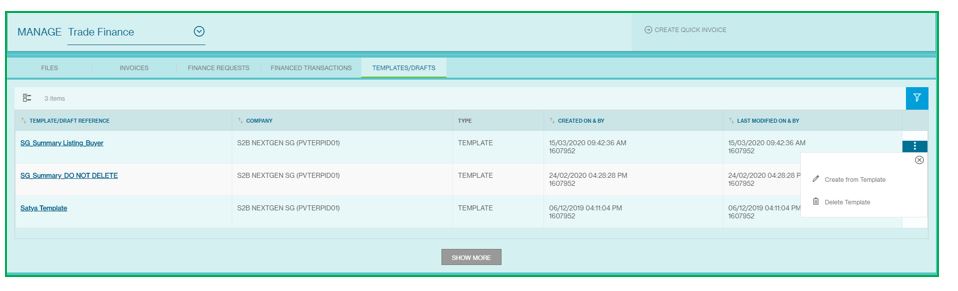
Edit the template and click on the submit button.
Click on the reset button the edit from the start.
Also you can save the invoice as template again by clicking on the Save as Template button
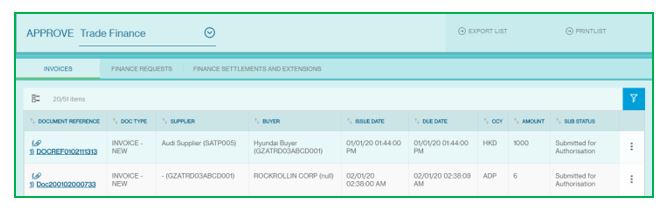
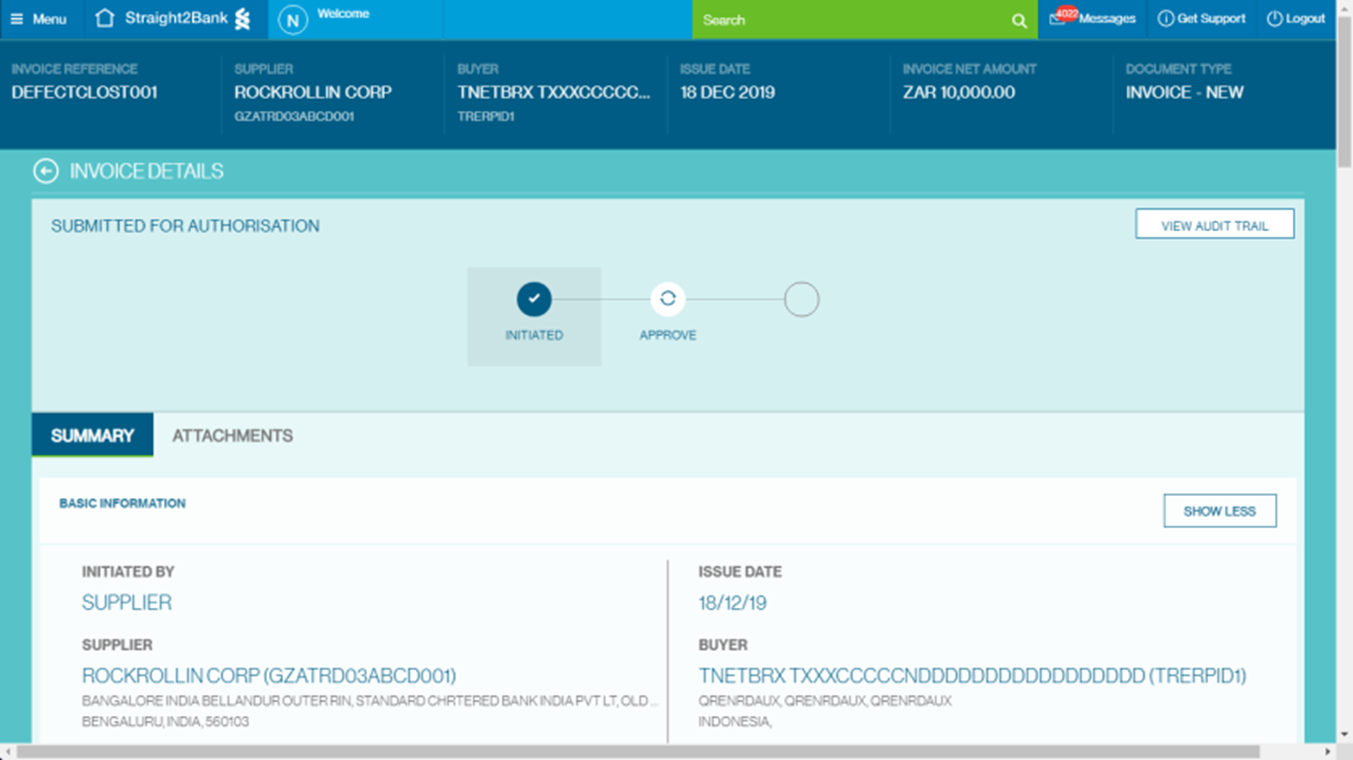
Approve/Reject Invoice
1Approve/Reject Invoice List Screen
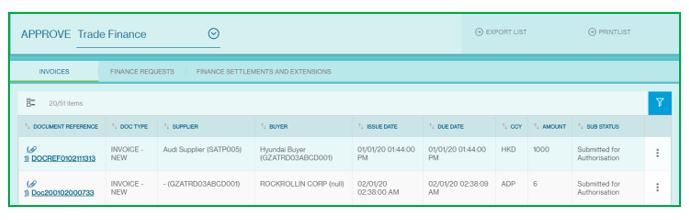
Invoice that are pending approval will be available from the Menu > Trade > Approve > Invoice

This screen has various data fields.
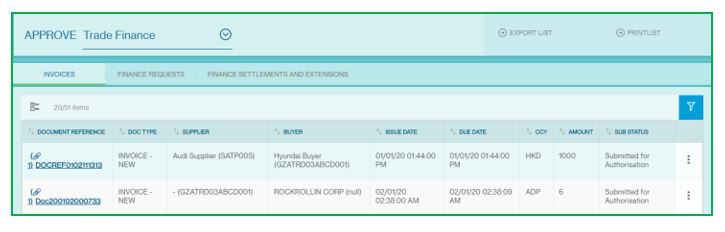
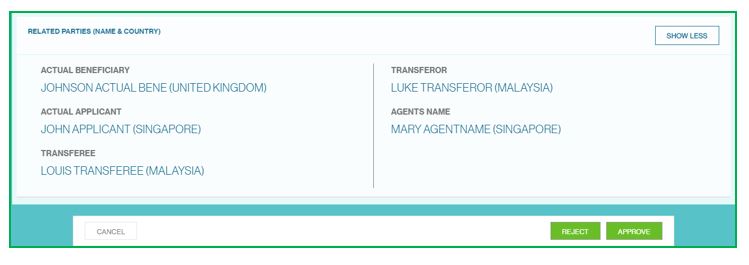
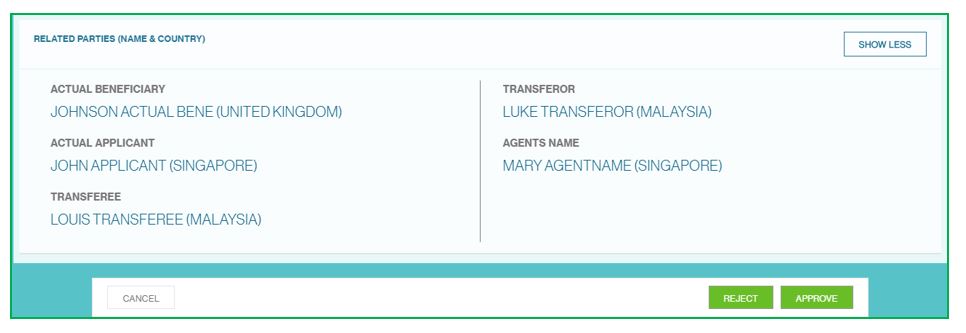
Clicking on Document Reference Number, new page will provide summary of the invoice that have been submitted pending approval.
Before approving, check all the invoice information, then click on the reject or approve invoice.
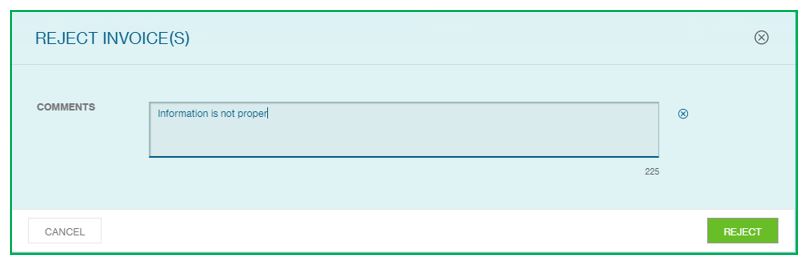
2Reject Invoice
With an “Approver” profile, you will also be able to reject invoice on Straight2Bank. By doing this, selected trade instruction will be rejected from any further authorization related function (i.e.) approval or rejection by others, and the status of the invoice instruction will appear as “Rejected by Approver”.
Invoice that are pending approval will be available from the Menu > Trade > Approve > Invoice (as below screen).
Clicking on Document Reference Number, new page will provide summary of the invoice that have been submitted pending approval.
Reject option will be available at the bottom of the page
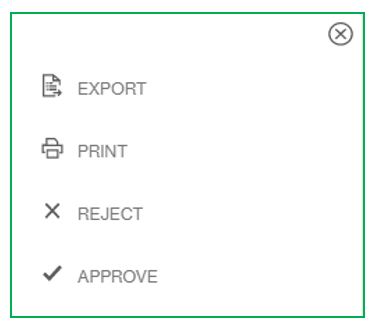
Click on action menu button of selected invoice.
Additional Reject Comments must be provided and this will be available to the Initiator or any other user who has access to view the invoice for further action such as edit and re-submit or delete the invoice.
3Approve Invoice
Creation of invoice on Straight2Bank is based on your user entitlement either by uploading the invoice file or by using the create invoice section.
Entry Points
Approve Invoice List Screen
Invoice that are pending approval will be available on the Approve Invoice Invoice List Screen - from the Menu > Trade > Approve > Invoice.

You can approve selected invoice by clicking Action Menu.
Invoice Detail Display
This screen has various data fields along with Filter or Sort options.
Clicking on Document Reference Number, new page will provide summary of the invoice that have been submitted pending approval. User can use the Approve button at the bottom of this page
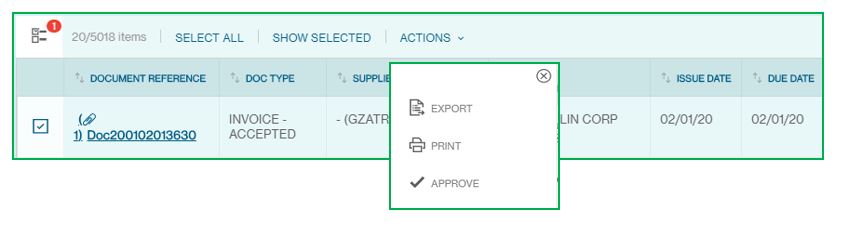
Multi-Select
Click on Multi-Select button and select Invoice needs approval (tick check box).
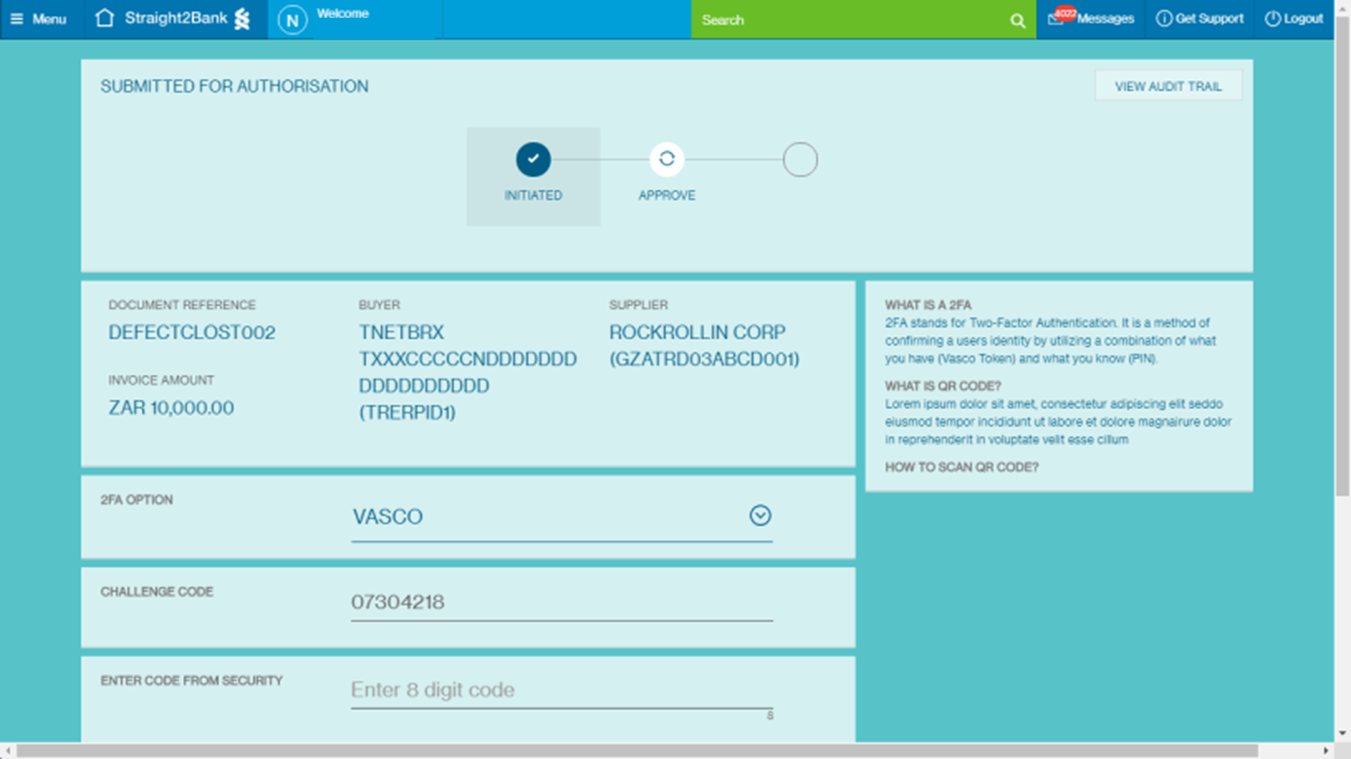
4Use a Vasco Token for Approval
Once you have clicked the “Approve” button in Action Menu, the “Submit Approval” screen will be shown:
Your Vasco token is required at this point. Approvers are able to approve a payee by performing the steps below:
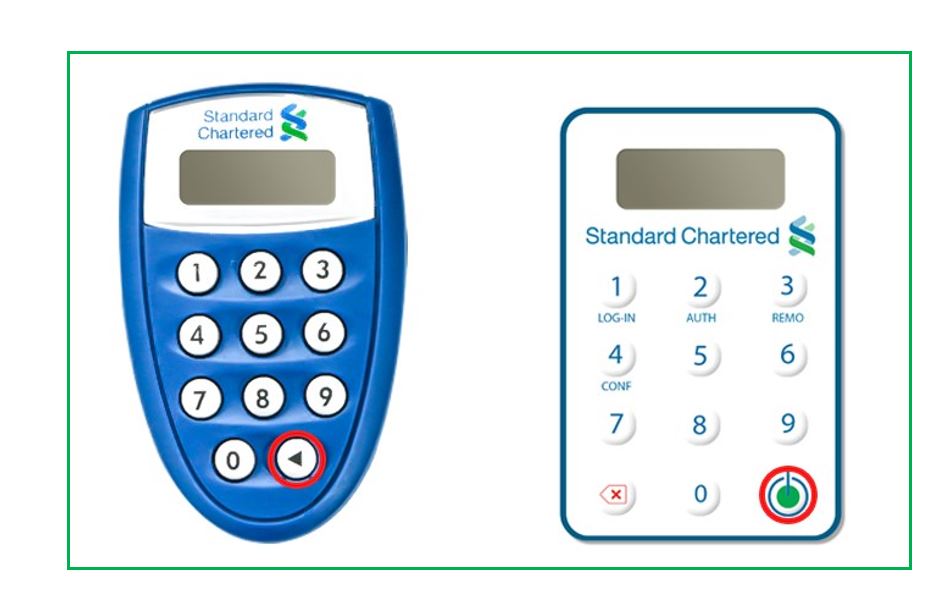
Turn on the Vasco Token and enter PIN
Turn on the Vasco token by pressing the on button.
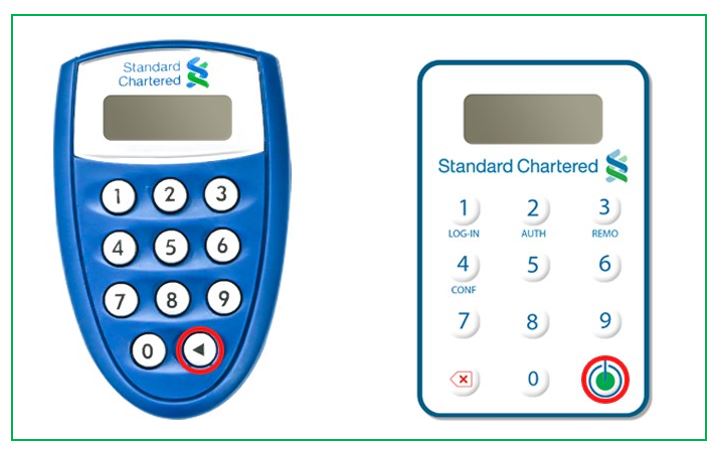
Proceed to enter your personalized PIN (setup during Token activation) to activate the Token.
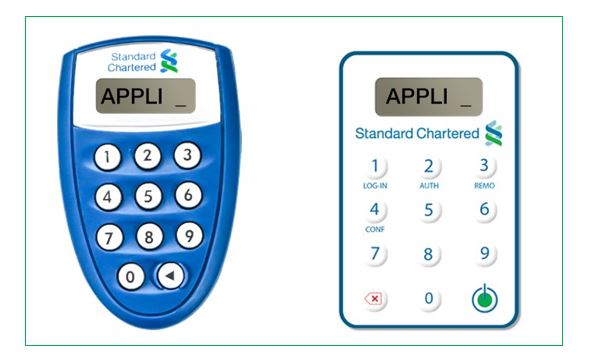
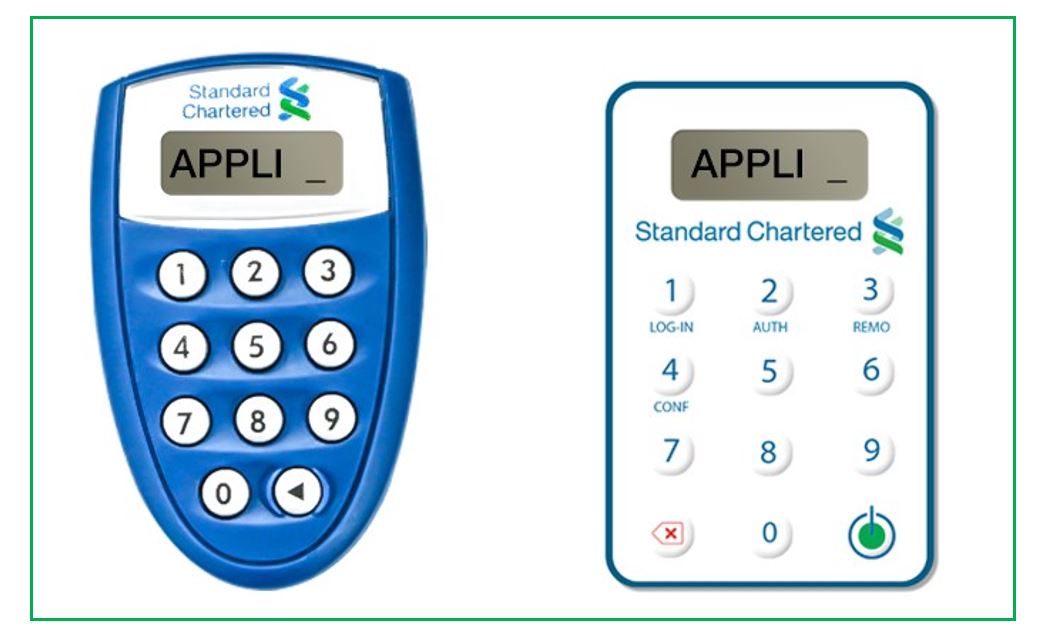
Display “APPLI _”
The screen will display “APPLI _” upon successful login.

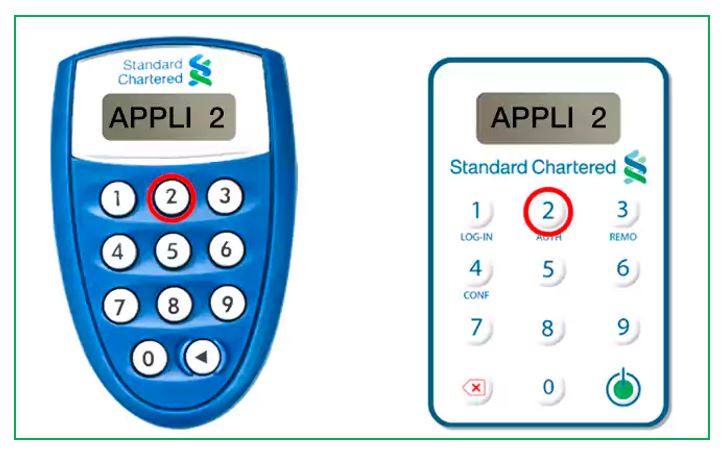
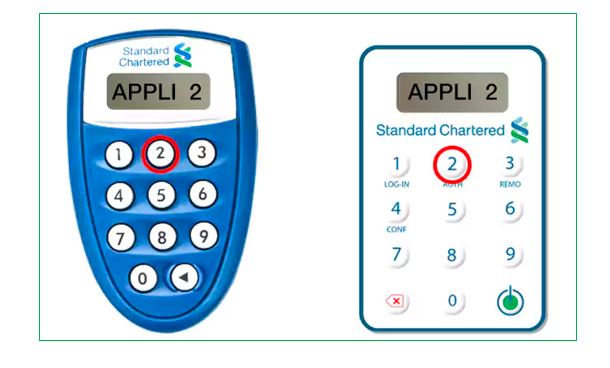
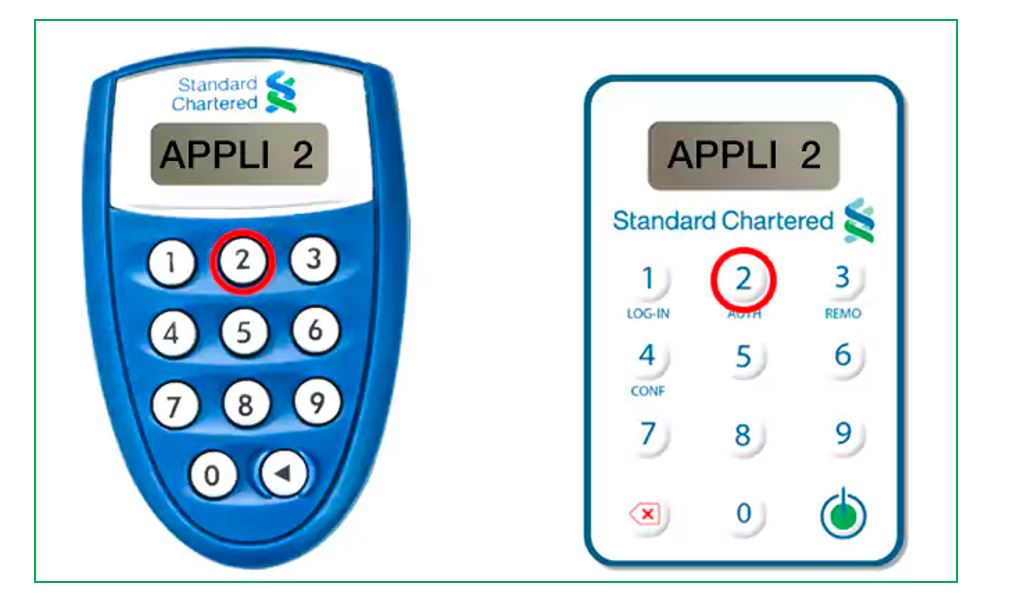
Enter the number “2”
Enter the number “2” on the token keypad for Transaction Authorization - “APPLI 2”.
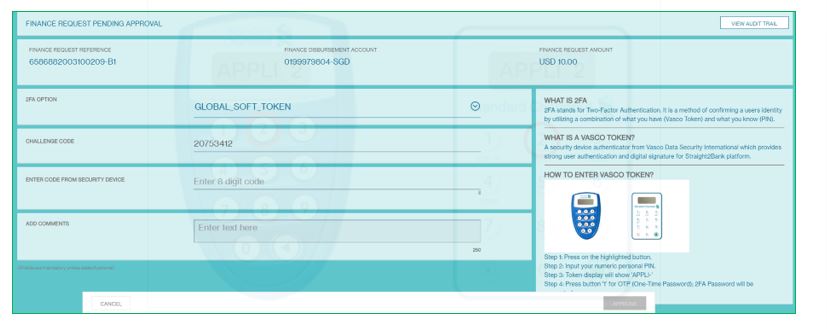
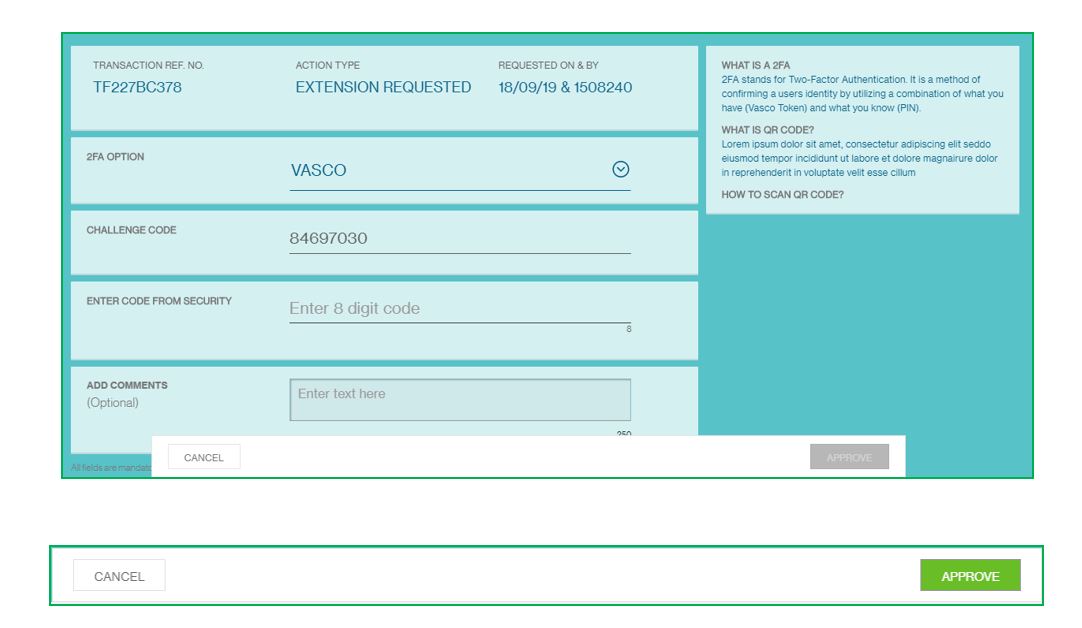
Input the “Challenge Code”
You will be prompted to key in a set of numbers on the Token. Input the “Challenge Code” response from the Straight2Bank into the Token shown as below.
Enter the “Response Code”
The Token will generate and display a new set of numbers as the “Response Code”. Enter this set of numbers in the “Enter Code from Security” fields on Straight2Bank screen and click Approve
5Use a Mobile Token for Approval
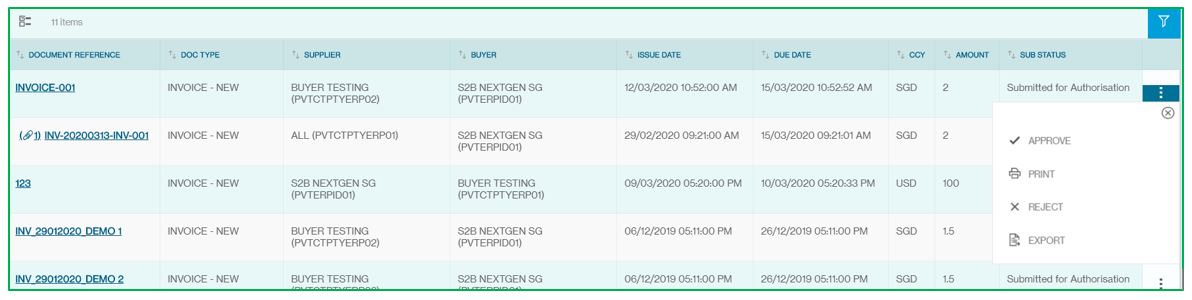
Go to Menu > Trade > Approve > Invoices
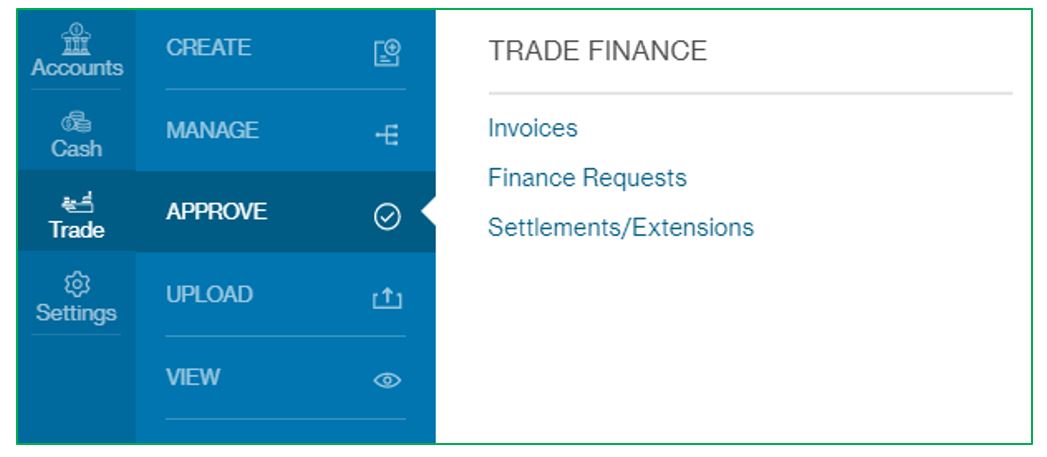
Click on the 3 dots for the transaction to be approved.
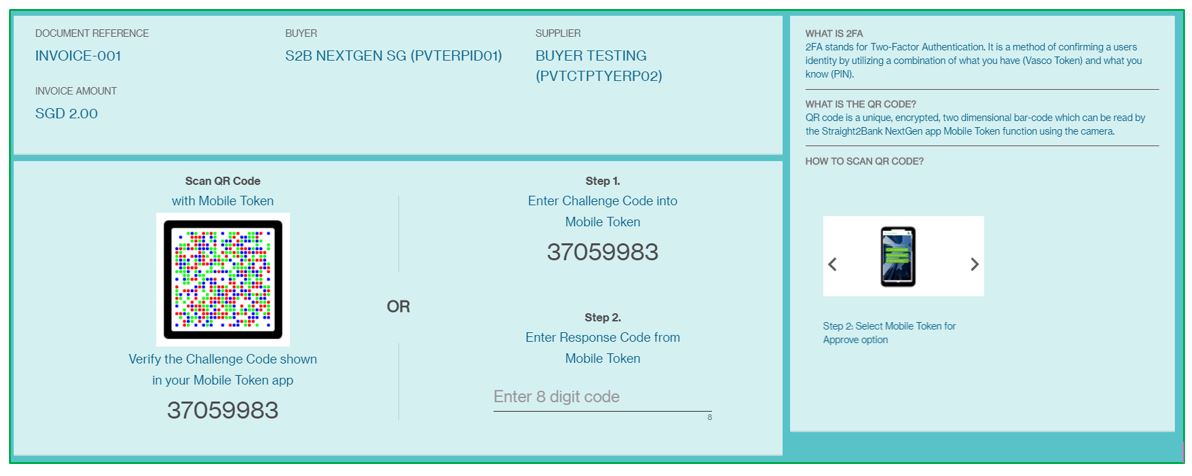
Log into the Straight2Bank NextGen App and tap on ‘Mobile Token to Approve’ before scanning the QR code.
Alternatively, clients can type the challenge code in the App and obtain the response code to be entered under ‘Step 2’.
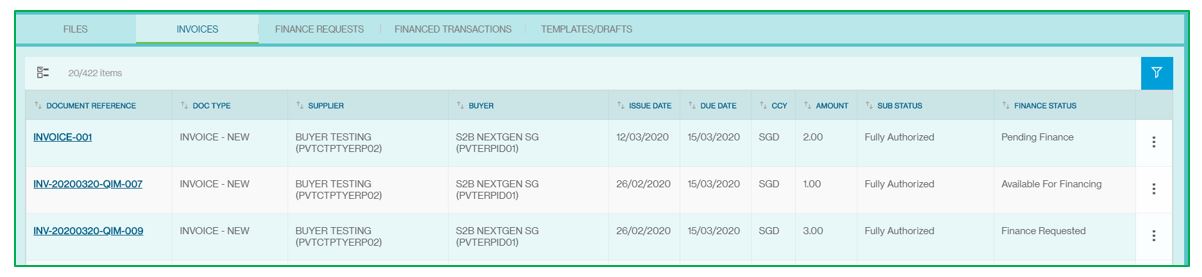
Once the invoice is approved, the sub status for the invoice will change from submitted for authorization to fully authorized.
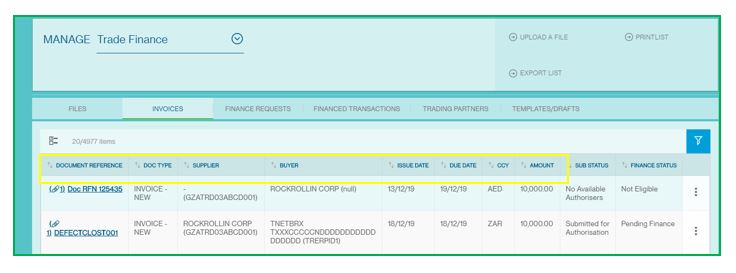
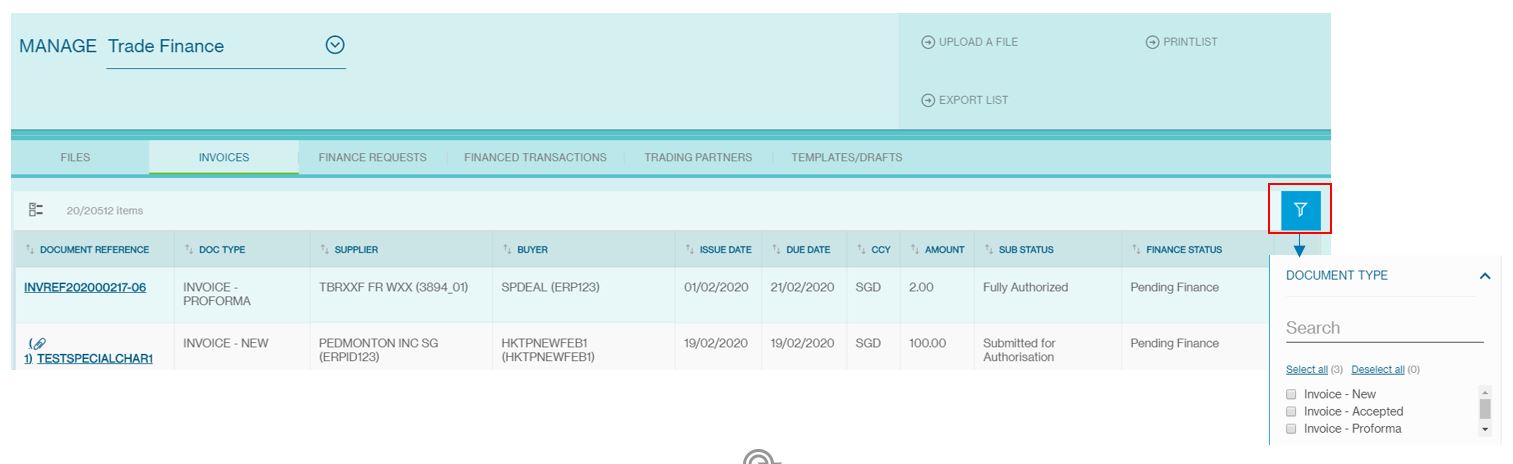
Manage Invoice
The Manage Invoice Screen will be available from the Menu > Manage > Invoices.
1Column Headers
This page displays the invoice as a table with the following headers:
- Document Reference
- Document Type
- Supplier
- Buyer
- Issue Date
- Due Date
- Amount
- Sub-Status
- Finance Status
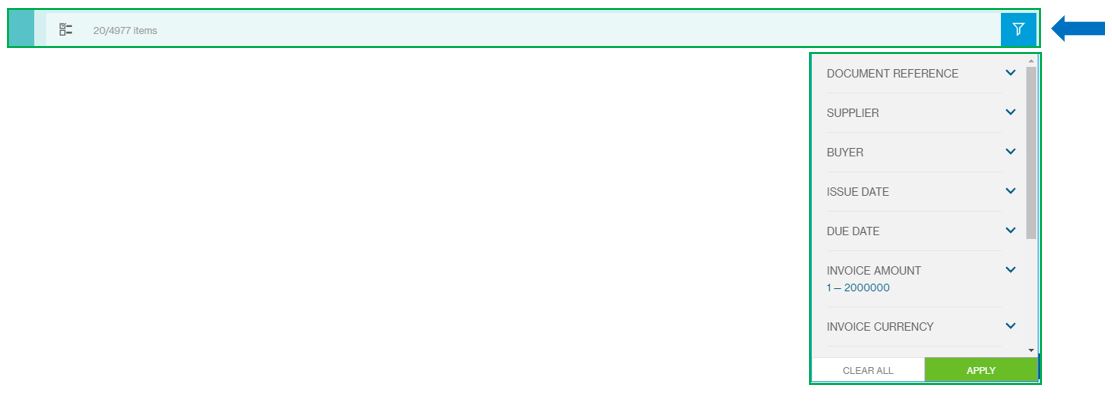
2Sort and Filter Function
You can click each of the headers predefined as sortable to sort the table data in ascending order. Clicking one more time on the sortable headers will sort the table values in descending order
3Multiple Invoice Selection
On click, the system shows the check box option for multiple selections and perform task for all the selected at once. (As image mentioned below)
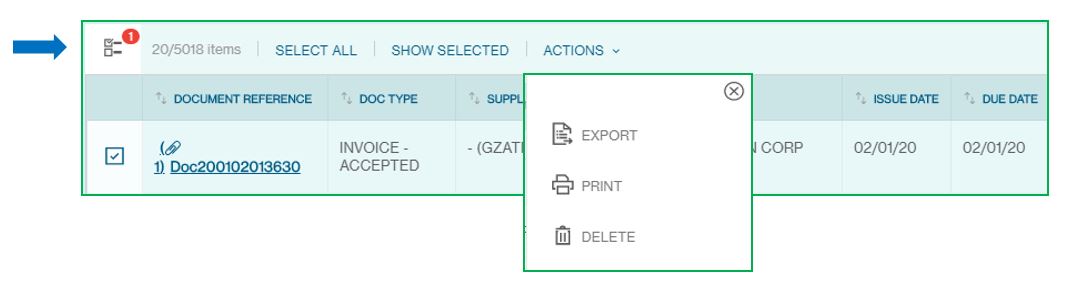
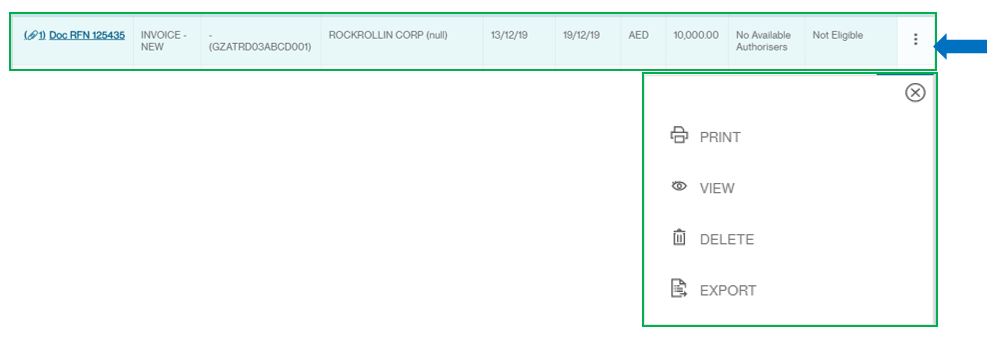
4Invoice Action Menu
This button provides you various services and functions pertaining to Invoice.
The list of actions shown in the action menu depends on the status of the invoice and the user entitlements to perform various actions.
The following are some key actions that apply to a trade under Manage Invoice:
- View
- Delete
- Export
The Print Options allows the customer to download the invoice details in PDF format. The Export Option allows the user to extract all the invoice details as CSV or Excel file. The View opens the Invoice summary page for viewing Invoice Details
5Delete Invoices
Customers can now delete invoices which fall under the following financing sub statuses –
- Not eligible
- No Available Approvers
- Submitted for Authorisation
- Rejected by Approver
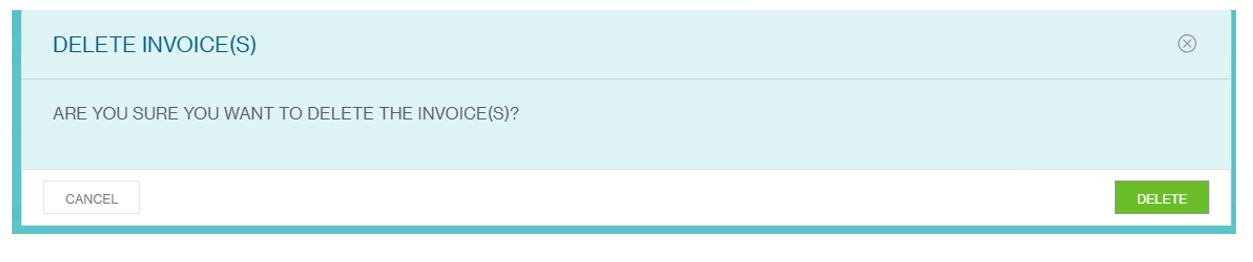
To delete invoices, go to Menu > Trade > Manage > Invoices. Find the relevant invoice and select Delete.

After clicking Delete, a confirmation window will pop up for the client’s confirmation. Once the customer confirms, The invoice will be deleted once the customer clicks Delete.
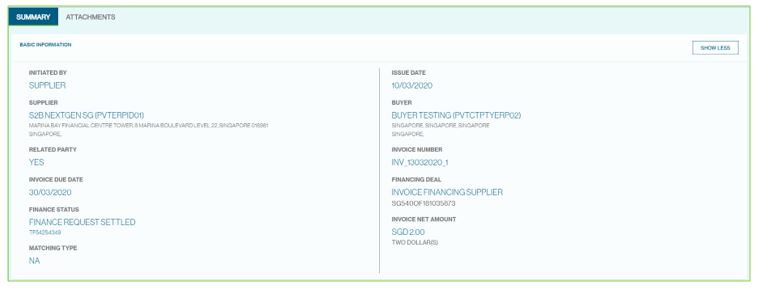
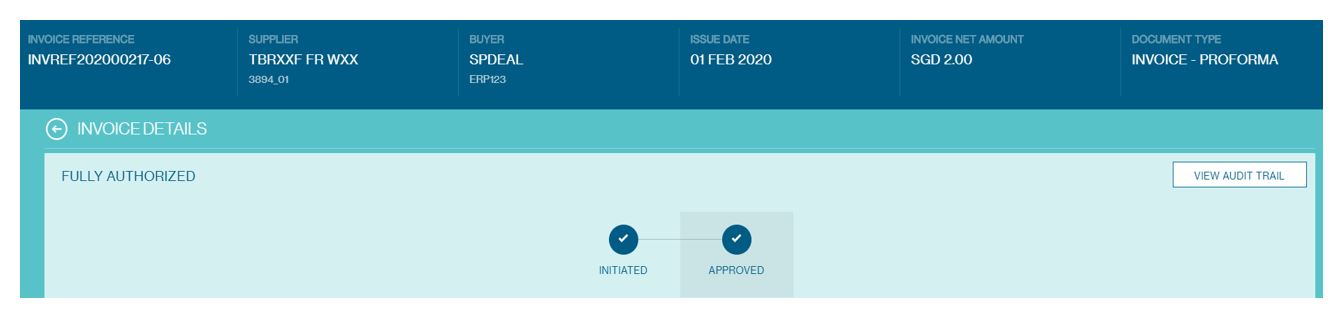
6View Invoice Summary
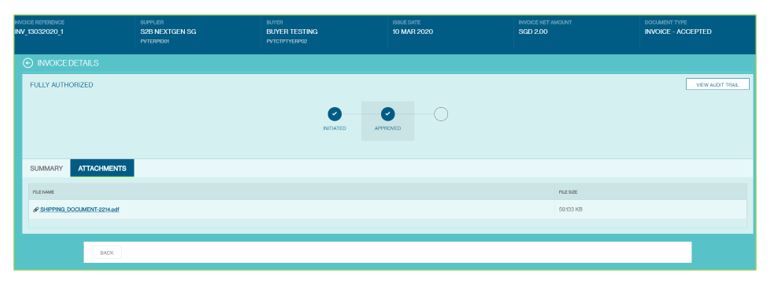
Click on each invoice and view invoice workflow and audit trail
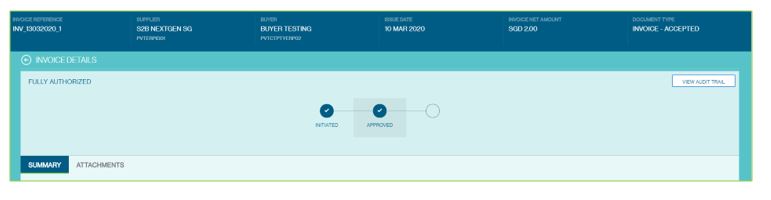
View Invoice Workflow
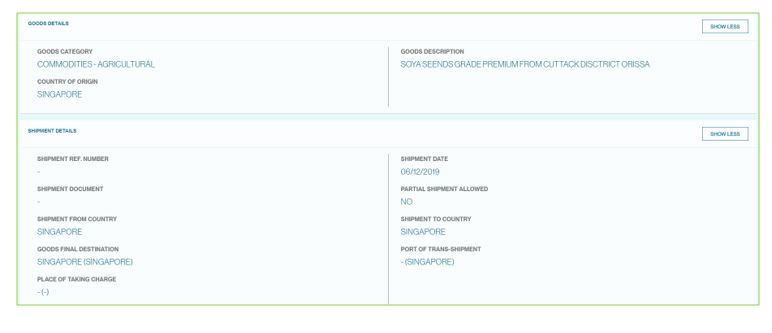
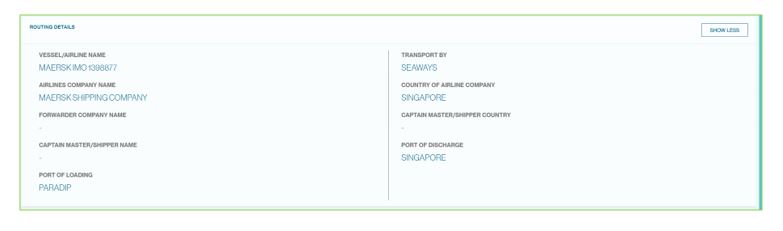
View Goods Details and Shipment Details
View Attachment
Understanding the Invoice Statuses
| Invoice Sub Status | Description |
|---|---|
| Submitted for Authorization | The invoice has been sent for authorization and pending actions from the approver |
| Partially Authorized | The invoice has been sent for authorization. There are multiple levels of approvers defined. The invoice has been authorized by one or more authorizers but not all of them |
| Fully Authorized | Invoice authorized and sent for further processing |
| Invoice Rejected | Invoice was submitted for approval and has been rejected by Authorizer |
| No Available Authorizers | The invoices have been Submitted for Authorization, but no authorizers are defined in the set ups |
| Pending Counterparty Registration | The Invoice has been submitted against a counterparty which has been created through Straight 2 Bank Nextgen and is pending registration at the back office. The invoice is "on-hold" and will be taken up for processing post registration |
| Counterparty Rejected by Bank | The Invoice has been submitted against a counterparty which has been created through Straight 2 Bank Nextgen. The counterparty was rejected during processing. |
| Rejected by Bank | The Invoice has been submitted against a counterparty which has been created through Straight 2 Bank Nextgen. The invoice failed validation. |
| Invoice Finance Status | Description |
|---|---|
| Pending Finance | The invoice has been submitted for batching to the back office. This is the first step of processing where invoices are grouped together before creating finance |
| Available for Financing | The invoice has been batched and available on S2B NextGen for creating manual finance request. The user can visit the Create Finance Request and initiate the finance request |
| Finance Requested | Customer have created finance request manually and being processed by the bank |
| Finance Request Processing | The finance request on the invoice is under process with the bank. |
| Finance Request Accepted | The finance request on the invoice has been processed and accepted |
| Finance Request Settled | The finance request on the invoice has been repaid by the customer |
| Finance Partially Settled | Part of the financed amount has been repaid. |
| Not Eligible | The invoice is not eligible for financing. The reasons for ineligibility can be found in the invoice summary page just below the Finance Status field |
| Finance Request Rejected | The finance request on the invoice has been rejected by the bank |
Batching of Invoices
NextGen supports batch-based financing. All Invoices post submission and approval are automatically grouped into batches by a pre-defined invoice attributes important among which are Customer company, Role (Buyer/Supplier), Counterparty, Product, Invoice Currency, etc. Each batch of invoices is then financed. The number of finances is equal to the number of batches created by the system based on the pre-defined criteria.
Post batching these are sent for manual or auto financing.
- Auto Financing: A client that opts for auto-finance, all invoices which are batched are automatically sent for financing and all eligible invoices are financed. The customer can view the financed transactions in the Trade -> Manage -> Financed Transaction Page
- Manual Financing: A client that opts for manual finances, post batching needs to log in, review the batches and manually initiate a finance request from the Trade -> Create -> Finance Request Screen. The number of manual finance requests to be initiated by the customer equal to the number of the unique batches of invoices.
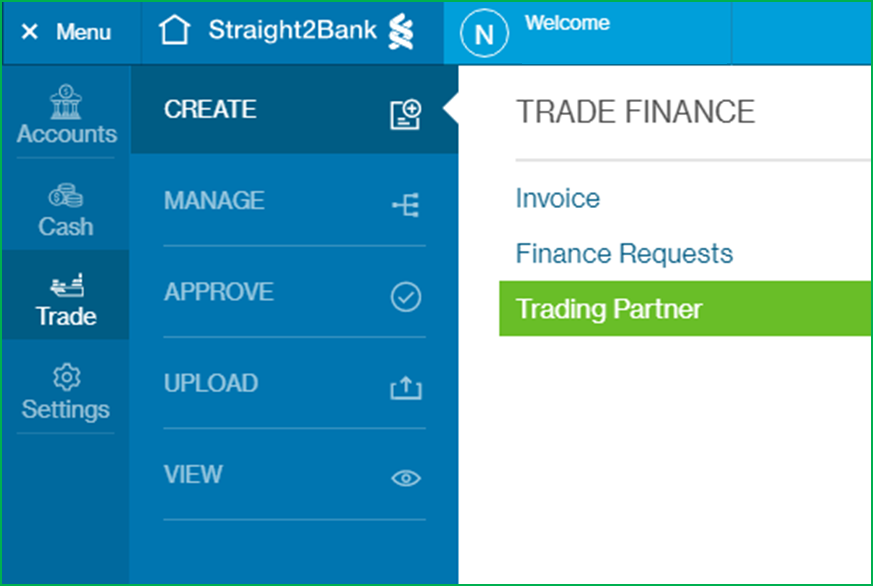
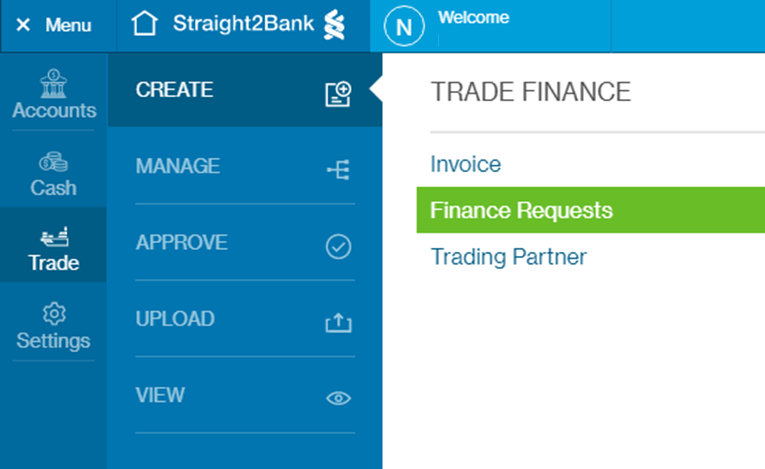
Create Trading Partner
The Create Trading Partner will be available from the Menu > Trade > Create > Trading Partner.
This option can be used to create new trading partners for an Unrestricted Deal. Post creation of the trading partner it is sent to the bank for processing. Once, the registration of the Trading Partner is completed, the status changes to Fully Authorized and the customer can submit invoices against these trading partners and get finance
The customer can also create invoices when he has created the Trading Partner and it is being processed. All such invoices are kept on hold by S2B NextGen and submitted for finance only when the Trading Partner registration is complete.
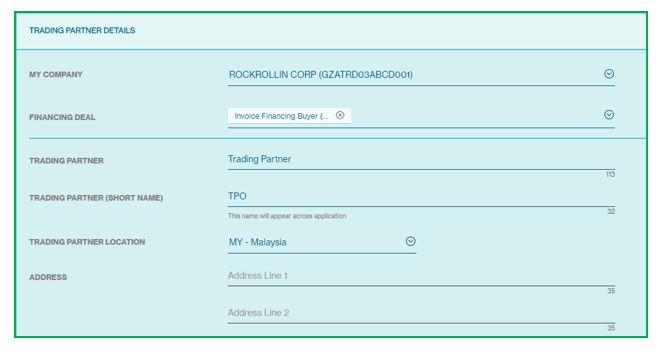
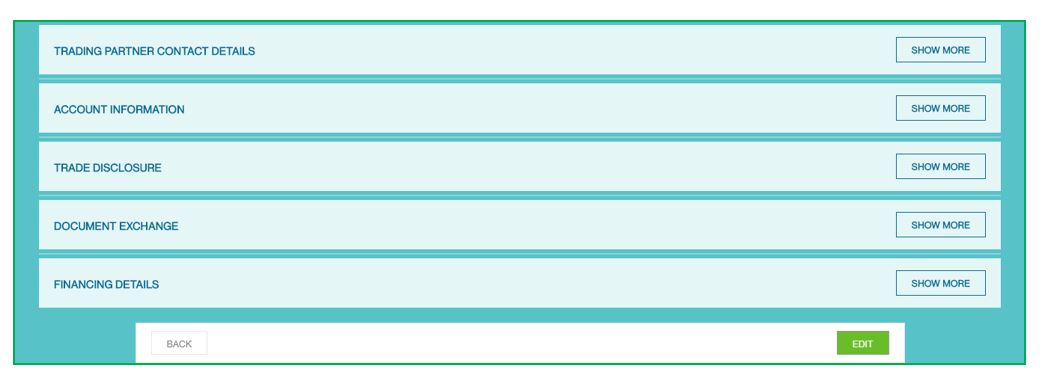
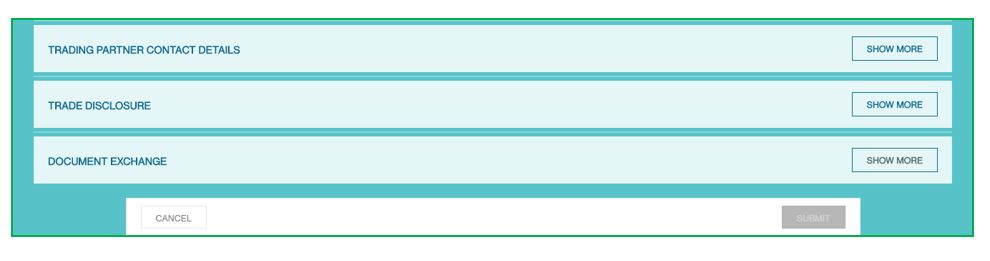
This page displays the Trading Partner as a form with the following headers:
- Trading Partner Details
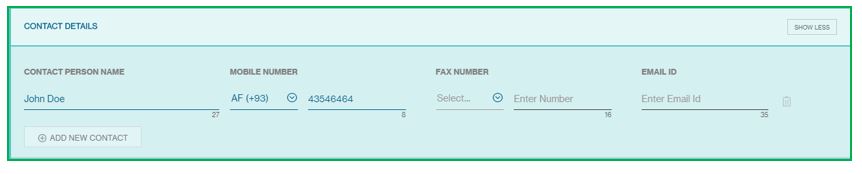
- Contact Details
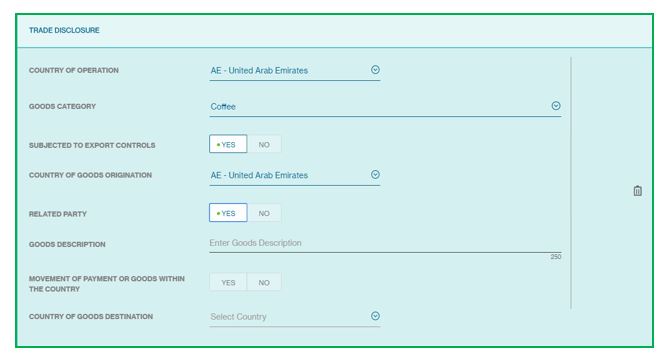
- Trade Disclosure
- Document Exchange
On this page, all inputs are mandatory unless stated as optional. Fill in the transaction's details including:
Trading Partner Details
Allow to enter the trading partner details. Some fields are auto-populated. The ERPID which is entered can be used in the invoice file to refer to the Trading Partner.
Contact Details
Allow to enter the contact details.
Trade Disclosure
Allow to enter the Trade Disclosure. Some fields are auto-populated.
Document Exchange
Fields are auto-populated.

At the end of the trading partner screen, you will have various options pertaining to the trading partner. The options available are:

Cancel
Allows you to cancel the transaction instruction creation and get back to the previous page.
Submit
Click to submit the Details and can be manage from the Manage Trading Partner option
Manage Trading Partner
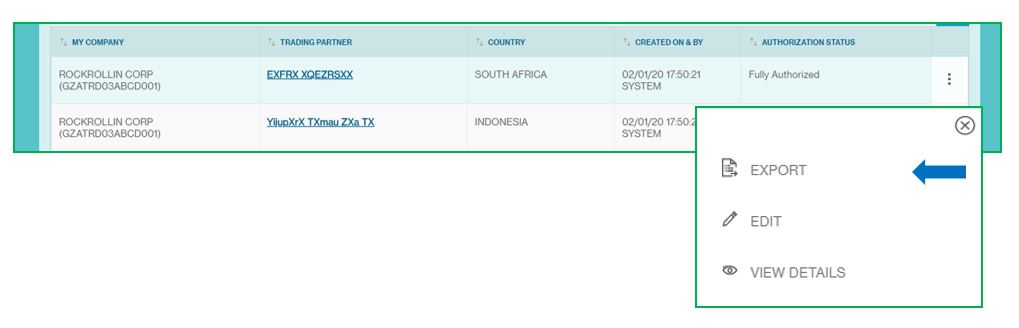
This screen lists all Trading Partners registered by the customer with the bank.
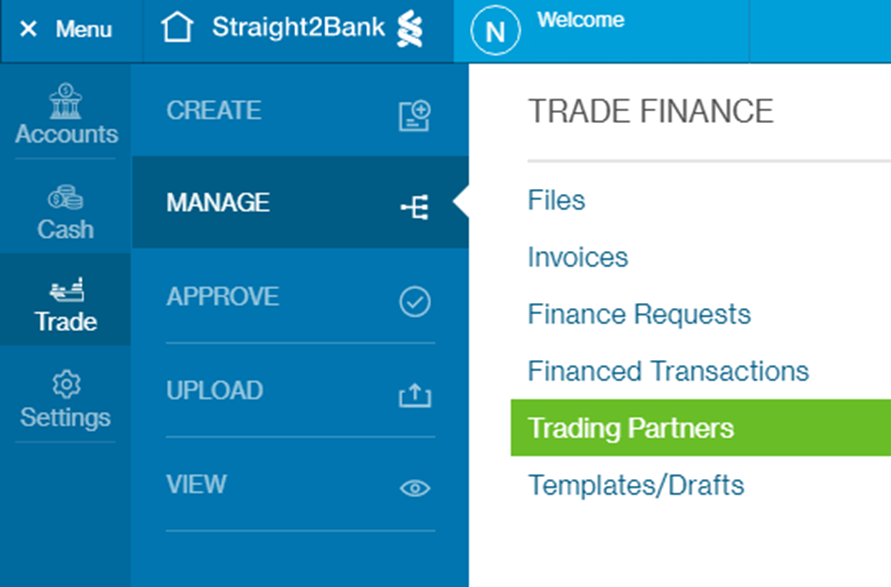
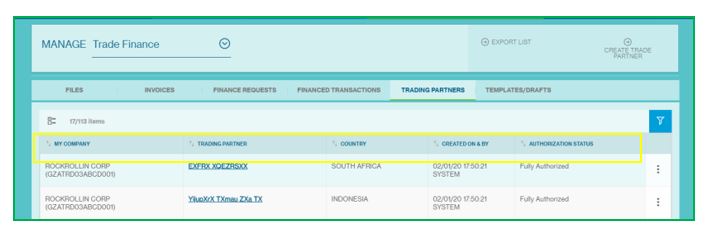
The Manage Trading Partner Screen will be available from the Menu > Trade > Manage > Trading Partner.
1Column Headers
This page displays the Finance Request as a table with the following headers:
- My Company
- Trading Partner
- Country
- Created ON &BY
- Authorization Status
2Sort and Filter Function
You can click each of the headers predefined as sortable to sort the table data in ascending order. Clicking one more time on the sortable headers will sort the table values in descending order

3Multiple Trading Partner Selection
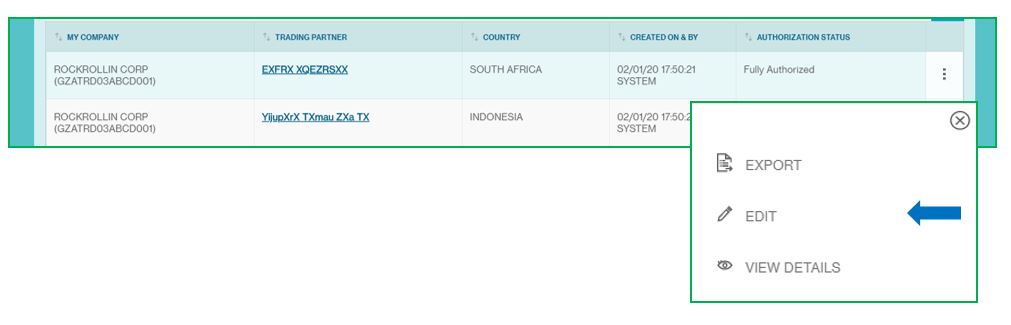
On click, the system shows the check box option for multiple selections and perform task for all the selection at once. (As image mentioned below)
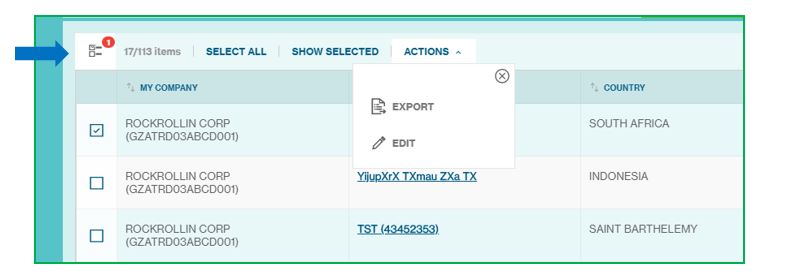
4Trading Partner Action Menu
This button provides you various services and functions pertaining to trading partner.
The list of actions shown in the action menu depends on the status of the trading partner and the user entitlements to perform various actions.
The following are some key actions that apply to a trade under create trading partner:
- Export
- Edit
- View Details
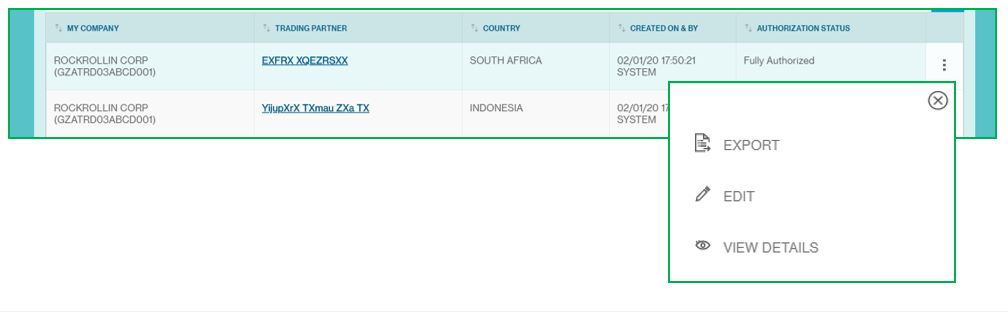
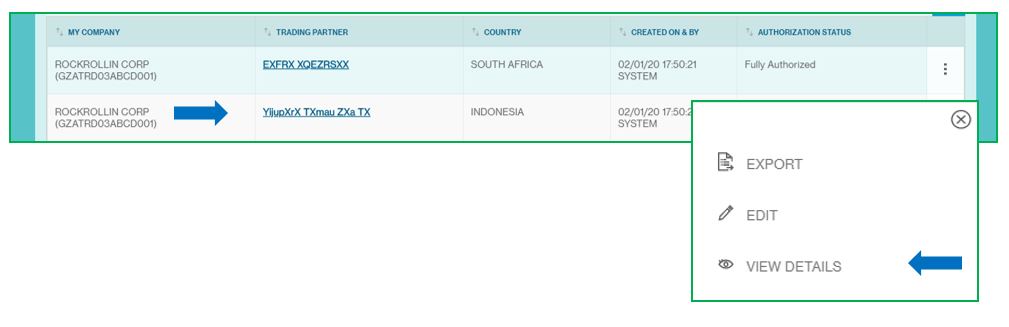
5Trading Partner Details
Click on the Trading partner or click on the view button from the action menu
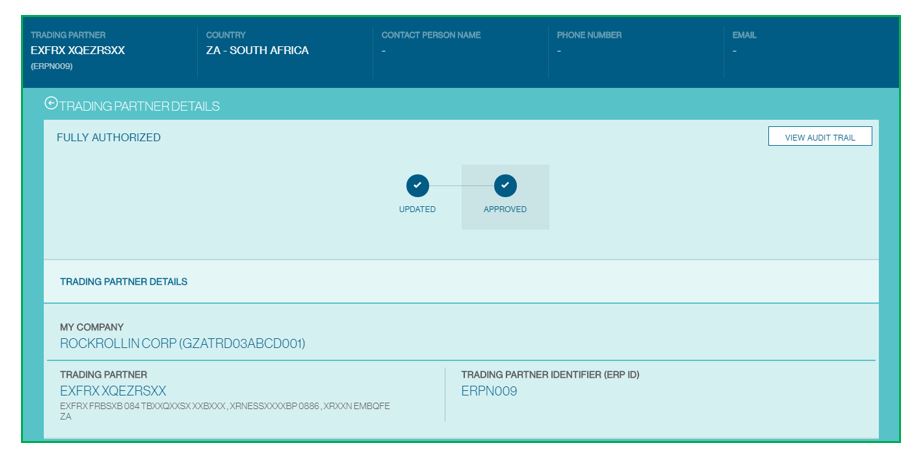
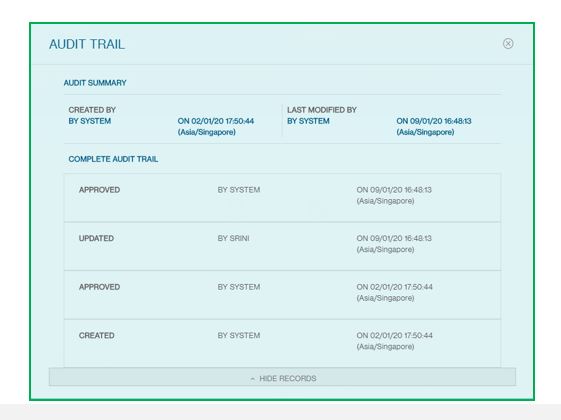
View audit trail information
6View Other Details
View all the information of the trading partner
Click on the edit button to edit the trading partner details or edit from the action menu button
7Export the Trade Partner Details
Click on the export button to export the details in CSV format
8Edit the Trade Partner Details
Click on the edit button to edit the details.
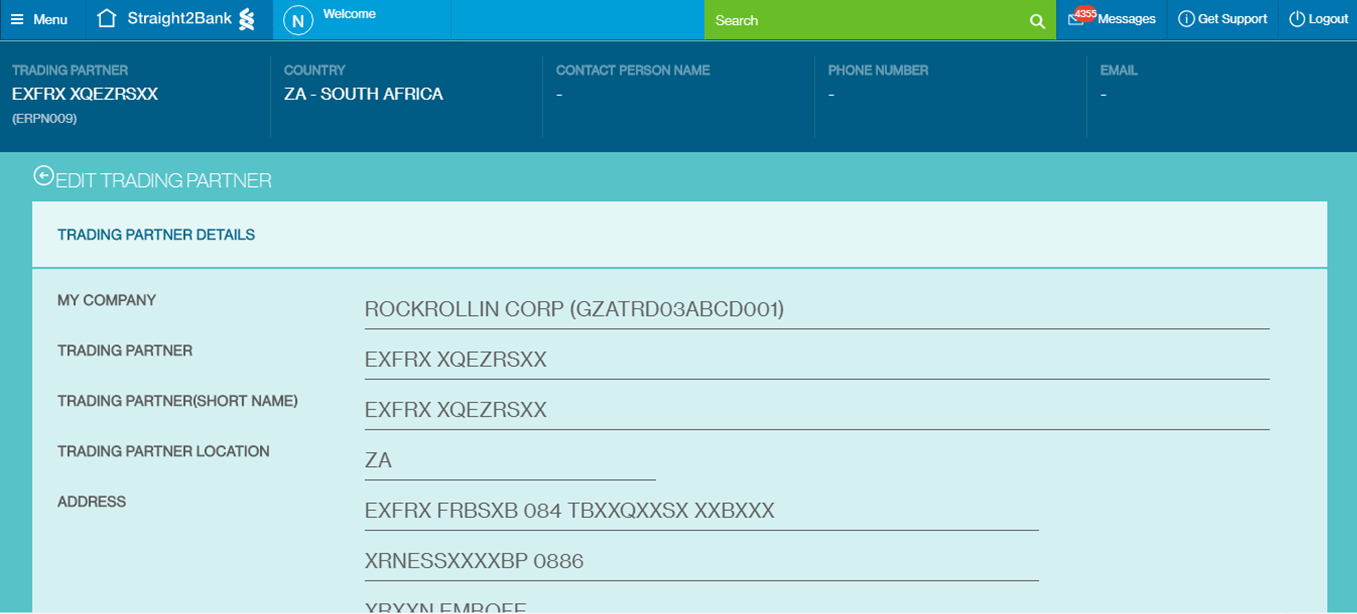
Users can edit the ERP Id, Contact Details and Trade Disclosure Sections.
To make changes, click on the submit button
Understanding Trading Partner Authorisation Statuses
| Trading Partner Status | Description |
|---|---|
| Fully Authorized | The Trading partner is registered with the bank. Invoices against such Trading Partners can be uploaded and financed |
| Pending Registration by Bank | Request for registering this unrestricted Trading Partner has been created through S2B NextGen and under process with Bank. If invoices are uploaded against such Trading Partners they will be kept on hold and submitted for further processing post registration of the Trading Partner |
| Rejected by Bank | Request for registering this unrestricted Trading Partner but rejected by Bank |
Create Finance Request
All clients who are set up to raise finance requests manually need to use this option.
All documents post submission are validated and grouped together into batches. Post batching, all eligible batch of invoices can be viewed in the Create Finance Request List Page. Customers can review the batches and initiate a request for finance from this screen.
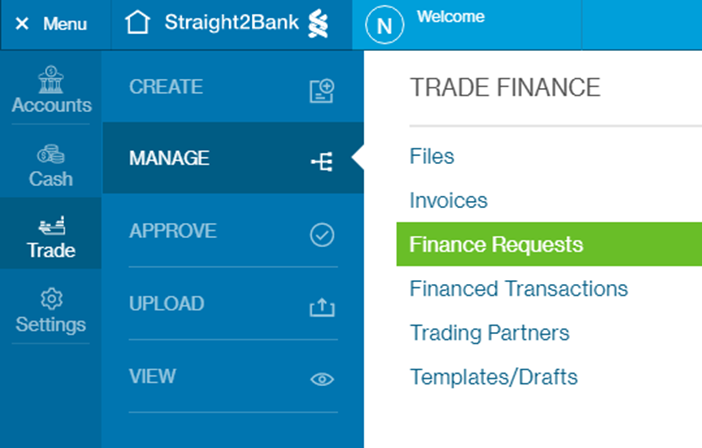
The Create Finance Request Screen will be available from the Menu > Trade > Create > Finance Requests.
1Column Headers
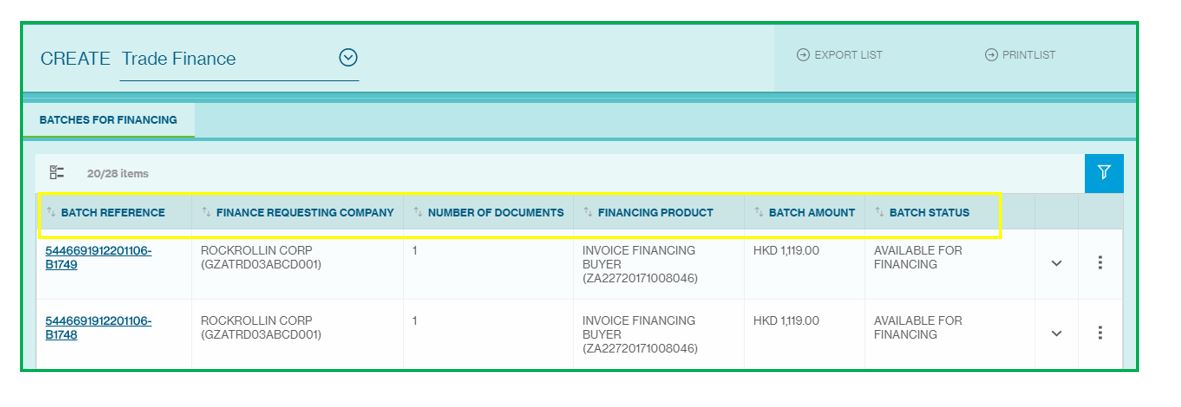
This page displays the Finance Request as a table with the following headers:
- Batch Reference
- Finance Requesting Company
- Number of Document
- Finance Product
- Batch Amount
- Batch Status
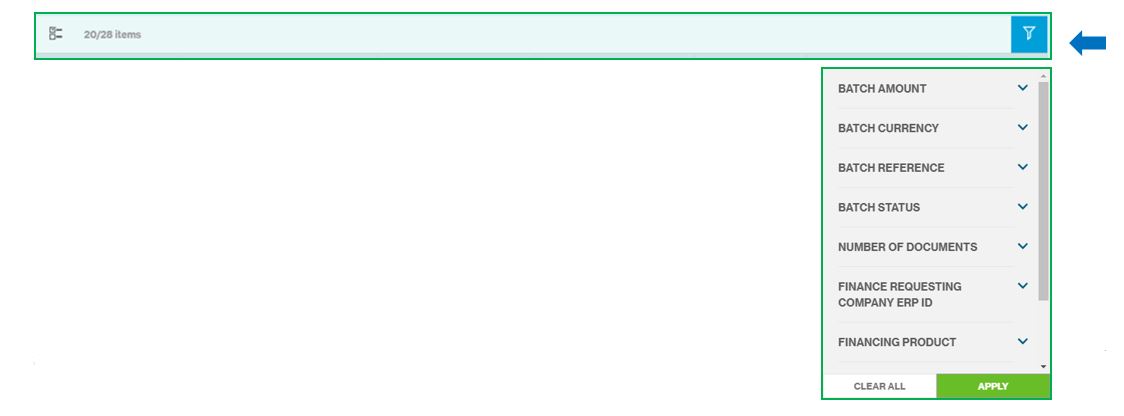
2Sort and Filter Function
You can click each of the headers predefined as sortable to sort the table data in ascending order. Clicking one more time on the sortable headers will sort the table values in descending order
3Create Multiple Finance Requests
On click, the system shows the check box option for multiple selections and perform task for all the selection at once. (As image mentioned below)

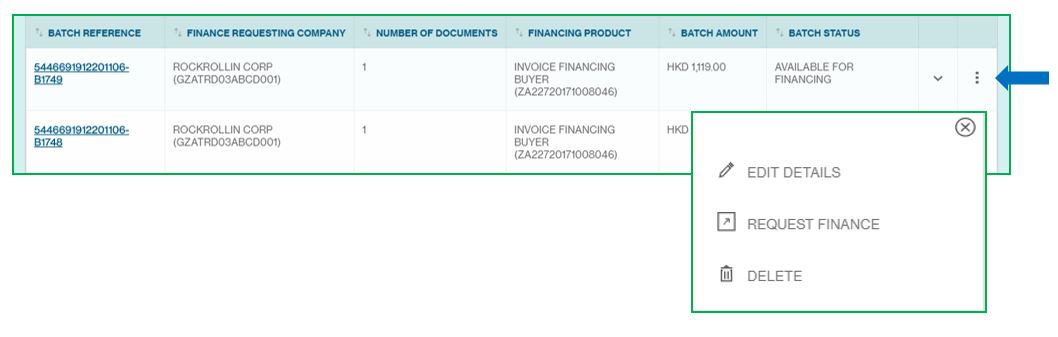
4Menu Action
This button provides you various services and functions pertaining to Invoice.
The following are some key actions that apply to a trade under create finance request:
- Edit Details
- Request Finance
- Delete
5Edit Details
Click on the edit details button. This button provides option to edit and create a finance request
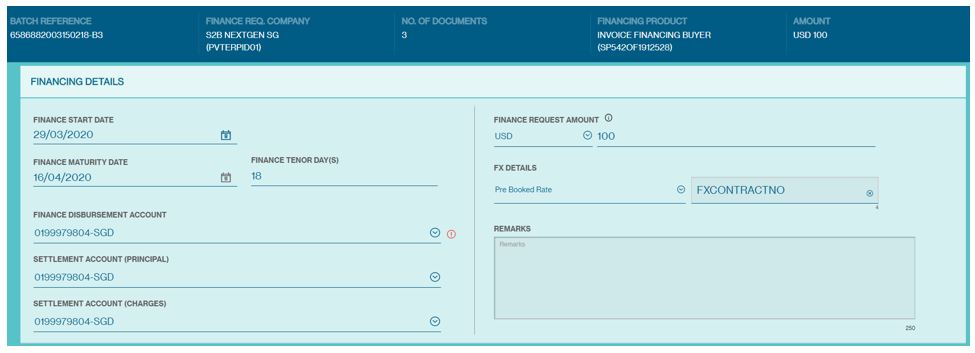
The following are some field which can be edited in the invoice:
- Finance Start Date
- Finance Maturity Date
- Finance Tenor Days
- Choose Finance Disbursement Account
- Choose Settlement Account (Principal)
- Choose Settlement Account (Charges)
- Finance Request Amount and Currency
- FX Details (appears only when applicable)
- FX Contract Number (appears only when applicable)
- Remarks
- Client can modify the Finance Start Date to a future date for future dated finance requests.
- All accounts pre-registered by the customer with the bank previously are retrieved and displayed as a dropdown in the account fields. Customer can choose these from the drop down
- In case of Import Invoice Finance, the Finance Disbursement Account is the account of the Supplier
- The currency is driven by finance currency defined on the deal:
- If finance currency on the deal is Document Currency, it is read-only and populated with the invoice currency
- If finance currency on the deal is Preferred Currency, it is non-editable and populated with the preferred currency set up on the deal
- If finance currency on the deal is Any Currency, user can choose from a drop-down list
- In case, the finance request currency and the account currency are not the same, the user is prompted to provide FX Details – FX Rate (Bank Rate or Pre-booked Rate) and in case of Pre-booked, the user can provide the FX Contract Number
- Any specific instruction for processing which client needs to communicate to bank, e.g. instruction to add a new bank account for a newly created counterparty, etc can be done by adding a suitable remark
Click on the request finance button.

6Request Finance from Action button
Click on the Request Finance Button
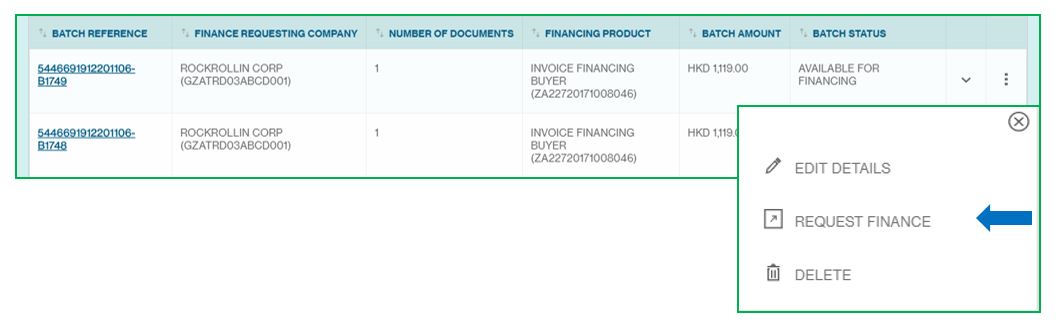
An alert box displays click on the request finance button


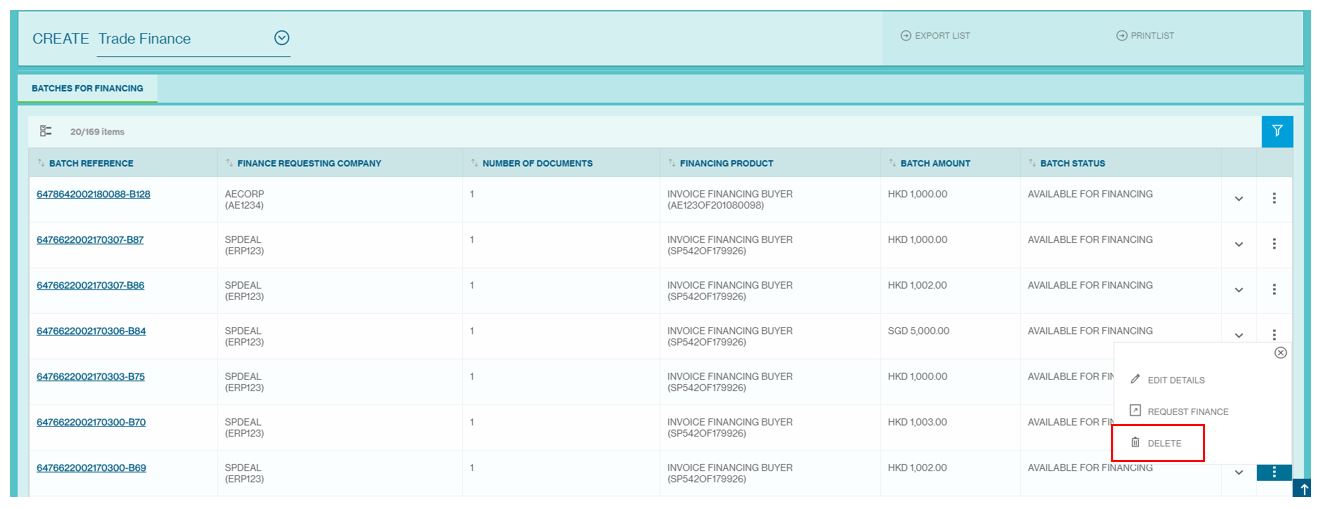
7Delete Invoice Batches
Clients can now delete invoice batches – when they delete an invoice batch, the underlying invoices will be deleted too.
Go to Menu > Trade > Create > Finance Requests and click the 3 dots to show the options below.
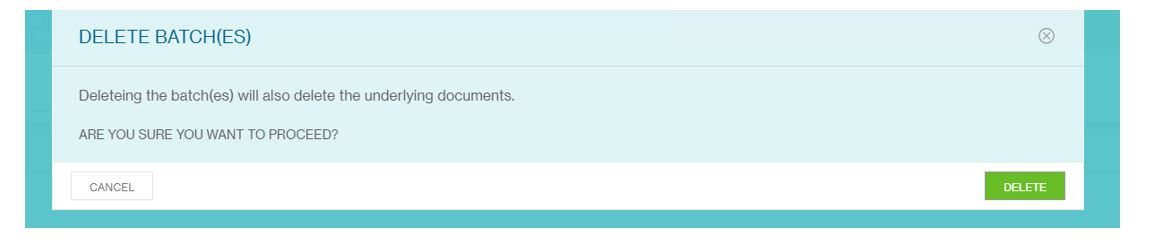
When clients click delete, the confirmation window will show below. Click delete to confirm and the batch, together with the underlying invoices will be deleted.
The customer can upload the invoices again and request for finance.
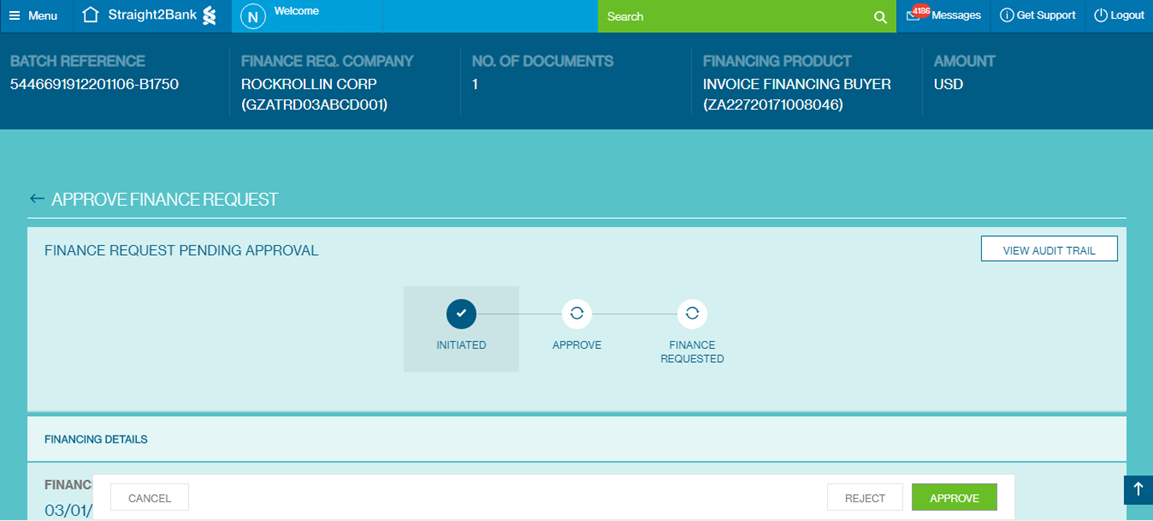
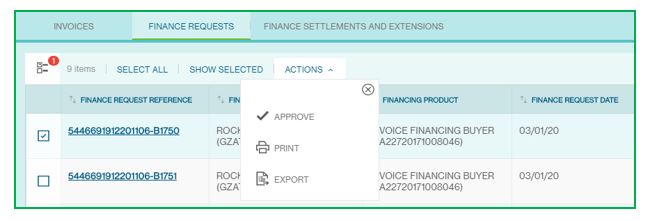
Approve Finance Request
1Navigate to Finance Request
Finance Request that are pending approval will be available from the Menu > Trade > Approve > Finance Request

This screen has various data fields.
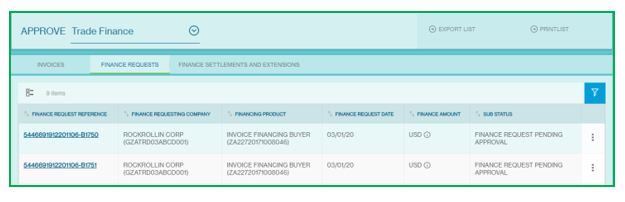
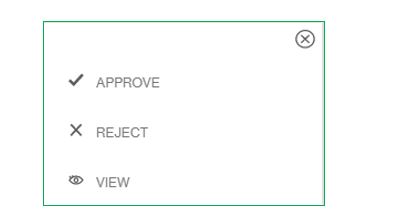
Users can approve/reject either by doing a multi select on this list page (approve/reject multiple items), using the action menu on each line item (the 3 dots) or by clicking on each item going into the detail and using option at the bottom of the page
Clicking on Finance Request Reference, new page will provide summary of the finance request that have been submitted pending approval.
Click on action menu button of selected invoice. Approve option will be available from the menu.
Before approving, check all the finance request information, then click on the reject or approve.
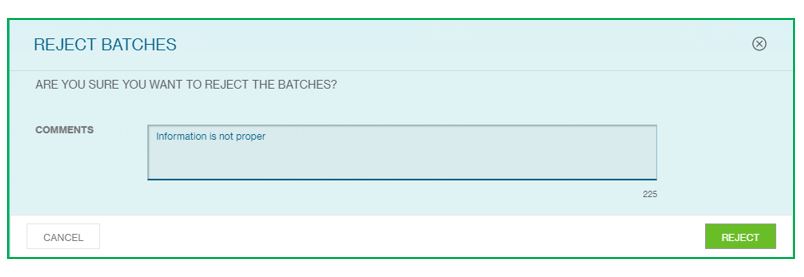
2Reject Finance Request
With an “Approver” profile, you will also be able to reject Finance Request on Straight2Bank. By doing this, selected request will be rejected from any further authorization related function (i.e.) approval or rejection by others, and the status of the finance request instruction will appear as “Rejected by Approver”.
Finance Request that are pending approval will be available from the Menu > Trade > Approve > Finance Request (as below screen).

Click on action menu button of selected finance request.
Clicking on Batch Number, new page will provide summary of the finance request that have been submitted pending approval.
Reject option will be available at the bottom of the page
Additional Reject Comments must be provided, and this will be available to the Initiator or any other user who has access to view the finance request for further action such as edit and re-submit or delete the invoice.
3Approve Finance Request
Approve Finance Request List Screen
Finance Request that are pending approval will be available on the Approve Finance Request List Screen - from the Menu > Trade > Approve > Finance Request.
You can approve selected invoice by clicking Action Menu from the Approve Finance Request List Page at the end of each line item.
Multi-Select
Click on Multi-Select button and select multiple finance requests and approve (tick check box).
Customers can also go into the details of each finance request by clicking on the hyperlink and use the approve button at the end of the page.
Turn on the Vasco Token and enter PIN
Turn on the Vasco token by pressing the on button.
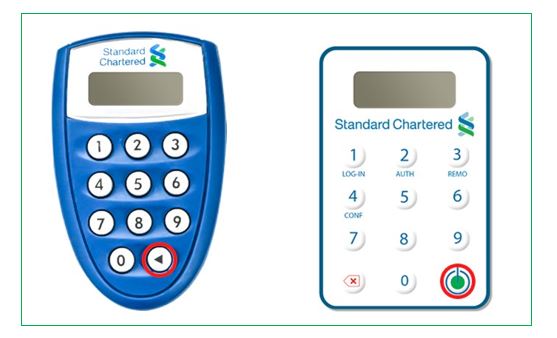
Proceed to enter your personalized PIN (setup during Token activation) to activate the Token.
Display “APPLI _”
The screen will display “APPLI _” upon successful login.
Enter the number “2”
Enter the number “2” on the token keypad for Transaction Authorization - “APPLI 2”.
Input the “Challenge Code”
You will be prompted to key in a set of numbers on the Token. Input the “Challenge Code” response from the Straight2Bank into the Token shown as below.
Enter the “Response Code”
The Token will generate and display a new set of numbers as the “Response Code”. Enter this set of numbers in the “Enter Code from Security” fields on Straight2Bank screen and click Approve
Post approval the finance request status is changed to Finance Requested and is taken up for processing.
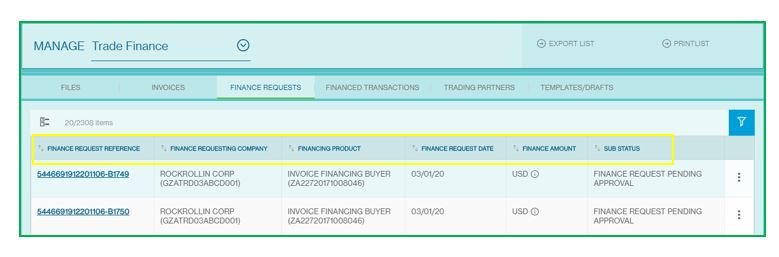
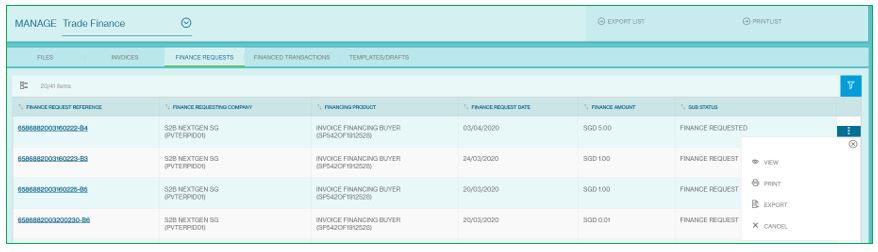
Manage Finance Request
All finance requests raised manually can be viewed on this screen. The Manage Finance Request Screen will be available from the Menu > Trade > Manage > Finance Requests.
1Column Headers
This page displays the Finance Request as a table with the following headers:
- Finance Request Reference
- Finance Requesting Company
- Financing Product
- Finance Request Date
- Finance Amount
- Sub-Status
2Sort and Filter Function
You can click each of the headers predefined as sortable to sort the table data in ascending order. Clicking one more time on the sortable headers will sort the table values in descending order
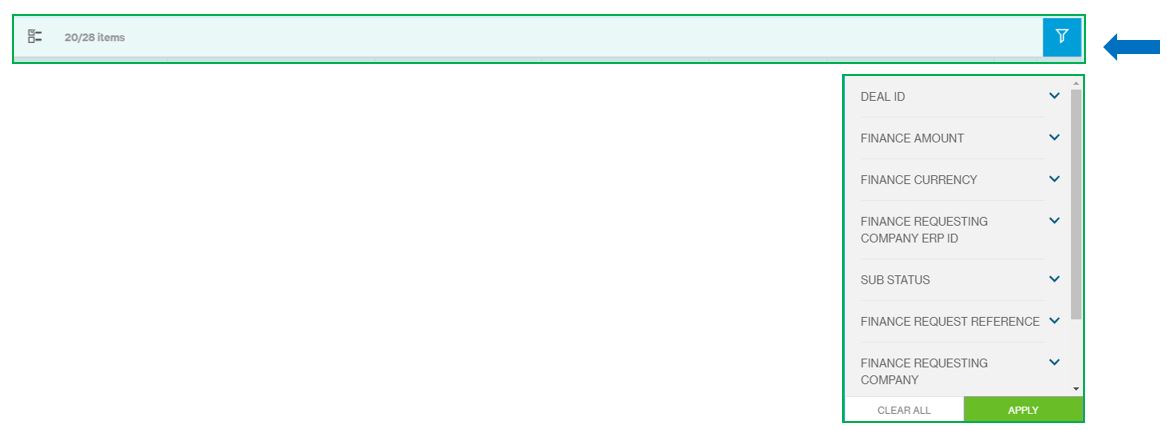
3Multiple Finance Request Selection
On click, the system shows the check box option for multiple selections and perform task for all the selection at once. (As image mentioned below)
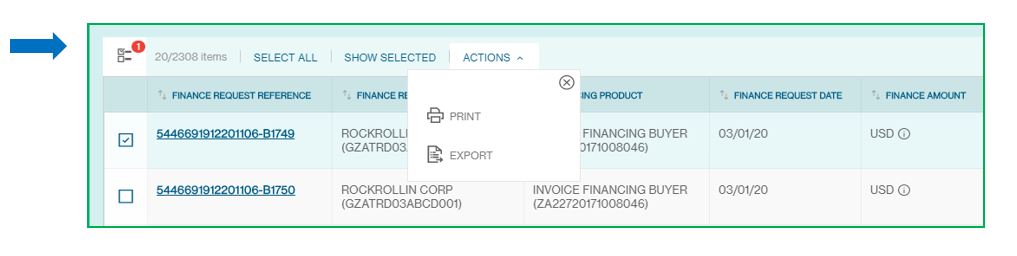
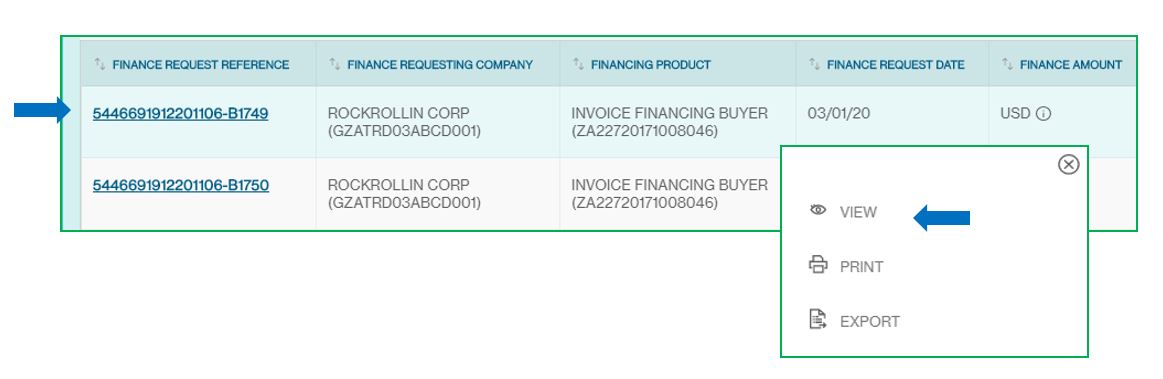
4Finance Request Menu Action
This button provides you various services and functions pertaining to Invoice.
The list of actions shown in the action menu depends on the status of the invoice and the user entitlements to perform various actions.
The following are some key actions that apply to a trade under create finance request:
- View
- Export
- Cancel

5Finance Request Details
Click on the Finance Request Reference or click on the view button from the action menu
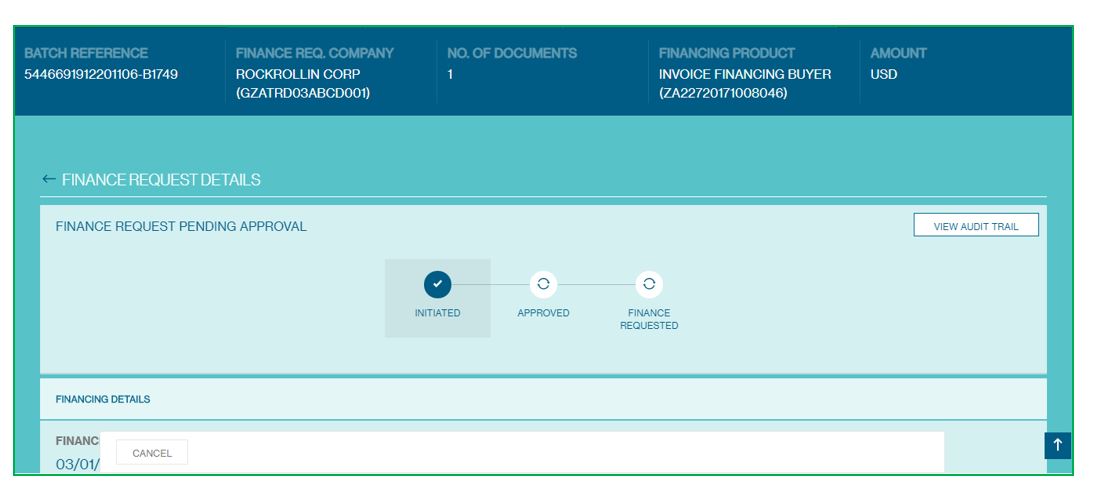
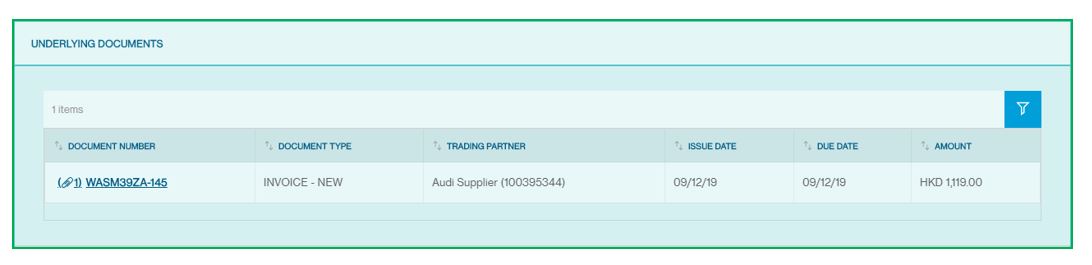
View all the underlying invoice information
6View Audit Trail
Click on the Finance Request Reference or click on the view button from the action menu. And then click on the view audit trail button

7Cancel Finance Request
This option is available only for Future Dated Finance Requests, i.e., when the Finance Request Date is in the future
Post clicking on Cancel, the user is asked for Cancellation Reason. Post this a cancellation request is initiated.
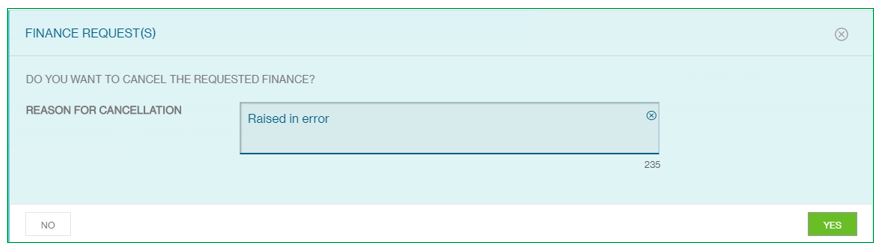
Once cancelled, the Batch goes back to the status – “Available for Financing” and is available in the Create Finance Request Page for the customer to initiate finance request again.
Understanding Finance Request Statuses
| Invoice Sub Status | Description |
|---|---|
| Available For Financing | Batch of invoices is available for the customer to create a finance request |
| Finance Request Pending Approval | Manual Finance Request has been Submitted for Authorization and pending action from approver |
| Finance Request Accepted | Manual Finance Request Processed by bank and finance granted |
| Finance Request Rejected by Approver | Manual Finance Request has been Submitted for Authorization and rejected by approver |
| No Eligible Approvers | The finance request have been Submitted for Authorization but no authorizers are defined in the set ups |
| Finance Cancellation Initiated | Cancellation request on a finance request which is future dated has been initiated |
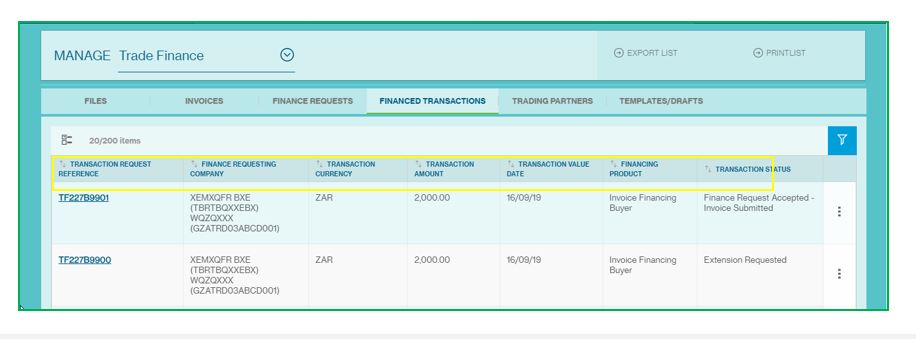
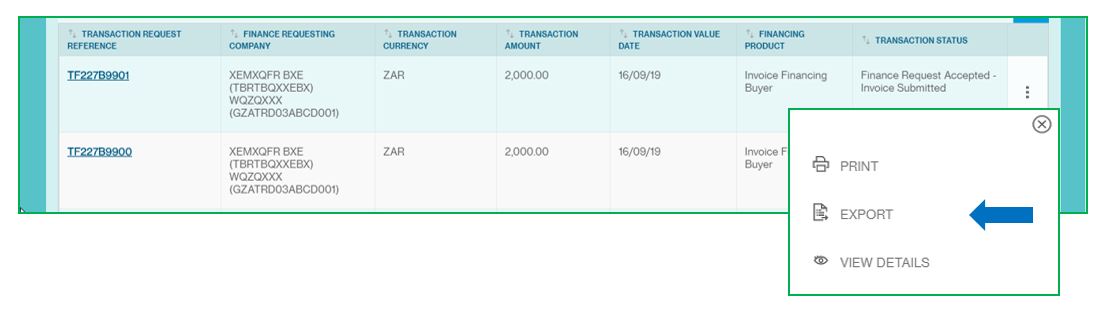
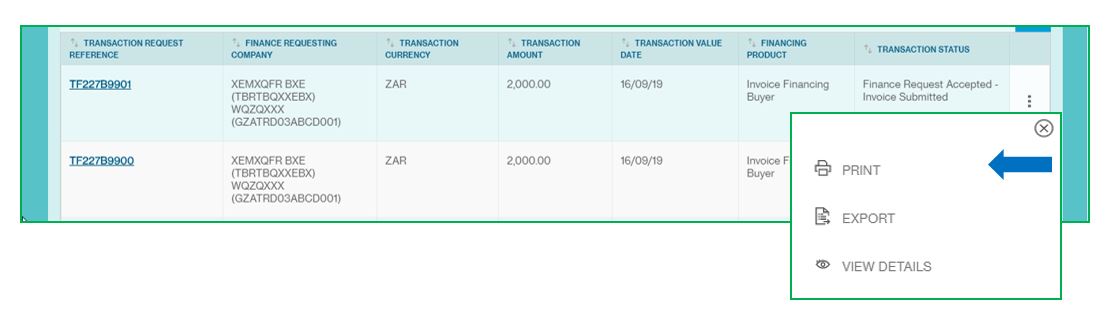
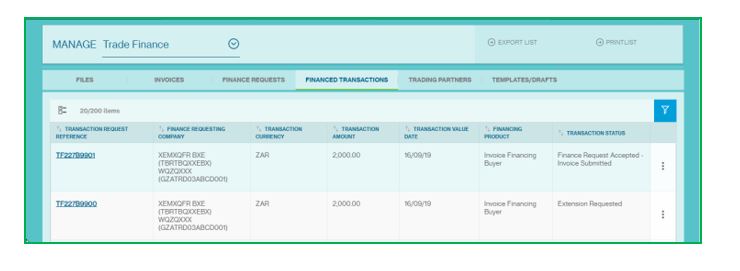
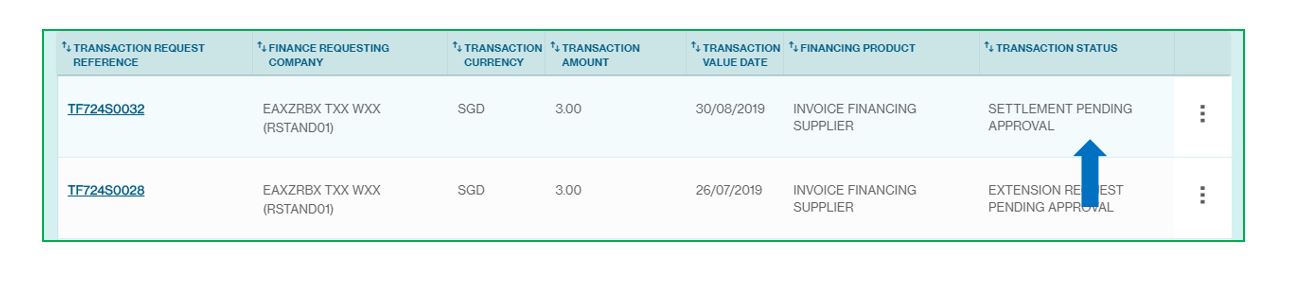
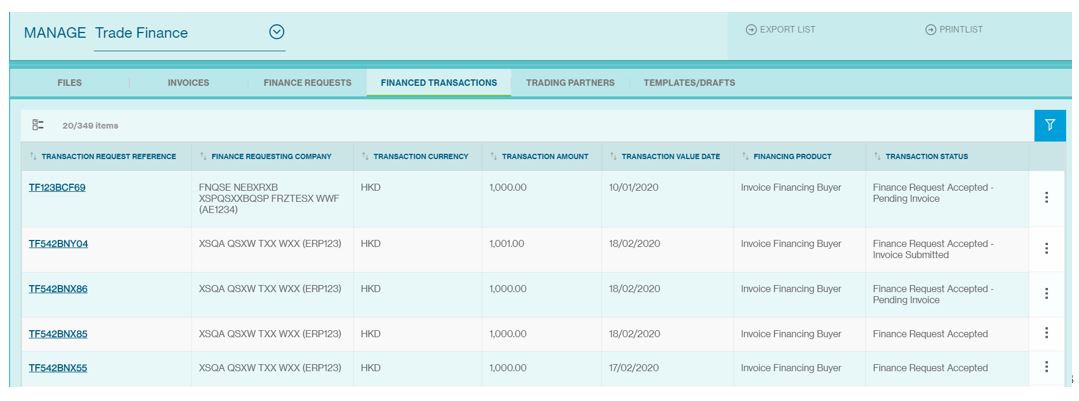
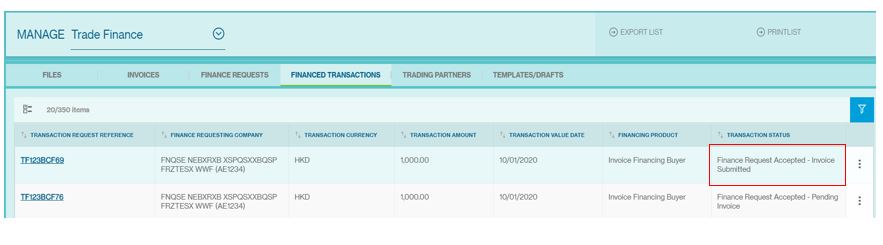
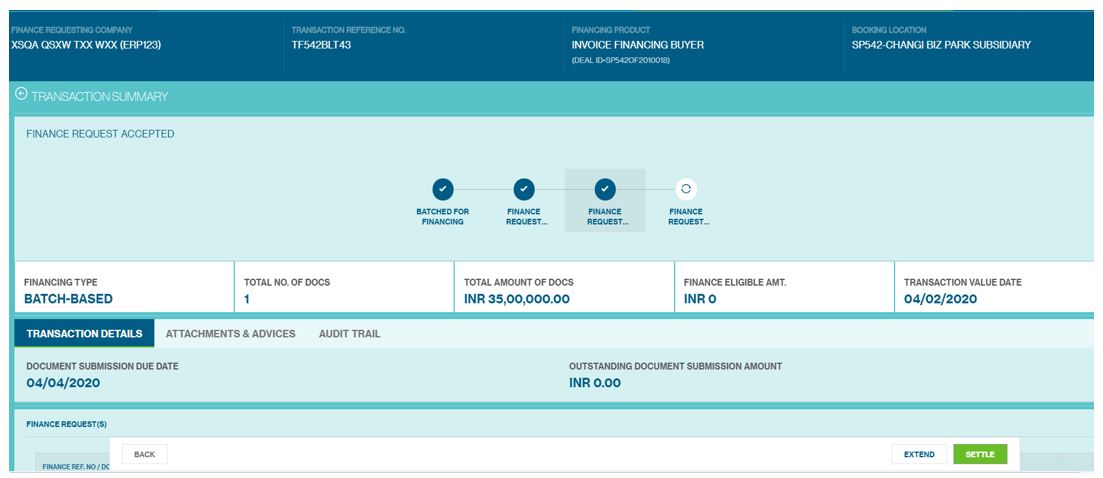
Manage Financed Transactions
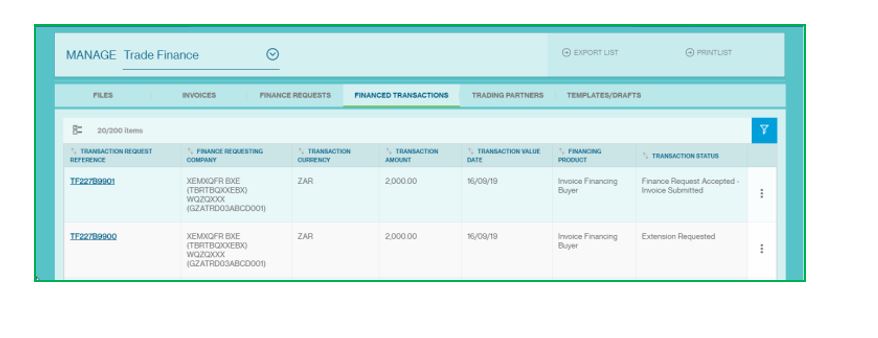
All finances can be viewed on this screen. The entire life cycle of the finance – disbursement, amendment, settlement, etc can be tracked on this screen. The Manage Financed Transaction Screen will be available from the Menu > Trade > Manage > Financed Transaction.

1Column Headers
This page displays the Financed Transaction as a table with the following headers:
- Transaction request reference
- Finance request company
- Transaction currency
- Transaction amount
- Transaction value date
- Financing product
- Transaction Status
2Sort and Filter Function
You can click each of the headers predefined as sortable to sort the table data in ascending order. Clicking one more time on the sortable headers will sort the table values in descending order
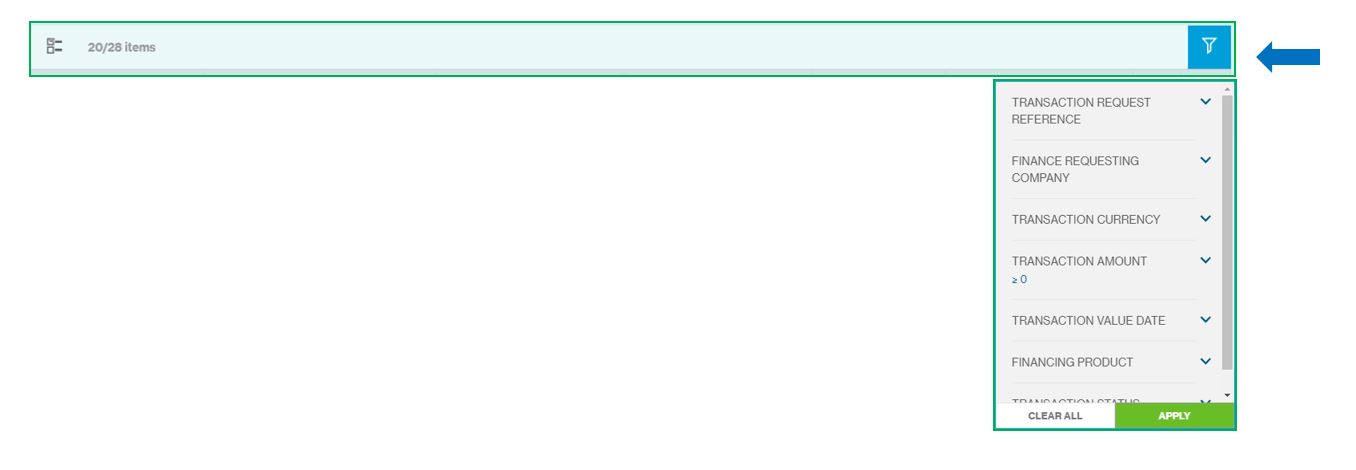
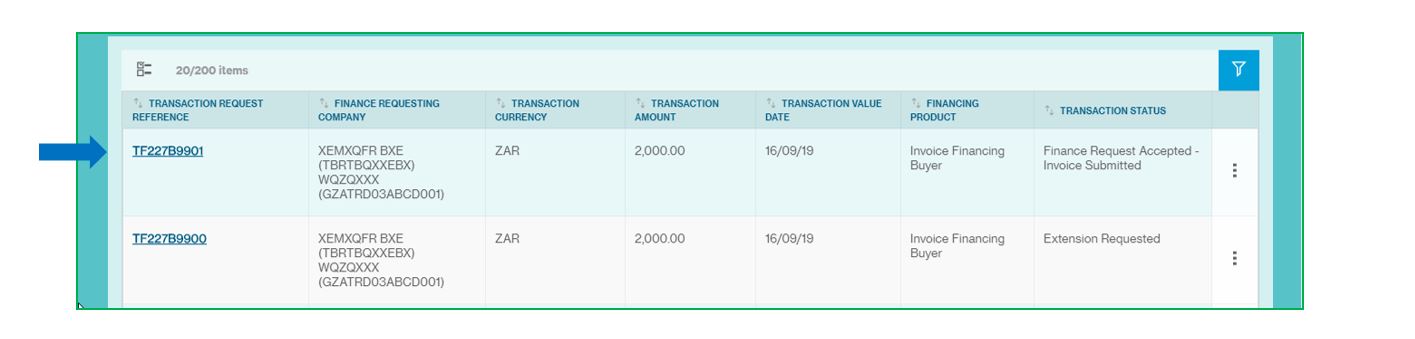
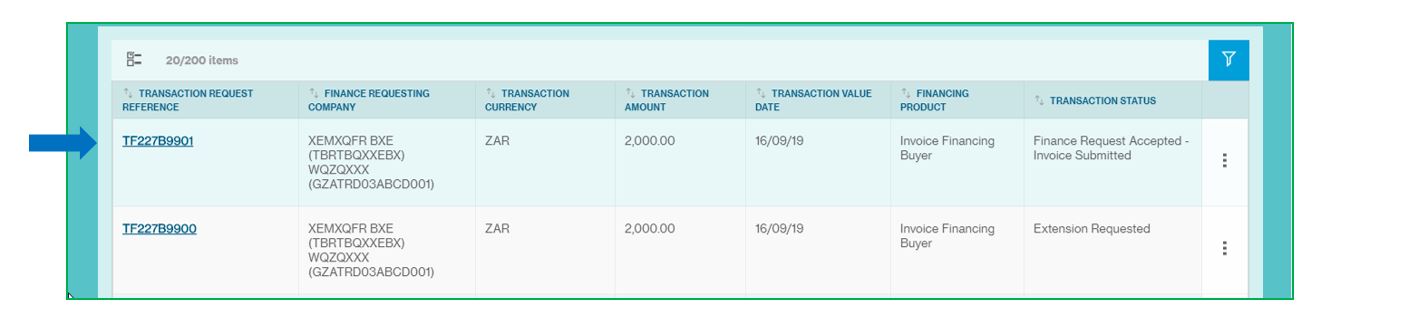
3Multiple Transaction Selection
On click, the system shows the check box option for multiple selections and perform task for all the selection at once. (As image mentioned below)

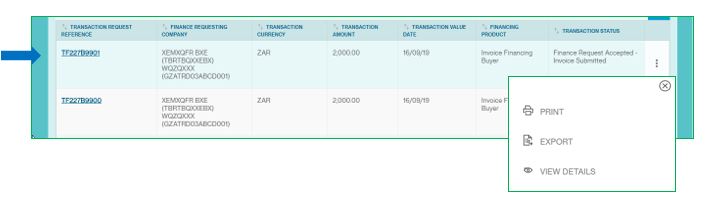
4Transaction Action Menu
This button provides you various services and functions pertaining to file.
The following are some key actions that apply to a Finance Transaction:
- Export
- View Details
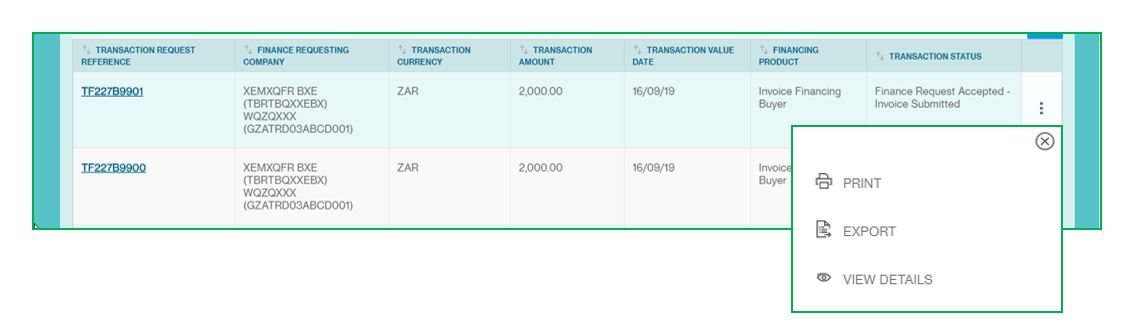
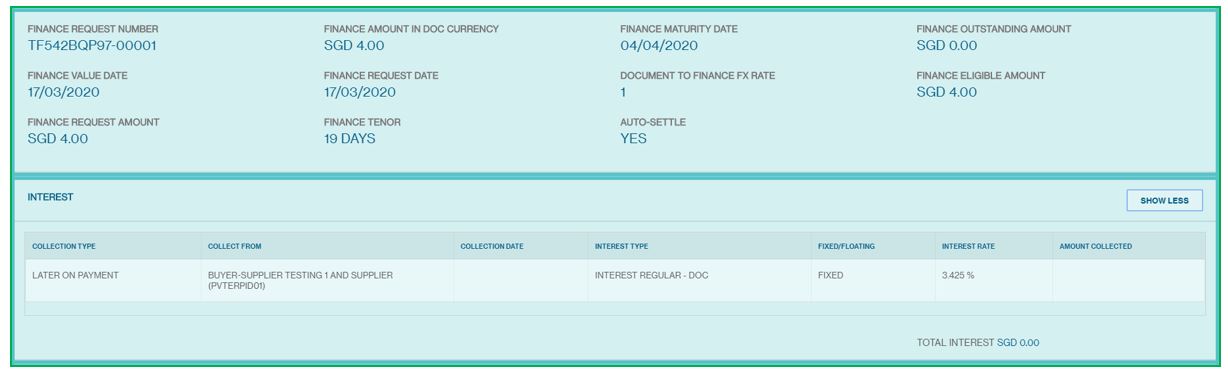
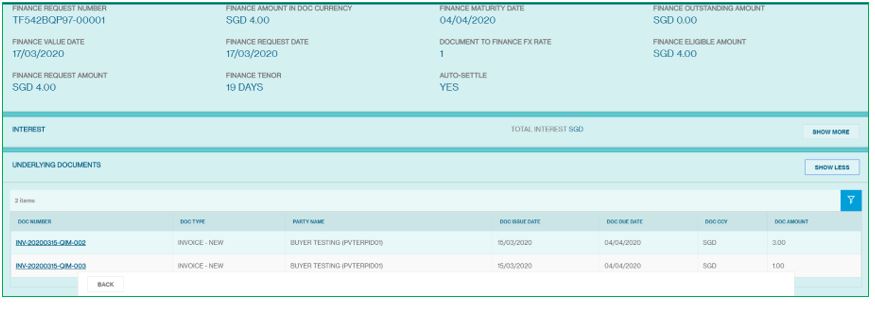
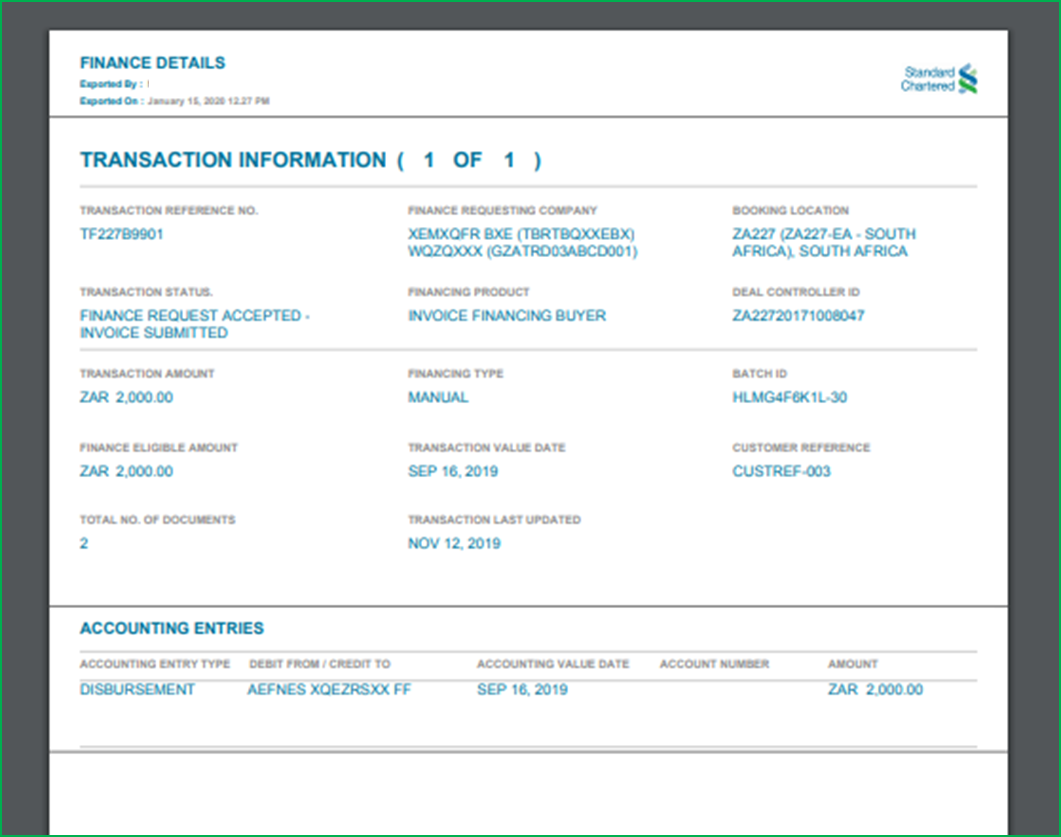
5View Finance Transaction Details
Click on the File or click on the view button from the action menu
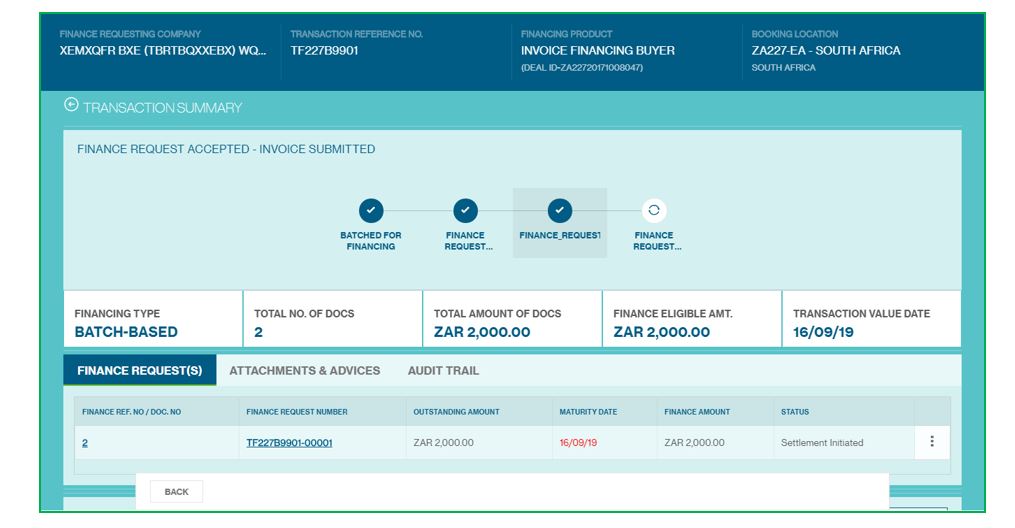
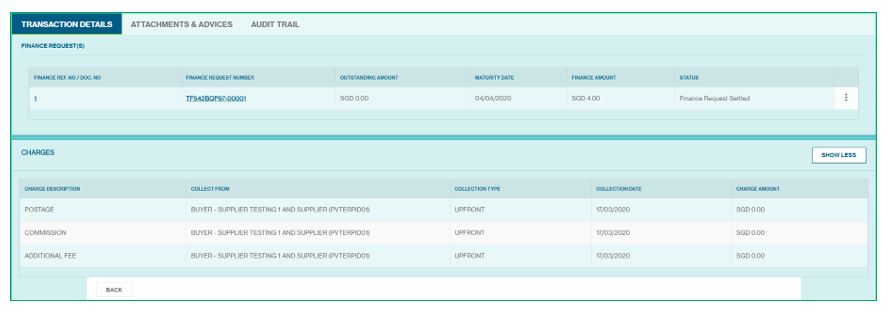
Click on the Finance Request Number or click on the 3 dots to view the details. (as below image). The customer can view the finance details
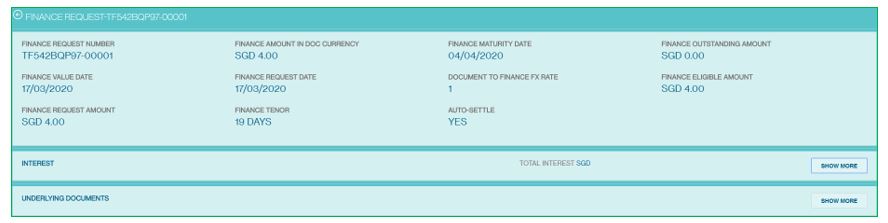
View interest:
View Underlying Invoices and click on the Document Reference and view invoice summary
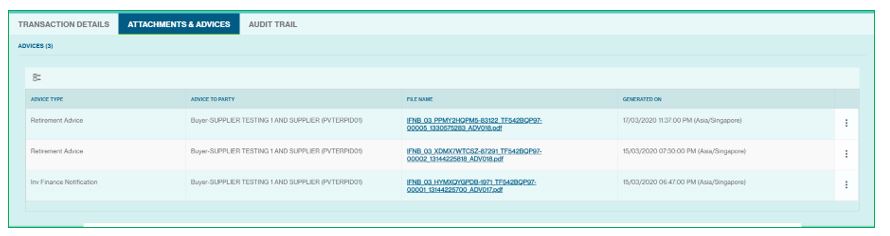
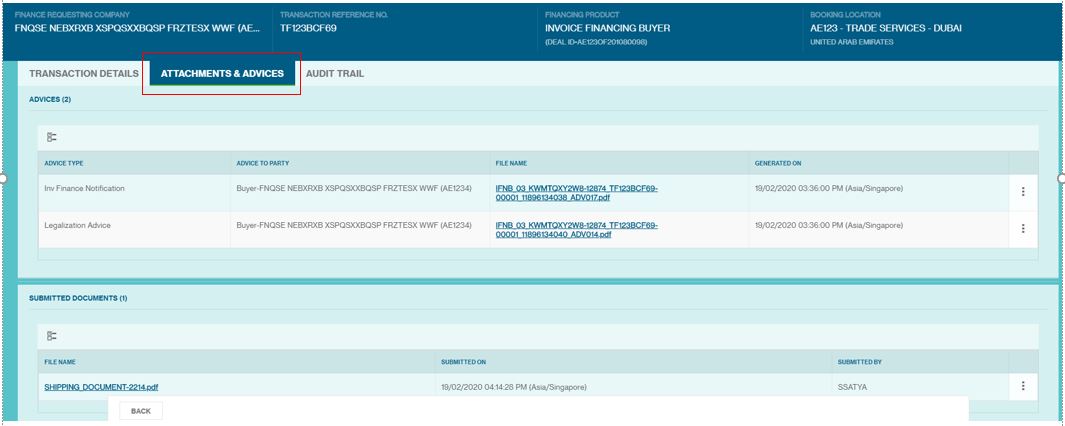
Click on the Attachment and Advices tab to view the details.
Click on the file name or 3-dots to download the advice. All advices are available here for the customer to view and download.
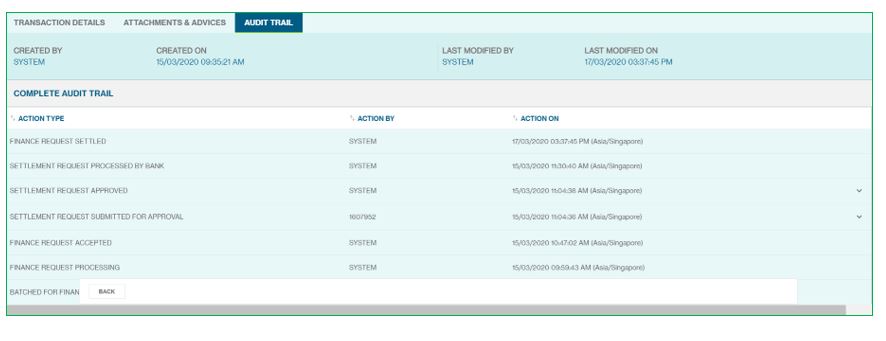
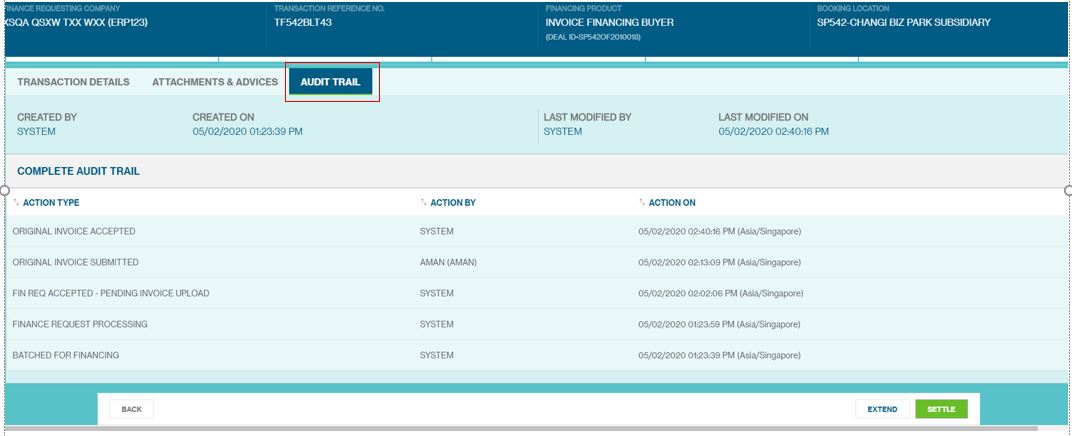
Click on the Audit Trail tab to view the details.
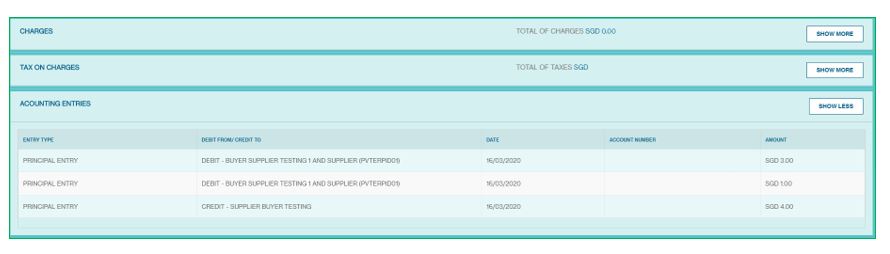
View Charges and Tax on Charges
View Accounting Entries
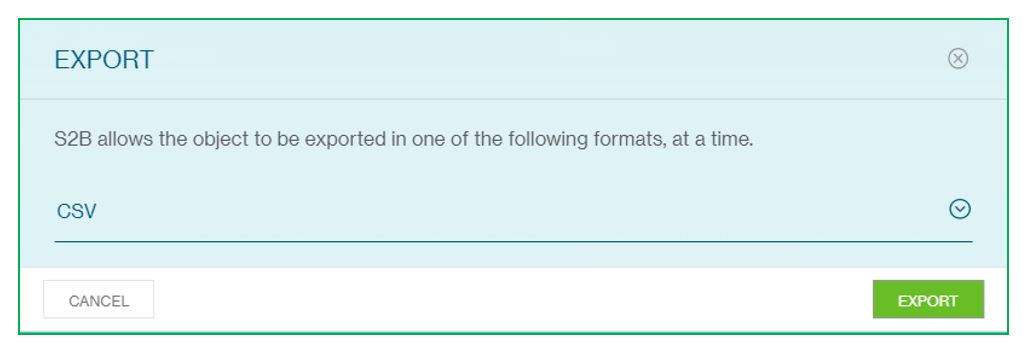
6Export the Finance Transaction Details
Click on the export button to export the details in CSV format
7Print the Transaction
Understand the Transaction Status
| Transaction Status | Description |
|---|---|
| Finance Request Accepted | The finance request has been processed and finance granted by the bank |
| Finance Request Rejected | The finance request has been rejected by the bank |
| Finance Request Settled | The finance has been completely repaid by the customer |
| Finance Partially Settled | The finance has been partially repaid |
| Settlement Pending Approval | Settlement Request has been Submitted for Authorization and pending action from approver |
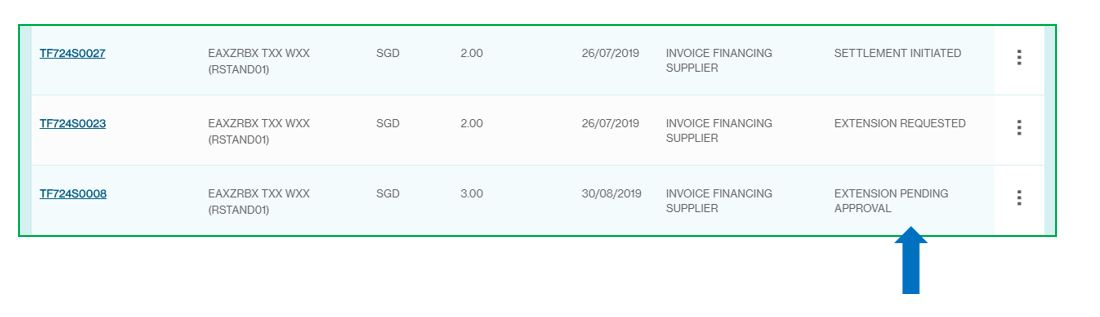
| Settlement Initiated | Settlement Request has been initiated and under processing with the bank |
| Extension Requested | Request for extending the maturity of the transaction has been raised and sent for processing |
| Extension Pending Approval | Request for extending the maturity of the transaction has been Submitted for Authorization and pending action from approver |
| Finance Request Accepted – Pending Invoice | Finance Request has been granted by the bank for a Proforma Invoice Financing Transaction. The Transaction is awaiting submission of original invoice and shipping documents by the customer. |
| Finance Request Accepted – Invoice Submitted | Finance Request has been granted by the bank for a Proforma Invoice Financing Transaction. The customer has submitted original invoice and shipping documents and is being processed by the bank. |
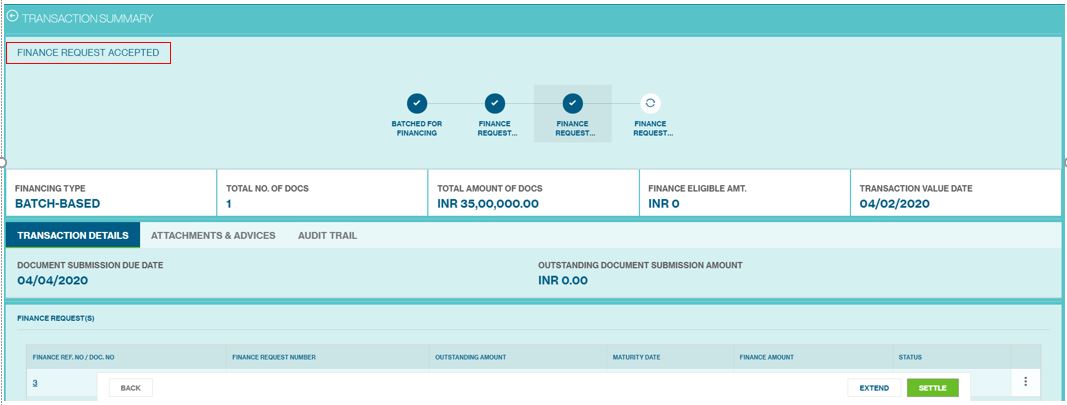
Extend Transactions
The Create Extension Screen will be available from the Menu > Trade > Manage > Finance Transaction.
Extension requests can be created only before the maturity date of the transaction when the Finances are in the Status
– Finance Request Accepted

You see all the list of transaction as below
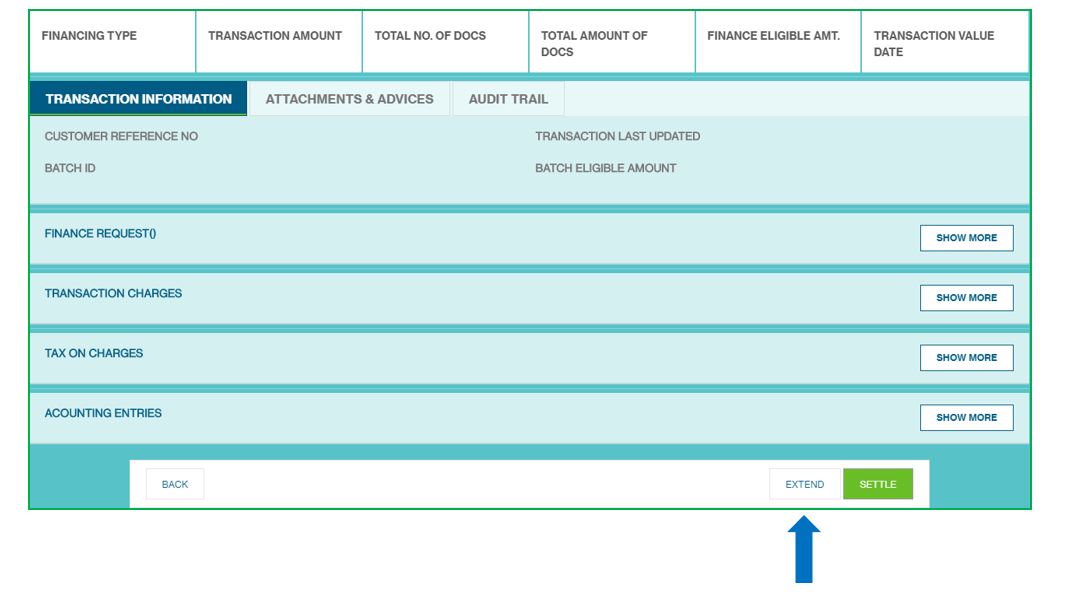
1Finance Transaction Details
Click on the Finance Transaction Reference
In next screen, full details of selected finance transaction are displayed.
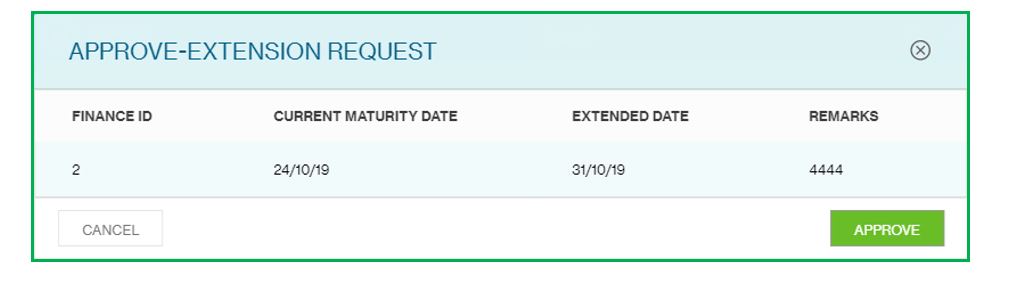
To extend this transaction click on the extend button (see at the bottom of the screen)
To extend the maturity of the transaction, some field need to be filled
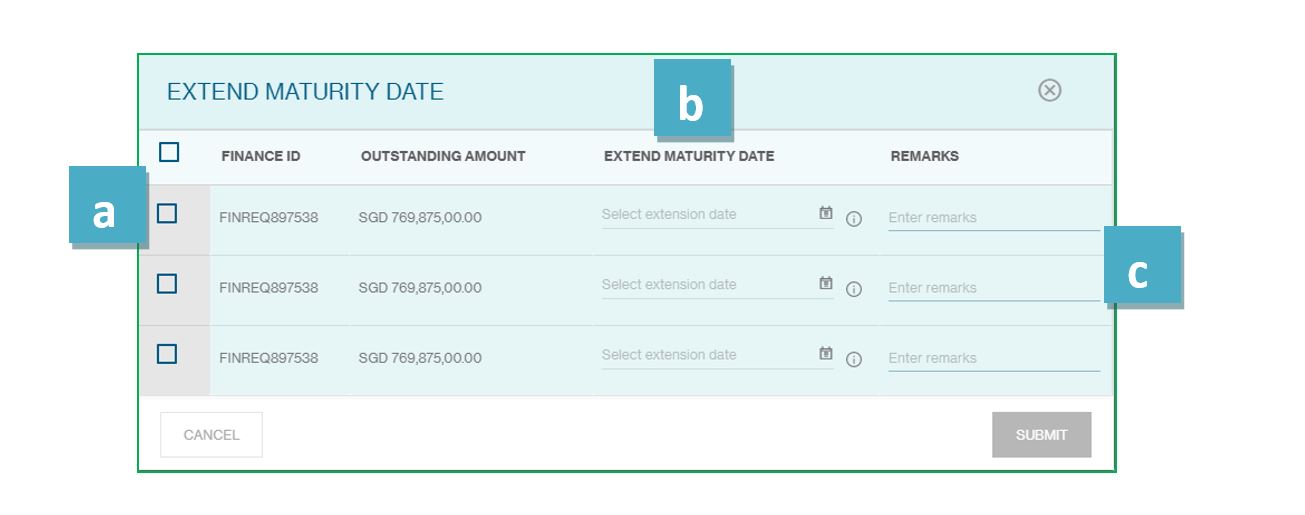
Below point help you to fill the form
- Select the Finance id.
- Check more than one finance id or select all at once
- Option to choose extend maturity date
- Enter the remark if any
Click on the submit button for the extension.
Now the status is update to “Extension Requested”
Settle Transactions
The Create Settlements Screen will be available from the Menu > Trade > Manage > Finance Transaction. Settlement requests can be created when the Finances are in the Status – Finance Request Accepted
You see all the list of transaction as below
1Finance Transaction Details
Click on the Finance Transaction Reference
In next screen, full details of selected finance transaction are displayed.
To settle this transaction, click on the settle button (see at the bottom of the screen)

To settle the transaction, some field need to fill
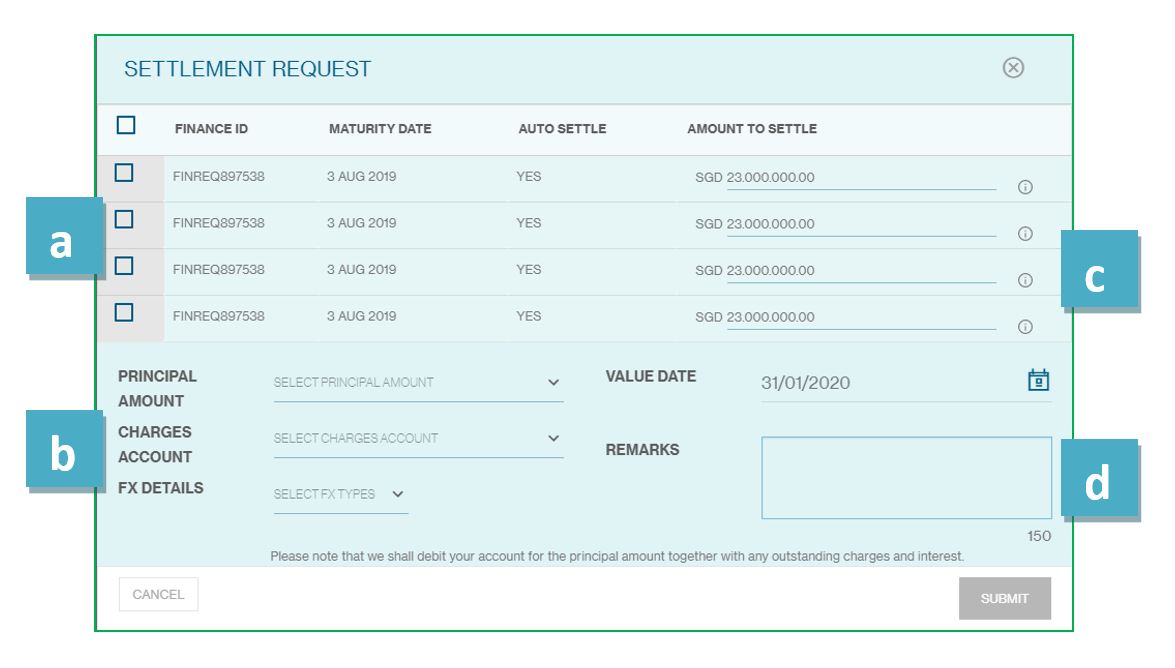
Below point help you to fill the form
- Select the Finance id.
- Check more than one finance id and select all at once
- Select the principal amount, charges account and FX details from the drop down
- Option to enter the amount to be settle
- Enter the remark if any
Click on the submit button for the settlement.
Now the status is update to “Settlement Pending for Approval”. Once the Settlement Request is approved by the authorizer as mentioned in the Approve Settlements/Extension section, it is sent for processing.
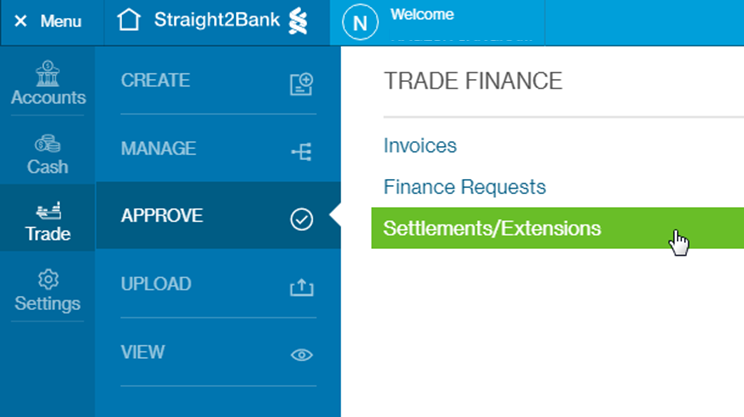
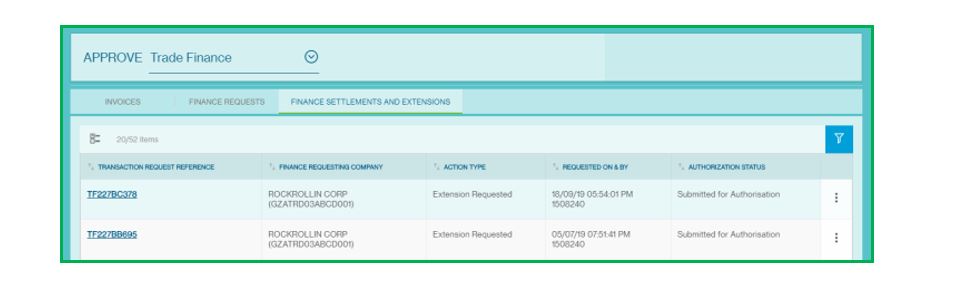
Approve/Reject Settlements and Extensions
1Send for Approve
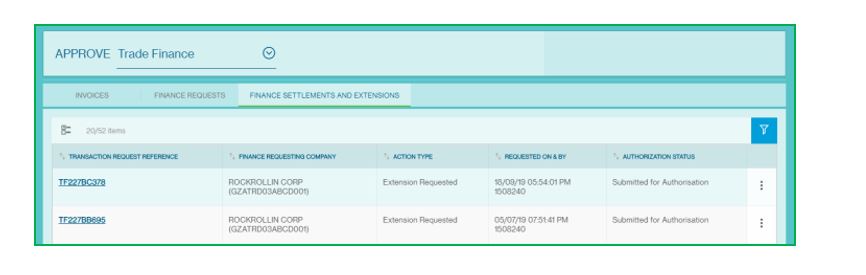
Pending Settlements/ Extensions approval will be available from the Menu > Trade > Approve > Settlements/Extensions.
This screen lists both settlement and extension request which have been raised and available for the authorizer to approve or reject.
This screen has various data fields that may be customized optionally by clicking on Filter or Sort button.
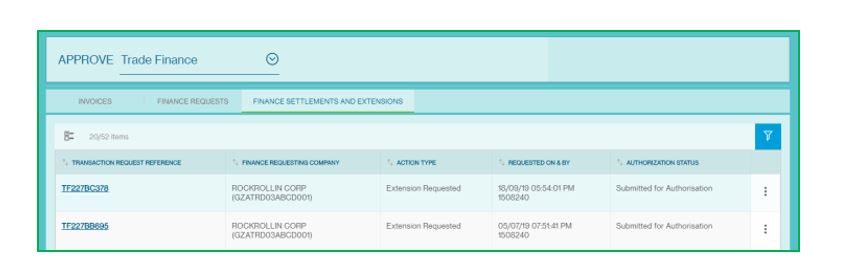
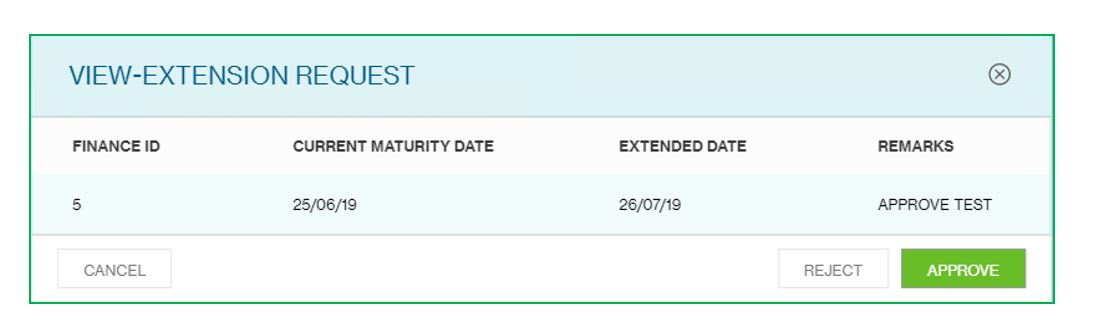
Clicking on Transaction Request Reference Number, new page will provide summary of the extension/settlement request that have been submitted for approval.
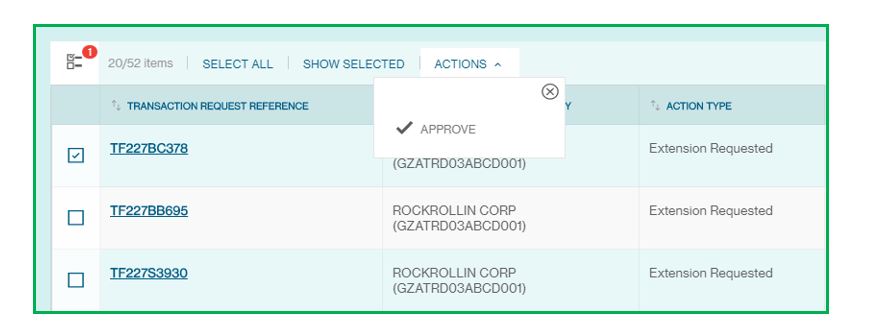
Click on action menu button of selected invoice
Approve option will be available from the menu.
Before approving, check all the invoice information, then click on the reject or approve invoice.
2Reject Extensions/Settlements
With an “Approver” profile, you will also be able to reject settlements/extensions on Straight2Bank. By doing this, selected trade instruction will be rejected from any further authorization related function (i.e.) approval or rejection by others, and the status of the settlements/extensions instruction will appear as “Rejected by Approver”.
Request that are pending approval will be available from the Menu > Trade > Approve > Settlements/Extension (as above screen).
This screen has various data fields that may be customized optionally by clicking on Filter or Sort button.
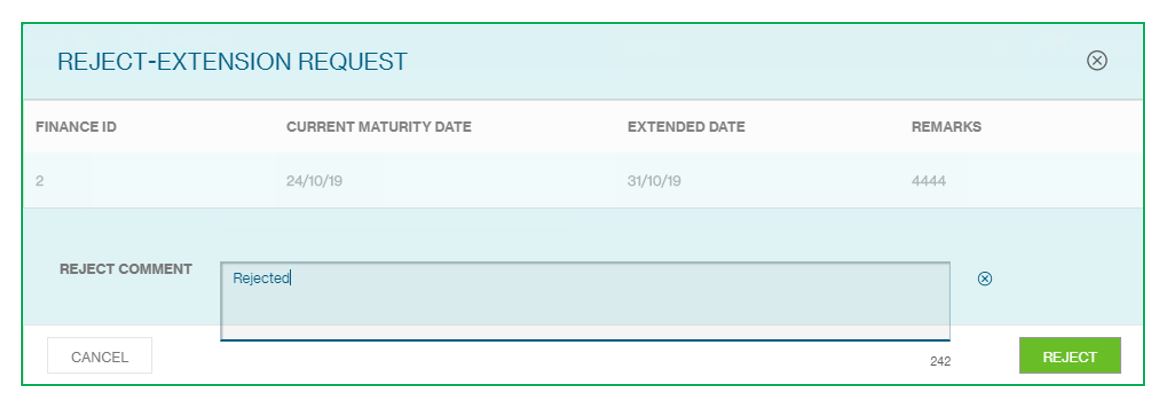
Clicking on Transaction Request Reference Number, new page will provide summary of the invoice that have been submitted pending approval.
Reject option will be available at the bottom of the page
Click on action menu button of selected extension request.
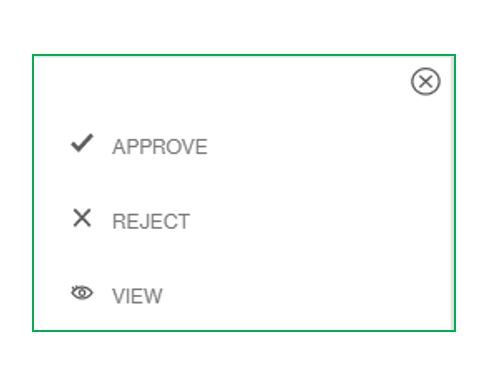
3Approve Settlements/Extensions
Entry Points
Approve Invoice List Screen
You can approve selected invoice by clicking Action Menu.
Settlements/Extension Detail Display
Clicking on Document Reference Number, new page will provide summary of the invoice that have been submitted pending approval.
Multi-Select
Click on Multi-Select button and select Invoice needs approval (tick check box).
Approve option will be available from Actions menu.
4Use a Vasco Token for Approval
For authorization, your operator(s) will inform you of the invoice details or reference number that requires authorization with support documents. Alternatively you will receive an e-mail alert to log into Straight2Bank for authorization.
Once you have clicked the “Approve” button in Action Menu, the “Submit Approval” screen will be shown:
Your Vasco token is required at this point. Approvers are able to approve a payee by performing the steps below:
Turn on the Vasco Token and enter PIN
Turn on the Vasco token by pressing the on button.
Proceed to enter your personalized PIN (setup during Token activation) to activate the Token.
Display “APPLI _”
The screen will display “APPLI _” upon successful login.
Enter the number “2”
Enter the number “2” on the token keypad for Transaction Authorization - “APPLI 2”.
Input the “Challenge Code”
You will be prompted to key in a set of numbers on the Token. Input the “Challenge Code” response from the Straight2Bank into the Token shown as below.
Enter the “Response Code”
The Token will generate and display a new set of numbers as the “Response Code”. Enter this set of numbers in the “Enter Code from Security” fields on Straight2Bank screen and click Approve
Proforma Invoice Financing
Submit Invoices
Customers can submit invoices by:
- Bulk upload by specifying the Doc Type as ‘PINV’ in the excel file; OR
- Creating invoices through Quick Invoice creation, specifying the Doc Type as PINV – Proforma Invoice
View Proforma Invoices
To view the Proforma Invoices, go to Menu > Trade > Manage > Invoices, click the filter button and select Invoice – Proforma under ‘Document Type’. The document type is also shown in the invoice details.
Transaction Status Update
The financing flow for Proforma Invoices – batching, manual/auto finance – is the same as all other invoices.
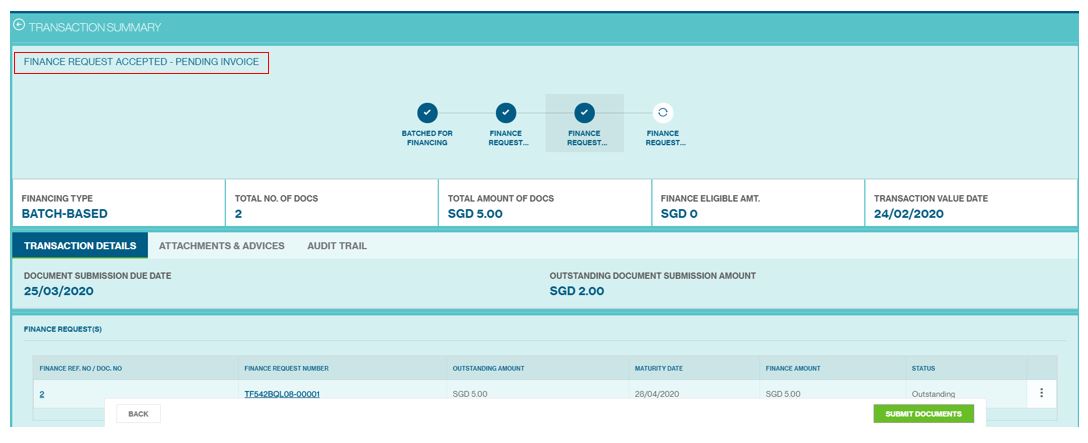
To view the status of the Proforma Invoice financing request. Go to Menu > Trade > Manage > Invoices. Once the financing request has been accepted, the transaction status will change from Pending Finance to Finance Request Accepted – Pending Invoice.
The Transaction Status can be viewed at Menu > Trade > Manage > Financed Transaction
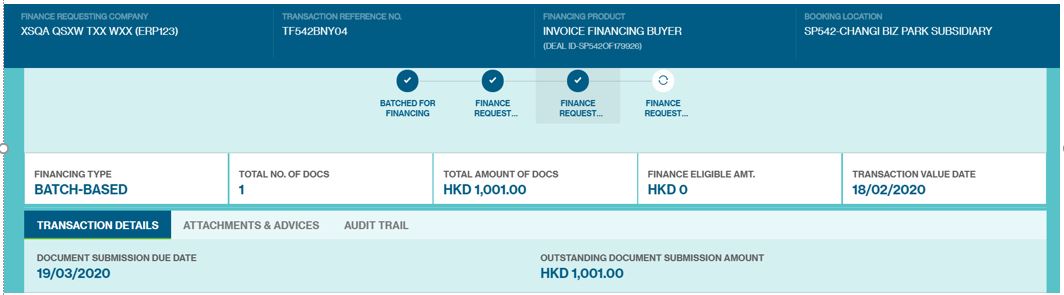
Doc Submission Date and Amount
Click the transaction reference to view the following information:
- Due Date which the original invoice and shipping documents need to be submitted by
- Outstanding Submission Amount
Reminders for Original Doc Submission
Clients will receive 2 email reminders to submit the original documents by the due date. The reminders are sent 7 days and 1 day prior to the Document Submission due date.

Original Doc Submission
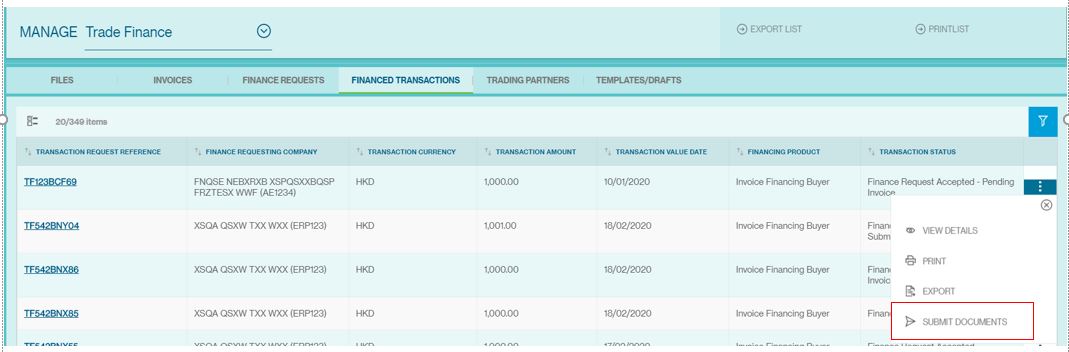
Clients can submit original documents for all transactions with the status Finance Request Accepted – Pending Invoice. To submit the original documents, clients can follow one of the options below:
- Go to Menu > Trade > Manage > Financed Transactions, filter for transactions with the status Finance Request Accepted – Pending Invoice, click the 3 buttons followed by Submit Documents
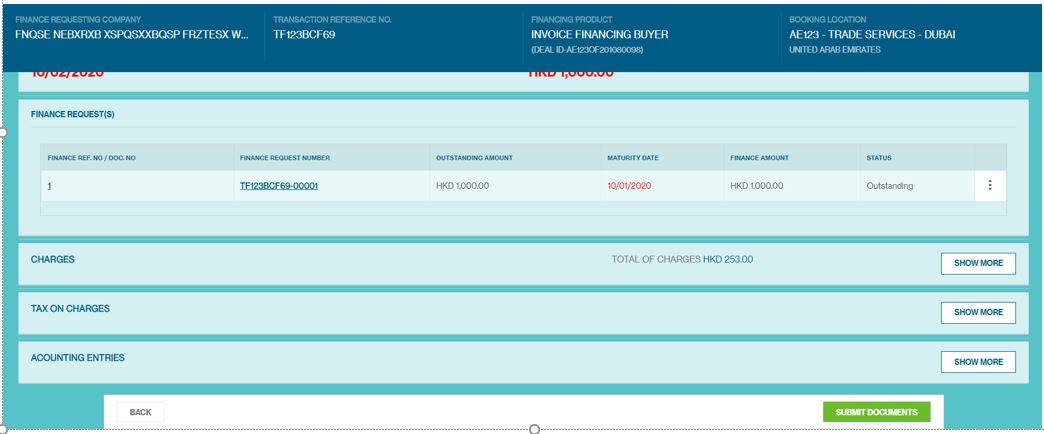
Go to Menu > Trade > Manage > Financed Transactions, filter for transactions with the status Finance Request Accepted – Pending Invoice and click on the transaction request reference number if you wish to view more details of the finance request.
At the bottom of the page, click on Submit Documents.
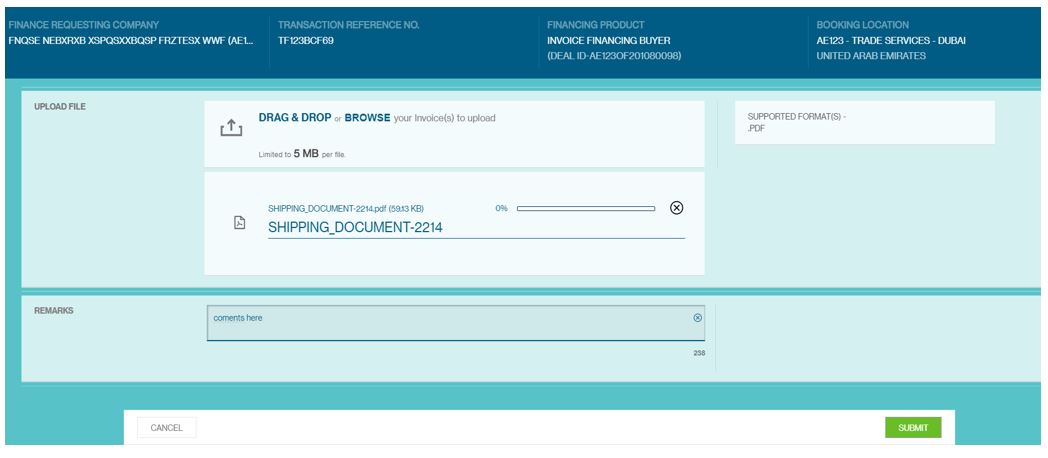
Upon clicking Submit Documents, clients will view the page below where they can drop the scanned copy of the invoices and shipping documents, enter remarks (if any) and then click Submit.
Post Doc Submission
Upon submitting the documents, they will be sent to OTP for processing and the transaction status will change to Finance Request Accepted – Invoice Submitted.
To view all original documents submitted to the Bank, go to Menu > Trade > Manage > Financed Transactions. Click on the relevant transaction reference number and click the Attachments & Advices tab.
After OTP reviews the original documents, if the original document submissions process is complete, the transaction status for the financed transaction will change to Finance Request Accepted and the Outstanding Invoice Submission Amount will be shown.
If the original document submission is deemed to be incomplete where clients need to provide additional documents for the remaining amount, the transaction status will reflect Finance Request Accepted – Pending Invoice and clients can further submit original documents.
Post Verification of Original Documents
Post review of the original documents at OTP, in case, Doc submission process is complete, NG modifies the transaction status to “Finance Request Accepted” and the Outstanding Doc Submission amount is zero. Customer can now Extend or Settle the transaction.
Audit Trail
To view the complete audit trail of the Proforma Invoice Financed Transaction, go to Menu > Trade > Manage > Financed Transactions, click on the relevant transaction reference number and click the Audit Trail tab.
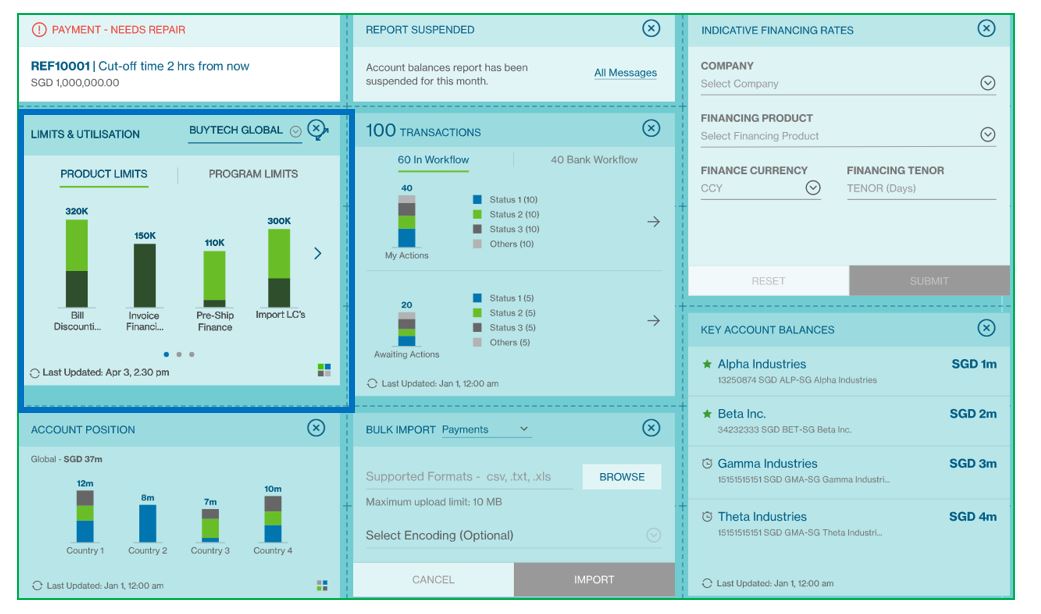
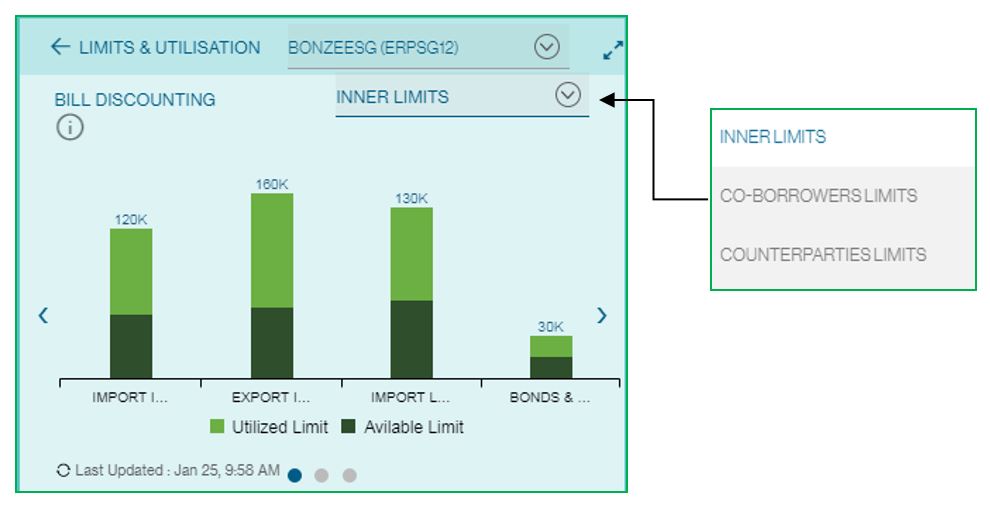
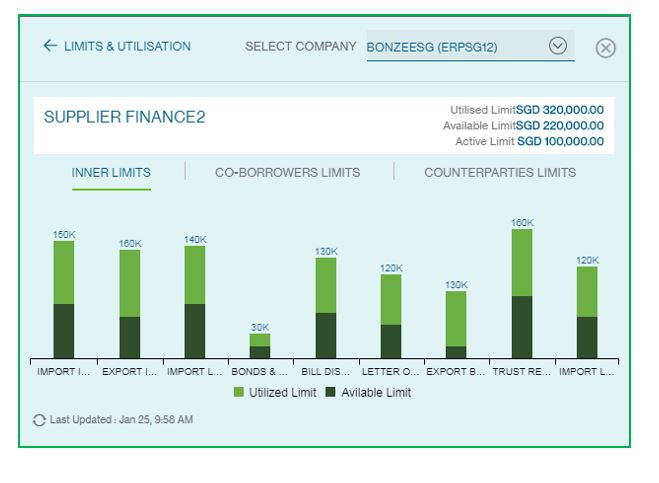
Limit and Utilization Widget
The limits and utilization widget shows limits set up for the customer for each product/program and also what part of the limit is consumed. The view is updated real time.
Customers can also drill down further to view inner limits by clicking on each of the bars.
click on to enlarge the dashboard![]()
Choose the list of company from drop down
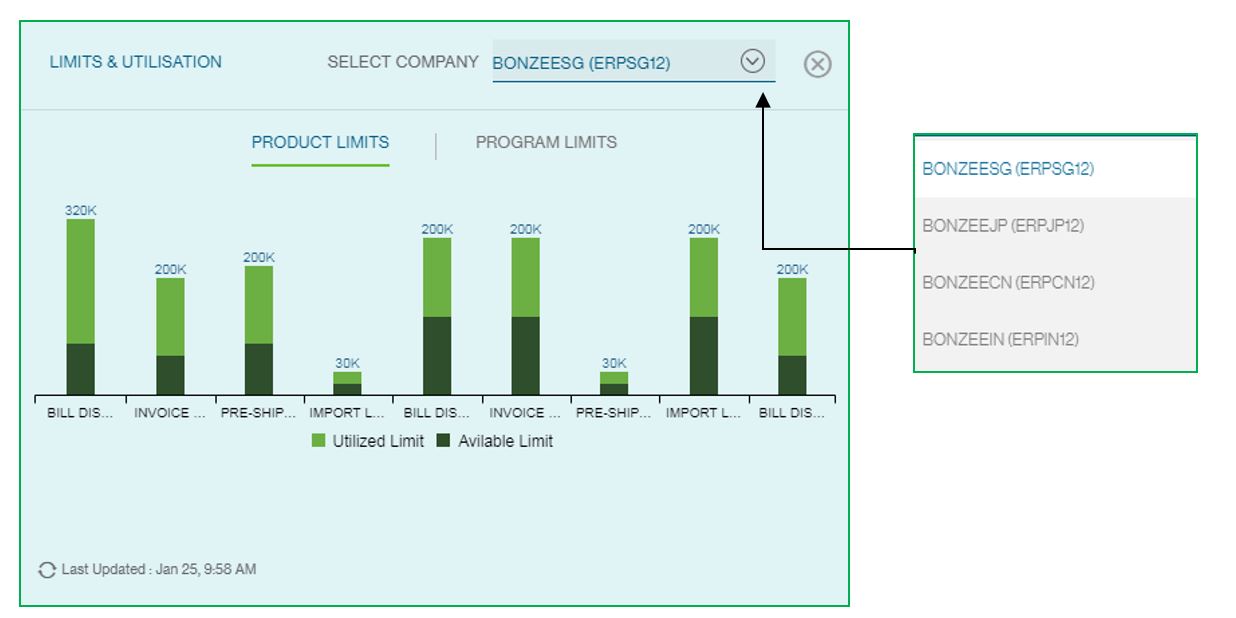
To see more details of product limit or program limit, click on the bar as shown in below image
Switch between product limits and program limit any time
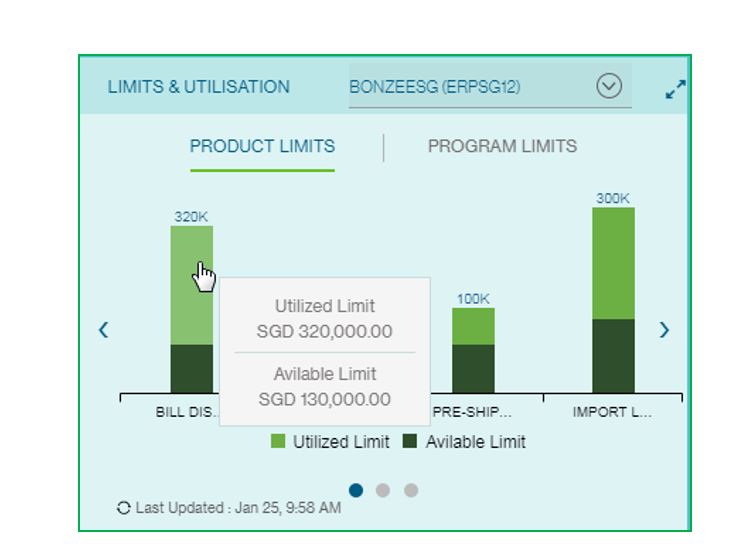
Choose the limits from the drop down also to see the changes in limits and utilization
Customer can enlarge the table as below
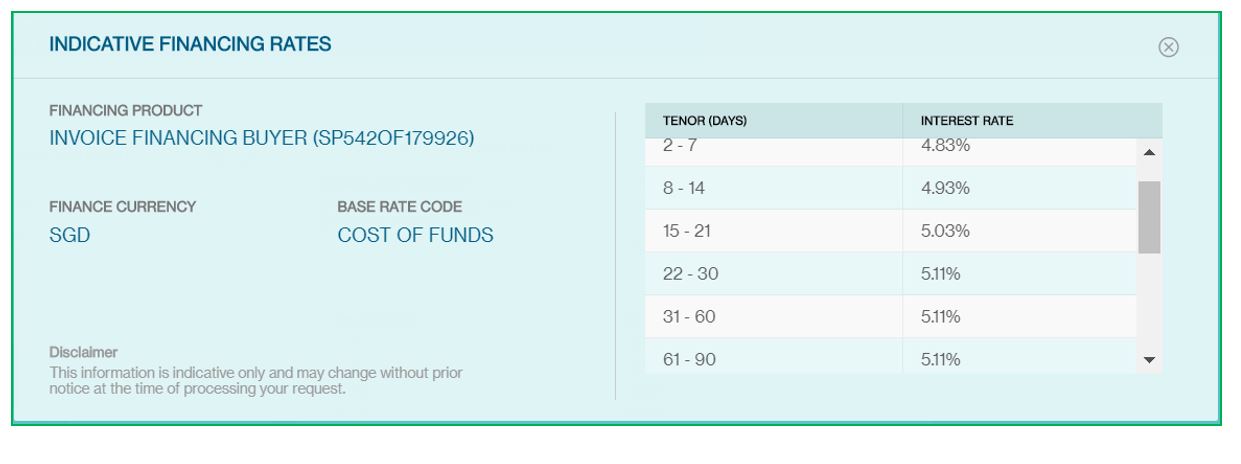
Indicative Financing Rates Widget
This allows the customer to quickly get an indicative interest rate from the bank for a product, tenor and currency before requesting for finance.
In the dashboard, the Indicative Financing Rates widget showing
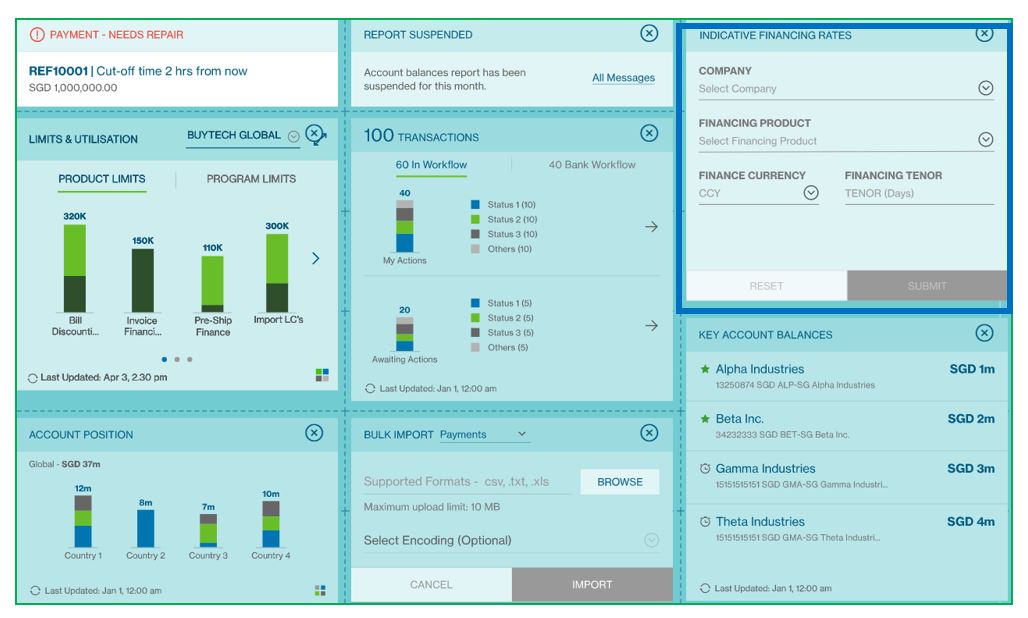
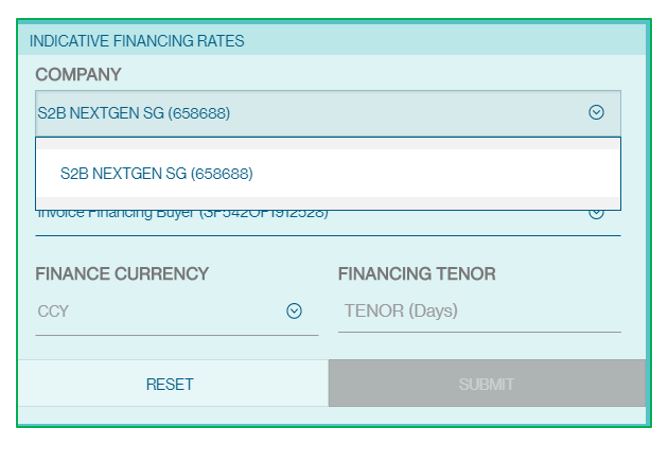
Choose the list of company from drop down
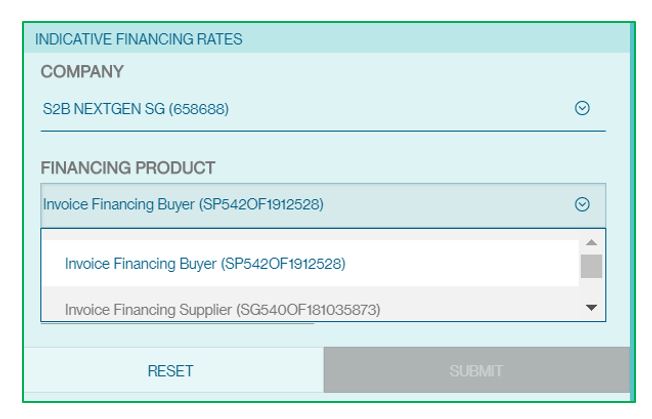
Choose the financing product from the drop down
Select the currency from the drop-down list and enter the tenor
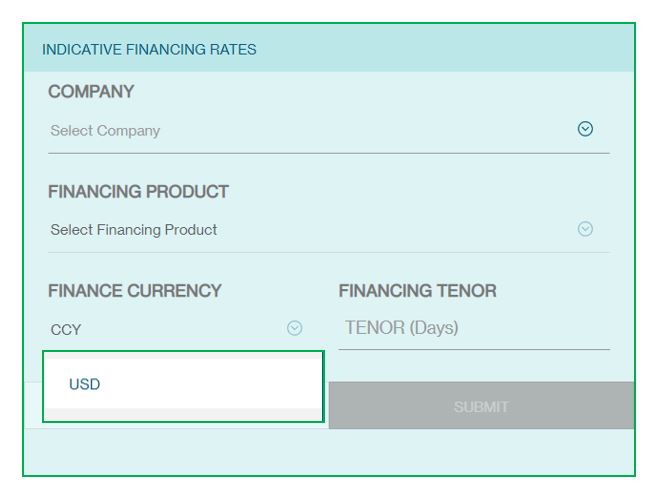
Click on the submit button to see the report
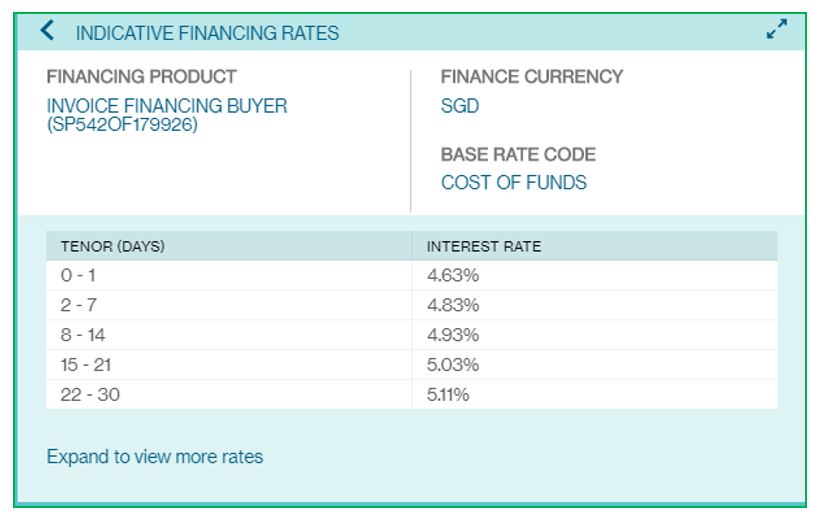
Customer can enlarge the dashboard as below
Trade Finance Reports
Trade Finance Transaction Report
This report lists all financed transactions of the client. It carries all transaction details, charges, advices, audit trail, finance details, and interest. This is a standard report and can be downloaded as a PDF.
Financed Document Report
This report lists all documents submitted by the customer and financed by the bank. It carries all details of the document and the associated finance. It is an editable report and the customer can customize it based on their needs. Learn how to subscribe for reports here
Overview of Alerts
S2B NextGen generates alerts which are event driven. Alerts are delivered to the message centre which can be viewed post logging into S2B NextGen, by Email, and SMS.
The alert supported by S2B NextGen are:
| Alert Category | Description |
|---|---|
| Transaction Status Alert | These alerts are generated at different stages of processing of the finance request. The customer is notified when the finance request is granted, when a maturity extension request is accepted, or a finance is settled. The email alert has the details of the transaction as a password protected PDF attachments. All the advices are embedded in the PDF as an attachment. |
| File Upload Alert | This alert helps notify the customer on the status of the file upload – success or failure. In case of failures, a detailed list of documents which failed validation along with the reason of failure is attached |
| Document Eligibility Alert | This alert notifies the customer in case some of the documents during processing are ineligible for finance along with the reason for ineligibility |
| Original Document Submission Reminders | This alert is specific to Proforma Invoice Finance. PIF customers are required to submit original invoices and shipping documents by a specific due date. This reminds the customer twice 7 days and 1 day before the due date to make the submissions. |
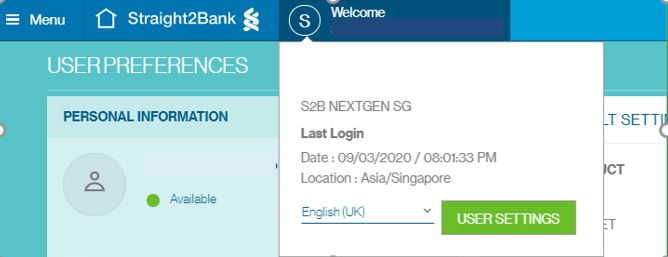
Alerts are always delivered to the message centre. In case, the customer wants to stop alerts to email or sms, he can do so by clicking on user settings
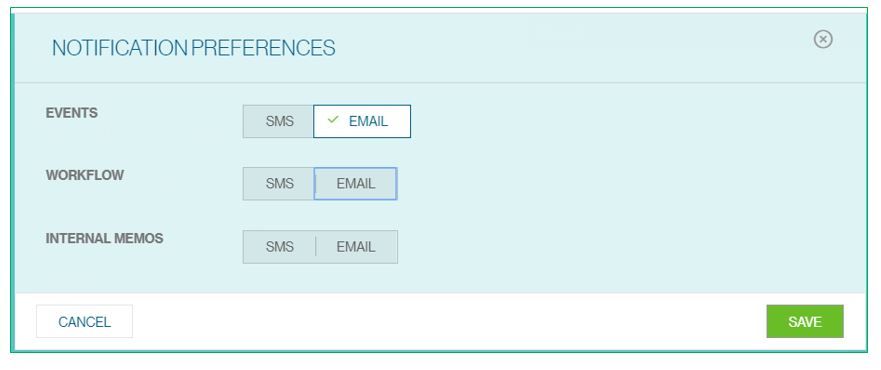
Edit the Notification Preferences
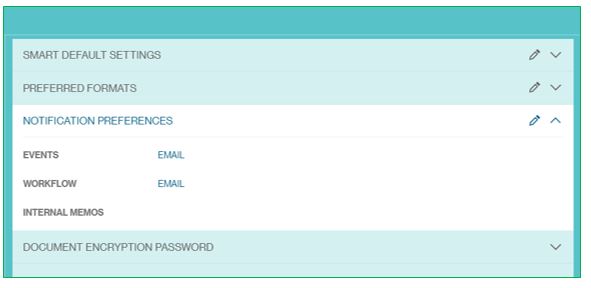
Select you preferred notification preferences. NextGen Trade alerts fall under either the Events or Workflow category. Learn how to subscribe for alerts here.
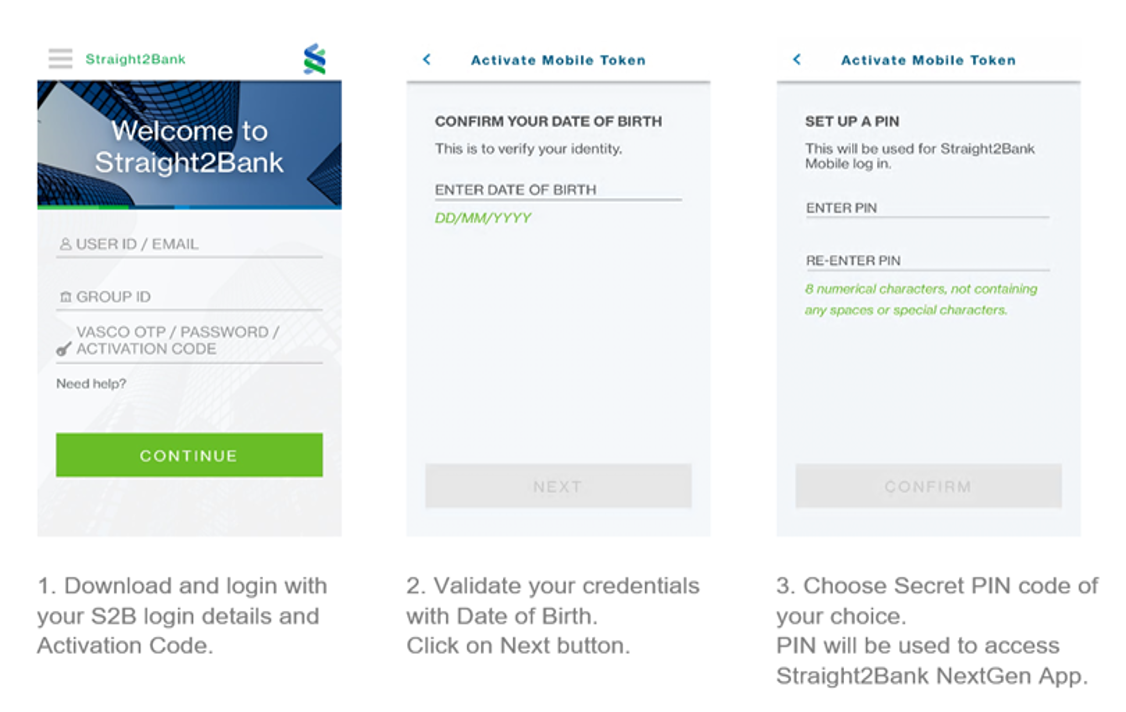
First Time Login
Based on the your registered email with the Bank, you will receive an email notification containing the temporary password.
Go to https://s2b.standardchartered.com/unifiedlogin/login/index.html and login with your new User ID, Group ID and temporary password.
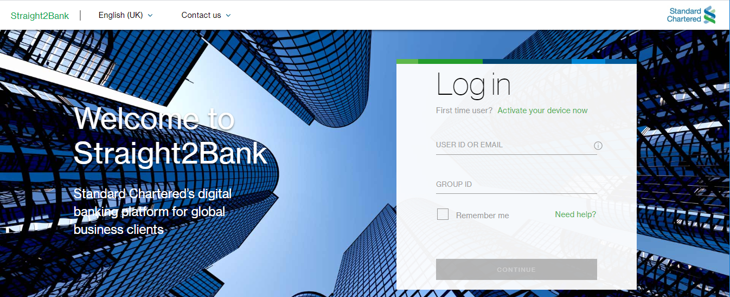
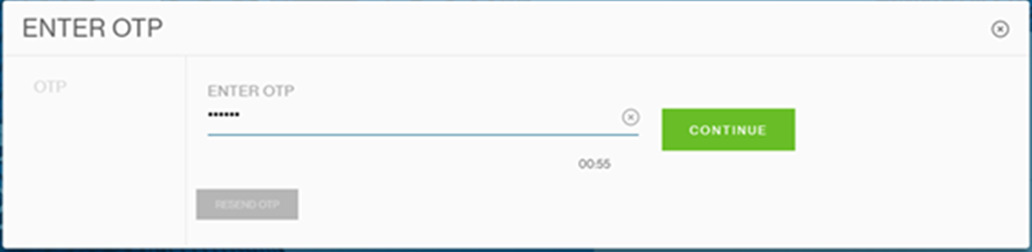
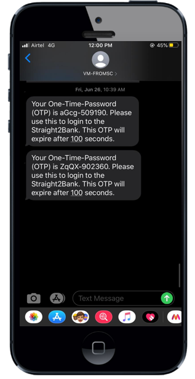
Use the SMS OTP sent to your registered mobile number with the Bank and click Continue.
Set the answers to your security questions and click Continue. Security questions are used to recover your password should you forget it.

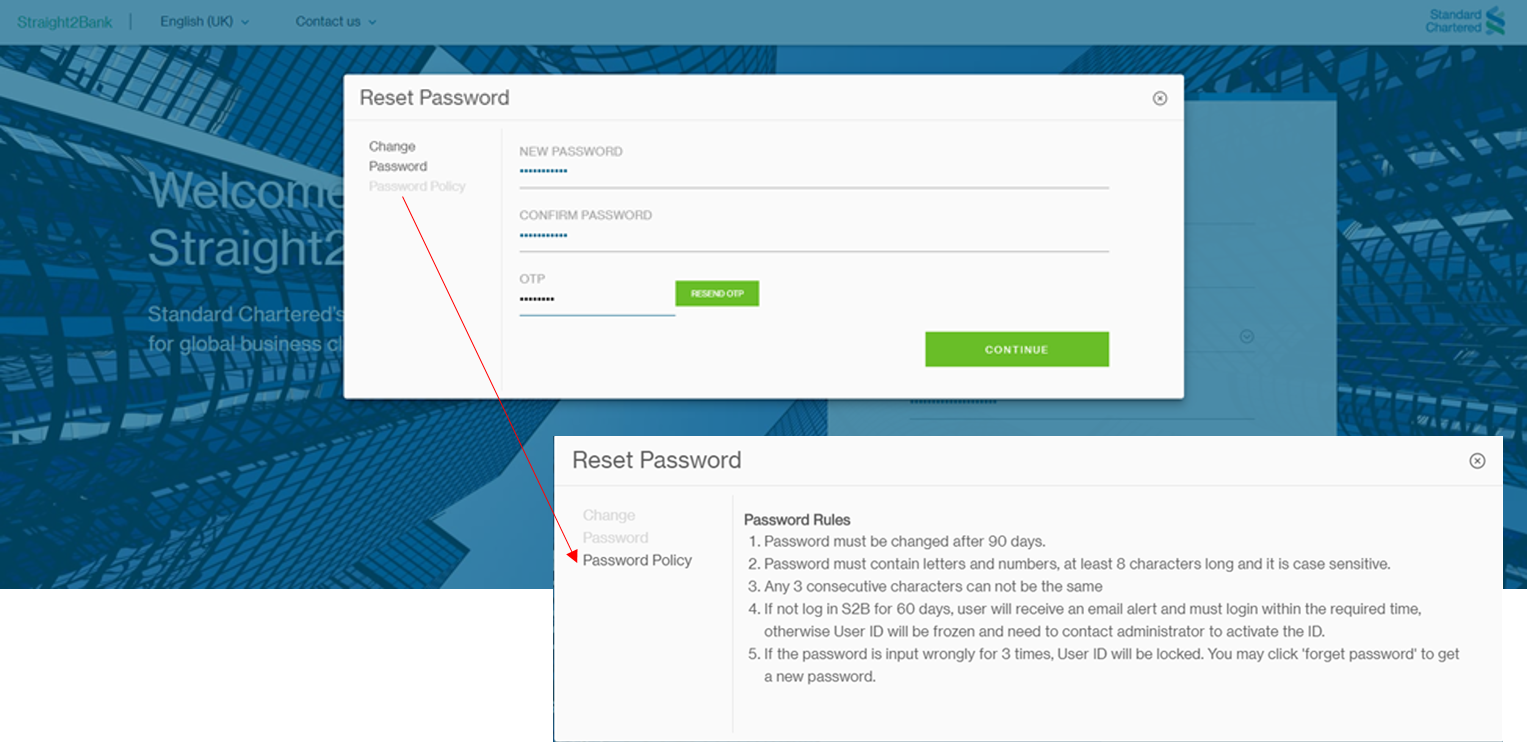
Set the permanent password according to the password policy and guidelines and click Continue.
Alternatively, you can login to Straight2Bank NextGen to access DTC using Mobile Token. The instructions will be sent to you via email address registered with the bank.
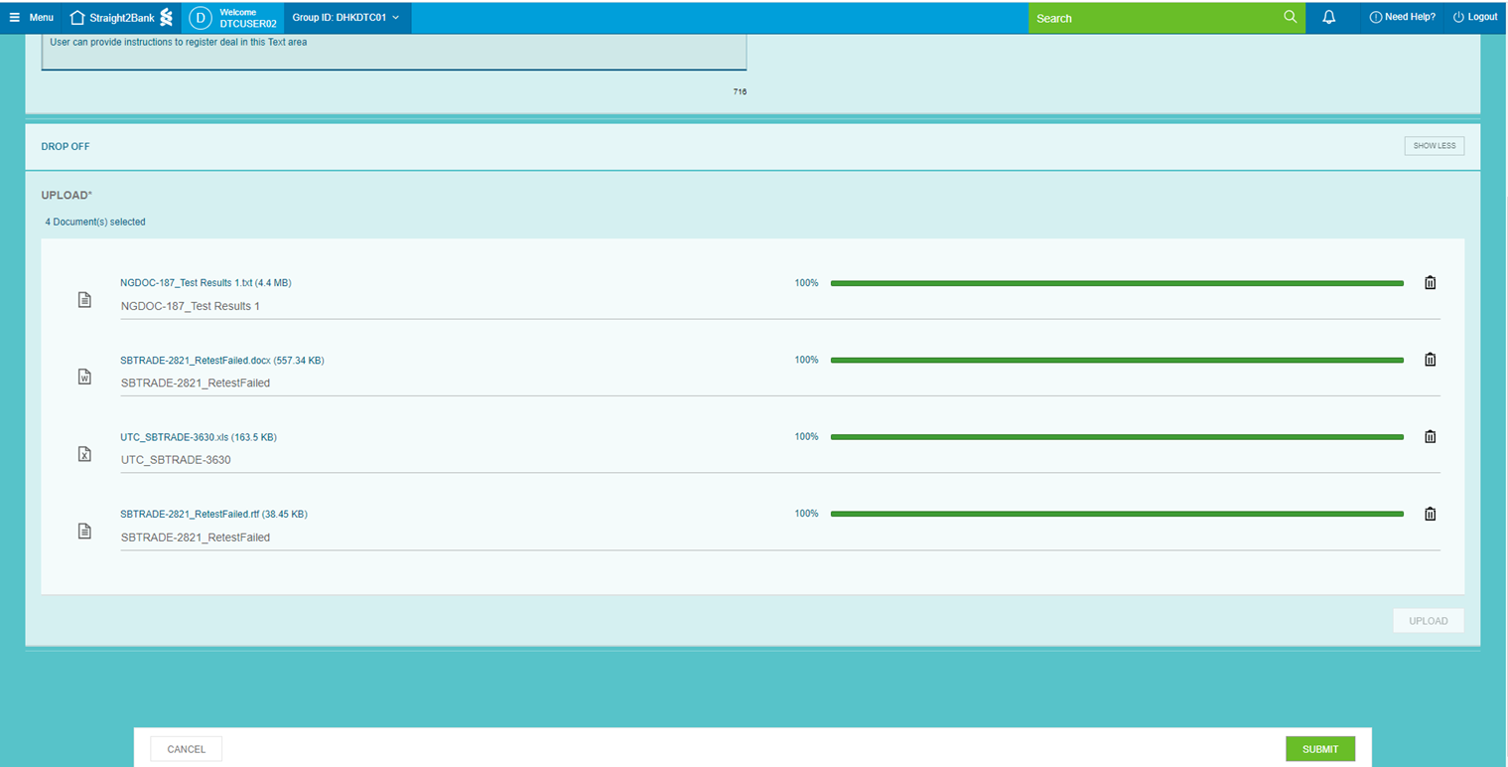
Submit Document
Once you have successfully created your permanent password, login to Straight2Bank NextGen. To access the document drop off function, go to Menu > Trade > Create > Document Drop off

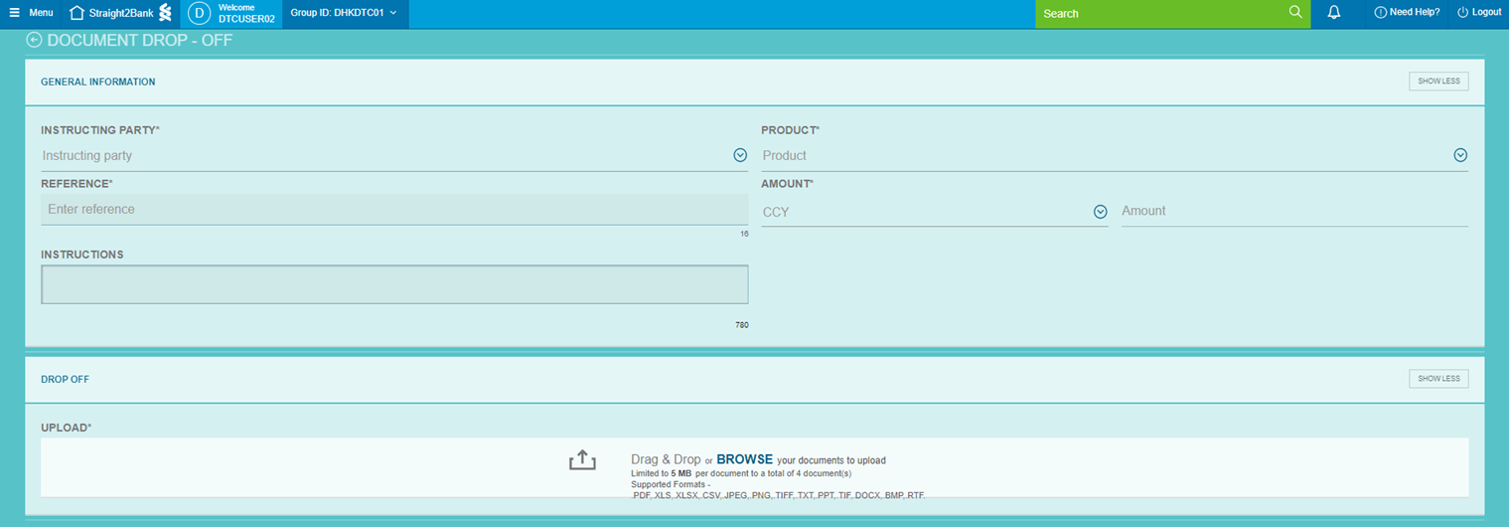
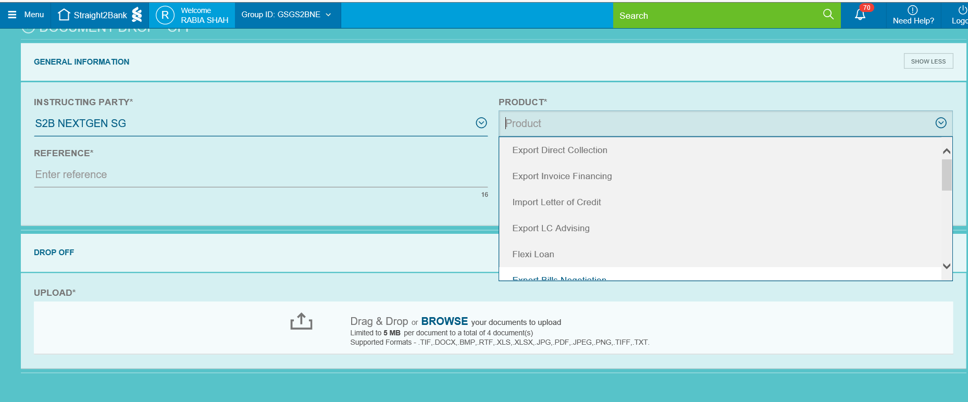
Select the Instructing Party and Product applicable for this document
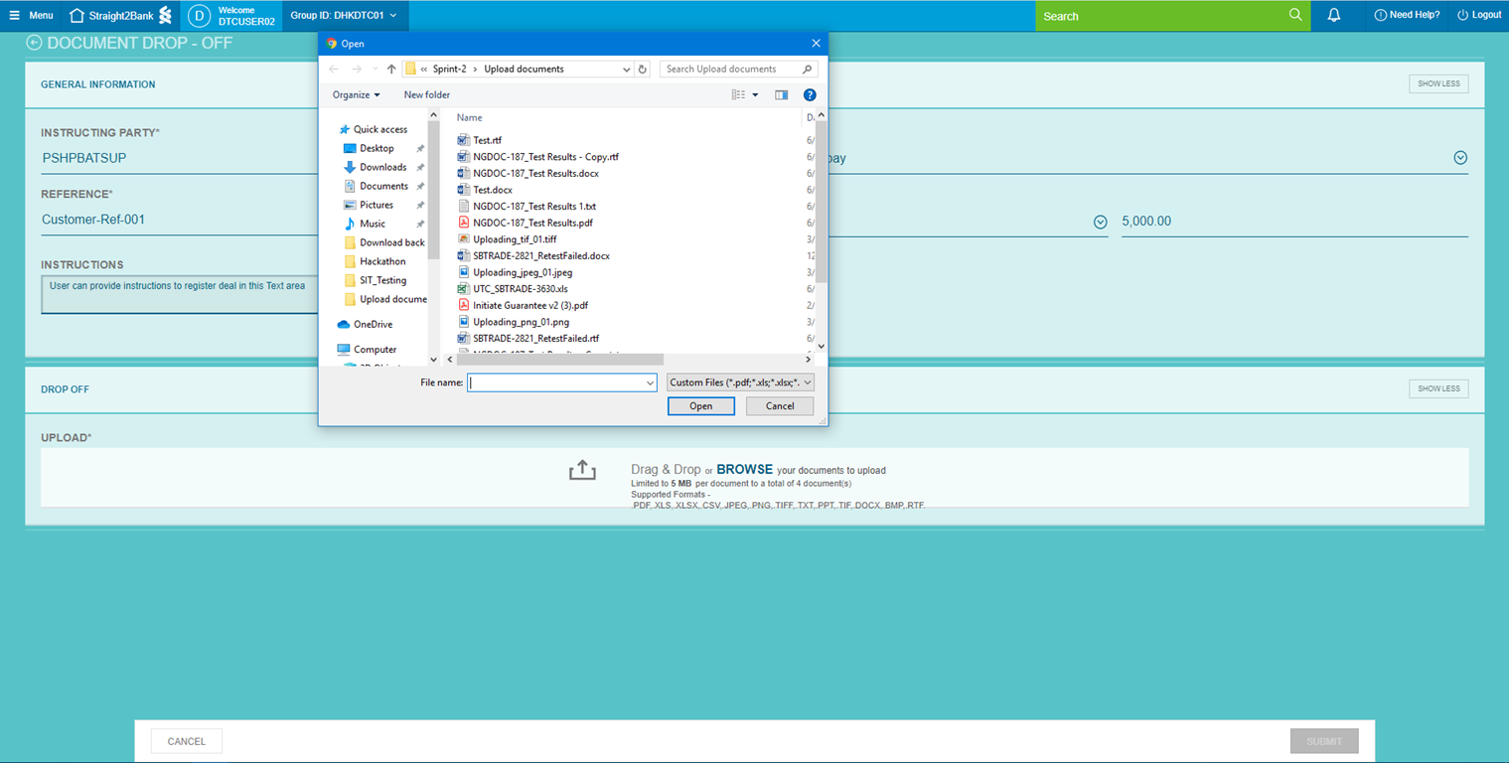
Enter your reference number and instructions for this document and upload the document either through drag and drop or the browse function as shown below.
When you are done uploading all your documents, click Submit.
The confirmation message and file reference number will appear after you have successfully submitted your documents to the Bank. You can choose to upload another file or go to Manage File to view the status of this document.

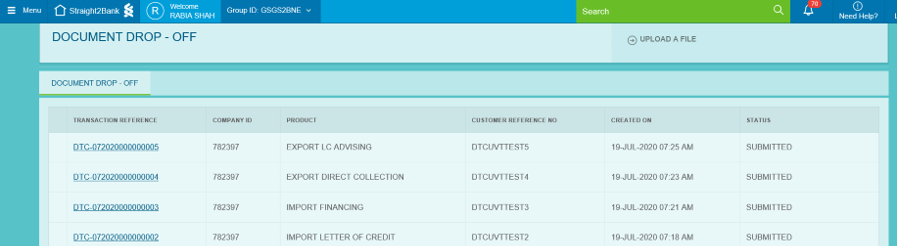
Document Submission Status
Alternatively, to view the status of the document, you can access it via Menu > Trade > Manage > Document Drop off

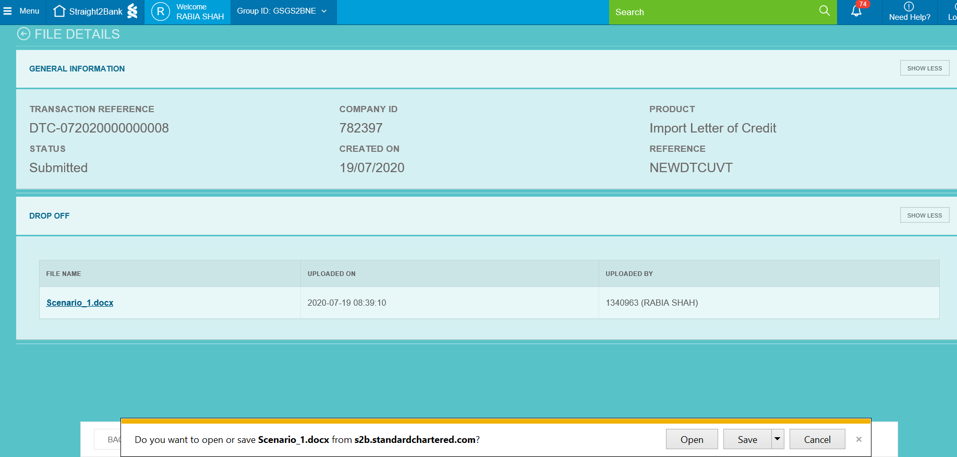
Click on the Transaction Reference number to view the document submitted to the Bank.
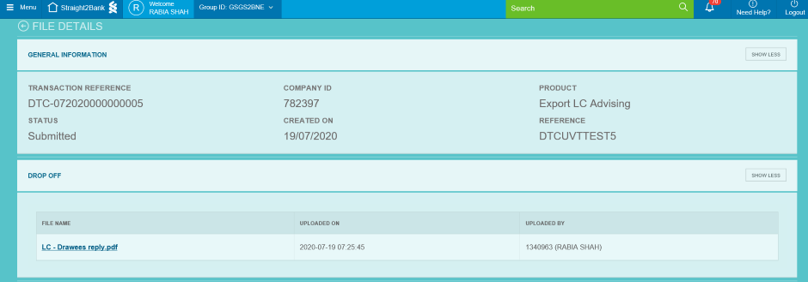
Click on the file name if you wish to download/open the document.
Deals registered with the Bank can be identified via the green arrow icon or status column.
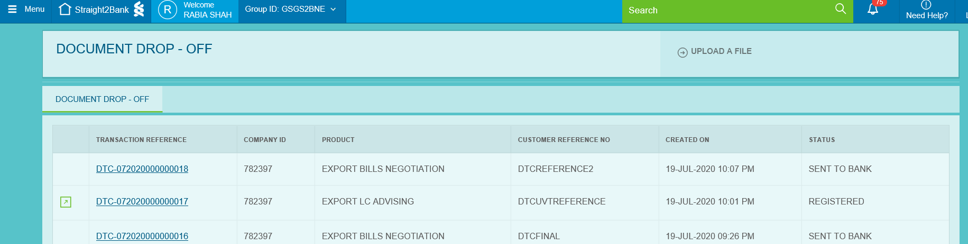
Click on the green arrow to view more details of the deal.

Refer to the table below to understand the definition of the various statuses of the Document Drop off.
| Document Drop off Status | Definition |
|---|---|
| Submitted | Document successfully uploaded and submitted to the Bank |
| Sent to Bank | Document received in Bank’s system |
| Accepted by Bank | Document accepted in Bank’s system |
| Registered | Document registered in Bank’s system |
| Onboarding Error | Client ID setup is incomplete or wrong product selected in Document Drop off request |